

Voice Menus
Webex Campaign allows the user to import Voice Flows and push deployments aimed at targeted customers. A voice flow created in Webex Connect must be imported for use in Webex Campaign.
A voice flow comprises a series of actions that are initiated when a particular key is pressed on the phone. For instance, when an individual contacts a bank's customer service number, they typically encounter a voice menu that provides options such as "Press 1 for banking-related inquiries, press 2 for credit cards, press 3 for home loans, press 4 for car loans, and so on." These actions are predetermined when the voice flow is created, and further voice menus can be initiated based on the customer's response.
Import a Voice Menu
A voice flow should have been created beforehand using Webex Connect and published to be imported into Webex Campaign. Please refer to the steps that are required in Webex Connect to integrate a voice flow with Webex Campaign.
To import a voice flow, follow these steps:
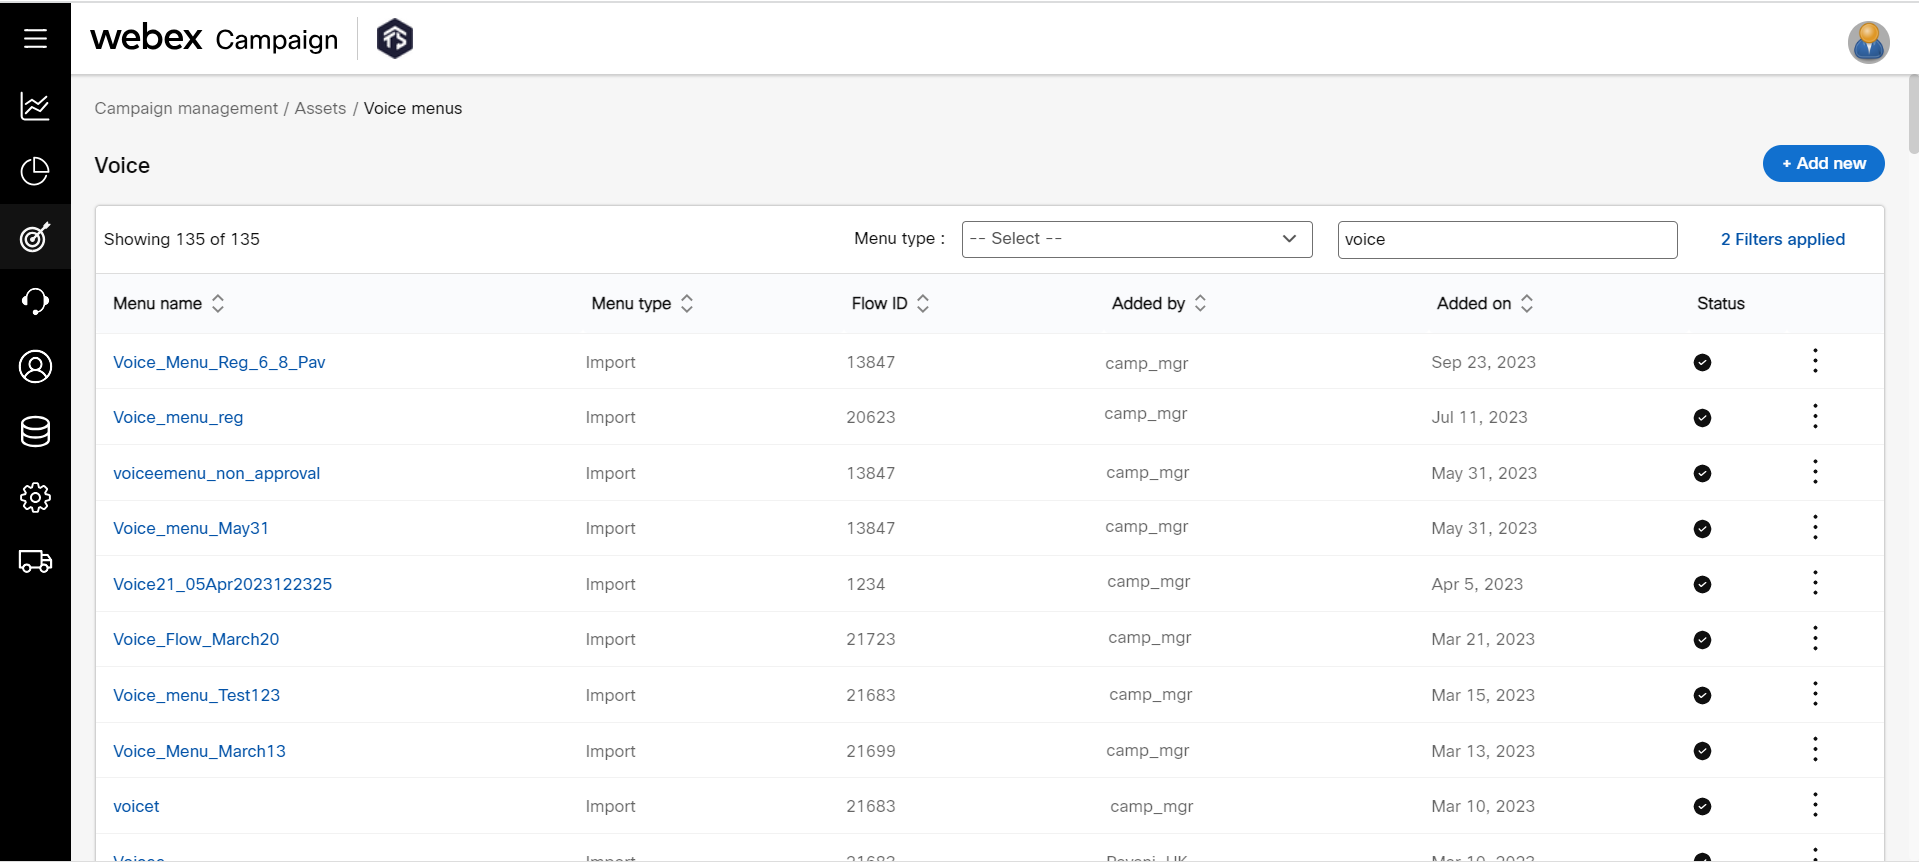
- Navigate to Campaign management > Assets > Voice menu screen, and click +Add new. The Import voice menu screen appears.
Please contact your account manager to create a voice flow using Webex Connect. Before importing the voice flow in Webex Campaign, the Flow ID, Preview password, Preview URL, Webhook URL, and Service key, must be shared by the voice flow creator with you.
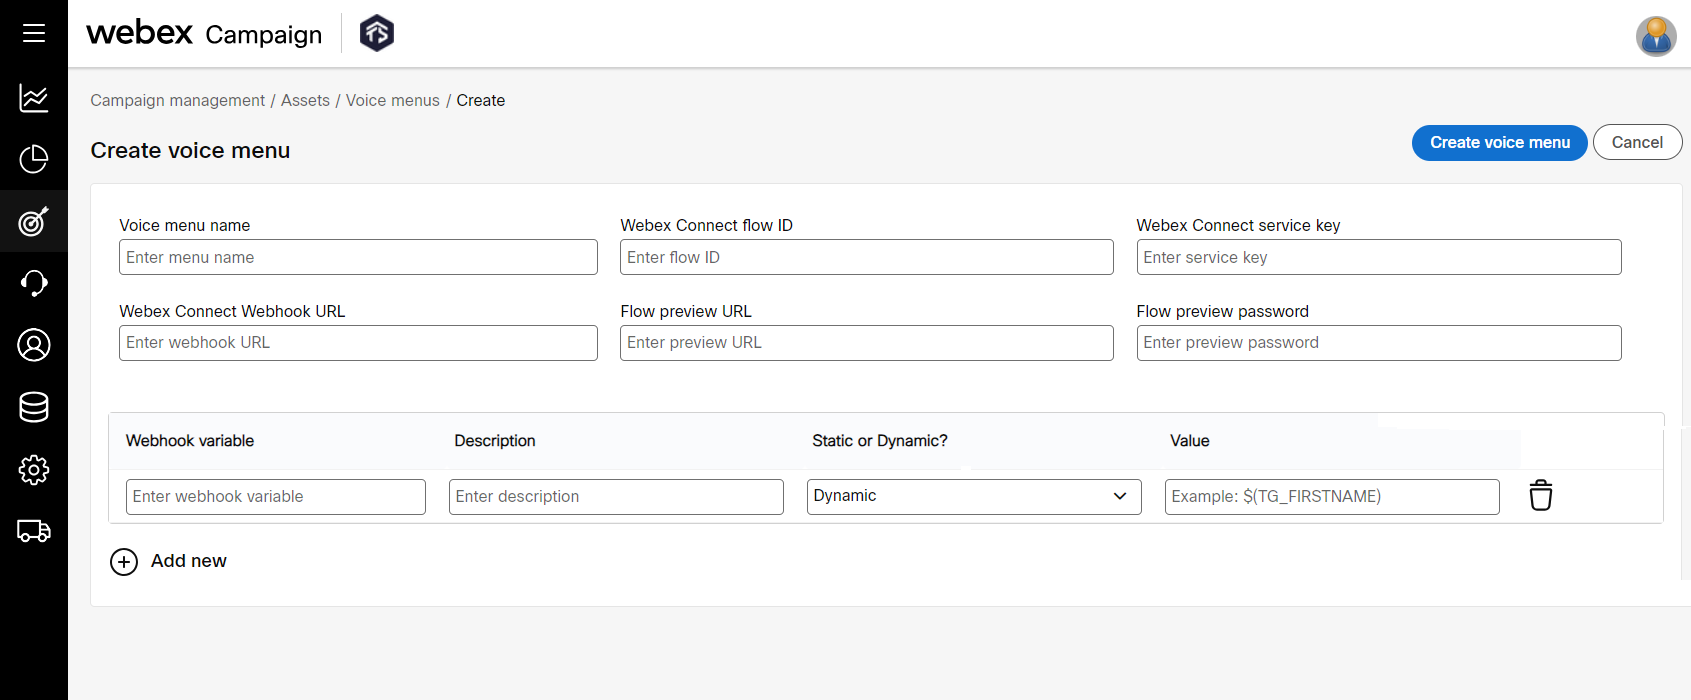
- On the Import voice menu screen, enter details for the following fields:
- Voice menu name: Enter a name for the voice prompt.
- Webex Connect flow ID: Enter the Flow ID.
- Webex Connect service key: Enter the Webex Connect service key.
- Webex Connect Webhook URL: Enter the webhook URL of the flow.
- Flow preview URL: Enter the preview URL of the flow.
- Flow preview password: Enter the password to preview the voice flow.
- Webhook variable: Enter the webhook variable for the selected Webhook URL.
- Description: Enter a description for the variable.
- Static or Dynamic?: Select whether the variable is Static or Dynamic.
- Value: Enter the value of the personalization header. For example, if you select Dynamic, enter the value as $(TG_FIRSTNAME). If you select Static, enter the value such as "Hi, Welcome to Webex Campaign".
-
Click Import voice menu.
-
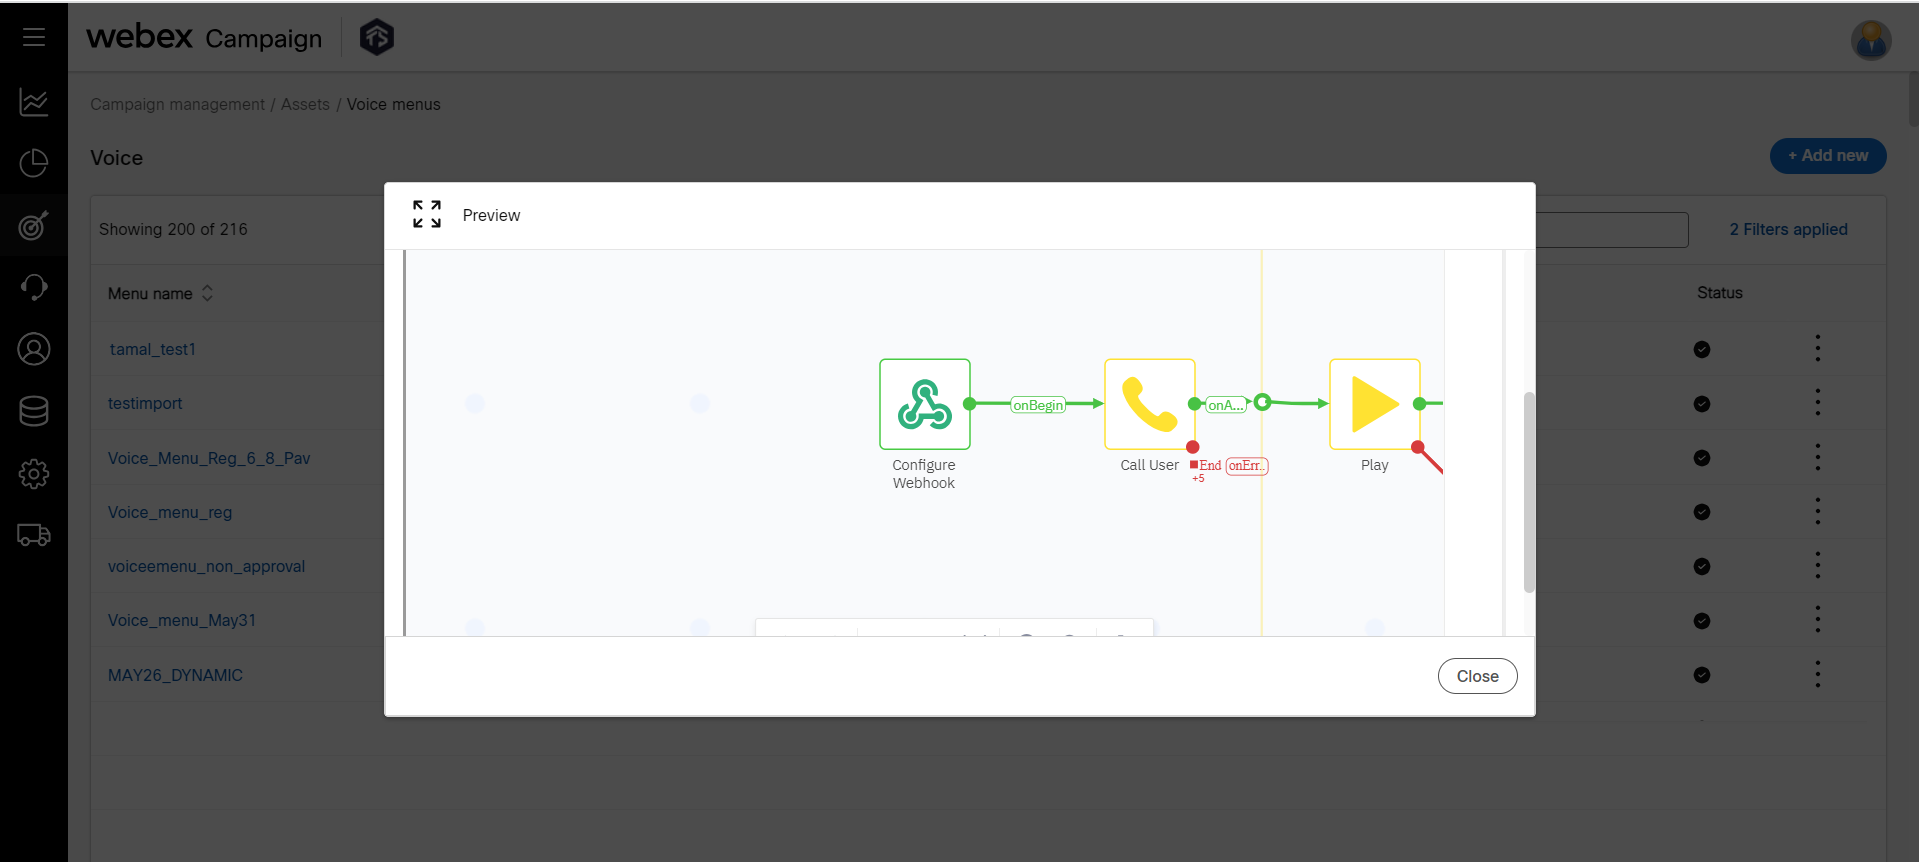
(Optional) You can preview it once the voice menu is imported. To preview the voice menu, click on the ellipses icon of the respective flow and click Preview.
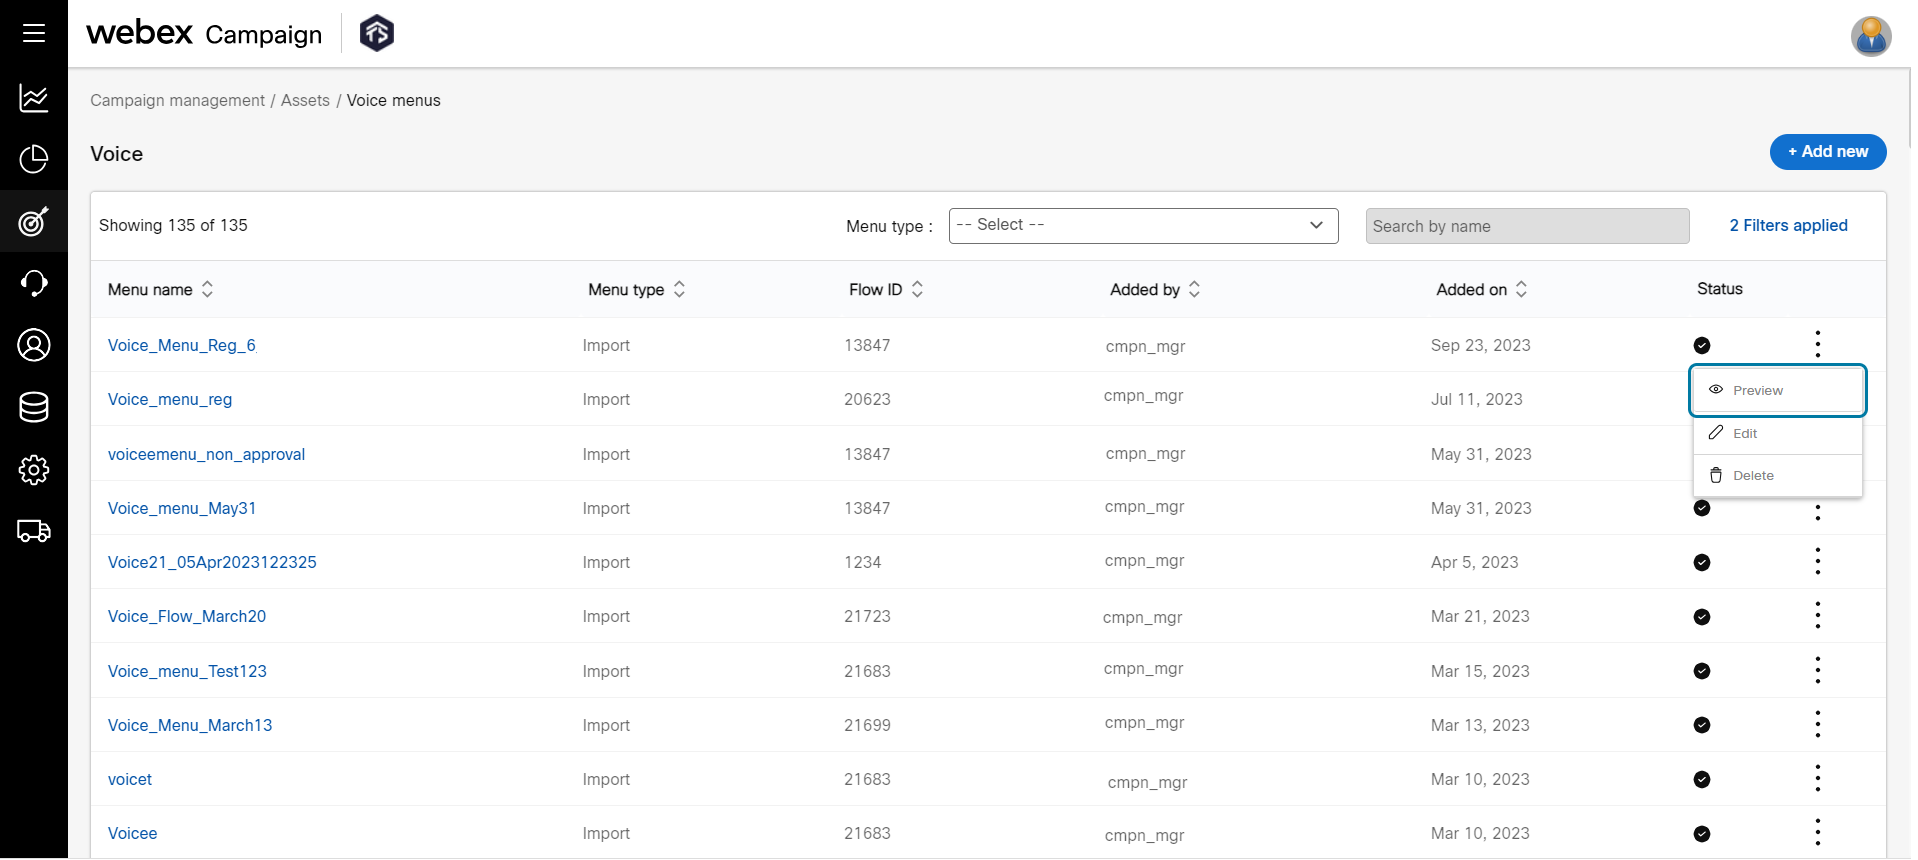
- (Optional) You can edit a voice flow to amend the details. To edit a voice menu, click on the ellipses icon of the respective flow and click Edit. Make necessary changes and click Update voice menu.
- (Optional) To preview a URL, click on the ellipsis icon of the required voice menu and click Preview.
A voice menu cannot be edited if it is associated with an active or completed deployment. If the deployment is not associated to any deployment then all fields are editable except Voice menu name and Webex connect flow id.
Enabling a Webex Connect Voice Flow to be used in Webex Campaign
The purpose of this section is to provide the configuration steps needed in a voice flow that has been developed on Webex Connect and is being imported into Webex Campaign. It is important to note that the information provided in this section is not comprehensive and does not include all the necessary steps involved in creating a voice flow. However, it does offer a basic understanding of the some nodes and their configuration that are necessary for voice flow. For a more detailed guide on creating a voice flow and information on all voice flow nodes, please refer to the Webex Connect documentation.
To create a voice flow you need a few nodes such as Webhook, Call User, Play, IVR Menu, Record, Collect Input, and Call Patch. You may use the above nodes as per your voice flow requirement.
Prerequisites to create a Voice flow:
- You must have access to the Webex Connect platform.
- Some knowledge of how to create flows using Webex Connect platform.
- Enable the share option once the flow is created successfully.
Step1: Configuring the Call User node in Webex Connect
While creating the Voice flow, double-click on the Call User node and configure it as mentioned below:
- Destination Type: Select msisdn from the drop-down.
- Destination: Enter $(msisdn). It is the variable that represents the header (customer phone number) that is present in the target data.
- From Number: Enter $(fromnumber): It is the variable that will be mapped with the provisioned phone number for the client.
- Display Number: Leave this option empty. It is useful if you want to display some other number to customers than the provisioned number.
- Display Name: Leave this option empty. It is useful if you want to display a name to customers on their mobile devices.
- Callback Data (Optional): Enter $(callbackdata). It is useful to post additional data to notify URL.

Step 2: Enabling the sharing option for the Voice flow
After you have created the flow, enable the sharing option as shown below.
- Click the Share icon and enable Link Sharing ON.
- The voice flow URL will be displayed along with an option to set a password, The URL and Password must be shared with the user who imports a voice flow into Webex Campaign.
- Click Save.

Step 3: Integrating Outbound Webhook
- From the menu, go to Assets > Integrations and then click Add Integration. You will notice various integrations that are possible with Webex Connect.
- Click Outbound Webhook.

- The Outbound configuration screen appears. Enter details for the following fields:
- Name: Enter a name for the integration.
- Entity: Select the service in which the voice flow was created.
- Channel: Select the channel as Voice from the drop-down.
- Which Notifications Do You Want To Receive?: Select Dropped checkbox. Other notification types will be discarded.
- Endpoint configuration URL: Enter the client domain suffixed with /voicenotifyweb/voiceoutboundnotificationV5. For example, https://mycampaign.webexcampaign.io/voicenotifyweb/voiceoutboundnotificationV5

- Click Save.
Step4: Copying a Service Key
To copy the service key of a service, go to the API tab of the service and click on the Auth Type drop-down. Select the Service Key and then click on the copy icon. The Service key must be used when you import the voice flow in Webex Campaign.

Now you can import the voice flow into Webex Campaign.
Updated 8 months ago