

Campaign List
Webex Campaign houses all the campaigns and deployment set-ups under the Campaign list screen. You can view all your campaigns in chronological order, with the campaign attributes listed.
You can use the drop-down filters on the top to filter the campaigns and deployments based on the Purpose and Created by drop-downs. You can also use the Search function to find a campaign by the Campaign name or Reference ID.

By default, the Campaign list screen will display the Campaigns created by the user by applying the Filter. Click on the 1 Filters applied link to apply filters based on Created by, Reference ID, P&L, Purpose, and Category.

Actions of a Campaign
You can create deployments in a campaign or edit or delete a campaign using the ellipses icon available for the respective campaign.
To create a deployment, click on the Campaign name or the Campaign logo. The Deployment list screen will be displayed.
A campaign can be deleted only if it does not have any deployments associated with it.

Campaign details: A floating panel
This feature will help you more quickly review and compare multiple deployments within a campaign – thus potentially saving you a lot of time every day.
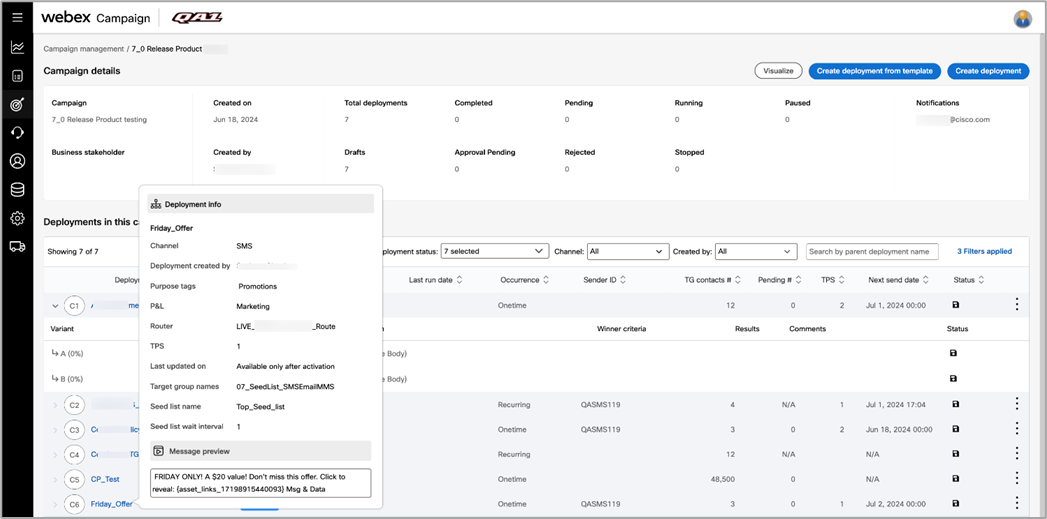
This floating panel will be shown when you hover your mouse over the deployment name. This panel will show the following info about the deployment:
a) Channel
b) Deployment creator
c) Purpose tags
d) P&L tag
e) Router
f) TPS
g) Last updated on
h) Names of target groups associated with the deployment
i) Seed file name
j) Seed file wait interval
k) Message preview: This is shown only in case of SMS & MMS channel deployments.
This floating panel will disappear when you click somewhere on the screen away from the deployment name.
Updated 8 months ago