

Add or edit data exchange to Upload from Webex Campaign to SFTP / S3
It is mandatory to create a profile manager client setup before you create a data exchange.
The data management tab allows users to create a data exchange configuration with the customer's SFTP connection. The SFTP/Amazon S3 configuration details are used to download or upload the feed(ETL).

Add New Data Exchange
Follow these steps to create a new data exchange:
- Navigate to Data management > Data exchange list screen and click Add new data exchange. The Add new data exchange screen appears.

- Enter details for the following fields.
-
Data exchange name: (Mandatory) Enter a name for the File client.
-
Protocol: (Mandatory) Select the protocol from the drop-down menu. The options are:
◘ **SFTP**: To upload files to an SFTP path. ◘ **Amazon S3**: To upload files to an Amazon S3 storage. ◘ **Local**: To upload files to a non-SFTP shared/mount path. -
Active: Enable the toggle to make the SFTP client active.
-
Transfer type: (Mandatory) Select the type of transfer as Upload from webex campaign .
-
Profile manager file client: (Mandatory) Select the file client you already created from the drop-down menu.
-
Source path in webex campaign: Enter the path from where the file should be picked up to upload to SFTP/ S3.
For example,
| Source path | Format |
|---|---|
| To configure the date format in the source path | /Data/InputFolder/&YYYY&/&MM&/&DD&/SNAP/ |
| To configure date format in source path along with subfolder | /Data/InputFolder/&YYYY&/&MM&/&DD&/&WORD&/ |
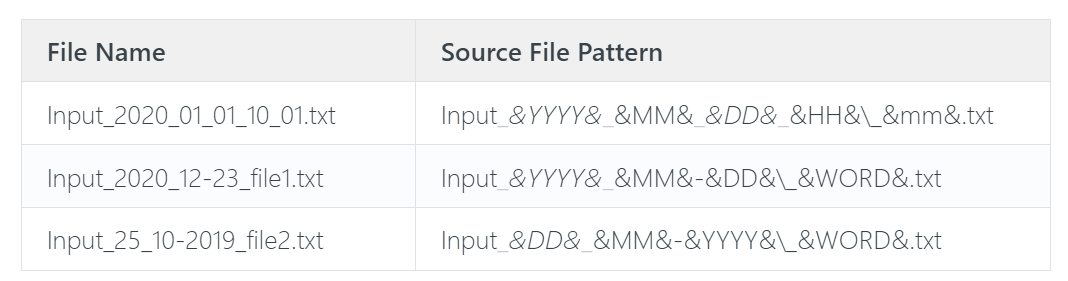
- Source file name pattern in webex campaign: Enter the source file name pattern. This option can be used if the file is .txt or .csv or any other file extension.
Following are some examples of file names and patterns:
-
Destination path in SFTP/S3: (Mandatory) Enter the destination path to upload the file. This will result in a new folder being created under your root path if the folder does not exist. If you choose to enter a folder name without specifying the path, then the destination path will be set to the folder under the root path.
-
Schedule start date: (Mandatory) Select the start date.
-
Schedule end date: (Mandatory) Select the end date.
-
Frequency of data transfer (seconds): Enter the interval to execute the particular job for every configured number of seconds. The minimum value you can set is 60 seconds.
Additional parameters
-
(Optional) Configure Additional parameters to include a filter of how the data exchange should process the data.
-
Day filter: Enter the days separated by ‘-’ to pick up a file for data loading. For example, if today's date is 15th June, if you enter 1-5, it indicates that the system has to pick up files of 1 day from the previous 5th day from the current date (10th June file). If you enter 2 - 3, the system will pick up files of 2 days from the previous 3rd day from the current date (12th and 11th June).
-
Pickup order: This option is used to specify the fetching order of the files. Enter 0 to follow FIFO (First In First Out) and 1 to follow LIFO (Last In First Out) order. For example, if there are 10 files in an SFTP location, you want the system to pick up the files in an order that is the first file to be picked up first then enter 0. If you want the last file to be picked up first, then enter 1.
-
Data timeout: Enter the timeout when reading from the data connection. The default value is 0 minutes. That means it will never timeout.
-
File count interval (mins): Enter the time interval to check the file count in SFTP source and destination folders.
-
Repeat count: This option is used to stop the number of intervals falling in between Execute from and Execute up to based on the interval scheduled. For example, if the data exchange From and To is configured for 24 hrs with an interval of 1 hr, then the count will be 24. That means the job gets executed 24 times. To stop the execution after 600 min, enter 600 as a repeat count. If you enter -1, the job will continue to execute as per the intervals till the end date.
-
Exclusive window: Enter the time in seconds to sleep before the download starts.
-
Folder thread size: Enter the number of concurrent folders that can be processed simultaneously during the job execution. This option is useful when the input files are provided in different folders. The default value is 1.
-
File thread size: Specify the number of concurrent files that can be picked up from SFTP and process them simultaneously during the job execution. This option is useful when you have more files to be processed. The maximum value you can enter is 20.
-
Rename suffix: Enter the file suffix to rename when the transfer to the destination path is successful. For example, .done or .completed.
-
Archive source file pattern: Enter the archive source file pattern. This option is used when the source file is uploaded as a compressed file such as .zip or .gz. This option will copy the compressed file to the destination and then extracts the .txt or .csv file from .zip or .gz.
-
Copy suffix: Enter the suffix to files that need to be appended while in transfer or copy. For example, _under_process_tmp. This is useful to identify the file that was in progress, in case the transfer is aborted or stopped for some reason.
-
We strongly recommend that you specify some value in the Copy suffix field to ensure that the receiving system does not start processing partially-transferred files. However, if your local IT expert has confirmed that your operating system is automatically able to identify when a file transfer is complete, then you may remove the default value of .tmp and leave this field blank.
-
Is preprocessing required: Enable the toggle if the file has to be preprocessed.
◘ Preprocess command: Enter the command to execute any executable file which takes
downloaded file as input and transforms into profile manager usable format file as output.
For example,
cdrconvert -f csv -I $(inputPath) -O $(outPutPath) -t /opt/softwares/delivery-CONVERTER-20/Compiler/bin/ ERS_R12_MSC_table.dat -m /opt/softwares/delivery-CONVERTER-20/Compiler/bin/ ERS_R12_MSC_mapping.txt -enumtext
◘ Exclude preprocess: Enter the file extension which you want to exclude from
preprocessing. For example, you are downloading 5 files from a folder that contains .csv
and .txt. If you know that .txt file need not be pre-processed, then enter .txt.command to
exclude preprocess.

- Click the Save.
The configuration will be saved.
Edit or Delete a Data exchange
- On the Data exchange list screen, click on the required Data exchange name you want to edit.
- Make necessary changes and click Update.

- To delete a Data exchange, click on the ellipses icon of the required Data exchange and click Delete.

Updated over 1 year ago