Target Group
A group of contacts grouped together with a name for the purpose of sending a deployment is called a Target Group. A target group can be created from an SFTP location or a File upload process. You can also split a target group into multiple child files and send them to an SFTP location or use them in deployments. You can use the + symbol as part of the email addresses while creating Target Groups. For example, the email addresses [email protected] and [email protected] will be considered different email addresses for TG creation, Opt-Out, and other purposes.
Personalization in the content will show the email address as provided in the TG data (i.e., the + sign will be shown in the HTML template and Previews).
- A text file containing a list of contacts and upload it to Webex Campaign
- Create contacts profile in Webex Campaign from an SFTP Server
To know the limitations and constraints of Target Group, refer to Target Group Requirements & Constraints section.
Optionally, you can designate a header to be the ‘Unique Customer ID’ for all target groups. Once you designate such a header, then the Webex Campaign will reject TG records that do not have this header.
Using the ‘Customer Care’ screen you will be able to search for the communications sent to a particular Customer ID without actually entering Email or MSISDN on the Customer Care screen.
Important notes when you use a CSV file to create a Target Group and use it in the deployments
- Comma-separated .CSV files are supported for both types of target groups: Static TG & Dynamic TG.
- After the comma-separated .CSV file is ingested within Webex Campaign, it will be internally converted into the system-native ‘pipe-delimited .txt’ format.
- As per the existing behavior for all files ingested for TG creation, the uploaded CSV files will also be deleted immediately after Webex Campaign has ingested it and converted it into the system-native ‘pipe-delimited .txt’ format.
- All the internal processing of the files will continue to be performed in this system-native format. Therefore, when you download files from Webex Campaign UI, they will be in pipe-delimited .txt format. For example., downloading the error records from the ‘Deployment summary’ page.
- If the uploaded CSV file has any value with a ‘pipe’ character, then that whole record will be considered invalid and rejected.
- When you select any TG from the ‘Existing TG list’, then it will be in the pipe-delimited .txt format.
- If you request any TG file data from the L2 support team, then those files will also be in pipe-delimited txt format.
- When a Segment is copied into a dynamic TG, the format of the TG will be in pipe-delimited txt format.
- The only supported ‘enclosing character’ will be ‘double quotes’. i.e., if a header value itself contains a comma (e.g., a customer’s address may contain a comma) then it should be enclosed in double quotes.
- The only supported ‘escape character’ will be ‘backslash’. It should be used if the header value itself contains double quotes.
Please contact your account manager to designate such a mandatory ‘Unique Customer ID’ header.

Visualize Target Group
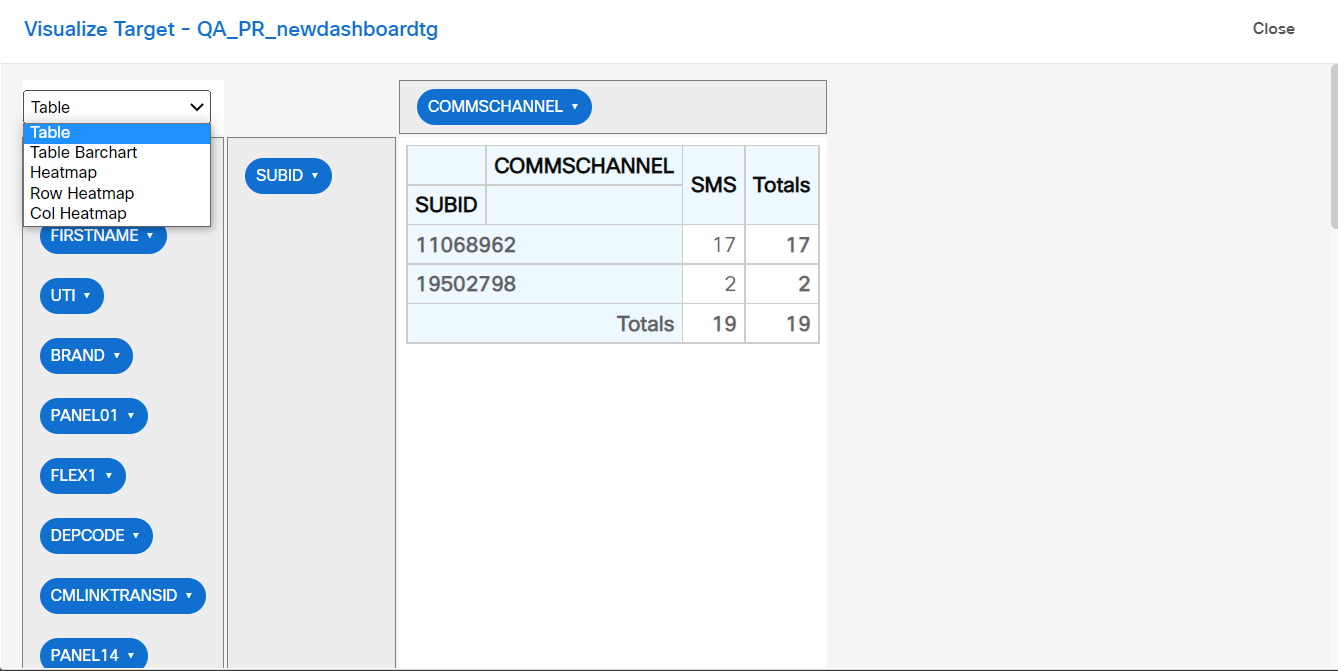
This feature allows you to visualize the target group. On the Target Group List screen, click the ellipses icon of the required target group and click on Visualize. The data explorer screen appears.
If any header has more than 100 unique values, the data cannot be visualized.
This tab allows you to displays the data in different charts such as:
- Table
- Table Barchart
- Heatmap
- Row Heatmap
- Col Heatmap
Select Table option from the drop-down. To visualize the data, drag and drop the required columns on columns and rows panel.

Select the required column from the drop-down. The data displays unique values based on the selected column.
Select the appropriate column carefully to generate the graph. If you select a column with unique data, then the screen may take a long time to display or it leads to your session expiry.
Updated about 1 year ago