

Deployment Schedule Nodes
The deployment schedule nodes enable you to set up a schedule for the deployment. Simply drag and drop the desired schedule node into the schedule placeholder.

Following are the schedule nodes and the applicable deployment types:
| Schedule Nodes | Simple Promotion | Follow Up | Instant Deployment-follow up to existing on a specific deployment |
|---|---|---|---|
| Based on Wait Period | No | Yes | No |
| Daily Recurring | Yes | Yes | No |
| Existing Calendar | Yes | No | No |
| Exclusion Days/Times | Yes | Yes | Yes |
| Immediately | Yes | No | No |
| Monthly Recurring | No | Yes | No |
| New Calendar | Yes | No | Yes |
| Weekly Recurring | No | Yes | No |
| Basic | No | No | Yes |
| Adv | No | No | Yes |
| Msg. queuing | No | No | Yes |
| Alt. response | No | No | Yes |
Based on Wait Period
This node is applicable for Follow up deployments only. This node is used to run a Follow-up deployment automatically after a certain period after the parent deployment has been completed. You can configure the time when the Follow-up should start and the number of days/hours the deployment has to run for.

The options for this node are:
- Wait period: Enter the wait period and select the days or hours or minutes. The wait period could be anything between 30 minutes to 31 days.
- Run for: Enter the number of days or hours the deployment should run for.
- Router: Select the router that is used to push the messages from the drop-down.
- TPS: This option is applicable for SMS deployments only. Enter the TPS (transactions per second), i.e. the number of messages to be pushed through the selected router by the platform per second.
- Delivery confirmation needed: To receive the delivery confirmation, set the slider value as YES.

Daily Recurring
This node is applicable for Follow up deployments. This node is used to run a Follow-up deployment every day as per the configuration. automatically after a certain period after the parent deployment has been completed. You can configure the time when the Follow-up should start and the number of days/hours the deployment has to run for.

The options for this node are:
-
Daily schedule: Click +Add and configure the schedule.
- Start date (Valid from): Select the start date.
- End date (Valid until): Select the end date.
- Start time: Select the calendar start time.
- End time: Select the calendar end time.
- For every ''x' days:
- Eligible weekdays: Select the days of the week required for the deployment.
- Batch size: Enter the required Batch size. If the Batch Size is entered, select whether the Batch Size is by # or %.
- Batch Interval: Enter the interval in minutes between batches. The interval is the time between the previous batch's end time and the next batch's start time. It does not consider the time taken to complete the batch with any given TPS.
-
Router: Select the router that is used to push the messages.
-
TPS [Max allowed TPS]: This option is applicable for SMS deployments only. Enter the number of transactions that should be sent per second.
-
Enable auto TPS: By default, the UI will display 1 when Auto TPS is enabled. However, if the TPS increases during deployment running according to the schedule, the updated (increased) TPS value will be shown in the UI. The Auto TPS set the TPS based on the optimal TPS required to complete the deployment within the defined schedule; it does not attempt to maximise the throughput up to the system/router limit. The Auto TPS factor in only the specific deployment's volume and schedule, and does not consider the total traffic tenant.
If the Auto TPS calculated is not enough to push the entire Target Group within the schedule, then the remaining Target Group will be reported as Message Not Pushed category in reports.
- Delivery confirmation needed: To receive the delivery confirmation, set the slider value as YES.
- Message validity: The message validity defines the maximum time frame the system re-tries sending a message to the customer if their device is temporarily unavailable, for example out of network connectivity or switched off.

Existing Calendar
This node is used to select an already-created calendar. This node is not applicable for Follow up Recurring deployments.

The options for this node are:
- Existing calendar: Click +Add and select the previously created calendar.
- Router: Select the router that is used to push the messages.
- TPS [Max allowed TPS]: This option is applicable for SMS deployments only. Enter the number of transactions that should be sent per second.
- Enable auto TPS: By default, the UI will display 1 when Auto TPS is enabled. However, if the TPS increases during deployment running according to the schedule, the updated (increased) TPS value will be shown in the UI. The Auto TPS set the TPS based on the optimal TPS required to complete the deployment within the defined schedule; it does not attempt to maximise the throughput up to the system/router limit. The Auto TPS factor in only the specific deployment's volume and schedule, and does not consider the total traffic tenant.
- Delivery confirmation needed: To receive the delivery confirmation, set the slider value as YES.
- Message validity: The message validity defines the maximum time frame the system re-tries sending a message to the customer if their device is temporarily unavailable, for example out of network connectivity or switched off.

Exclusion Days/Times
Exclusion days allow you to disable deployments on a particular day, to avoid disturbing customers with untimely messages. Exclusions can be set by the Administrator as a global default applied to all deployments and by the users during individual deployments.
For example, deployments may not send messages on public holidays or during religious festivals.
During exclusion periods, deployments that are running have their status changed to pending and the execution is stopped. Once the exclusion period has expired, the deployments automatically acquire running status, and the execution is resumed.
The exclusions are based on the configured time-zone and are configured on a channel basis.
This node is added automatically when you add any type of schedule node. The Exclusion Days & Exclusion Time can be configured to overwrite the default exclusion days/times and resume on completion of the specified time period. The Exclusion times can be set to prevent messages from being pushed outside working hours, religious holidays, or as a way of managing the volume of replies to allow for a steady response.

The options for this node are:
-
Exclusion days: To set a custom exclusion day, click +Edit and select Custom option. Select a Date and enter comments. To remove exclusion days, select None. Click Save & Proceed.
-
Exclusion times: To set a custom exclusion times, click +Edit and select Start time and End time. Click +Add more to add more exclusion times. To remove exclusion times, select None. Click Save & proceed.

Immediately
This node is applicable for Onetime deployments. Generally, all the deployments are scheduled in advance. This node allows you to run the deployment immediately. But this option is only effective outside of the system maintenance window of 11:45 pm to 2:00 am. Outside of this window, the system will start the process of preparing the Target Group soon after the Deployment is Activated / Approved (taking into account any Exclusion dates and Exclusion times set up by your Tenant Administrator).

Select the Router from the drop-down and click Save changes.

Monthly Recurring

The options for this node are:
- Monthly: Click +Add and configure the schedule.
- Start date (valid from): Select the start date.
- End date (valid until): Select the end date.
- Start time: Select the calendar start time.
- End time: Select the calendar end time.
- Batch size: Enter the required Batch size by percentage or the absolute size of the entire target group.
- Batch Interval: Enter the interval in minutes between batches. The interval is the time between the previous batch's end time and the next batch's start time. It does not consider the time taken to complete the batch with any given TPS.
- Monthly Recurring Type:
- Monthly - specific week days: Select this option to specify the days of the week required for the deployment.
- Monthly - specific month days: Select this option to specify the month days. For example, if the deployment is to run on the 20th, enter “20”. If the deployment is to run on any eligible day within a month, enter 1-31. If you want the deployment to be run on specific days of a month, for example, 18th, and 20th of every month, then enter 18, 20.
- Router: Select the router that is used to push the messages.
- TPS [Max allowed TPS]: This option is applicable for SMS deployments only. Enter the number of transactions that should be sent per second.
- Enable auto TPS: By default, the UI will display 1 when Auto TPS is enabled. However, if the TPS increases during deployment running according to the schedule, the updated (increased) TPS value will be shown in the UI. The Auto TPS set the TPS based on the optimal TPS required to complete the deployment within the defined schedule; it does not attempt to maximise the throughput up to the system/router limit. The Auto TPS factor in only the specific deployment's volume and schedule, and does not consider the total traffic tenant.
- Delivery confirmation needed: To receive the delivery confirmation, set the slider value as YES.
- Message validity: The message validity defines the maximum time frame the system re-tries sending a message to the customer if their device is temporarily unavailable, for example out of network connectivity or switched off.

New Calendar
This node is used to create a new calendar.

The options for this node are:
- New calendar: Click +Add to create a new calendar.
- Router: Select the router that is used to push the messages.

Weekly Recurring
The weekly recurring schedule causes a deployment to repeat on the same day or days of the week, based on the number of weeks between each set of occurrences.

The options for this node are:
- Weekly: Click +Add and configure the schedule.
- Start date (valid from): Select the start date.
- End date (valid until): Select the end date.
- Start time: Select the calendar start time.
- End time: Select the calendar end time.
- Eligible weekdays: Select the days of the week required for the deployment.
- Batch size: Enter the required Batch size by percentage or the absolute size of the entire target group.
- Batch Interval: Enter the interval in minutes between batches. The interval is the time between the previous batch's end time and the next batch's start time. It does not consider the time taken to complete the batch with any given TPS.
- Router: Select the router that is used to push the messages.
- TPS [Max allowed TPS]: This option is applicable for SMS deployments only. Enter the number of transactions that should be sent per second.
- Enable auto TPS: By default, the UI will display 1 when Auto TPS is enabled. However, if the TPS increases during deployment running according to the schedule, the updated (increased) TPS value will be shown in the UI. The Auto TPS set the TPS based on the optimal TPS required to complete the deployment within the defined schedule; it does not attempt to maximise the throughput up to the system/router limit. The Auto TPS factor in only the specific deployment's volume and schedule, and does not consider the total traffic tenant.
- Delivery confirmation needed: To receive the delivery confirmation, set the slider value as YES.
- Message validity: The message validity defines the maximum time frame the system re-tries sending a message to the customer if their device is temporarily unavailable, for example out of network connectivity or switched off.

Basic
This node is used to create a new calendar.

The options for this node are:
- Start date: Select the start date.
- End Date: Select the end date.
- Timezone: Select the time zone required to deploy in.
- Router: Select the router that is used to push the messages.
- Message validity: The maximum time frame the system re-tries sending a message to the target contact if their device is temporarily unavailable. For example, out-of-network connectivity or switched off.
Adv
This node is used to configure a schedule with additional options. Please refer to the Advance Calendar node.
Alt. response
This node is used to configure a message that is sent outside the configured schedule but within the general validity of the deployment. Click +Add and type in the message. This cannot include tracked links or personalization.

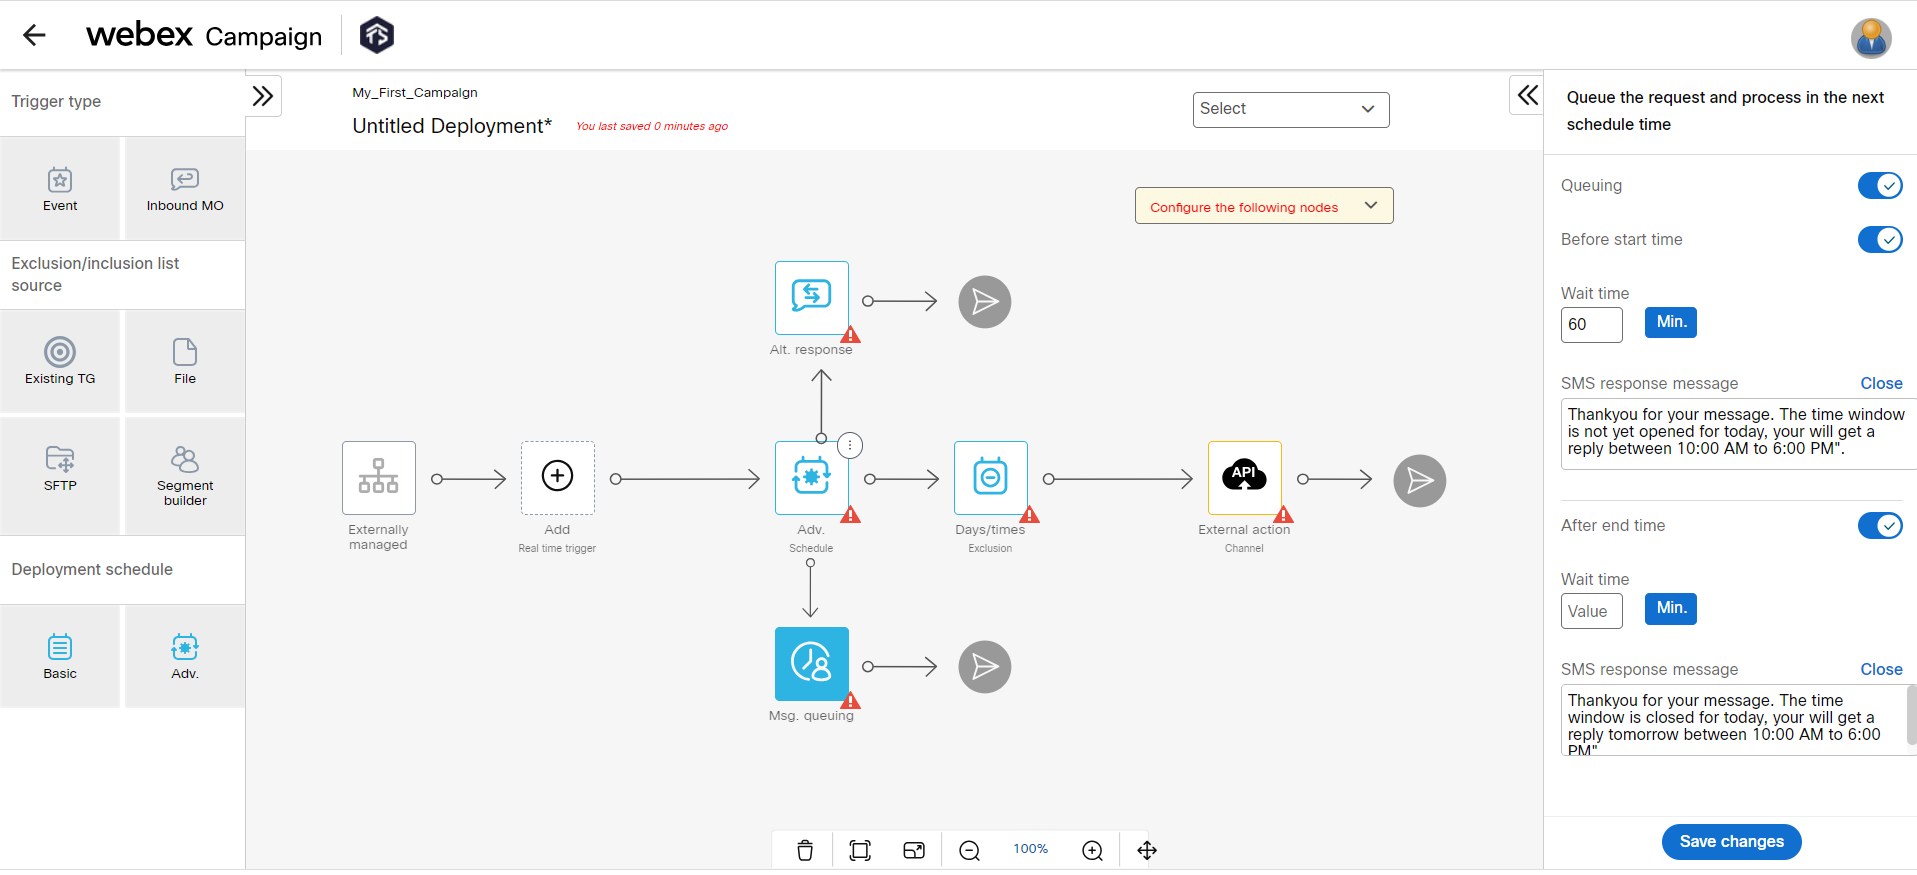
Msg. queuing
This node is used to queue the SMS MOs (Mobile Originated messages) that are received outside the configured calendar schedule such as 10:00 AM to 6:00 PM. For example, if an SMS is received from a contact after 6:00 PM, it will be added to a queue and processed during the next available schedule.
You can also configure a response message for the contacts who send messages before the calendar schedule. To configure the response message enable Before start time option and enter the desired Wait time in minutes. Click + configure and enter the text in the SMS response message textbox. For example, if you configure a message such as "Thank you for your message. We are open between 10:00 AM to 6:00 PM" with a wait time of 5 minutes, then the configured response will be sent after 5 minutes upon receiving the MO from a contact.
You can also configure a response message to the contacts who send messages after the calendar schedule. To configure the response message enable After end time option and enter the desired Wait time in minutes. Click + configure and enter a text in the SMS response message textbox. For example, if you configure a message such as "Thank you for your message. We are open between 10:00 AM to 6:00 PM" with a wait time of 5 minutes, then the configured response will be sent after 5 minutes upon receiving the MO from a contact.
Updated 8 months ago