

Exporting CAMP_OPTOUT_DATA daily to SFTP using File Channel
This is a tenant-specific feature. Please contact the operations team to enable this feature for you.
As you know, Webex Campaign already has a feature to store and maintain ‘Opt-out Lists’ data on your behalf. This existing feature can be accessed from the following menu: Administration >> Tenant Management >> Opt-out Management. Here you can create and maintain multiple ‘Opt-out Lists’ with each list being at ‘tenant-level’ or ‘channel-level’ or at a more granular level of ‘Opt-out category’. You can also download this opt-out list data to your PC by clicking on the count value under the ‘Opt-out Counts’ column.
The opt-out datastore ‘CAMP_OPTOUT_DATA’ will be refreshed with the opt-out lists data from all of your opt-out lists every night at approximately 3 am system time. You can extract channel-specific opt-out data based on a schedule to an SFTP location automatically.
The method explained in this tutorial will work only if the File Channel is enabled for your tenant. Please contact the operations team to enable File Channel for your tenant.
Follow these steps to export your opt-out data automatically to an SFTP location on a daily basis.
Step 1: Create a Segment with CAMP_OPTOUT_DATA
Step 2: Copy the segment to a dynamic TG
Step 3: Create a Campaign manager SFTP set up
Step 4: Create a Recurring File Channel deployment
Step 5: Verify the file in the SFTP location
Step 1: Create a Segment with CAMP_OPTOUT_DATA
Follow these steps to create a segment for exporting opt-out data on a daily basis:
-
Navigate to Profiles > Segment Builder screen and click Add new segment.
-
Select New and click Proceed.

- Enter a name for the segment and description.

- From the ‘Data sources’ dropdown, uncheck the Profile and Campaign data options and check only the Datastore option. Select the CAMP_OPTOUT_DATA’datastore. Click Next.

- On Segment builder step #3, select the following 6 output headers as shown in the screenshot below:
| Header | Description |
|---|---|
| CHANNEL | Enter the channel number that is used during the query to extract channel-specific data: > 0= SMS > 1= MMS > 7= Email |
| DEPLOYMENTID | The data for this header is only available when clicked on an unsubscribe link within an email. |
| KEY | Enter EMAIL or MSISDN to map the Key header. This is mandatory. |
| OPT_OUT_DATE | The data for this header will display the date and time when the opt-out record was added to the list. |
| OPTOUTSTORE | The data for this header will display the name of the opt-out list as specified on the Opt-out Management screen. |
| SOURCENAME | The data for this header will display how the opt-out was added to this list. The options are: AddedViaUI: This value will be shown if the opt-out is added through the Webex Campaign UI. OptOutAPI: This value will be shown when the opt-out is added through the API. ActionHandler: This value will be shown when the opt-out is added through an Event. Migration: This value will be shown when the Webex Campaign support team migrates the opt-out data from a legacy opt-out list. |
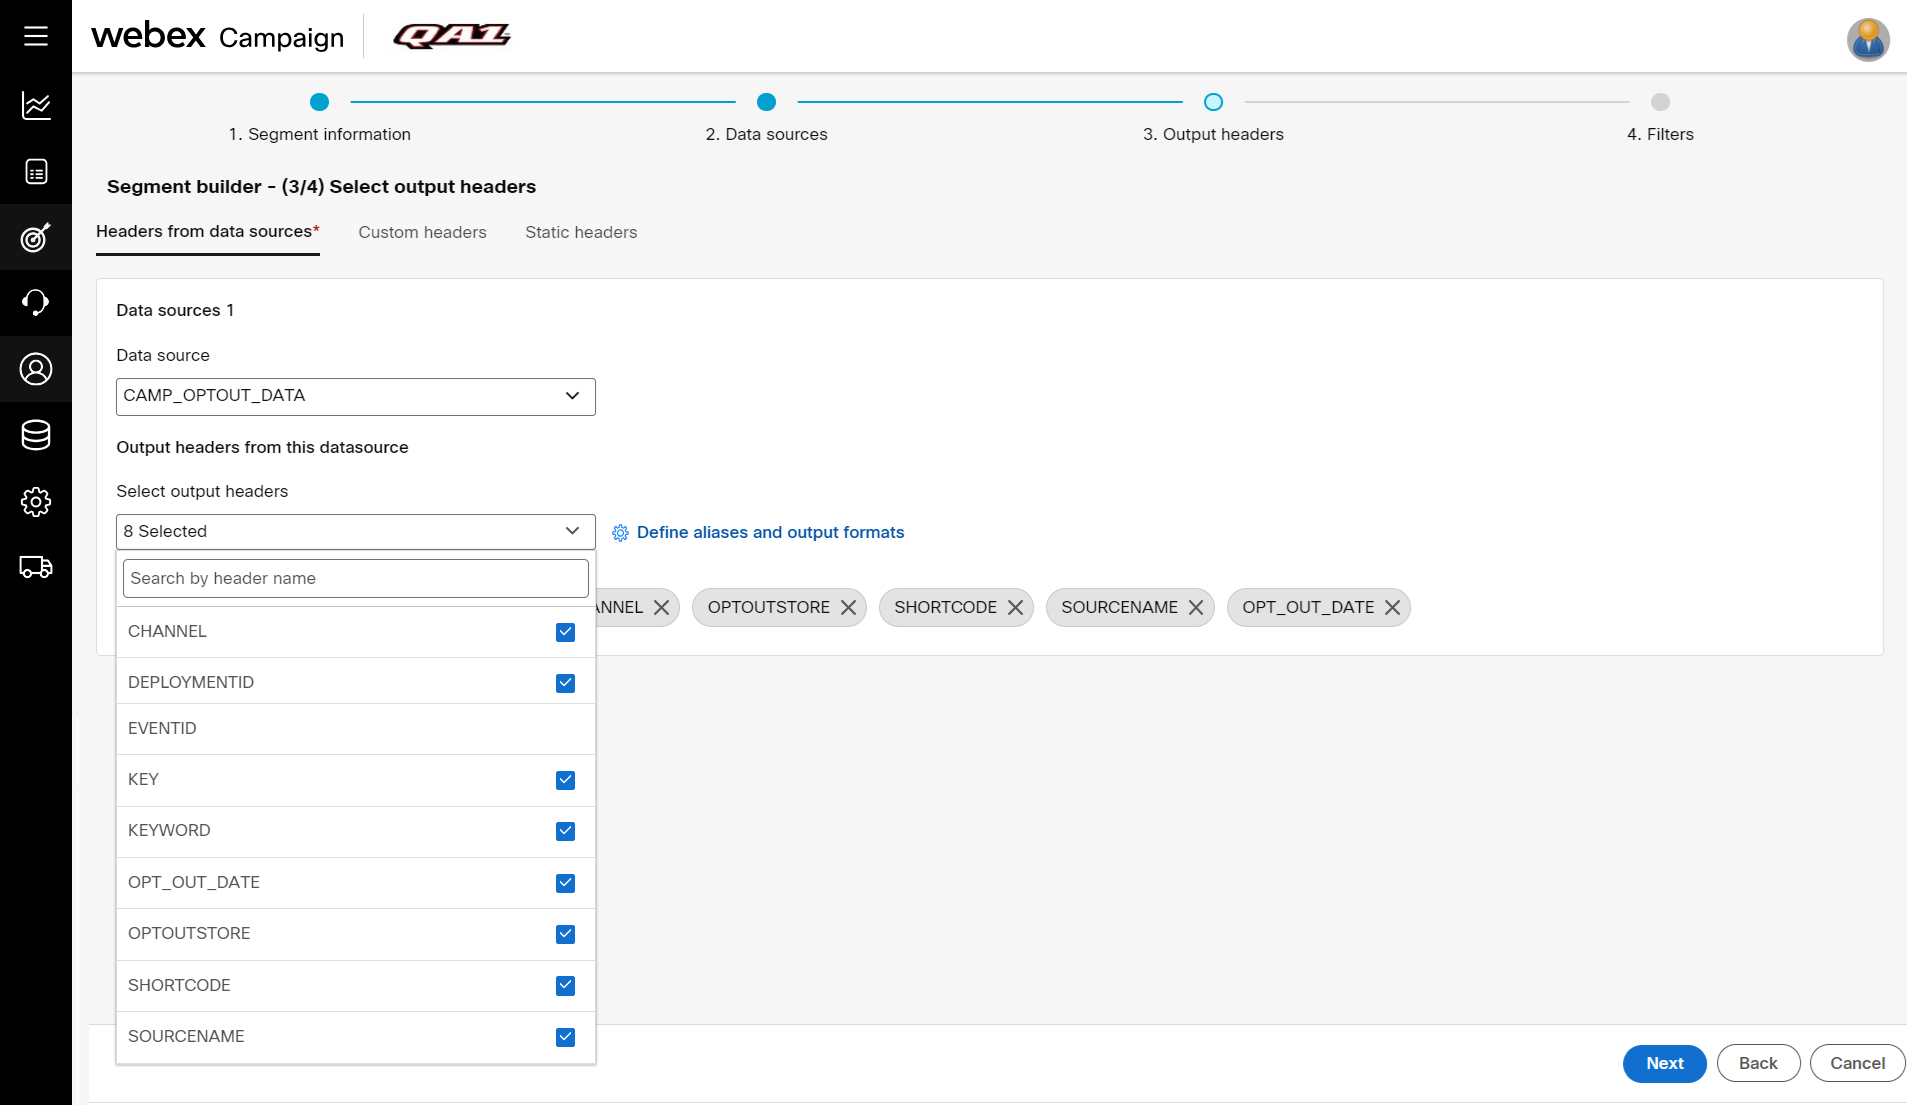
Apart from these 6 attributes, other attributes present in the datastore are not yet being populated. This work is in progress. We will also be adding more attributes to this datastore in the future.
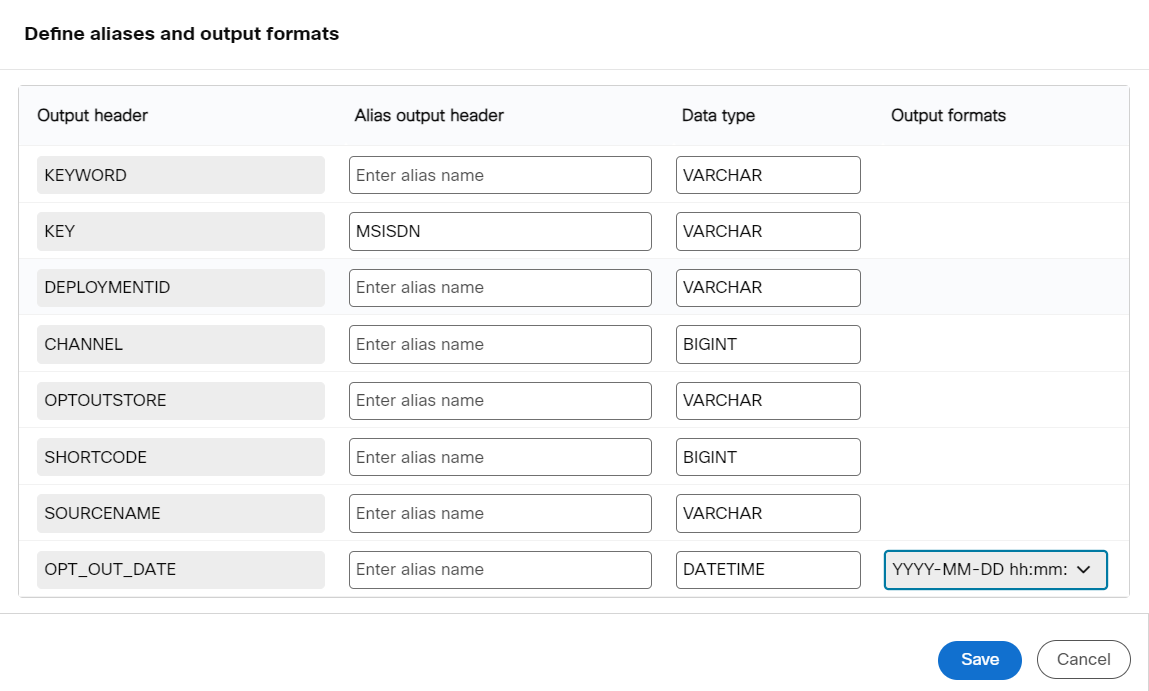
- Click Define aliases and export formats and enter MSISDN to extract SMS/MMS opt-out records or EMAIL to extract email channel opt-out records. Select a date format for OPT_OUT_DATE. It refers to the opt-out date recorded in Webex Campaign. The default date format is YYYY-MM-DD hh:mm:ss. You can choose a variety of date formats for the exported date from the dropdown. Click Save.
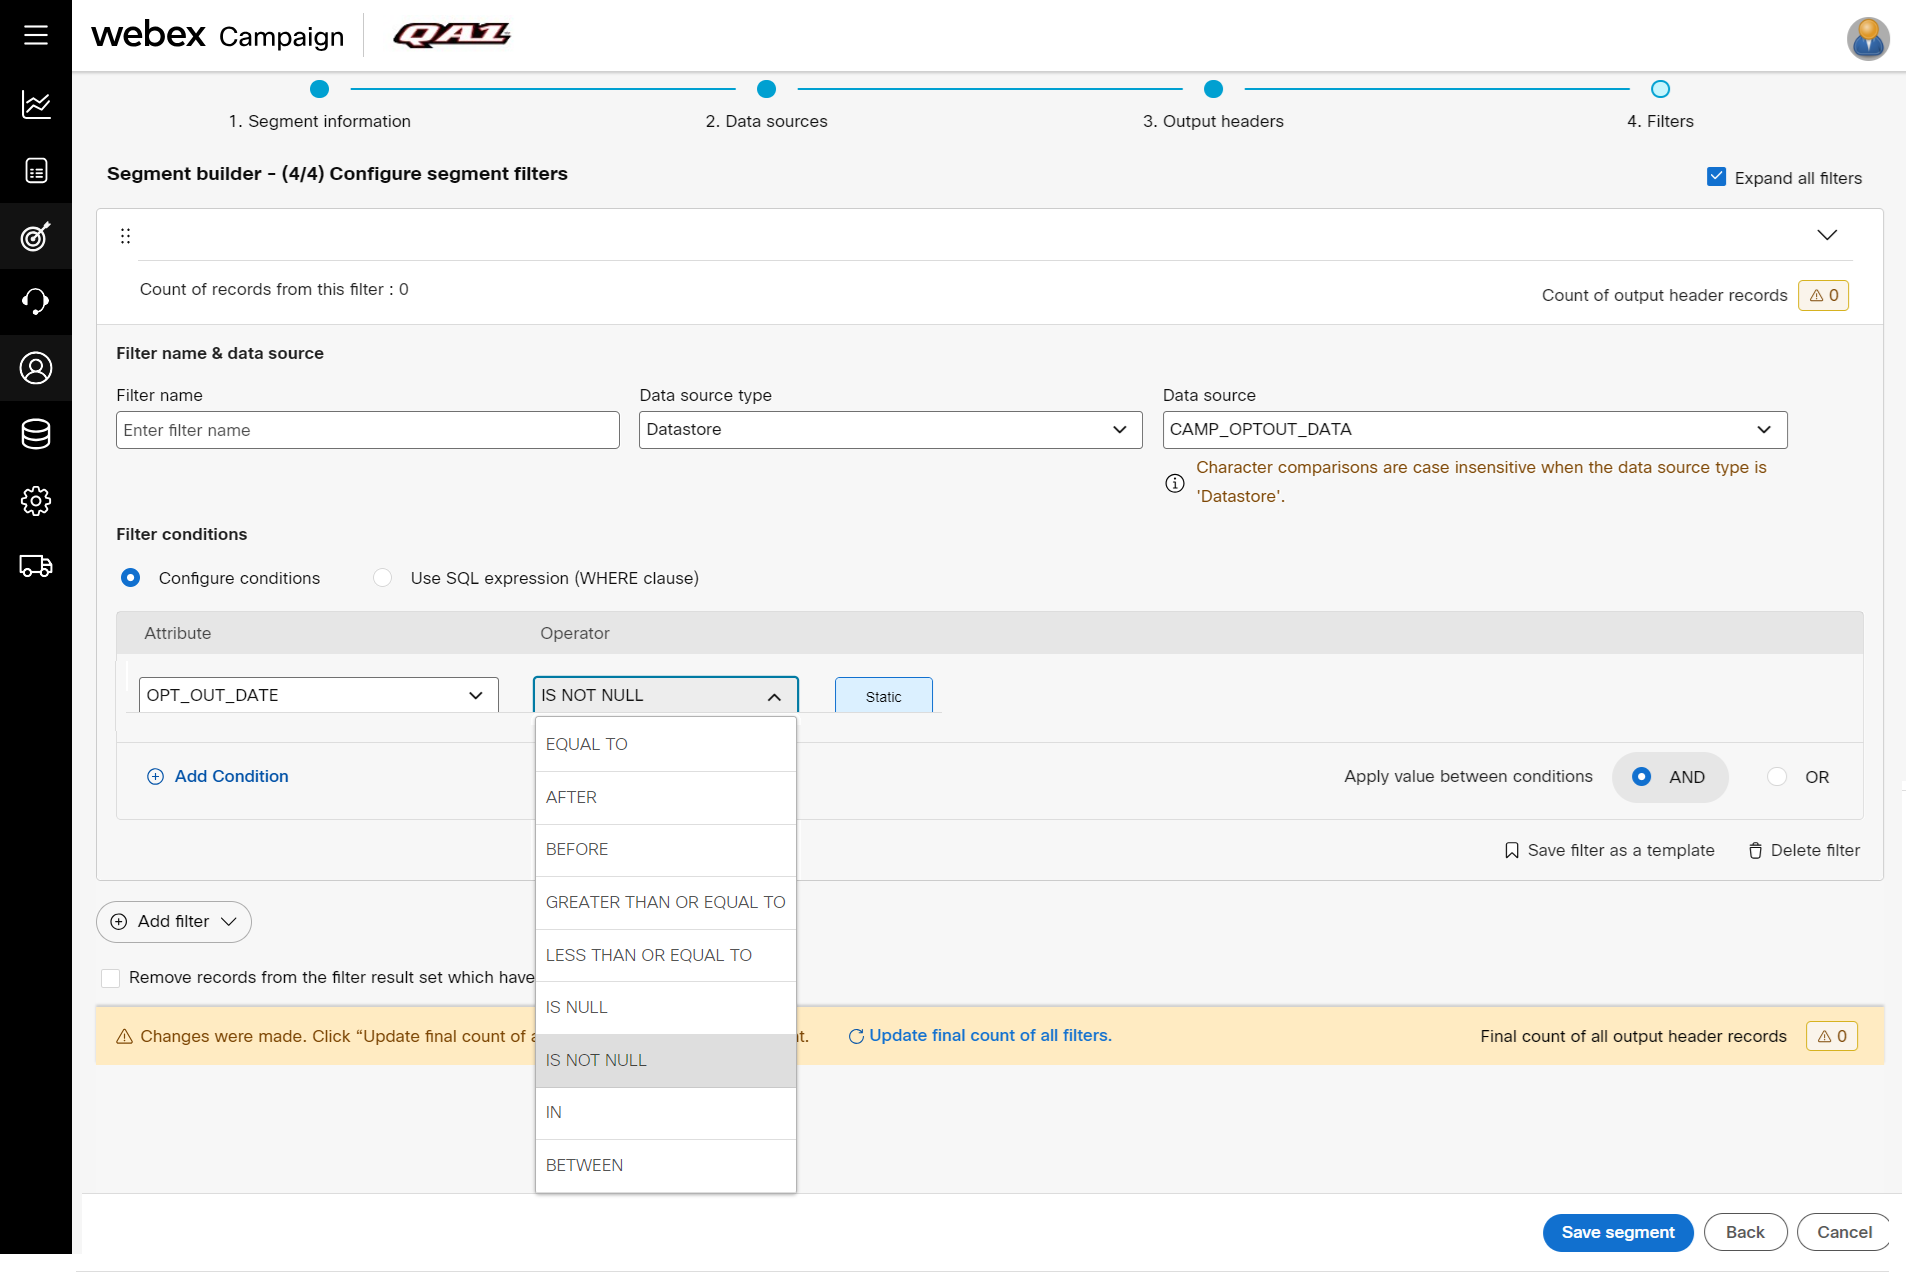
- On Segment builder step #4, use the following filter condition if you want to export channel-specific opt-out records every day: OPT_OUT_DATE IS NOT NULL.
If you want to export only a subset of opt-out records that were added after a specific date, then you can use other logical operators such as AFTER and then select the date filter.
- Click Save and exit.
You can also identify whether an opt-out record was added by an API user or a UI user. You can apply filter on 'SOURCENAME' column with the appropriate value as follows:
- For UI users, the value is of the format: ‘UI<display_name>’.
- For API users, the value is a hardcoded string: 'API_user'.
Step 2: Copy the segment definition to a dynamic TG
In this step, you have to copy the segment definition to a dynamic target group. A target group will be created as per the headers and filter conditions defined in the segment which will execute as per the deployment schedule.
The opt-out data is refreshed every night at approximately 3 am system time.
Follow these steps to configure the schedule:
- On the Segment list screen, click on the ellipses icon of the required segment and click Copy definition to a dynamic TG.

- The channels in this screen is displayed based on the Key that is mapped with the Define aliases and export formats screen. If you enter the Key as EMAIL, then this screen will display the Email channel. Select the MSISDN and click Create.

A new dynamic target group is prepared with the headers and filter conditions defined in the segment. When the dynamic target group is used in a deployment, the latest target data is queried and updated based on the filters defined from the CAMP_OPTOUT_DATA datastore.
Step 3: Create Campaign manager SFTP set up
This step is needed to configure SFTP connection details that are used to upload data to an SFTP location. The connection details once stored can be accessed at any time.
- Navigate to Tenant management > Campaign manager file clients set up and click +Add new SFTP configuration.

- On the Add SFTP configuration screen, enter details for the following fields:
- Site name: Enter a name to identify the SFTP site in Webex Campaign.
- Site address: Enter the IP address of the SFTP site to be accessed.
- Port: Enter the port number of the SFTP site.
- Protocol: Select the protocol as SFTP that is used to access the site.
- Username: Enter a user name to access the SFTP site.
- Authentication: Select the authentication type to access the SFTP site. This option will not be visible if you select the protocol as File .
- Password: This option is displayed if you select the Authentication as Password. Enter the password to access the SFTP site.
- Private Key File: This option is displayed if you select the Authentication as Private Key. Browse and select the private key file.
- Home Folder: Enter the SFTP home folder path where the opt-out data file should be copied. For example, if you enter '/home/optout_data_from_webex_campaign/', then in the home path, create a folder as optout_data_from_webex_campaign. The opt-out data that is extracted from CAMP_OPTOUT_DATA will be copied to this path. You can define a folder in the File Channel node during the deployment creation.
- Access: Select the type of access to be allowed for the user on the SFTP site.
The ideal permissions to be granted to Webex Campaign are Read / Write / Execute to allow full operational control of data files.

- Click Save.
Step 4: Create a Recurring File channel deployment
In this step, let us create a recurring deployment that will execute automatically as per the schedule.
- Navigate to Campaign Management > Campaign List screen and click on a campaign that you already created.
- Click Create Deployment and proceed to create a Recurring File channel deployment as shown below.

- On the deployment screen, configure the nodes as shown below:
- Target Group Node: Drag and drop the Existing TG node onto Add Target group and configure the target group that was created using the segment.
- Add Schedule Drag and drop the Daily recurring node onto Add Schedule and configure the schedule. You can choose to configure other nodes as required such as Weekly recurring or Monthly recurring.

- File Channel node: Click Add from the right palette and configure as below.

- Destination: Select the SFTP location that was created in Step 4 from the drop-down.
- Destination path: You can enter a folder or leave this empty. If you enter a folder, the folder will be created if it is not available in the SFTP path.
- File name: Enter a file name such as OPTOUT. A date format as shown in the above screen will be appended to the file name. For example, if your schedule is daily recurring at 02:00 pm, then the files will be named OPTOUT_20220922140000, OPTOUT_20220923140000, and so on until the schedule ends.
- Click Save.
- Save the deployment with a name and meta-tags and then Activate.

Step 5: Verify the file in the SFTP location
The file channel deployment will run as per the schedule. You can go to the SFTP path using a file client such as Winscp and verify the opt-out file.
Updated almost 2 years ago