Instant Deployments – Real-Time Follow-up
An Instant Follow Up deployment is used to Follow Up with contacts who respond to messages through an SMS. When a contact responds with an SMS, an automated response will be triggered by Webex Campaign to those contacts. The trigger could be a
- Event
- Inbound MO
- Link Click
- Email open
- Message delivered
- Message failed
The above options are displayed when you select any contact from specific deployments.
Prerequisite: A campaign should already be available to create a deployment.
Step1: Create a Deployment
Follow these steps to create an Instant Follow Up Deployment:
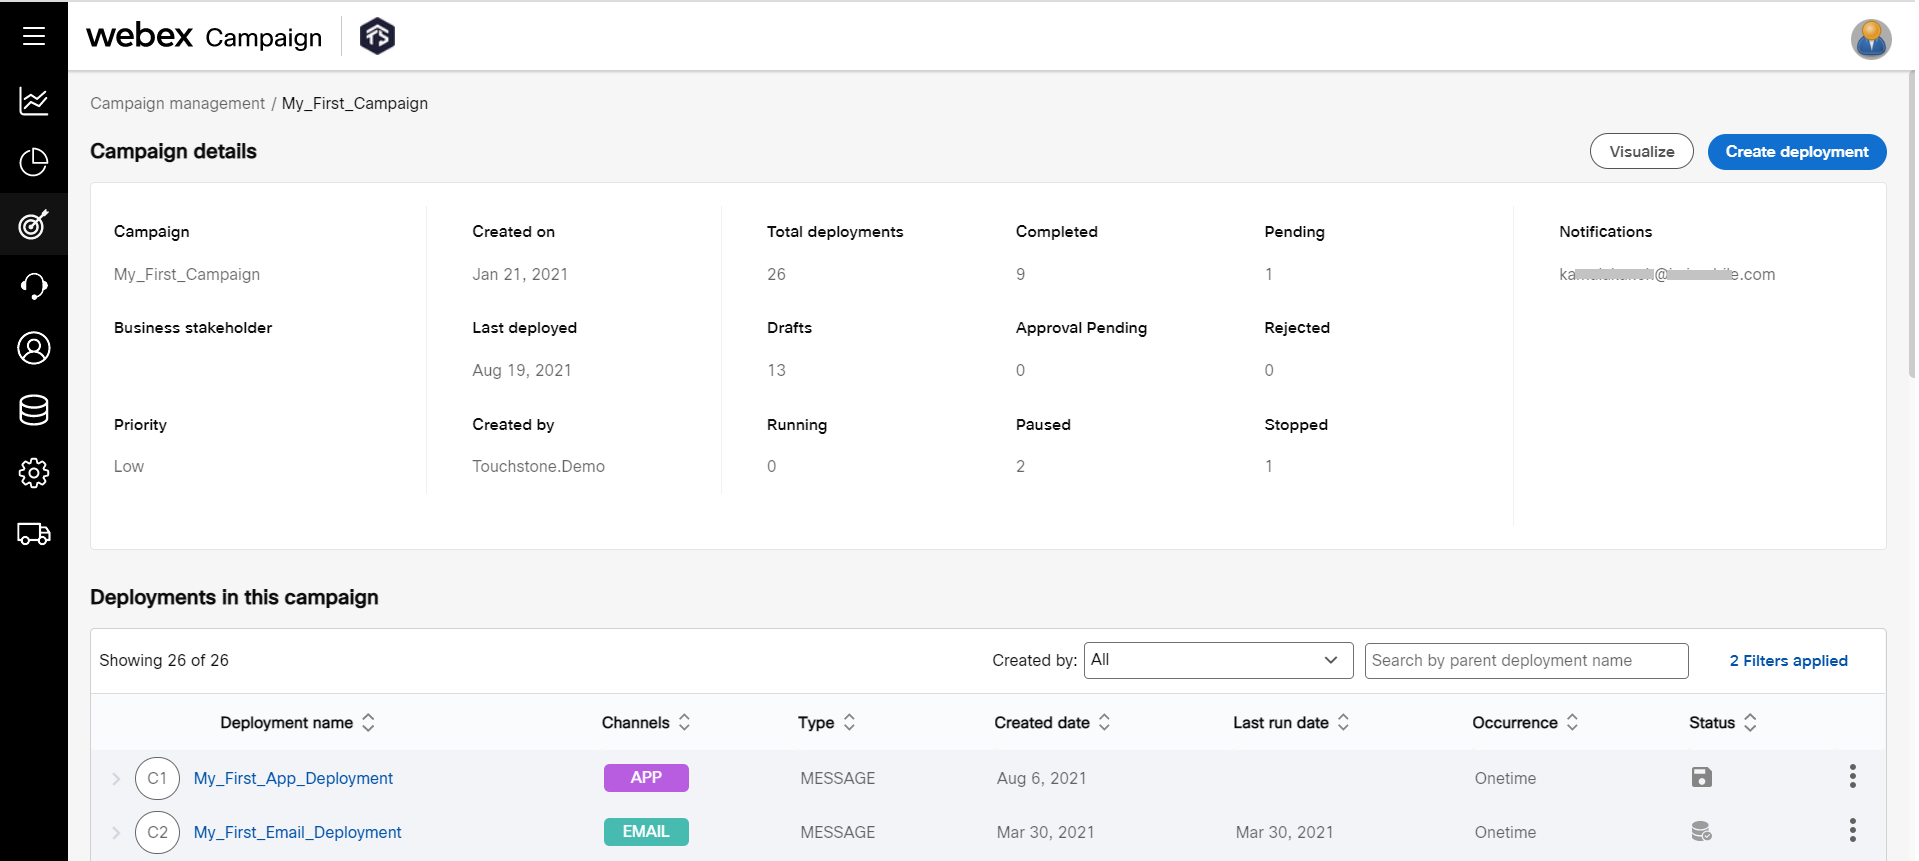
- Navigate to Campaign Management > Campaign List screen and click on the campaign in which you want to create a deployment.

- Click Create deployment on the campaign summary screen that appears. The campaign summary screen will display the status of all the deployments of the campaign.
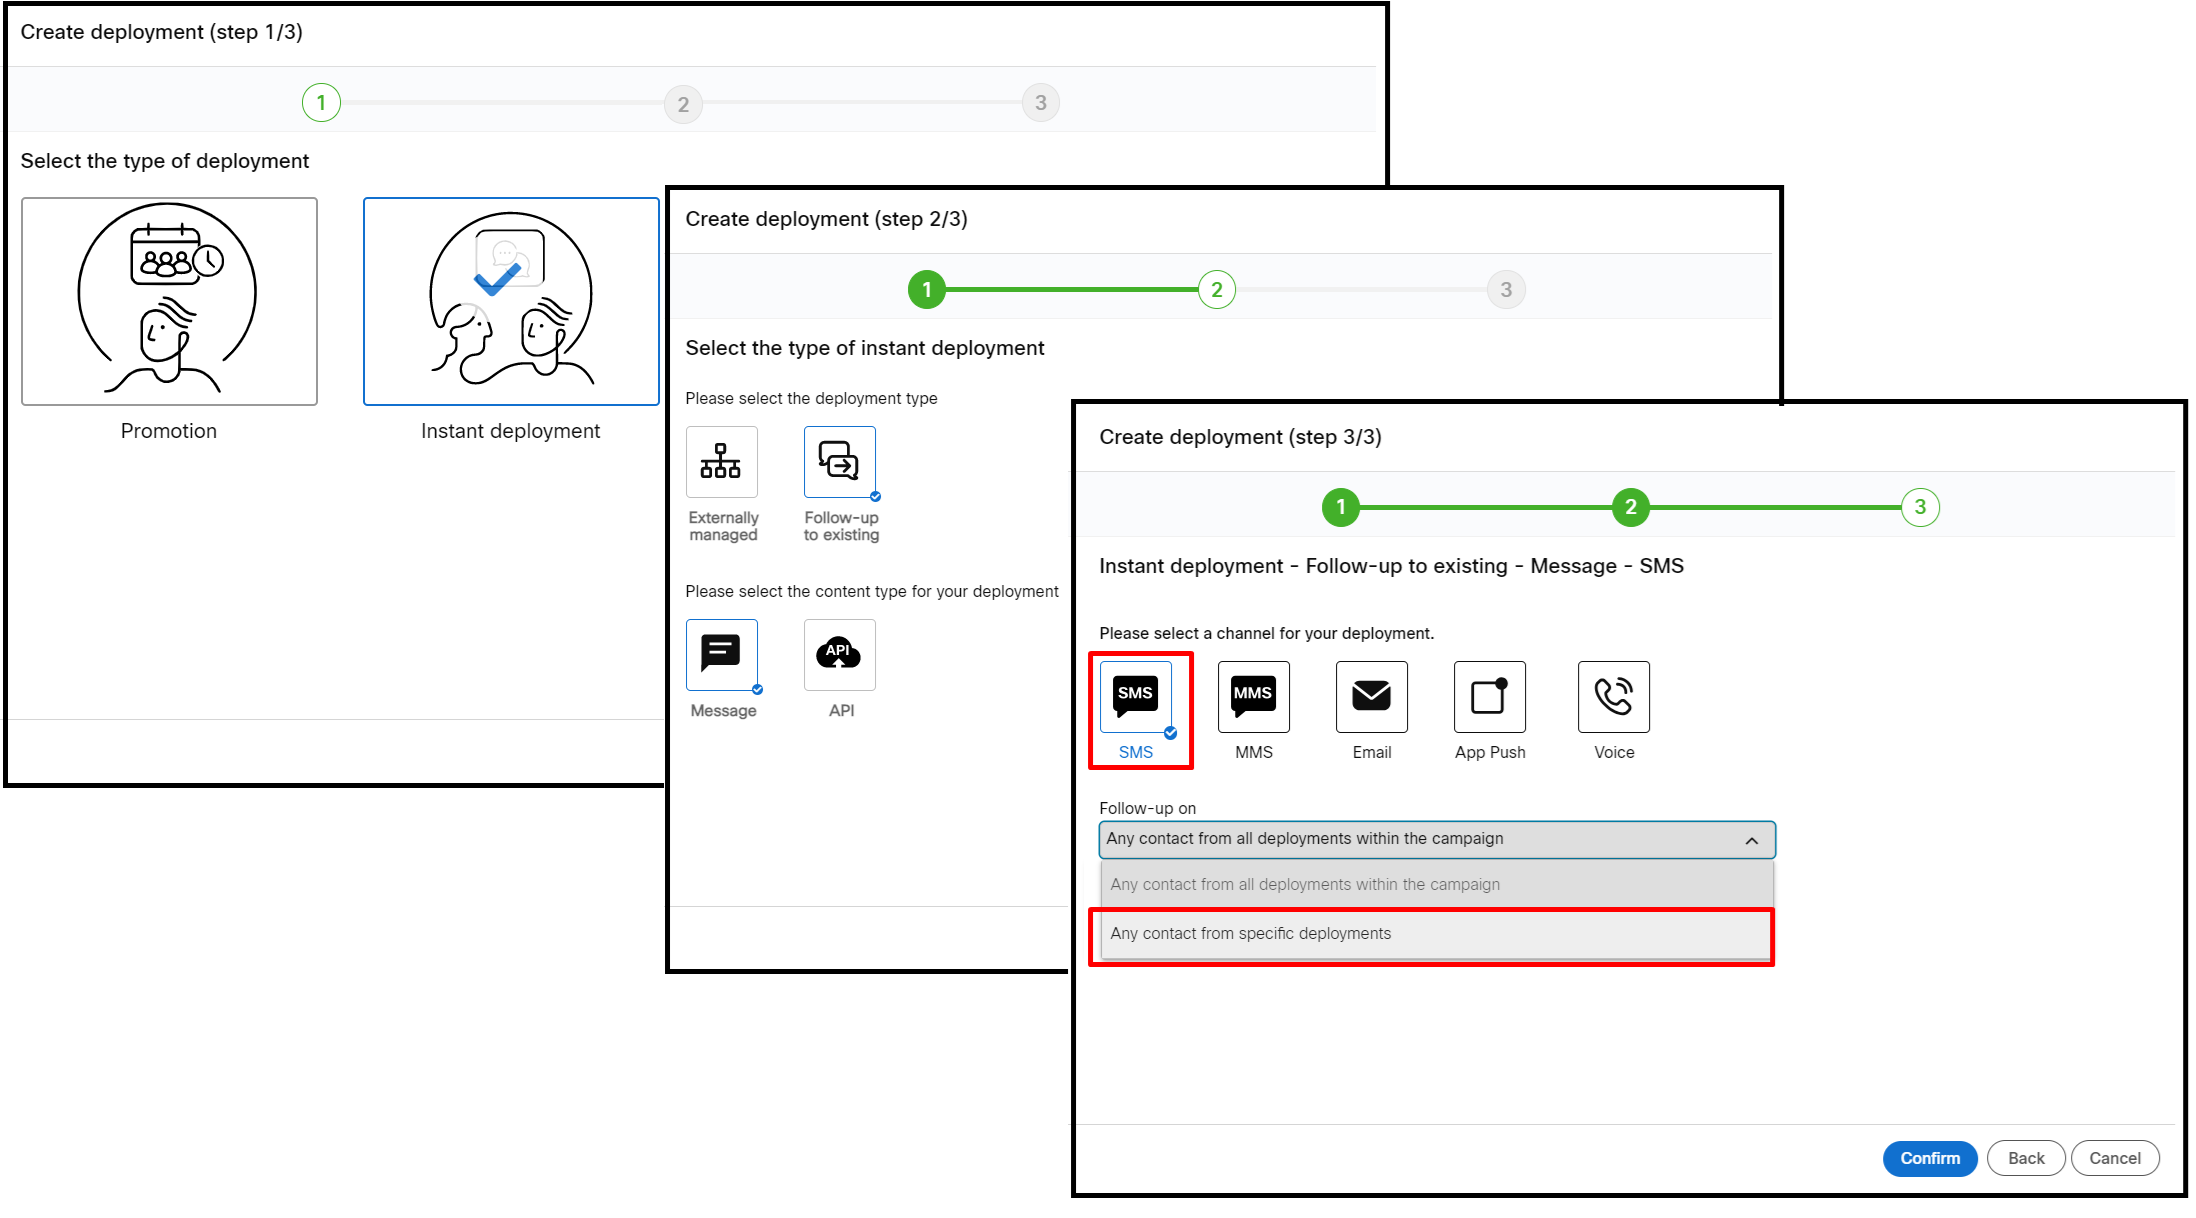
- Select the deployment type as Instant deployment.
- Select the type of promotion as Follow up to existing and content type as Message.
- Select the SMS Channel.
For this tutorial, I will select the SMS channel.
Step2: Choose Your Recipients
In Create Deployment (Step 3/3), select the recipients. The options are:
- Any contact from all deployments within the campaign: When this option is selected, any contact from all the deployments in the campaign is applicable.
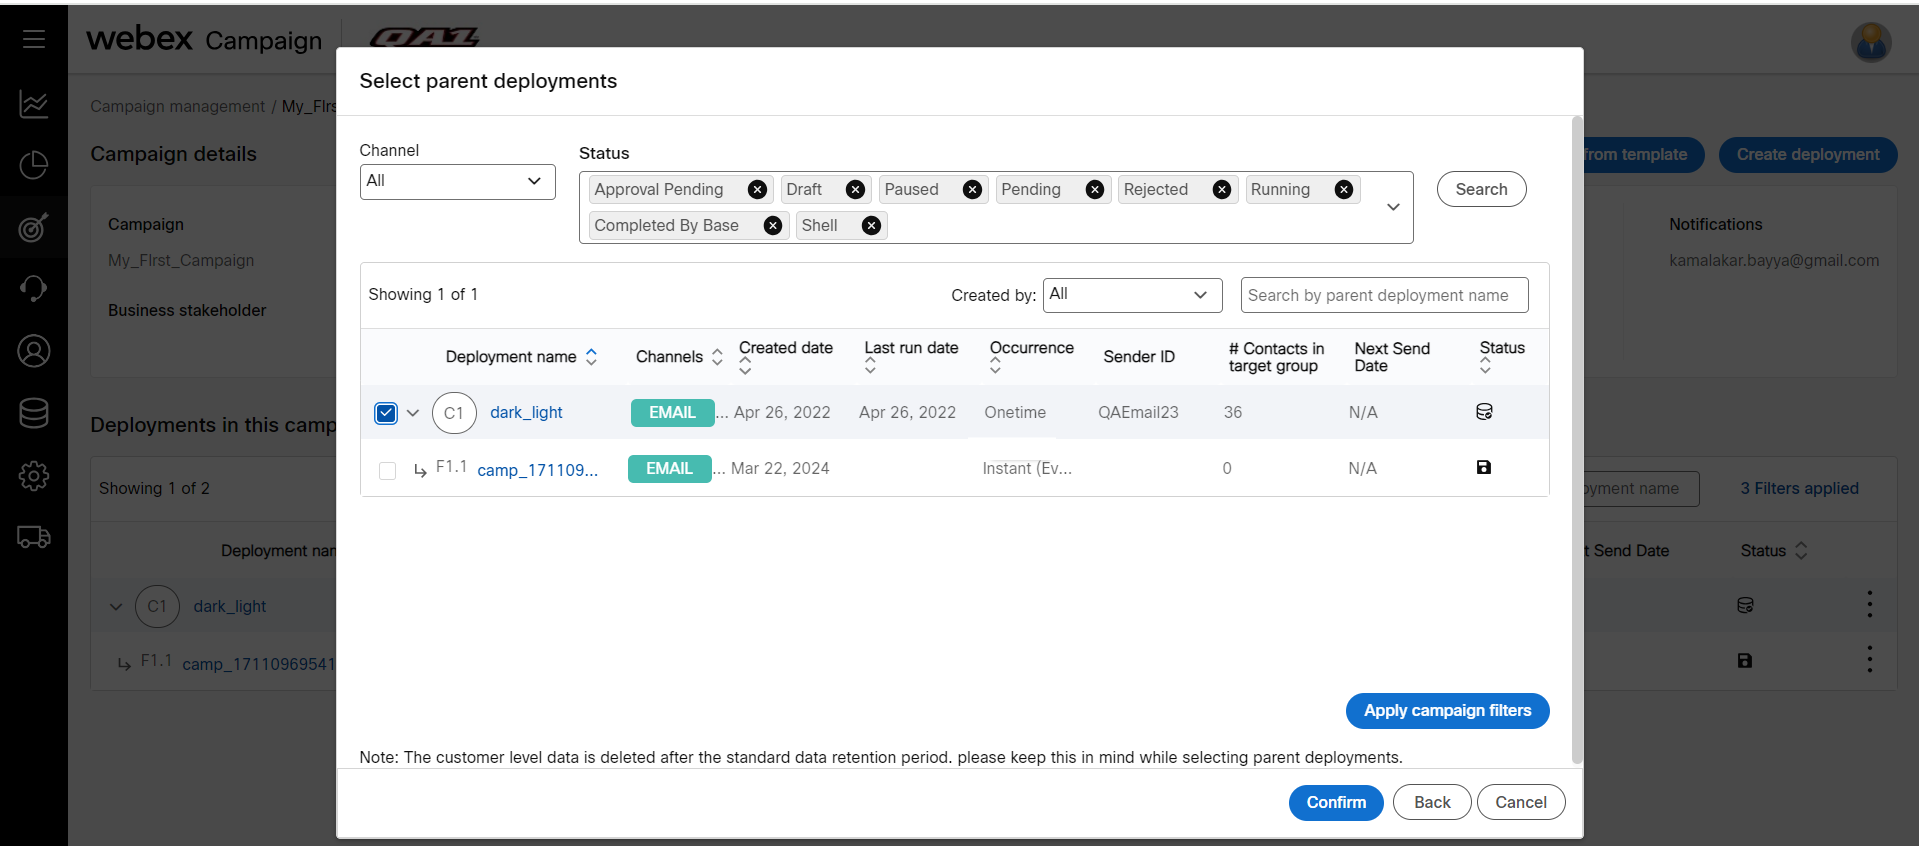
- Any contact from specific deployments: When selecting, you will be displayed with another popup to select a deployment. You can also trim down the contacts by applying a filter on the contacts of the selected deployment.
- Select the Any contact from specific deployments option.
- Select a specific deployment (contacts), that you want to target for the instant deployment and click Confirm.
Step 3: Select the Trigger Node
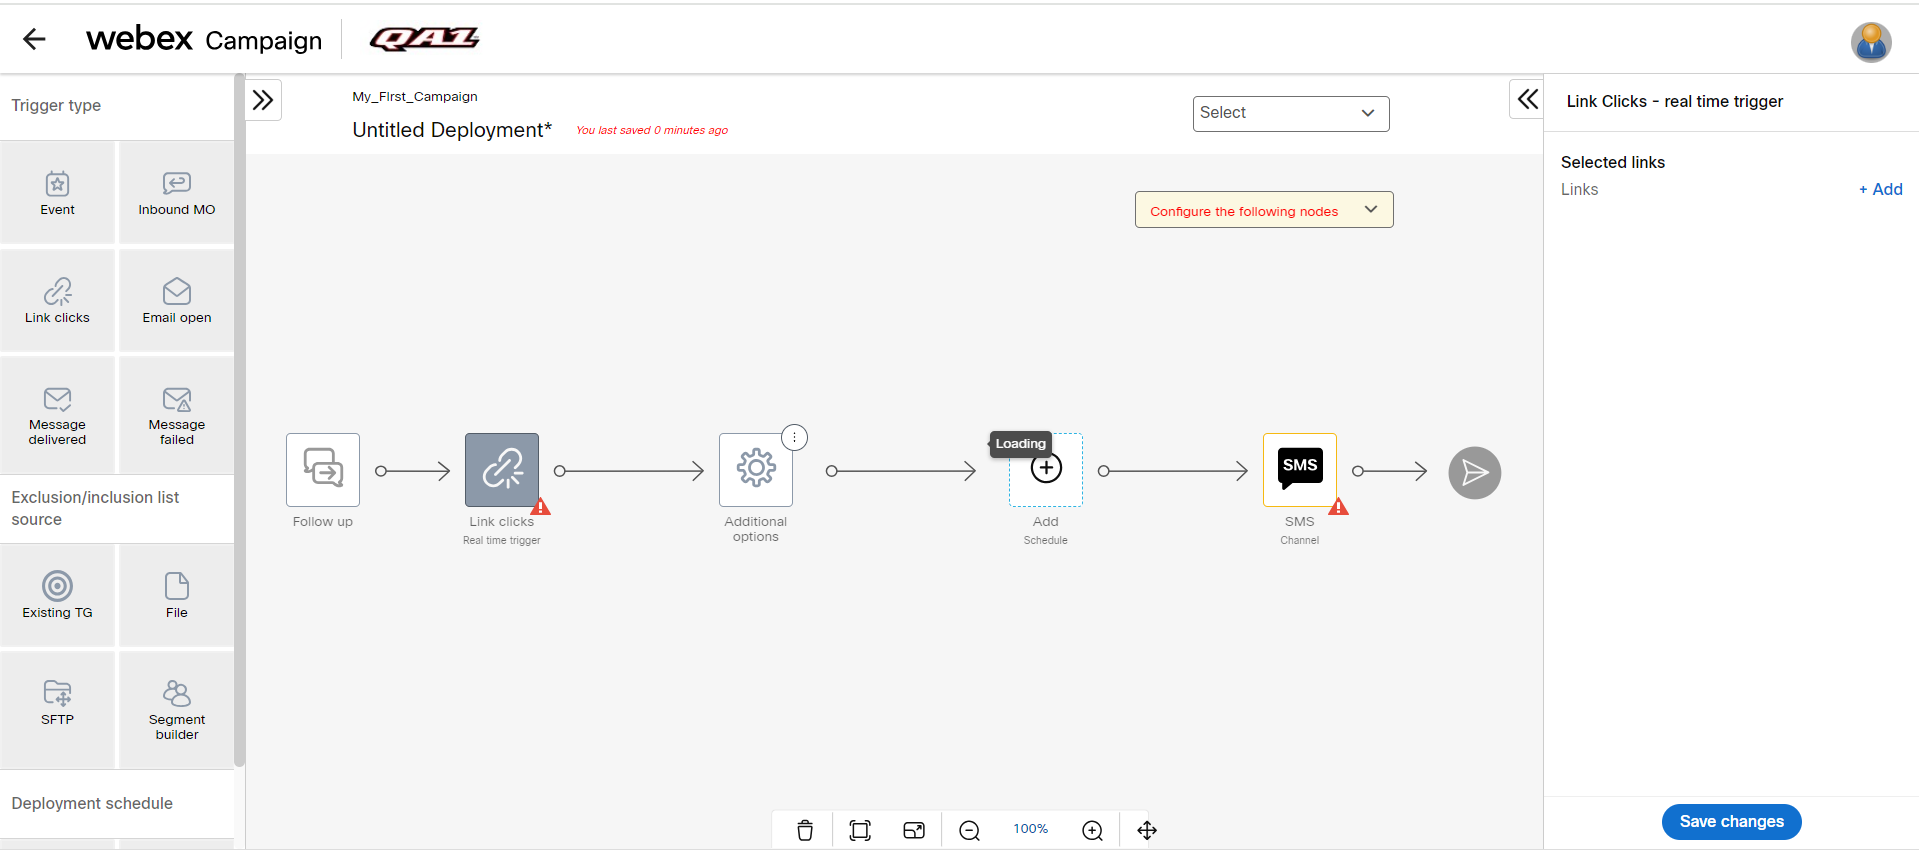
In this step, select a trigger so the SMS message will be sent to the customer as a ‘real-time follow-up’ when any of the below trigger actions happen with respect to the parent promotion email deployment for ANY of the customer who received the parent email deployment (depending on which has been chosen as a ‘trigger’ by the marketer for this follow-up deployment) :
The available triggers are:
- Event:: When a configured event occurs.
- Inbound MO: A message originates from the email recipient.
- Link clicks: A link within the email is clicked by the email recipient (This option appears when the follow-up channel is SMS and parent deployment channel is Email).
- Email open: The email is opened by the email recipient (This option appears when the follow-up channel is SMS and parent deployment channel is Email).
- Message delivered: The email is delivered to the recipient (This option appears when the follow-up channel is SMS and parent deployment channel is Email).
- Message failed: The email message fails to deliver (This option appears when the follow-up channel is SMS and parent deployment channel is Email).
- Drag-drop the Link clicks node onto the Real time trigger node. From the right panel click +Add . A popup screen is displayed with all the links available in the email of the parent deployment. Select a link to invoke this message (for example, Add to cart, Add to wish list, etc.).
There is no additional configuration needed when the trigger type is Email open, Message delivered, and Message failed.
Step 4: Create a Schedule
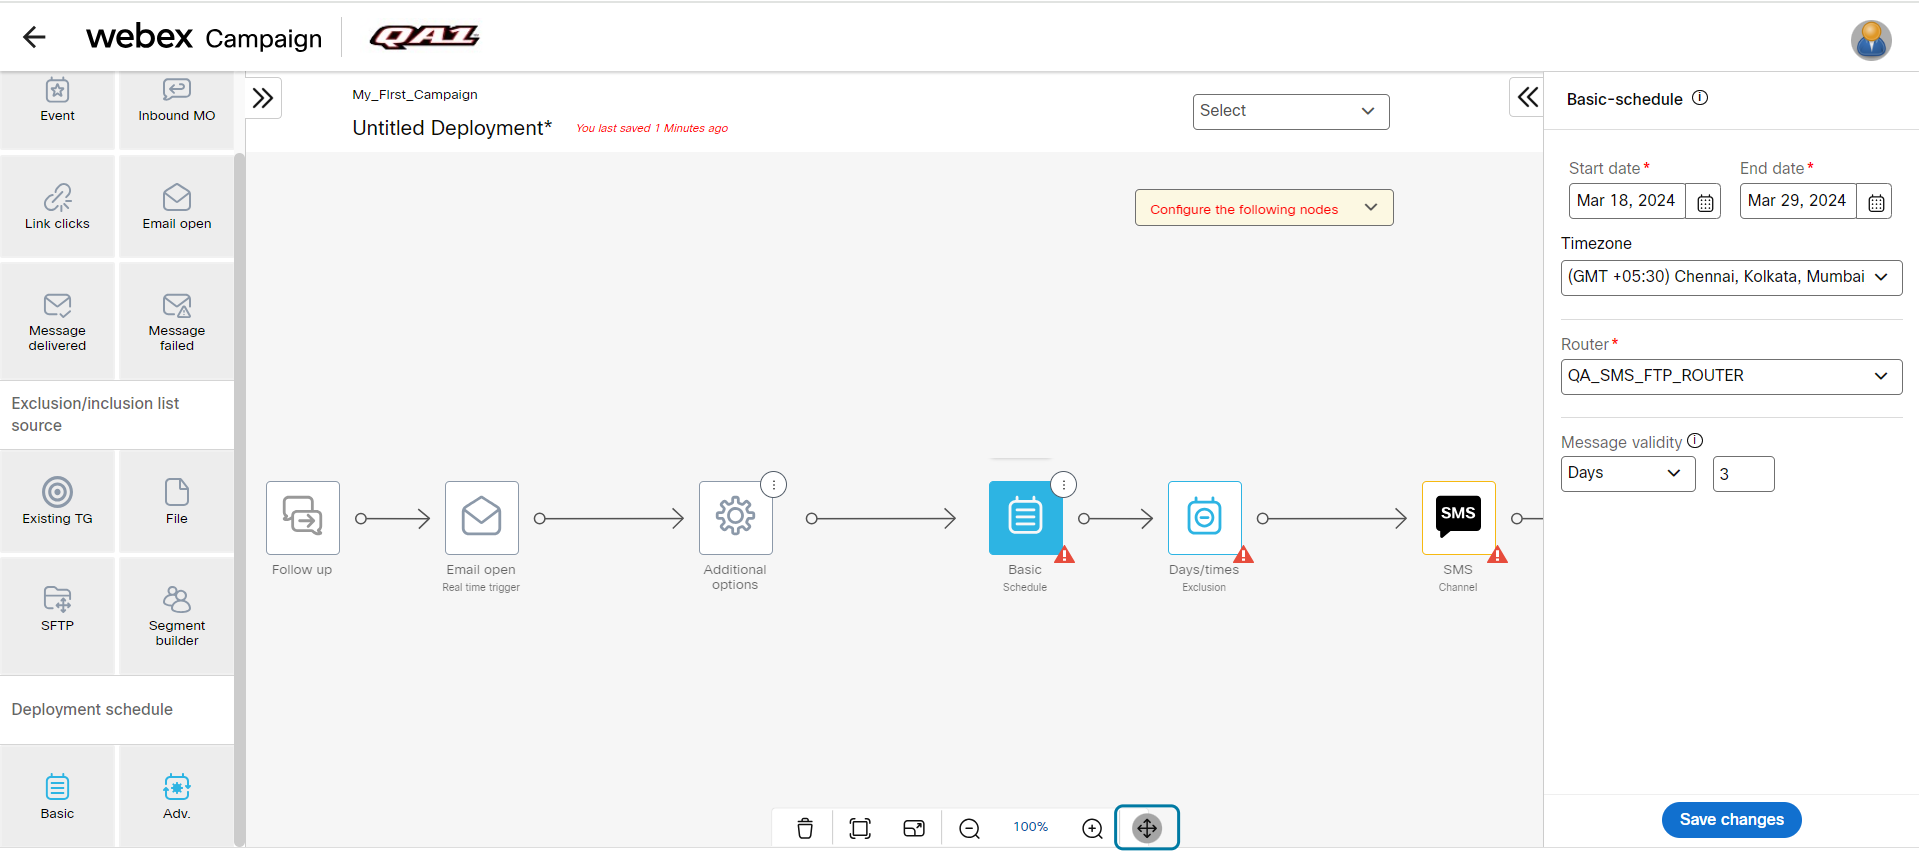
In this step, select a schedule for the deployment. For this tutorial, we will run the deployment Immediately as soon as the deployment is activated.
To configure the schedule:
- Drag and drop the Basic node onto the Schedule node.
- Select the Basic node. From the right panel, select Start date and End date.
- Select the Timezone and Router from the respective drop-downs. The router is predefined when the tenant is created
- Click Save changes.
Step 5: Configure Exclusion Day/Times
During the exclusion day or times, the deployment is paused temporarily and resumes once the exclusion day or time has lapsed. The exclusion day or time is set by the administrator that is applicable to all campaigns across the tenant. To add a custom exclusion day or time, configure this node.
For more information on exclusion days or times, go to Exclusion Days / times section.
For our tutorial, we will proceed with the default exclusion day or times. Select the Exclusion Days/ times node and click Save changes.
Step 6: Create Your Message
In this step, the content is configured. You can also add links and personalization to the content. We will proceed with a simple SMS message. To know more about SMS Content configuration, go to the SMS Channel Node section.
To configure the simple SMS content:
- Select the SMS node. From the right panel, select a Sender ID from the drop-down.
- Click + Add . The SMS content configuration screen appears.
- Configure your message and click Save SMS content.
- Click Save changes.
- (Optional) Click on the Preview and test to preview the deployment.
Now all the nodes are configured.
Step 7: Save the Deployment
In this step the deployment can be saved as a Draft or ready for Activation. Reporting Tags are mandatory to activate a deployment. If you are not sure of the Reporting Tags that should be used, you can save the deployment and come back later to select the Reporting Tags.
To save the deployment as ready for activation:
- Select Save & exit. The Save deployment screen appears.
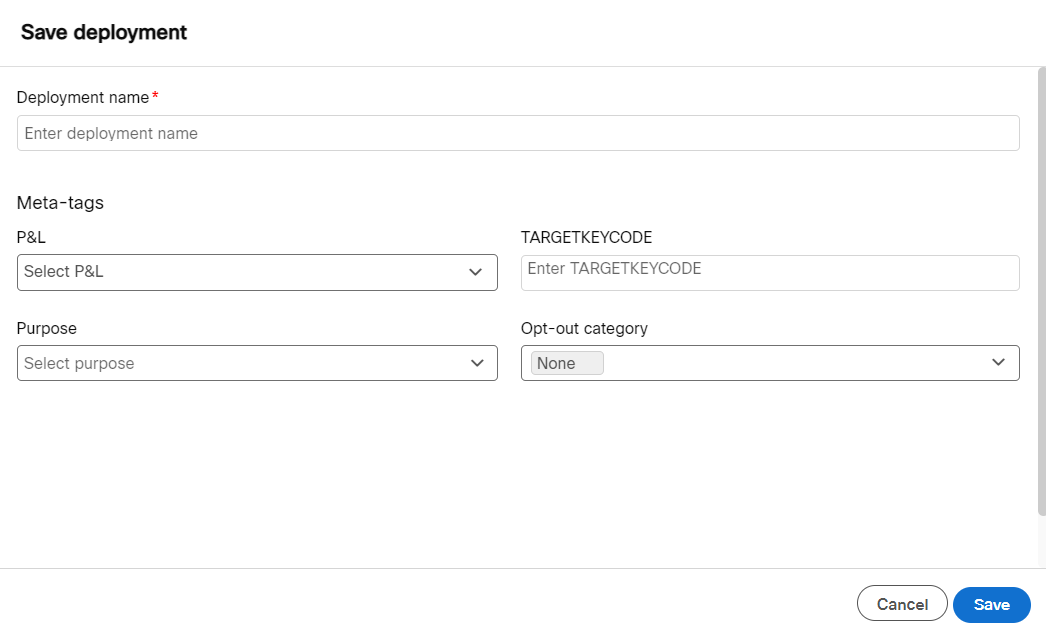
- Enter a name for the deployment such as My_First_Realtime_Deployment.
- Select a P&L to which you want to associate this deployment.
- Select one or more purposes from the Purpose drop-down.
- Click Save.
Now the deployment is ready for activation.
Step 8: Activate the Deployment
On the Campaign List screen, click the ellipses icon of the deployment and click Activate.
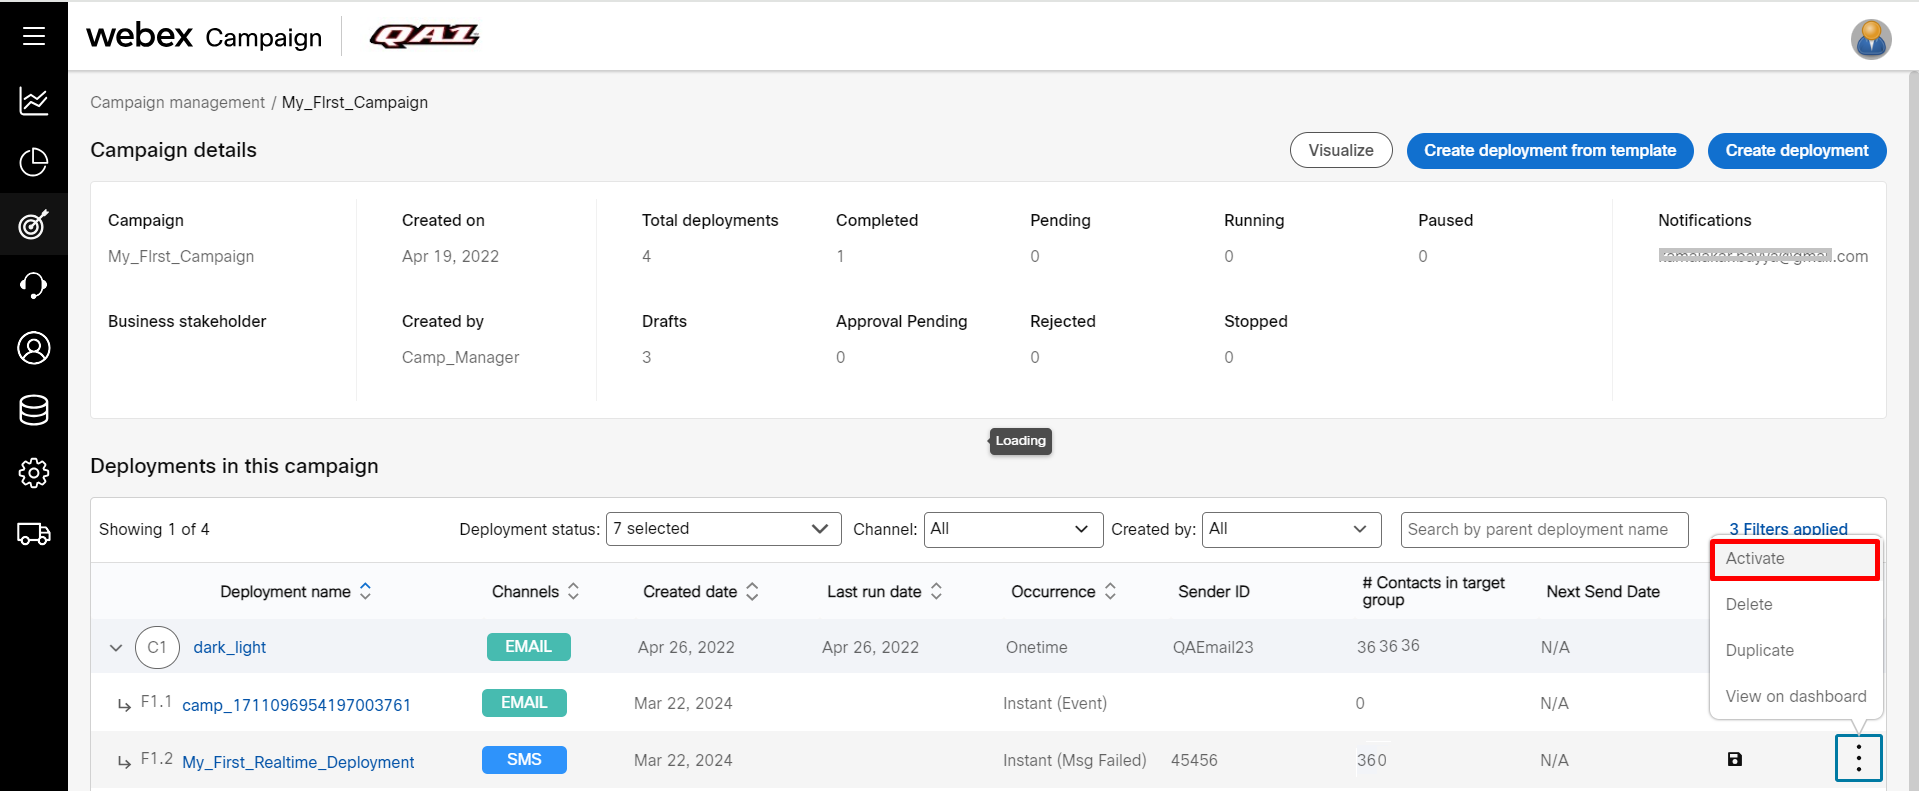
If the user does not have permission to approve their own created deployments, then instead of Activate button, you will notice Send for approval.
You can go to the Dashboard and Reports sections to view the performance of your deployment.
If you have questions, please contact your Webex Campaign account manager or Cisco Webex technical support team by phone or email:
- Europe / Middle East / Africa:
- Phone: +44 (0) 1494 750 600
- Email: [email protected]
- North America:
- Phone: +1-855-324-0970
- Email: [email protected]
Updated 7 months ago