

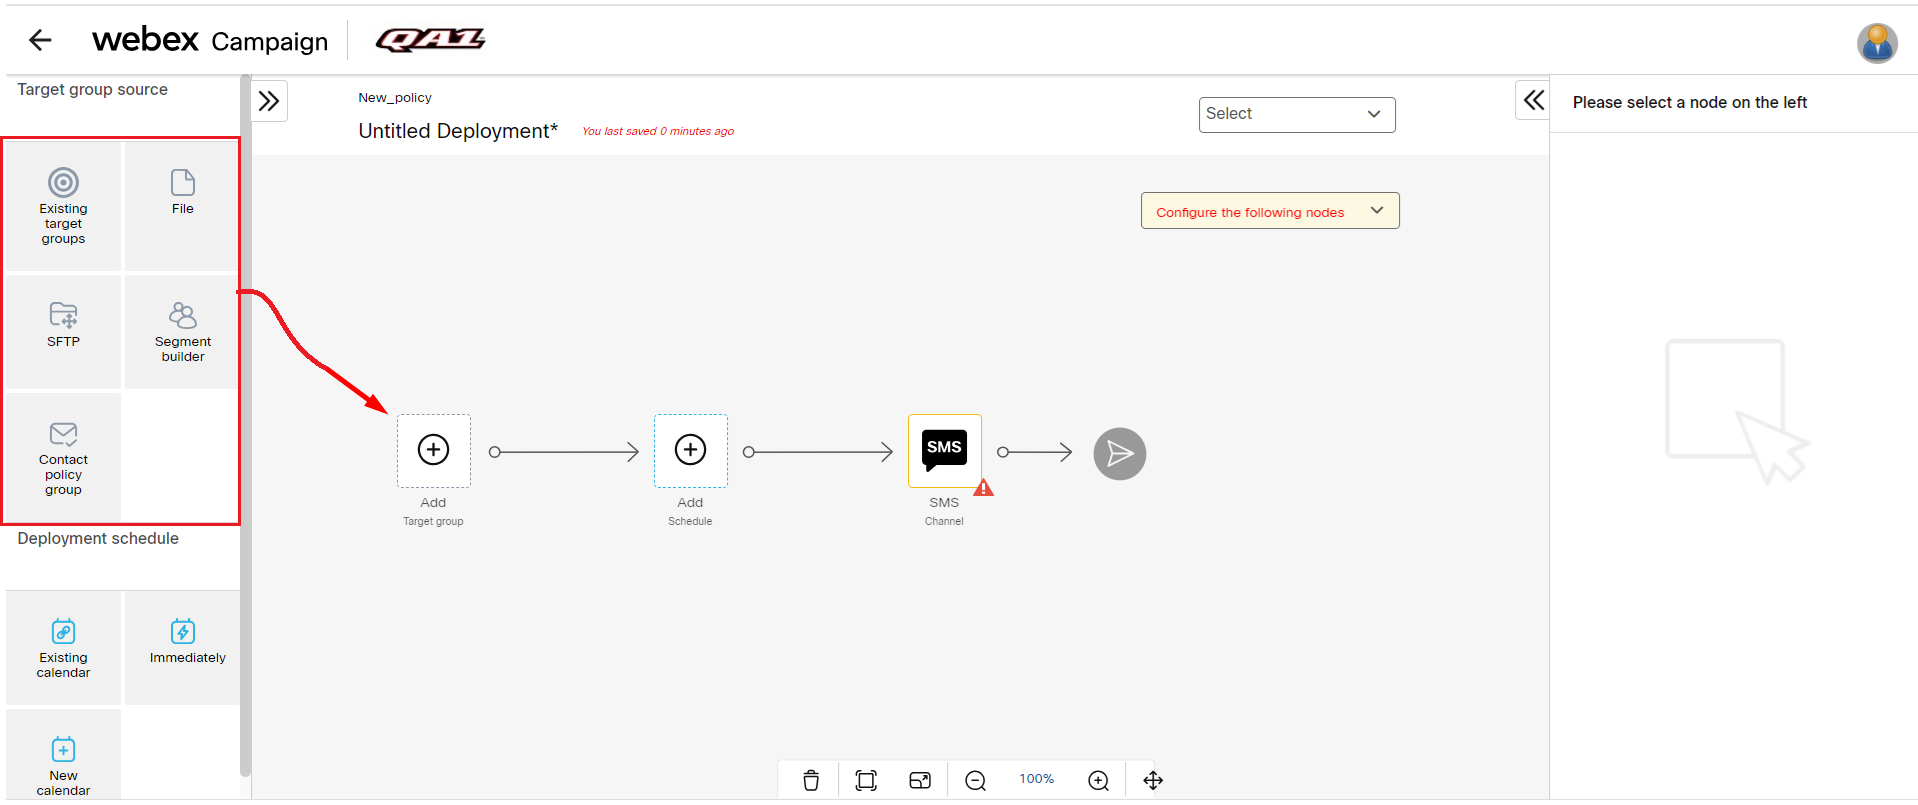
Target Group Source Nodes
The Target Group node will appear as an empty placeholder. A target group can be created from various sources, such as an existing Target Group or by creating a new target group. To do this, drag and drop one of the 'Target Group source' node onto the grey-colored 'Add Target Group' placeholder. After selecting the node, you can configure the Target Group using the right-side panel.
Existing TG
This node allows you to use an already created target group in the deployment.

You can use the search option and channels to filter the previously created target group. On selecting the target group, click Save and proceed. The right-side panel will display additional options for the selected Target Group. You can:
- view the headers of the selected Target Group.
- view the encrypted headers of the Target Group.
- view the mandatory headers of the selected Target Group.
It will also display the complete target group count with valid and error counts that are excluded from the target group. You can also download the valid target group.

File
This node allows you to import a new target from a text file.

Follow these steps to import a new target group from a text file:
- In the deployment creator screen, after adding the File node onto the Target Group placeholder node, click + Add.
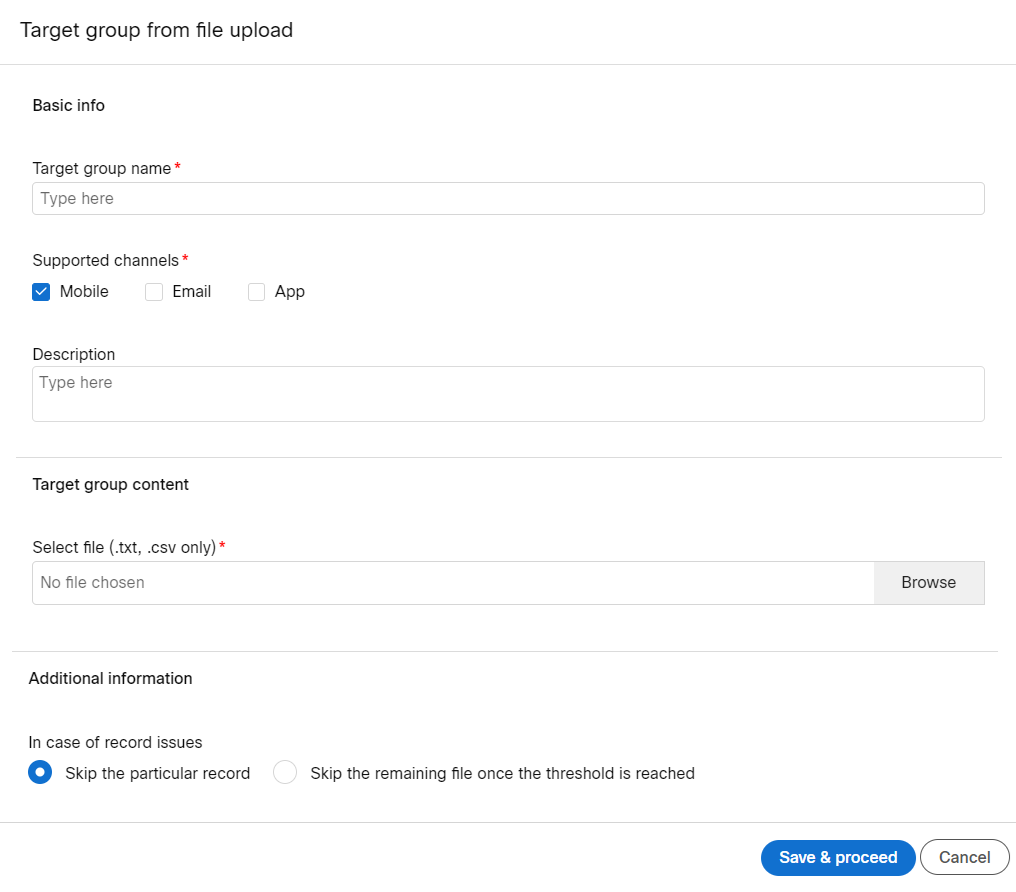
- Enter details for the following fields:
- Target Group Name: Enter a name for the target group.
- Supported Channels: Select the required channels that you want to use this target group. For example, if you select SMS, then the target group can only be used for SMS deployment and MSISDN should be present in the imported text file.
- Description : Enter a description for the target group.
- Browse: Click Browse and select the text file.
- Skip the particular record: Select this option to skip the record that has an issue.
- Skip the remaining file once the threshold is reached: Select this option and enter a threshold to skip the file once the threshold is reached. You can enter the threshold value in absolute records or in the percentage of the records in the file.
- Click Save and Proceed. The right-side panel will display additional options for the imported Target Group.
- (Optonal) Click Headers Encryption. The headers from the target group are displayed. You can enable or disable the encryption of the headers as required. The PII data headers like EMAIL, MSISDN, and CUSTOMERID are encrypted by default.
- (Optonal) Click Headers Validation. This feature is applicable for Promotions for TGs whose source is either ‘File’ or ‘SFTP’. In the example screenshot below, the mandatory channel for Email channel is ‘Email’. Therefore, ‘EMAIL’ header is automatically marked as ‘mandatory’. In addition to the default-mandatory header, you can specify any other headers within the file as ‘mandatory’.
If a contact record within the TG file(s) has values unspecified for these mandatory TG headers, then that contact record will be rejected. Contact records which fail the mandatory header validation will be available to be downloaded as ‘Errors’ for further investigation.

- Click Save to save the node configuration.
SFTP
This node allows you to import a new target from an SFTP location.

Follow these steps to import a new target group from an SFTP location:
- In the deployment creator screen, after adding the SFTP node onto the Target Group placeholder node, click +Add.
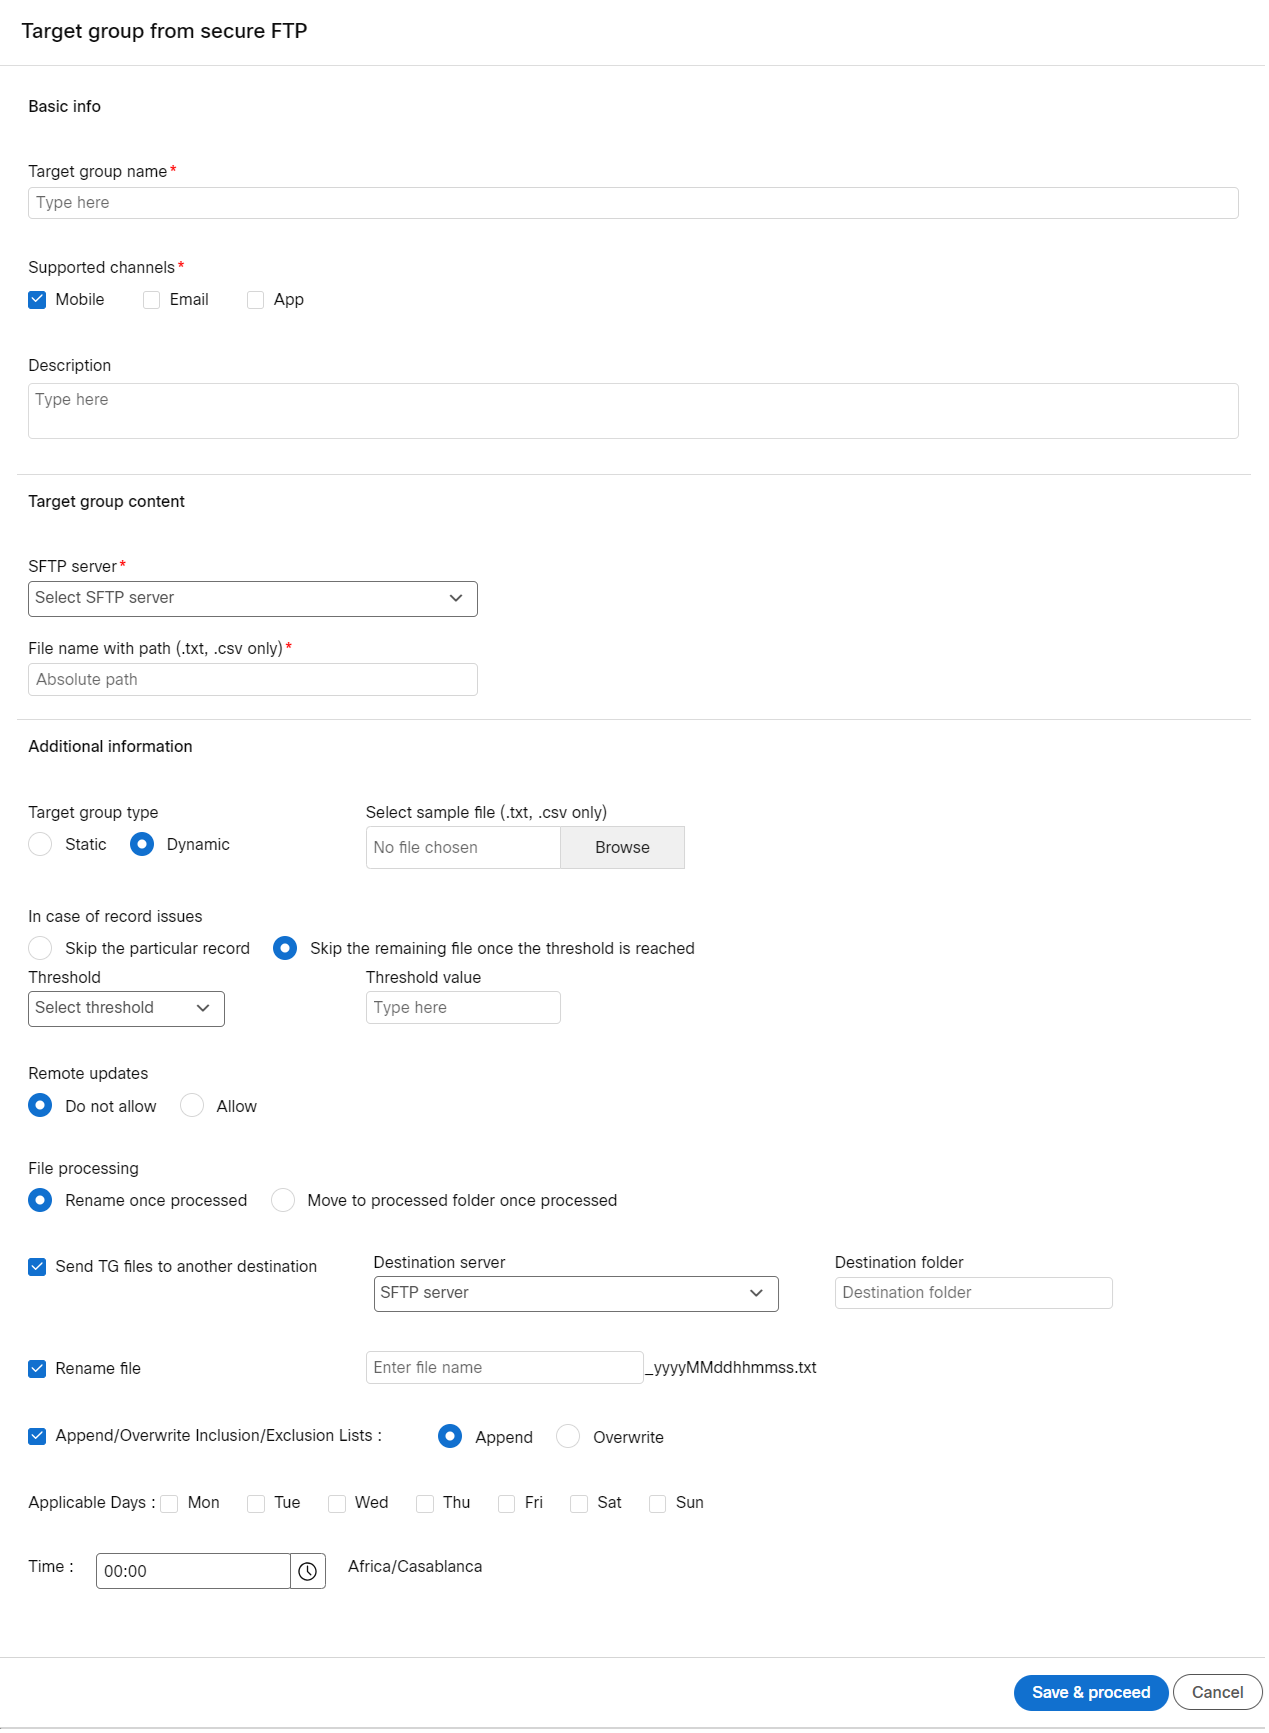
- Enter details for the following fields:
- Target Group Name: Enter a name for the target group.
- Supported Channels: Select the required channels that you want to use this target group. For example, if you select SMS, then the target group can only be used for SMS deployment and MSISDN should be present in the imported text file.
- Description: Enter a description for the target group.
- SFTP Server: Select the SFTP Server from the dropdown.
- Select File (.txtonly) : Enter the file path. If there is a possibility that the file name would be appended with numbers, date format etc, please add "" at the end of the file name. For example, File_name__.txt picks up File_name_01012015.txt as well as File_name_02022015.txt if both are present in the SFTP folder. You can add a date format expression such as $(ddMMyyyy).txt to only pick up files with today’s date. For example, File_name$(ddMMyyyy).txt. The filename is case-sensitive.
- Target Group Type: Select the target group type as Static.
- Skip the particular record: Select this option to Ignore invalid contacts and continue loading the file.
- Skip the remaining file once the threshold is reached: Select this option and enter a threshold to skip the file once the threshold is reached. You can enter the Threshold Value in absolute records or in the percentage of the records in the file.
The below options are applicable if the target group type is selected as Dynamic.
-
Select Sample File: Click Browse and select a sample file.
-
Remote Updates: Select Allow if you want to allow remote updates.
-
File Processing: If the file is processed, you can configure options to rename and move the processed files to another location.
-
Rename Once Processed: Select this option if you want to rename the files but do not want to move the files to another location.
-
Move to Processed folder once processed: Select this option to move the processed files to another location and configure the location.
-
Send TG file(s) to another destination: Select the checkbox and configure the destination server and location.
- Destination Server: Select the destination server from the drop-down.
- Destination Folder: Select the destination folder.
-
Rename: To rename a file, select the checkbox and enter the file name pattern.
-
Append/Overwrite Inclusion/Exclusion Lists : This option is displayed only when you add an Inclusion or Exclusion list using the SFTP option for an instant deployment. Select the checkbox to append or overwrite the Inclusion or Exclusion list. You can also configure the applicable days and time
Segment Builder
This node allows you to create a new target from a datastore or profile or campaign data.

The steps to create a Segment from a Node and creating a Segment from Profile > Segment are the same.
Follow these steps to create a new target group from Segment Builder:
- In the deployment creator screen, after adding the Segment Buildernode onto the Target Group placeholder node, click +Add.
- Enter a name and description of the segment. Click Next.
Refer Create New Segment section for next steps.

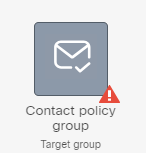
Contact policy group
This node allows you to use a ‘Contact Policy Allow List’ as a Target Group Source while configuring an SMS promotion deployment.
To use this node integration of Webex Campaign with Webex Connect's 'Contact Policy’ module is mandatory. Please contact your account manager.
It is useful for clients:
a) who use both Webex Campaign and Webex Connect for their various marketing and non-marketing use cases and
b) who use the optional module within Webex Connect called ‘Contact Policy’ to store and manage their customers’ opt-in and opt-out preferences for receiving communications via specific channels.
This feature is currently only available:
a) for SMS channel ‘simple promotion’ type deployments and
b) for clients who use Webex Connect as their SMS channel gateway.
Pre-requisites for using this feature:
a) You will need to have a valid tenant on Webex Connect.
b) You will need to have enabled the usage of the optional ‘Contact Policy’ module within your Webex Connect tenant.
c) You will need to have created at least one ‘Consent Group’ with a Group Category of ‘Allow List’. This ‘Allow List’ will have the mobile numbers (MSISDNs) of your customers who have opted in to receive communications from you via the SMS channel. Within ‘Contact Policy’, SMS channel is referred to as ‘Text’ channel.
d) You will need to request the Webex CPaaS Tech Support team to associate your Webex Campaign tenant with the corresponding Webex Connect tenant.
e) As this is a tenant-specific feature, you will need to request the Webex CPaaS Tech Support team to enable the ‘Contact Policy Integration’ feature on the Webex Campaign Admin Console.
How ‘Contact Policy Allow Lists’ data will be available to use within Webex Campaign:
a) As part of this integration with the ‘Contact Policy’ module, every morning once a day at approximately 5 am system time, Webex Campaign will automatically retrieve all the SMS opt-in records from all the ‘Allow Lists’ from your Webex Connect tenant’s Contact Policy module.
b) Only the ‘Allow Lists’ will be retrieved into Webex Campaign. i.e. ‘Deny Lists’ will not be retrieved.
c) Only those records from ‘Allow Lists’ will be retrieved into Webex Campaign which match the following criteria: ‘Channel’ = ‘text’ and ‘Consent’ = ‘true’.
d) These ‘Allow Lists’ will be fully flushed and reloaded every morning.
e) If an ‘Allow List’ has been disabled in the ‘Contact Policy’ module during the day (after it has been retrieved into Webex Campaign at 5 am), then during next morning’s refresh, this ‘Allow List’ will not be retrieved into Webex Campaign.
f). We have introduced a new screen to display the information about the ‘Contact policy groups’ which have been retrieved from your Webex Connect Contact Policy module. This screen is available here: Campaigns >> Target data >> Contact policy groups.
g) Any user whose role has the permission to view the ‘Target groups’ screen will also be able to view this new ‘Contact policy groups’ screen.
h) As these ‘Contact policy groups’ are system-created, they will always be visible to eligible users irrespective of which ‘User Group’ the user is currently in.
i) The ‘Last updated’ column in the above screen will show the date and time each ‘Allow List’ was refreshed within Webex Campaign. In production environments, the timestamp should be between 5 am and 5:30 am on each day.
j) The following 10 header values for each opt-in consent record will be retrieved from ‘Contact Policy’ into Webex Campaign:
i. MSISDN (while importing into Webex Campaign, the leading ‘+’ sign will be removed)
ii. CHANNEL (this value will always be ‘text’)
iii. GROUPID
iv. CONSENT (this value will always be ‘true’)
v. EXPIRES (this is the date/time when the customer’s opt-in consent expires)
vi. LASTUPDATED (this is when the opt-in record within ‘Contact Policy’ was last updated)
vii. REASON
viii. KEYWORD
ix. CAMPAIGN (this is different from what a ‘Campaign’ means in Webex Campaign)
x. SOURCE
k) This means if you use a ‘Contact policy group’ as a ‘TG Source’ within a deployment, then only these 10 headers can be used for personalization and conditional content logic.
How to use this feature (i.e. use a ‘Contact Policy Allow List’ as a Target Group Source while configuring an SMS promotion deployment):
a) When creating an SMS Promotion deployment, on the left side of the deployment canvas, you will now see a new node for ‘Contact policy group’ as a Target Group Source. You will need to drag and drop this node on to the blank Target group placeholder in the central canvas.
b) Next, you will need to click on the ‘Add’ link on the right-side node properties panel to select one of the allow lists. These allow lists would have been retrieved in the morning into Webex Campaign from your Webex Connect Contact Policy module.
c) Next, you will need to save the ‘Contact policy group’ node. Next, you will need to configure the schedule and SMS content nodes as usual; then save the deployment and activate it as usual.
d) As mentioned above, the ‘Allow lists’ are retrieved into Webex Campaign from your Webex Connect Contact Policy module by approximately 5:15 am every day. Therefore, when you activate the above deployment, messages will be sent only to those MSISDNs which were present in the allow list (i.e. opted-in) as of ~5:15 am that morning. So any new MSISDNs opted-in (and added to the ‘Allow list’) after 5:15 am, will not be part of this deployment’s target group today.
e) On the other hand, any MSISDNs which have opted-out of the ‘Allow list’ after ~5:15 am in the morning, will still be part of this deployment’s initial target group. However, before every message is pushed to the mobile operators’ SMS networks, Webex Connect will check against the specified ‘Allow list’ that the MSISDN’s CONSENT value is still ‘true’ and the value of the ‘EXPIRES’ field is still in the future. Thus, Webex Connect will automatically suppress the messages to those MSISDNs which have opted out since ~5:15 am in the morning.
Usage notes:
a) You cannot use more than one ‘Contact Policy allow list’ as a Target group source within a deployment; nor can you mix this TG source with any other type of TG source.
b) Webex Campaign will retrieve only ‘allow lists’ from your Webex Connect Contact Policy; i.e. You cannot use a ‘deny list’ as a Target group source.
c) You can use ‘Contact policy allow lists’ only within simple SMS Promotion deployments, i.e. Follow-up and A/B promotion deployments are out of scope for this feature. Similarly, instant deployments are out of scope for this feature.
d) If, due to some unforeseen reason, there is some problem in the early morning retrieval of the ‘Contact Policy Allow List’ into Webex Campaign, then:
a. the status will be changed to ‘Paused’ for any one-time (non-recurring) deployments which are using an ‘allow list’ as a Target group source, and
b. the status will be changed to ‘Pending’ for any recurring deployments which are using an ‘allow list’ as a Target group source. This scenario is conceptually similar to a ‘file missing from SFTP’ scenario when the TG source for a recurring deployment is SFTP. In this scenario, the deployment-creator will receive an email notification alert.
Updated 8 months ago