

Creating an Email Deployment
In this tutorial, you’ll learn how to create and run an Email deployment.
To create an Email deployment, there are some prerequisites that need to be completed. If your username is assigned with an admin role, then you can complete all the steps to create a deployment. If your username is assigned to a role that has limited permissions, then you can create a deployment and send it for approval. Upon approval, the deployment can be activated.
Prerequisites for an Email deployment:
- Access to the Campaign Management section
- A Campaign
- A Target Data for Email Channel
- A Test Contact with Email as a header
- A message template created using Drag-and-drop Email Composer or HTML Editor.
- A Sender ID
- A Purpose
- A P&L
Step 1: Create a Deployment
A deployment is a set of instructions to process a campaign under the parent campaign.
To create a deployment:
- Navigate to Campaign Management > Campaign List screen and click on the campaign in which you want to create a deployment.

- Click Create deployment on the Campaign Summary screen that appears. The campaign summary screen will display the status of all the deployments of the campaign. For more information on creating a deployment, go to the Creating a Deployment section.

- Select the Deployment Type as Promotion.
- Select the type of promotion as Simple promotion, mode of deployment as One time , and content type as Message.
- Select the channel as Email and click Create.
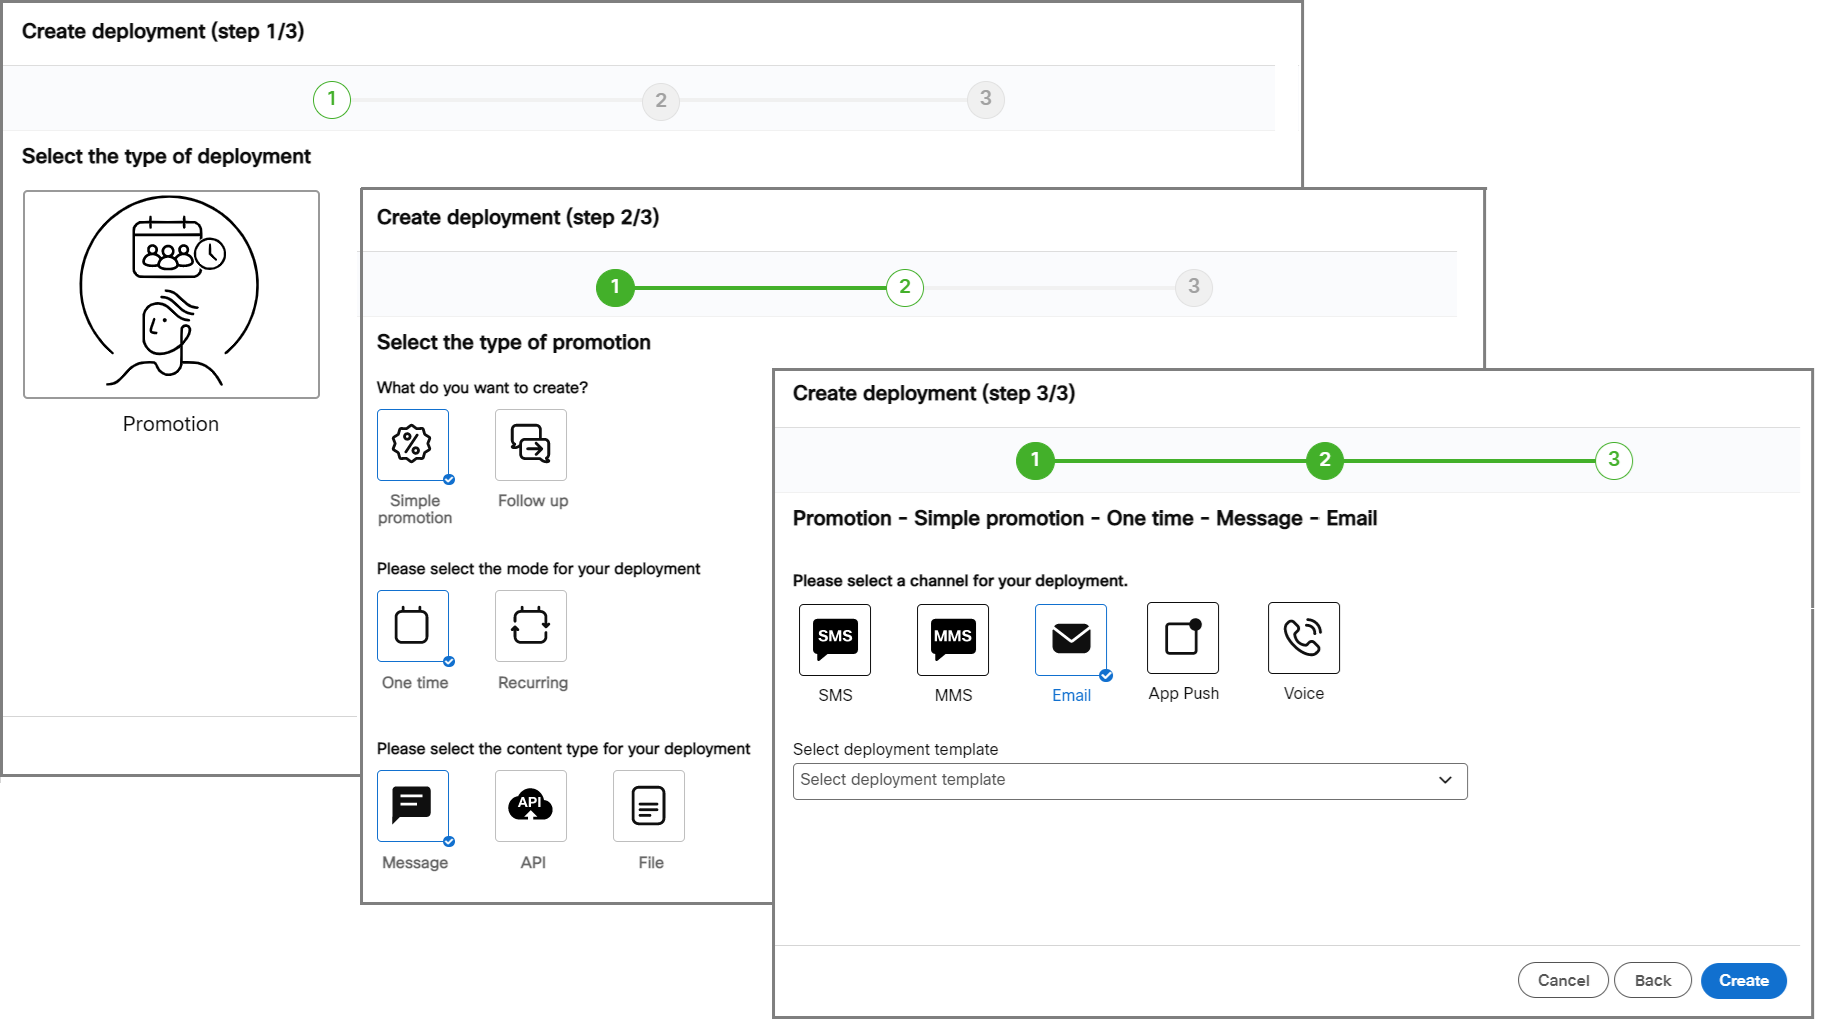
- The Deployment creation screen appears.

You have to configure each node in the deployment creation screen. The left panel will display different nodes that can be used to configure a node, The nodes are grouped based on their usage. On selecting a node the right panel will display the configuration options.
Step 2: Choose Your Recipients
In this step, the recipients of the deployment are selected. As mentioned in the prerequisites, a target group should already be uploaded to the Webex Campaign.
To select the recipients of the deployment:
- From the Target group source , drag and drop the Existing TG node onto the Target Group placeholder. We have chosen the Existing TG node because the target group is already uploaded as a prerequisite. For more information on adding a target group from different nodes, go to the Target Group Source Nodes section.

- Select the Existing TG node and click + Add from the right panel.
- Select the target group that was uploaded. In our case, it is My_First_Target_Group.
- Click Save & proceed to close the target group screen.
- Click Save changes.
Now the recipients are successfully configured for the deployment.
(Optional) Additional options Node
In this step, you can configure additional options for the target group such as applying an opt-out list, removing duplicates, applying contact frequency rules, and limiting the number of contacts in the target group.
To configure the options, select the Additional options node and configure the required option from the right pane:
- Exclude contacts from all opt-out lists: Enable this option to exclude contacts from all opt-out lists such as Tenant level, channel level, and category level.
- Apply contact frequency rule: Enable this option to control the maximum number of messages sent out to contacts depending on the channel and message purpose for a defined time window.
- Remove duplicates: Enable this option to remove duplicate mobile numbers from the Target Group.
- Limit the number of contacts: Enable this option to limit the number of contacts of the target group based on an absolute number of contacts or a percentage of contacts.

Step 3: Create a Schedule
In this step, you can send your deployment immediately, or create a schedule (a date and a time) to run the deployment in the future. For this tutorial, we will run the deployment Immediately as soon as the deployment is activated.
To configure the schedule:
- Drag and drop the Immediately node onto the Schedule node.
- Select the Schedule node. From the right panel, enter details for the following fields:
- Router: Select the router from the drop-down. This is predefined when the tenant is created.
- TPS: When a tenant is set up, based on the requirement the routers can be pre-configured with different TPS limits. When you want to push a large TG, you can use a router that has more TPS and enter a TPS for the deployment. The higher the TPS the quicker the deployment execution.
The TPS should not exceed the maximum allowed TPS for the selected router.
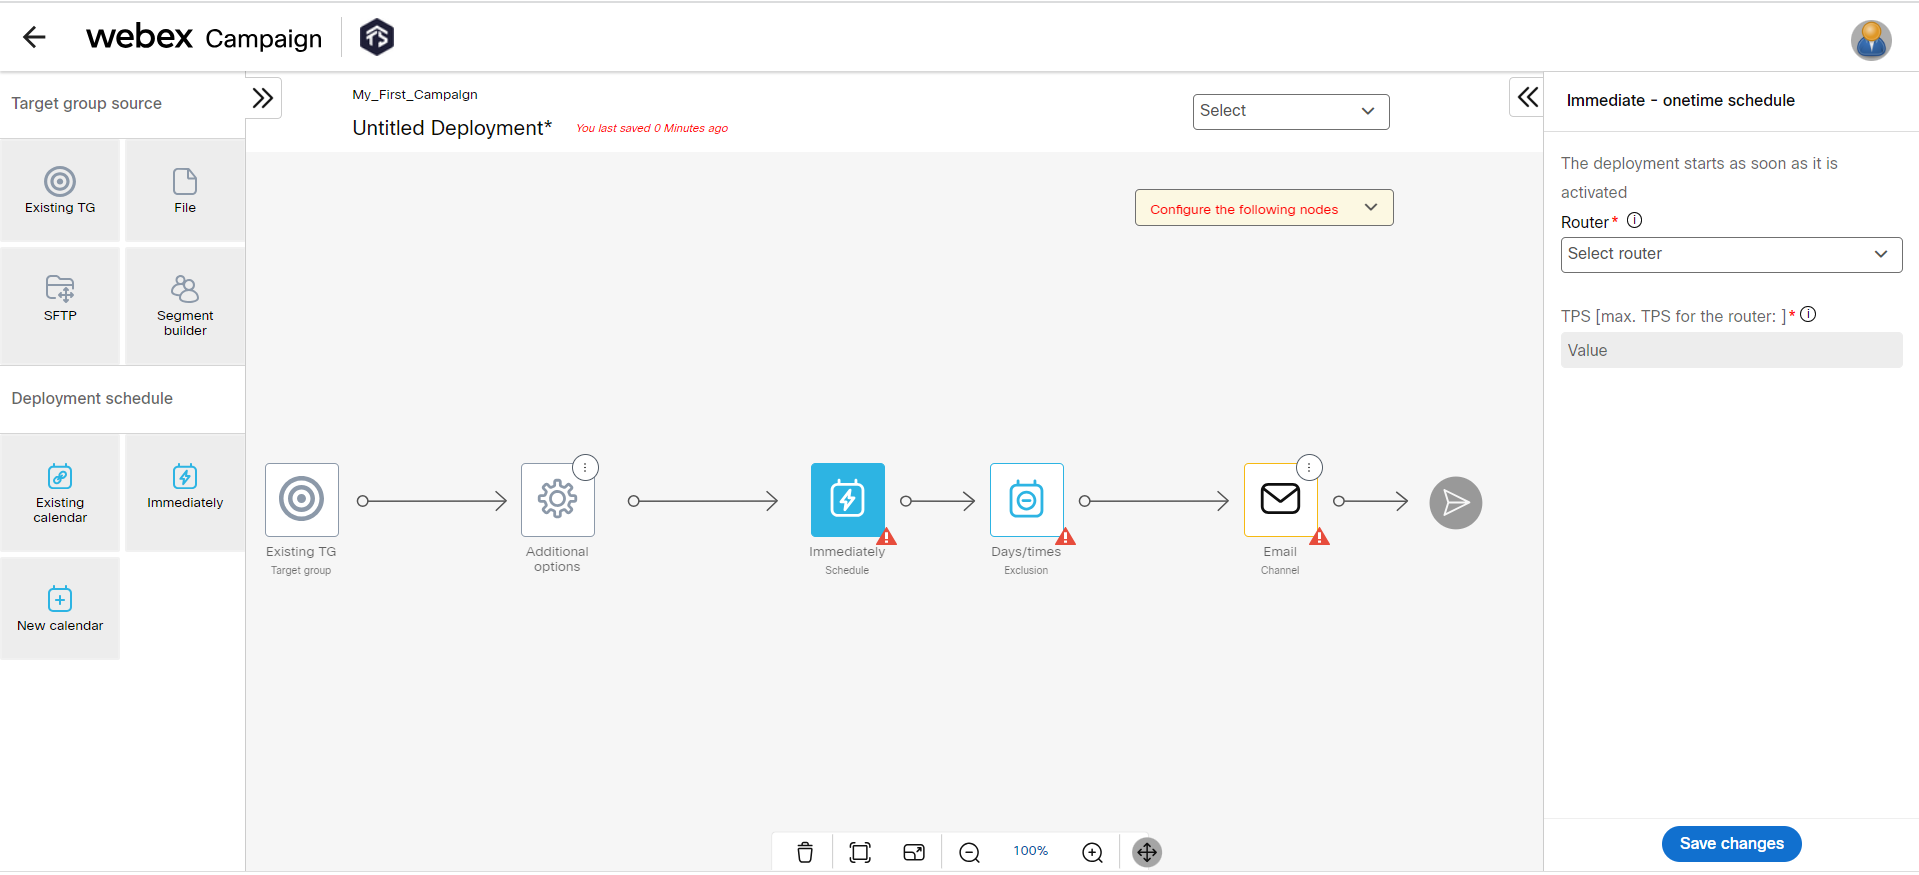
- Click Save changes.
Step 4: Configure Exclusion Day/Times
During the exclusion day or times, the deployment is paused temporarily and resumes once the exclusion day or time has lapsed. The exclusion day or time is set by the administrator and applies to all deployments under the tenant. To add a custom exclusion day or time, configure this node.
For more information on exclusion days or times, go to Exclusion days / times section.
For our tutorial, we will proceed with the default exclusion day or times. Select the Exclusion days/ times node and click Save changes.

Now the schedule is successfully configured for the deployment.
Step 5: Create Your Message
In this step, the content is configured. You can also add links and personalization to the content. We will proceed with a simple Email message. To know more about Email Content configuration, go to Email Channel Node section.
To configure the simple Email content:
- Select the Email node. From the right panel, click + Add . The Email content configuration screen appears.
- Click Choose from template and select a template from the Email Template list screen.
For this tutorial, I have already created a template with the name "My_First_Email_Template". - Click Confirm.

- Enter the Email subject as "Welcome to Webex Campaign. This is my first Email." and click Save & proceed.
- (Optional) Click on the Preview and test to preview the deployment. For more information, go to the Preview and test section.
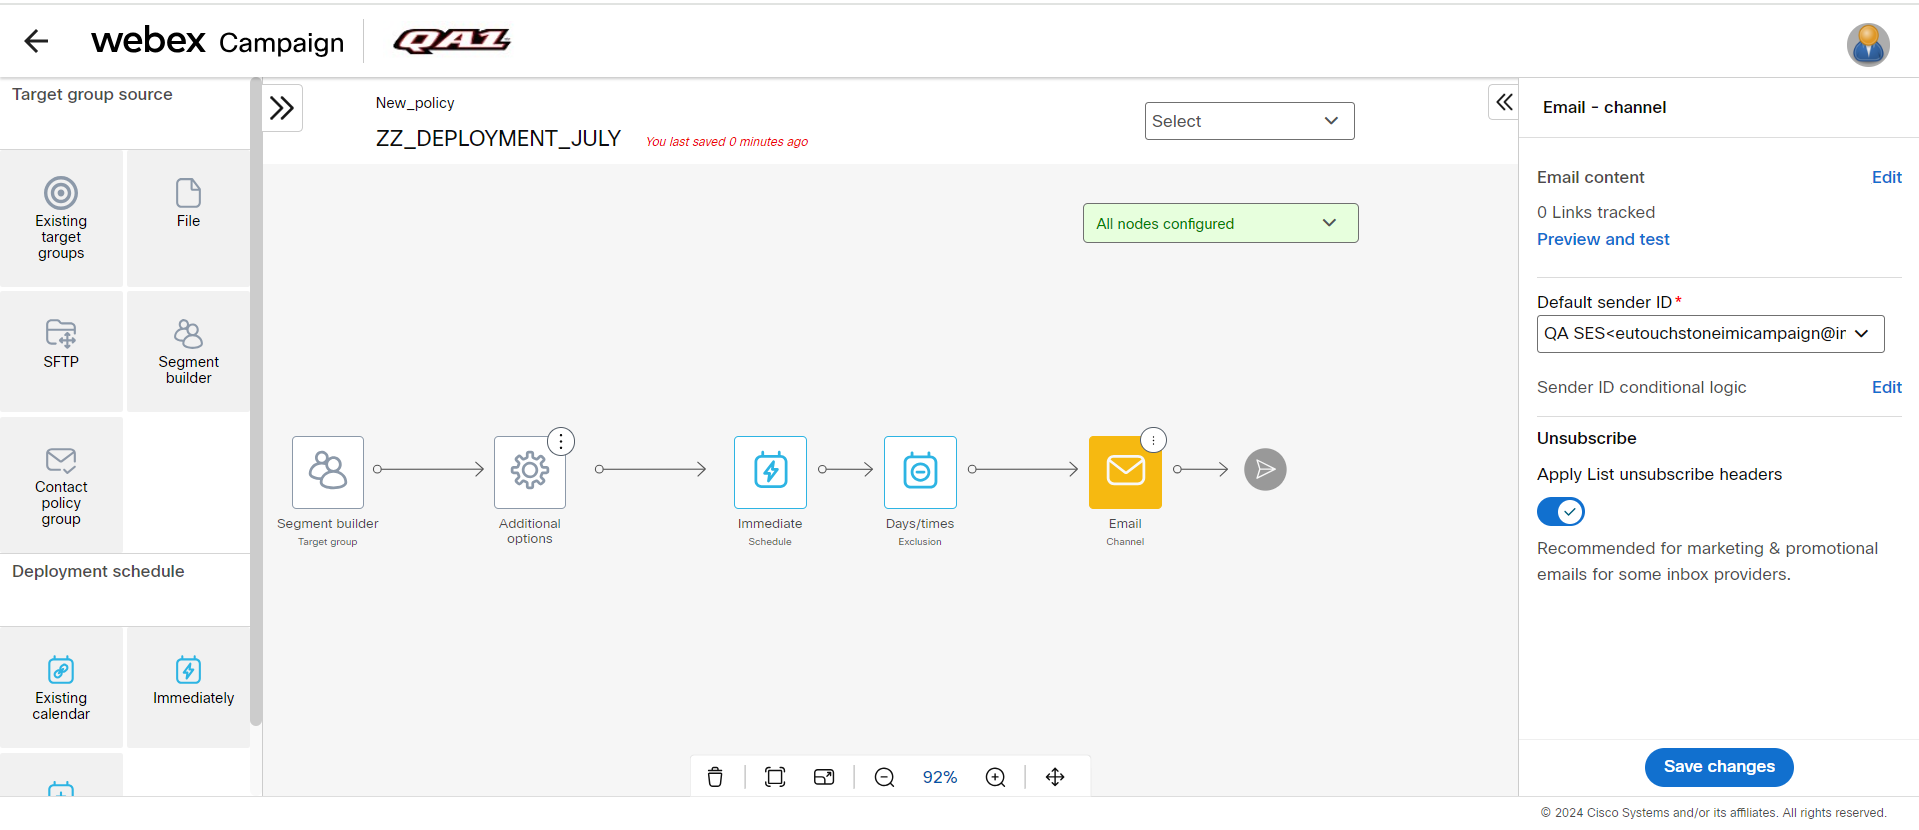
- Select a Default sender ID from the drop-down.
- By default, the List unsubscribe headers is enabled for all outbound emails. This will display an 'Unsubscribe' link (known as 'list unsubscribe') at the top of emails when the email recipients open their emails sent by you in their Gmail and Yahoo-Mail inboxes. However, if you believe that a specific email communication can be categorized as more of a service communication rather than a marketing or promotional communication, then you can disable this toggle.
This feature is applicable only for the following types of campaign deployments:- Simple promotions
- Follow-up promotions
- Instant deployments (triggered by invoking our Event API
With this feature, you can reduce any risks of non-compliance regarding your customers' email opt-out preferences because you no longer have to remember to select any opt-out category while activating the deployment.
Usage notes:
- This feature does not apply to 'sender-ID-based’ email A/B deployments (where each variant has a different sender-ID). This means that for a ‘sender-ID-based’ A/B deployment, during the deployment's ‘TG Prep’ process, all the emails in the TG will be scrubbed against the ‘global- level’, ‘email-channel-level’, and ‘category-level’ opt-out lists.
- If the ‘Conditional Sender ID' feature is used within a deployment, the scrubbing will be performed against the ‘sender-ID-level’ opt-out list corresponding to the ‘default sender-ID’.
- You cannot use this unsubscribe link in the content on your own. It has to be used enabled or disabled in the Email node.
- Click Save changes.
UTM TAGS: when sending a test email from the Preview screen, the value for 'Campaign Name' parameter in UTM tags will always be 'TestCampaignGroup'.
Now all the nodes are configured.
Step 6: Save the Deployment
In this step, the deployment can be saved as a Draft or ready for Activation. The Deployment meta tags are mandatory to activate a deployment. If you are not sure of the Deployment meta tags that should be used, you can save the deployment and come back later to select the Deployment meta tags.
To save the deployment as ready for activation:
- Select Save & exit. The Save deployment screen appears.

- Enter a name for the deployment such as My_First_Deployment.
- Select a P&L to which you want to associate this deployment.
- Select one or more purposes from the Purpose drop-down.
- Click Save.
Now the deployment is ready for activation.
Step 7: Activate the Deployment
On the Campaign List screen, click the ellipses icon of the deployment and click Activate. You will receive notifications for various stages of the deployment.

If the user does not have permission to approve their own created deployments, then instead of Activate button, you will notice Send for approval.
You can go to the Dashboard section to view the performance of your deployment.

If you have questions, please contact your Webex Campaign account manager or Cisco Webex technical support team by phone or email:
- Europe / Middle East / Africa:
- Phone: +44 (0) 1494 750 600
- Email: [email protected]
- North America:
- Phone: +1-855-324-0970
- Email: [email protected]
Updated over 1 year ago