

Creating Recurring Deployments
What Are Recurring Deployments?
In Webex Campaign, recurring deployments are the deployments that are created once and continue to run as per the schedule daily, weekly, or monthly until you stop them. A recurring deployment can be scheduled to run for 2 years.
When to use a Recurring Deployment?
A Recurring Deployment is useful when the content is constant and the target contacts are dynamic. That means the same content is sent to different contacts as per the schedule. You can create a recurring deployment in such a way that the target group is picked up from an SFTP location before the schedule.
A recurring deployment will look for a Target Group file an hour before the start time and then every 30 minutes up until 30 minutes before the end time. If the deployment is unable to locate the target group file at that point, the deployment declares it could not find the file and stops. Then you can use the Deploy Now option to manually send if the Target Group data becomes available.
If you want your Target Group to be picked up more than once a day, then you have to set up multiple rows in the calendar. For example., 9:00-9:45, 10:00-10:45, and 11:00-11:45. After 11:45, it sets the next process time for the next day. If more than one file is found in the SFTP location, those files will be merged and picked up for processing.
For more information on how to use the Deploy Now option, click deploying recurring deployments immediately using deploy now.
How to Create a Recurring Deployment?
Follow these steps to create a Recurring Deployment:
Step 1: Create a Deployment
If you decide to proceed with an existing campaign, follow these steps:
- Navigate to Campaign management > Campaign List screen and click on the campaign in which you want to create a deployment.

- Click Create deployment on the campaign summary screen that appears. The campaign summary screen will display the status of all the deployments of a campaign.

- Select the deployment Type as Promotion.
- Select the type of promotion as Simple promotion, mode of deployment as Recurring, and content type as Message.

- The Deployment creation screen appears where each node is configured. The nodes are grouped based on their usage.

Step 2: Choose Your Recipients
Make sure an SFTP connection is already configured. To configure SFTP setup, refer to Configure SFTP.
- From the Target group source , drag-and-drop the SFTP node onto the Target group placeholder.

- After adding the SFTP node, click +Add from the right menu.

- Enter details for the following fields:
- Target group name: Enter a name for the target group.
- Supported channels: Select the required channels that you want to use for this target group. For example, if you select SMS, then the target group can only be used for SMS deployment and MSISDN is mandatory for the target group.
- Description : Enter a description for the target group.
- SFTP server: Select the SFTP Server from the dropdown.
- Select file (.txt, .csv only) : Enter the file path. If there is a possibility that the file name would be appended with numbers, date format, etc, please add '*' at the end of the file name. For example, samplefile_*.txt picks up samplefile_15122022.txt as well as samplefile_16122022.txt if both are present in the SFTP folder. You can add a date format expression such as $(yyyyMMdd).txt to only pick up a file that has a year-month-and-date format. For example, samplefile_$(yyyyMMdd).txt will pick up samplefile_20220815.txt. The filename is case-sensitive.
- Target group type: Select the target group type as Dynamic.
- Select sample file: Click Browse and select a sample text (.txt) file.
We support the following file formats:
| Filename | Format |
|---|---|
| samplefile_20220815.txt | samplefile_$(yyyyMMdd).txt |
| samplefile_15082022.txt | samplefile_$(ddMMyyyy).txt |
| samplefile_081522.txt | samplefile_$(MMddyy).txt |
| samplefile_15-08-22.txt | samplefile_$(dd-MM-yy).txt |
| samplefile_22-15-08.txt | samplefile_$(yy-dd-MM).txt |
| samplefile_20220815 123946.txt | samplefile_$(yyyyMMdd HHmmss).txt |
| samplefile_20220815123946.txt | samplefile_$(yyyyMMddHHmmss).txt |
In case of record issues, select how to proceed. The options are:
- Skip the particular record: Select this option to Ignore invalid contacts and continue to load the file.
- Skip the remaining file once the threshold is reached: Select this option and enter a threshold to skip the file once the threshold is reached. You can enter the Threshold Value in absolute records or in the percentage of the records in the file.
-
Remote updates: Select an appropriate option in case you want to allow remote updates.
-
File processing: If the file is processed, you can configure options to rename and move the processed files to another location.
-
Rename once processed: Select this option if you want to rename the files but do not want to move the files to another location. The file will be renamed to <your input file>_done.txt/csv.
-
Move to processed folder once processed: Select this option if you want to move the files to the processed folder. The folder has to be created in the root SFTP location. If the folder is not available, then it will be created automatically by Webex Campaign.
-
Click Save & Proceed.
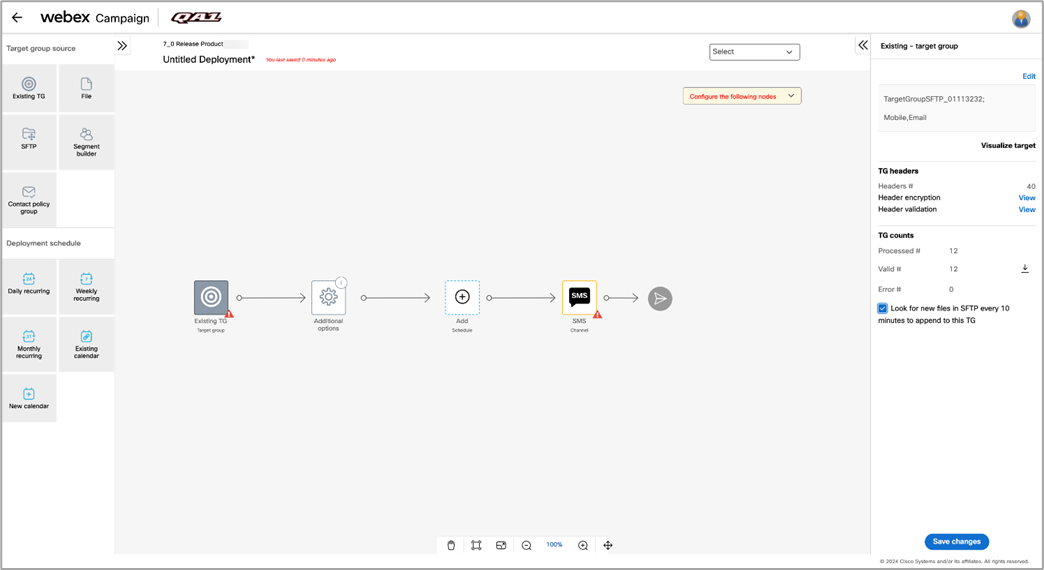
- (Optional) Select Look for new files in SFTP every 10 minutes to append to this TG checkbox when multiple or delayed files are expected to be processed within the schedule of a recurring deployment. This is a tenant-specific feature. It is available to clients who requested this feature.
Usage notes:
a) This feature is currently available only for SMS & MMS channel recurring simple promotion type deployments whose Target group type is ‘dynamic’.
b) This feature is available for deployments that have the option enabled for “Send using local time zone of recipients”.
c) This feature is not available for instant and A/B promotion deployments.
d) This feature is useful in case of recurring deployments that have the TG-source of SFTP and if you are expecting to receive an unknown or unpredictable number of files in the SFTP from your upstream 3rd party systems during the daily / weekly / monthly schedule slot. Previously, such recurring deployments would have processed only one file during the schedule slot. However, now with the introduction of this feature, the system will continue to check for the arrival of new files every 10 minutes until the end of the schedule slot on that day. Every subsequent file will in effect be appended to the already existing Target group.
e) The TG count will be updated after the newly arrived file is appended to the TG.
f) If you forgot to enable this option initially when activating a recurring deployment, then you may pause the deployment, then enable this option and resume the deployment again.
(Optional) Step 3: Configure Additional options
Additional options are displayed under this node. You can configure the following options:
-
Exclude contacts from all opt-out lists: Enable this option to filter out contacts of Target Groups who have opted out from receiving communications. By default, you will not be able to override this default value of ‘Yes’ – which means the customers’ opt-out preferences will always be taken into account during the TG Preparation process for each deployment.
However, you can allow certain senior or experienced users to configure deployments such that they are able to ignore customers’ opt-out preferences (e.g. for regulatory or mandatory service-related communications for which you are allowed to ignore customers’ opt-out preferences). This permission can be given to specific users in their User Profiles. (Administration >> Users & roles >> UI users >> Update user >> User parameters >> Step2).
If the checkbox is checked for Able to ignore organizational Opt-out lists for specific deployments, then that user will be able to set to No the option for Exclude contacts from All Opt-out Lists on the Deployment Canvas Additional options node. -
Apply contact frequency rule: Enable this option to apply the contact frequency rule. This will control the maximum number of messages sent out to contacts depending on the channel and message purpose for defined time windows.
-
Remove duplicates: Enable this option to remove duplicates from the contacts list. Only the unique contacts will be considered for the target group preparation. You can amend this option for recurring deployments when the deployment is in Paused state. The new value for this setting will take effect after you resume the recurring deployment from the next run instance.
-
Limit the number of contacts: Enable this option to send a deployment to a certain number of contacts instead of the complete Target Group. For example, if a target group contains 2,200 contacts, but the limit is set to 1,000 then the communication will be sent to 1,000 contacts only.

- Click Save & proceed.
Step 4: Create a Schedule
We assume you already know how to create a schedule. Follow the below links to create a schedule of your choice.
Step 5: Configure the Content in the Channel Node
In this step, the content is configured in the channel node.
Now all the nodes are configured.
Step 6: Save the Deployment
In this step, the deployment can be saved as a Draft or ready for Activation. The Deployment meta-tags are mandatory to activate a deployment. If you are not sure of the Deployment meta-tags that should be used for the deployment, you can save the deployment and come back later to select the Deployment meta tags.
Follow these steps to save the deployment as ready for activation:
- Select Save & exit. The Save deployment screen appears.

- Enter a name for the Deployment such as My_First_Deployment.
- Add Meta-tags to the deployment. Select a P&L to which you want to associate this deployment.
- Select one or more purposes from the Purpose drop-down.
- (Optional) Enter a Deployment code.
- (Optional) Select an Opt-out category.
- Click Save.

Now the deployment is ready for activation.
Step 7: Activate the Deployment
On the Campaign list screen, click the ellipses icon of the deployment and click Activate. You will receive notifications for various stages of the deployment.

The deployment will run as per the configured schedule.
Updated over 1 year ago