

Creating an App Push Deployment
In this tutorial, you’ll learn how to create and run an App Push deployment.
To create an App Push deployment, there are some prerequisites. If your username is assigned with an admin role, then you can complete all the steps to create a deployment. If your username is assigned to a role that has limited permissions, then you can create a deployment and send it for approval. Upon approval, the deployment can be activated.
Prerequisites for an App Push deployment:
- Access to Campaign management section
- A Campaign
- An App for iOS or Android or both added to Webex Connect product and import it into Webex Campaign
- A Target Group data for App Push deployment
- A Test contact with APPDEVICEID or customerId as a header
- A Purpose
- A P&L
Step 1: Create a Deployment
A deployment is a set of instructions to process a campaign under the parent campaign.
To create a deployment:
- Navigate to Campaign management > Campaign list screen and click on the campaign in which you want to create a deployment.

- Click Create deployment on the campaign summary screen that appears. The campaign summary screen will display the status of all the deployments of the campaign. For more information on creating a deployment, go to Creating a Deployment section.

- Select the Deployment type as Promotion.
- Select the Type of promotion as Simple promotion, mode of deployment as One time , and content type as Message.
- Select the Channel as App Push and select the App from the drop-down. the App should have already been imported from Webex Connect.
To add an app into Webex Connect, contact your account manager.
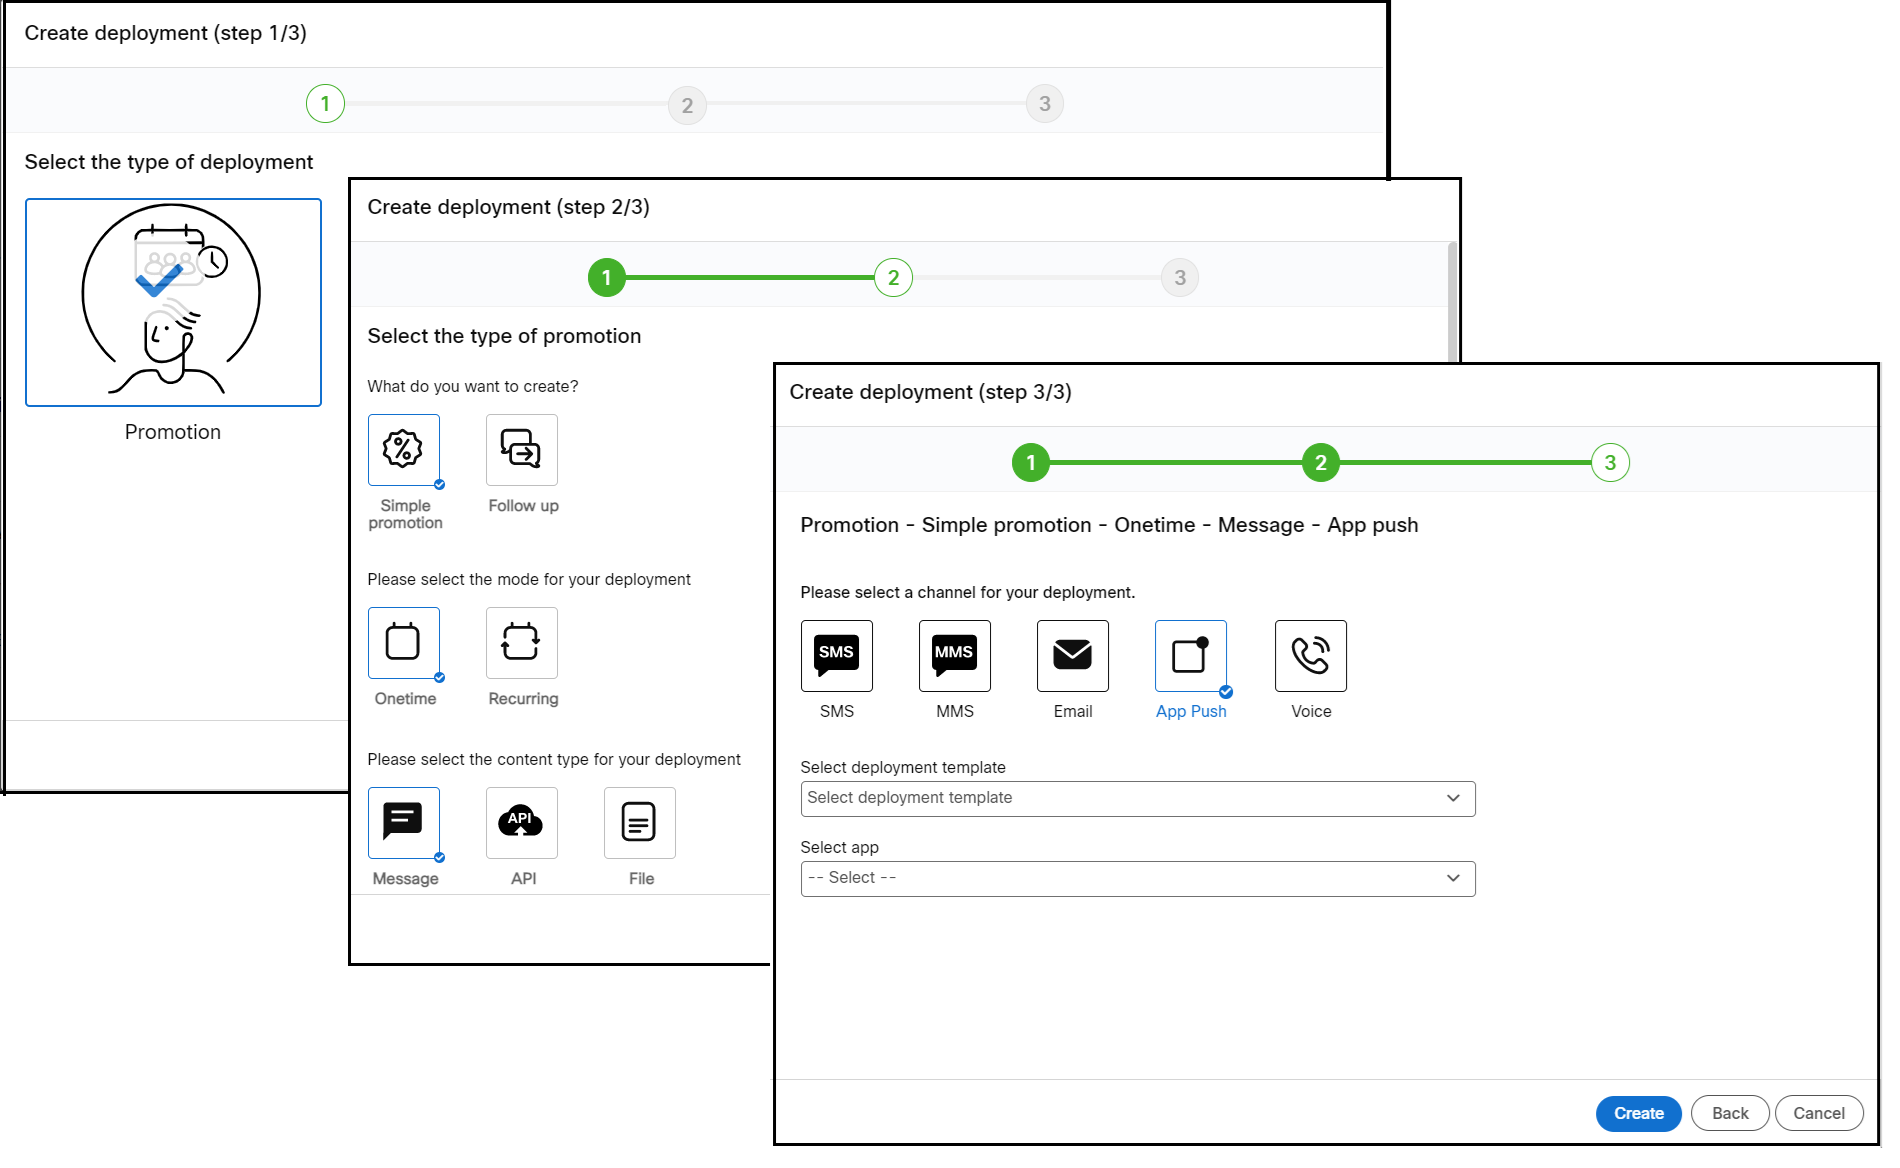
- Click Create.
- The Deployment creation screen appears.
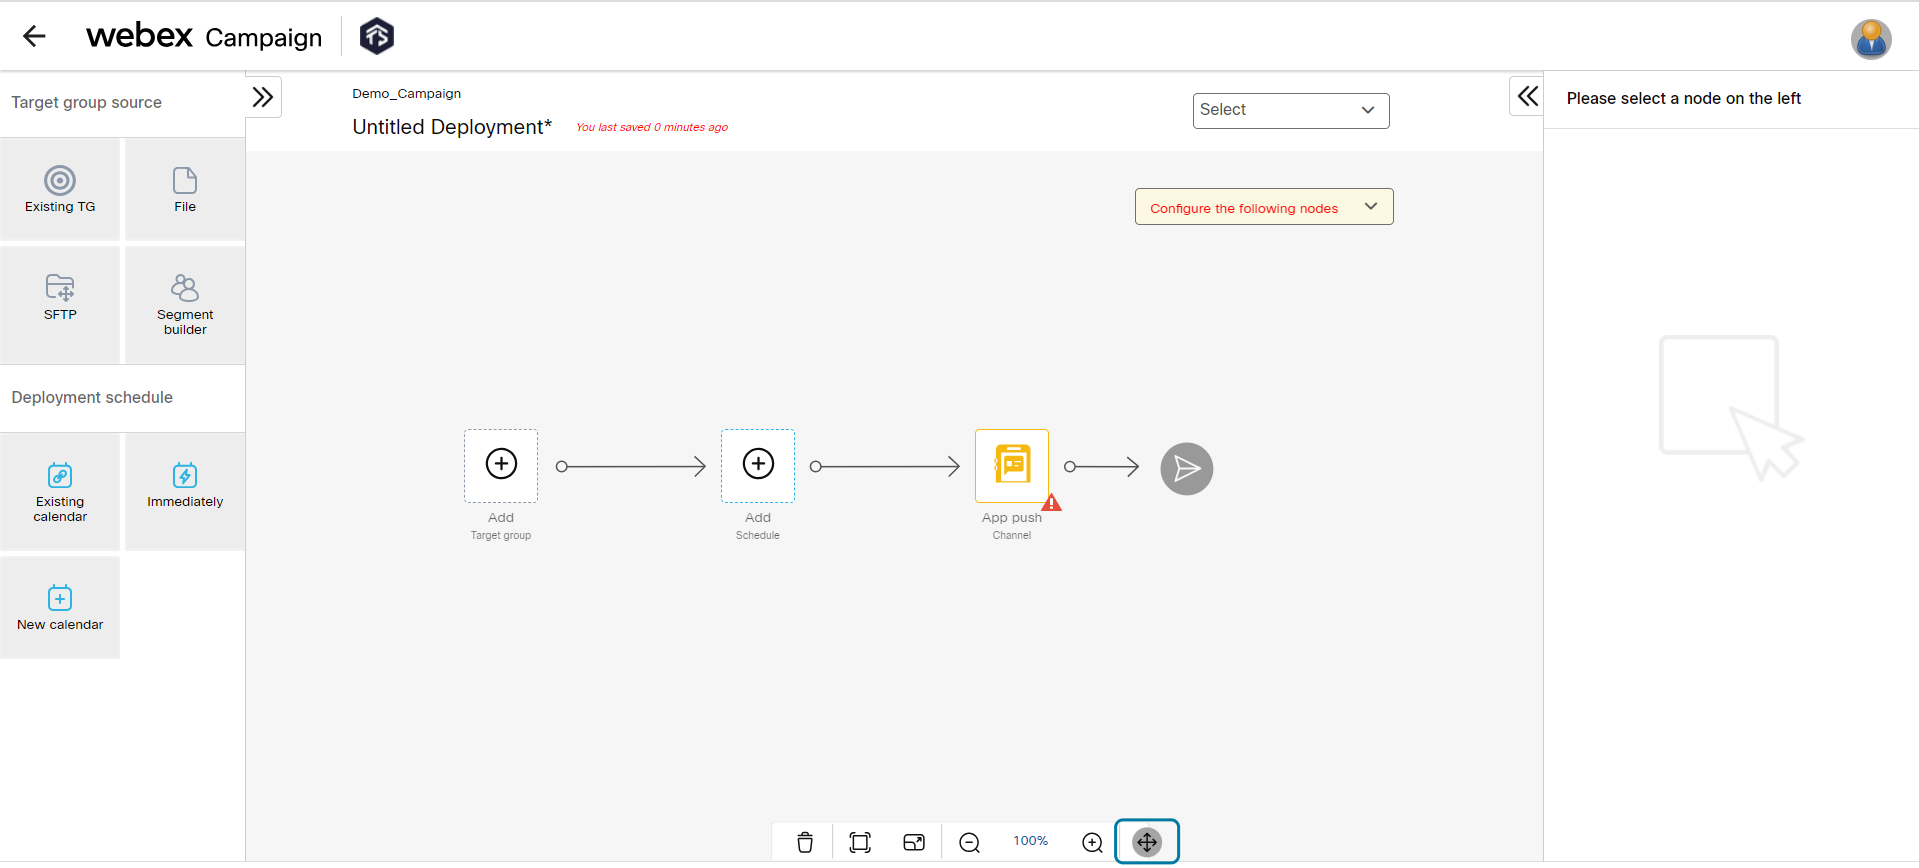
You have to configure each node in the deployment creation screen. The left panel will display different nodes that can be used to configure a node, The nodes are grouped based on their usage. On selecting a node the right panel will display the configuration options.
Step 2: Choose Your Recipients
In this step, the recipients of the campaign are selected. As mentioned in the prerequisites, a target group should already be uploaded to the Webex Campaign.
To select the recipients of the campaign:
- From the Target group source , drag and drop the Existing TG node onto the Target Group placeholder. We have chosen the Existing TG node because the target group is already uploaded as a prerequisite. For more information on adding a target group from different nodes, go to Target Group Source Nodes section.

- Select the Existing TG node and select the Input data key from the drop-down.
- Click + Add from the right panel.
- Select the target group that was uploaded. In our case, it is My_First_Target_Group.
- Click Save & proceed to close the target group screen.
- Click Save changes.
Now the recipients are successfully configured for the deployment.
(Optional) Additional options Node
In this step, you can configure additional options for the target group such as applying an opt-out list, removing duplicates, and limiting the number of contacts in the target group.
To configure the options, select the Additional options node and configure the required option from the right pane:
- Exclude contacts from all opt-out lists: Enable this option to exclude contacts from all opt-out lists such as Tenant level, channel level, and category level.
- Remove duplicates: Enable this option to remove duplicate mobile numbers from the Target Group.
- Limit the number of contacts: Enable this option to limit the number of contacts of the target group based on an absolute number of contacts or a percentage of contacts.
Step 3: Create a Schedule
In this step, select a schedule to send your deployment immediately, or create a schedule (a date and a time) to run the deployment in the future. For this tutorial, we will run the deployment Immediately as soon as the deployment is activated.
To configure the schedule:
- Drag-and-drop the Immediately node onto the Schedule node.
- Select the Schedule node. On the right panel, enter details for the following fields:
- Message validity: Select the time frame in which the system should attempt to deliver the message to the device.
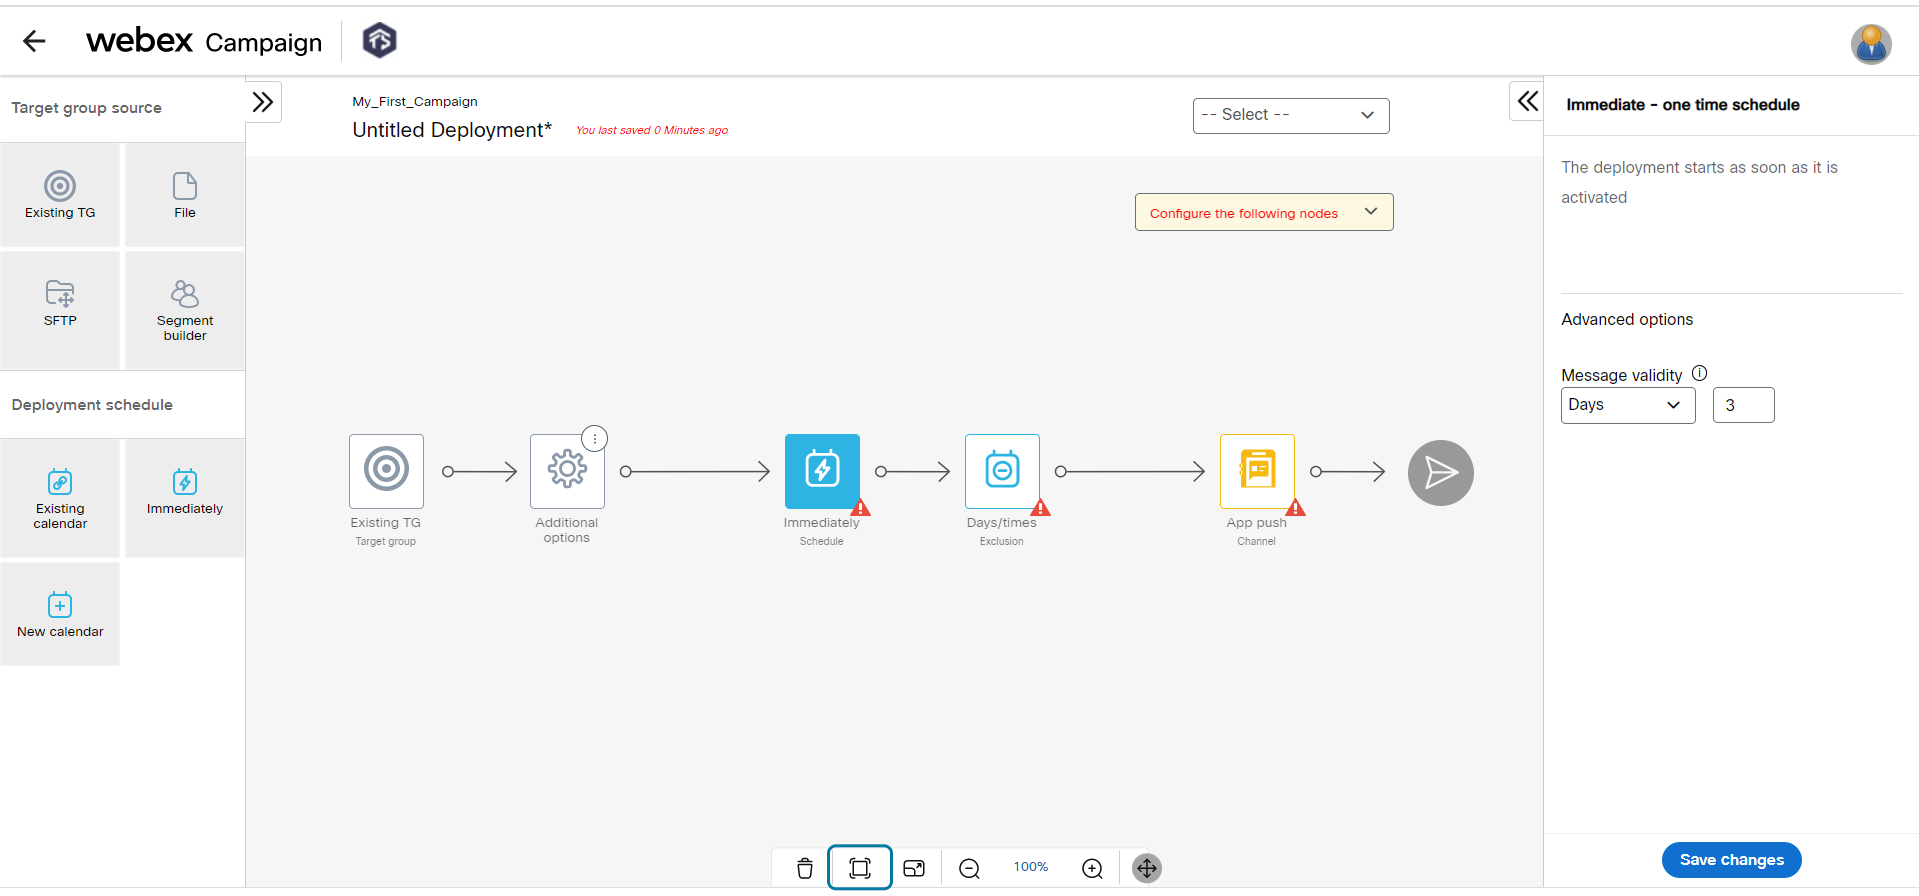
- Click Save changes.
Step 4: Configure Exclusion Day/Times
During the exclusion day or times, the deployment is paused temporarily and resumes once the exclusion day or time has lapsed. The exclusion day or time is set by the administrator that is applicable to all campaigns across the tenant. To add a custom exclusion day or time, configure this node.
For more information on exclusion days or times, go to Exclusion days / times section.
Now the schedule is successfully configured for the deployment.
Step 5: Create Your Message
In this step, the content is configured. To know more about App push channel configuration, go to App Push Channel Node section.
To configure the simple App push content:
- Select the App push node. From the right panel, click + Add. The App push content configuration screen appears.
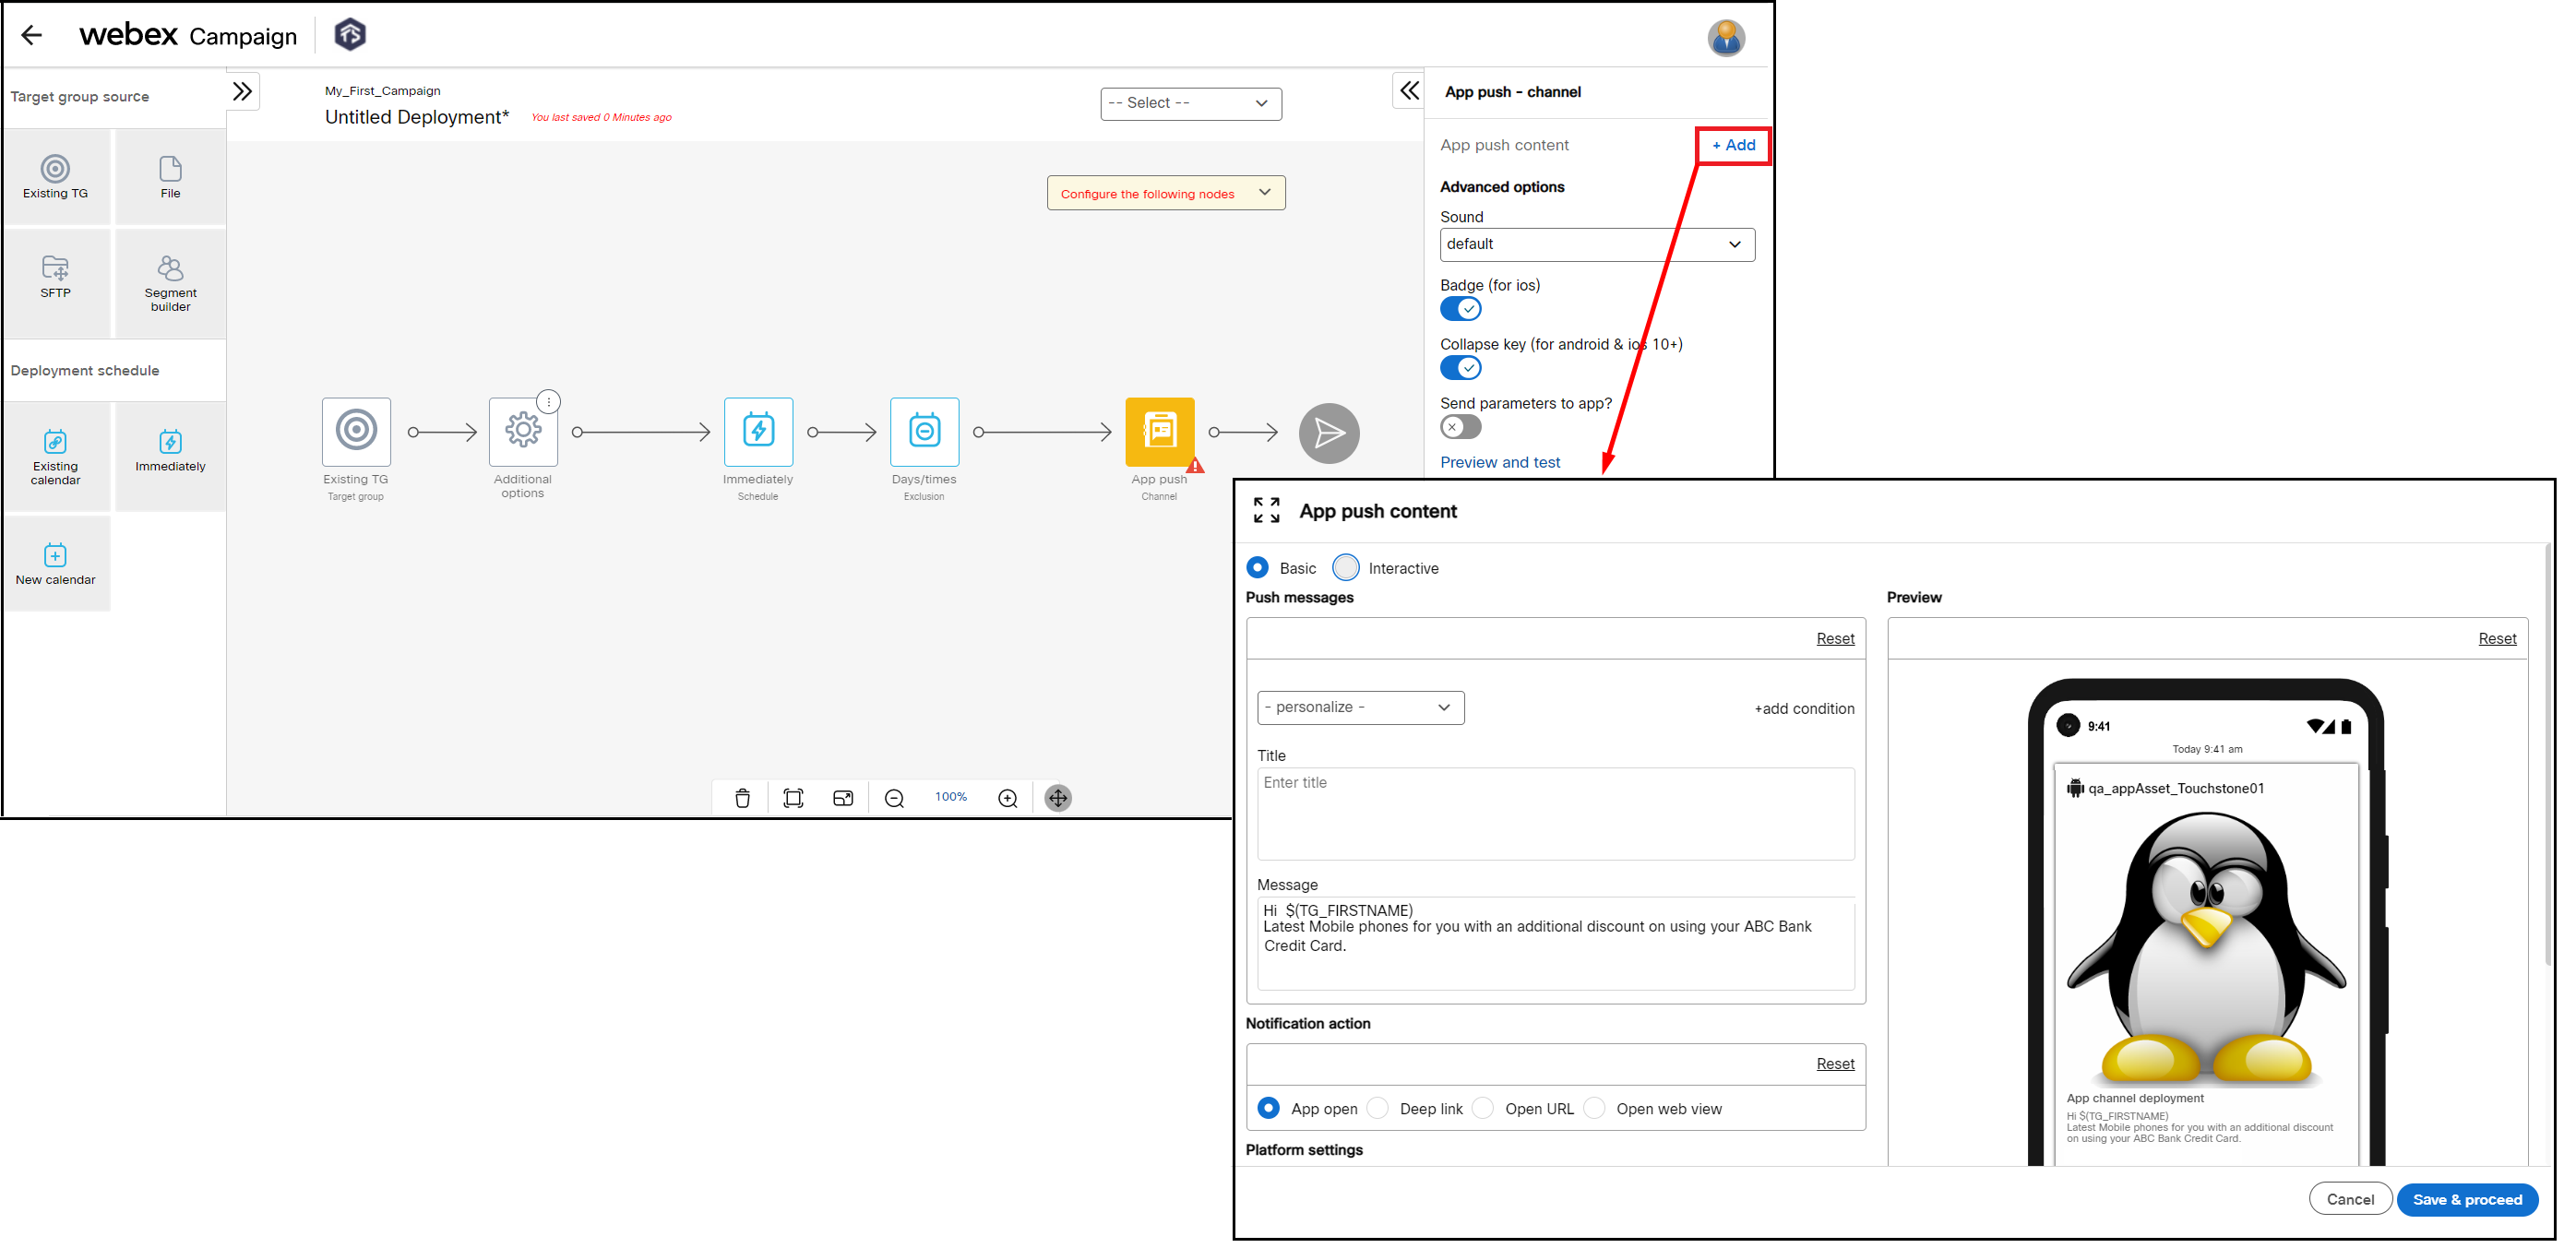
- Configure the App push content.
- Basic: Select this option to configure basic notification.
- Interactive: Select this option to configure interactive notifications. An interactive notification allows you to configure actions on buttons.
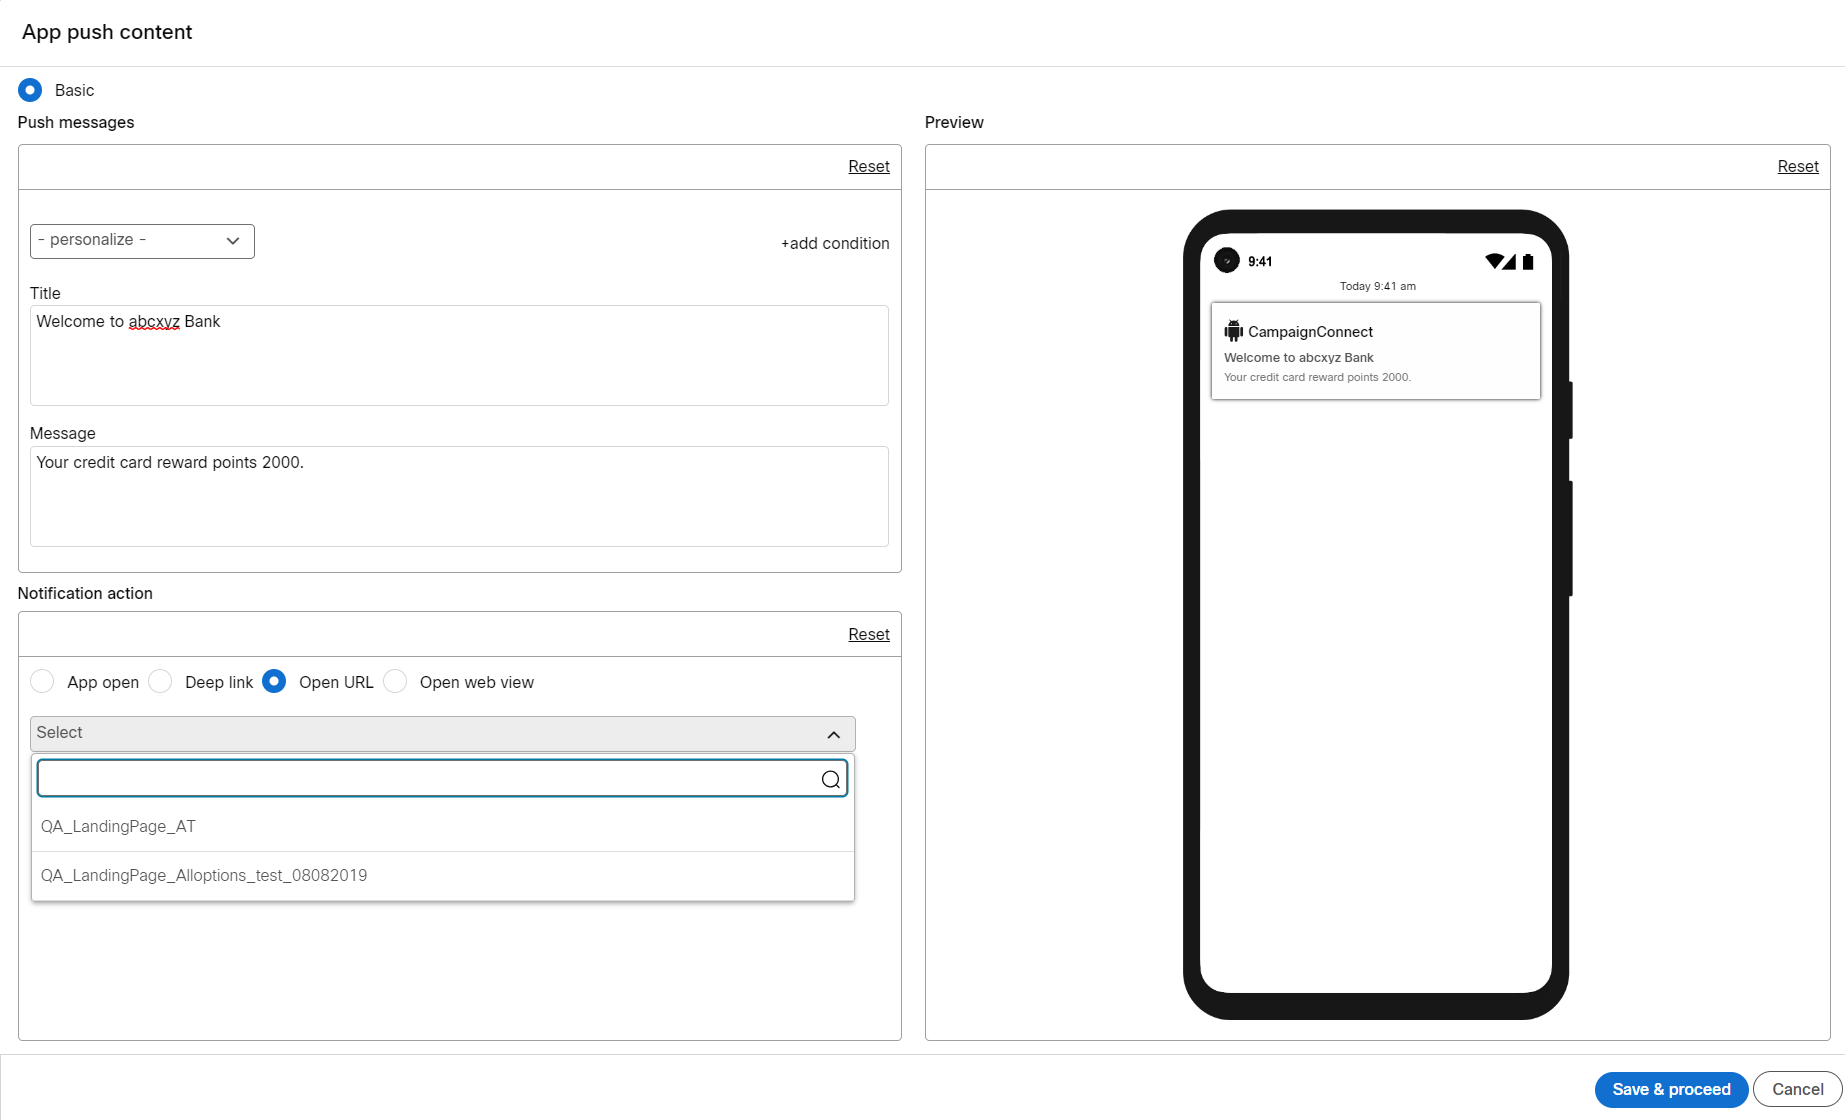
Push Message
- Personalize: To personalize a message, select the Personalize drop-down and select the required header.
- + add condition: Select this option to add conditional content.
- Title: Enter a title for the message.
- Message: Enter the message.
Notification action: You can configure what kind of action should occur on clicking the notification.
- App open: Select this action to open the App.
- Deep link: Select this action to configure a deep link within the App. The deep link should be exposed by the app.
- Open URL: Select this action to lead a message receiver to the configured URL. The URL could be a web page or a deep link within your app. When the notification is clicked, the configured URL will be opened.
- Open web view: Select this action to lead a message receiver to the configured URL. The URL will be opened in the browser.
Platform settings
- Android rich notification image URL: Enter the URL of an image for Android rich notification.
- iOS 10+ rich notification image URL: Enter the URL of an image for iOS rich notification.

- Click Save & proceed.
Advanced options You can configure the following advanced options.
- Sound: Configure this option to enable a sound for notification. The sound files that are added to the app will be displayed. When configured the sound will be played whenever the notification is received by the recipient.
- Badge for (iOS): Configure this option to enable badge.
- Collapse key (for Android & iOS 10+) Configure this option to enable collapse key. It replaces notifications already present on the user's device if the current notification contains this same collapse Key.
- Send parameters to app? Configure this option to send Android and iOS parameters to the app.
- Parameter: Enter a parameter name.
- Source Select the Source from the drop-down.
- Value: Select a value from the drop-down.
Click Save to close the popup.

- Click Save changes.
Now all the nodes are configured.
Step 6: Save the Deployment
In this step, the deployment can be saved as a Draft or ready for Activation. The Deployment meta tags are mandatory to activate a deployment. If you are not sure of the Deployment meta tags that should be used, you can save the deployment and come back later to select the Deployment meta tags .
To save the deployment as ready for activation:
Now the deployment is ready for activation.
Step 7: Activate the Deployment
On the Campaign List screen, click the ellipses icon of the deployment and click Activate. You will receive notifications for various stages of the deployment.

If the user does not have permission to approve their own created deployments, then instead of Activate button, you will notice Send for approval.
You can go to the Dashboard section to view the performance of your deployment.

If you have questions, please contact your Webex Campaign account manager or Cisco Webex technical support team by phone or email:
- Europe / Middle East / Africa:
- Phone: +44 (0) 1494 750 600
- Email: [email protected]
- North America:
- Phone: +1-855-324-0970
- Email: [email protected]
Updated over 1 year ago