Release 6.8 - 2023 October
1.0 Campaign Manager module enhancements
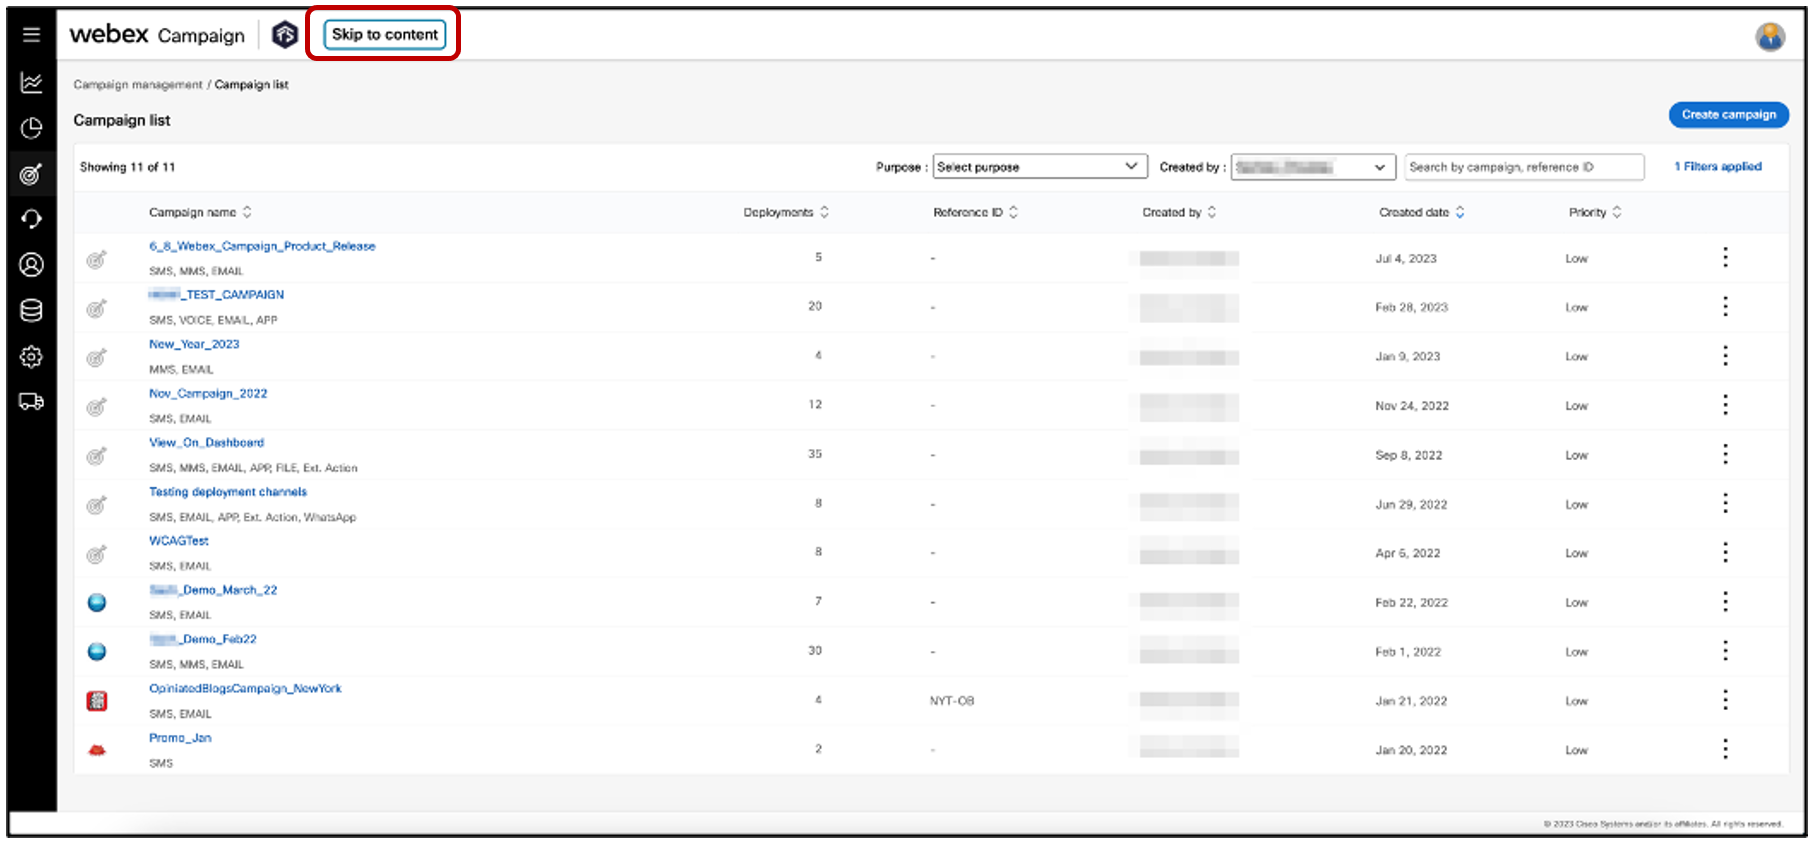
1.1 Accessibility WCAG WEB 2.4.1 (A) compliance: Added ‘bypass block’
We have continued to make progress in improving Webex Campaign’s accessibility for visually impaired users and users with limited finger dexterity. The primary mechanism for this accessibility improvement is to ensure as much of the product’s functionality as possible is accessible to users only with the use of a keyboard (without having to use the mouse) so that they can work effectively with their preferred screen reader software.
As part of this journey to improve the product’s accessibility, we have introduced the ability for keyboard-only users to ‘skip to content’, thus saving them the time and a few keystrokes of the tab key. This feature was introduced so that we can be compliant with the Web Content Accessibility Guidelines (WCAG) criterion “WEB 2.4.1 (A)”.
This “Skip to content” wording is not visible to most regular users; however, if a user is just navigating with their keyboard, then this ‘bypass block’ will become visible.
1.2 Support for SMS short-links without https:// or http:// prefix
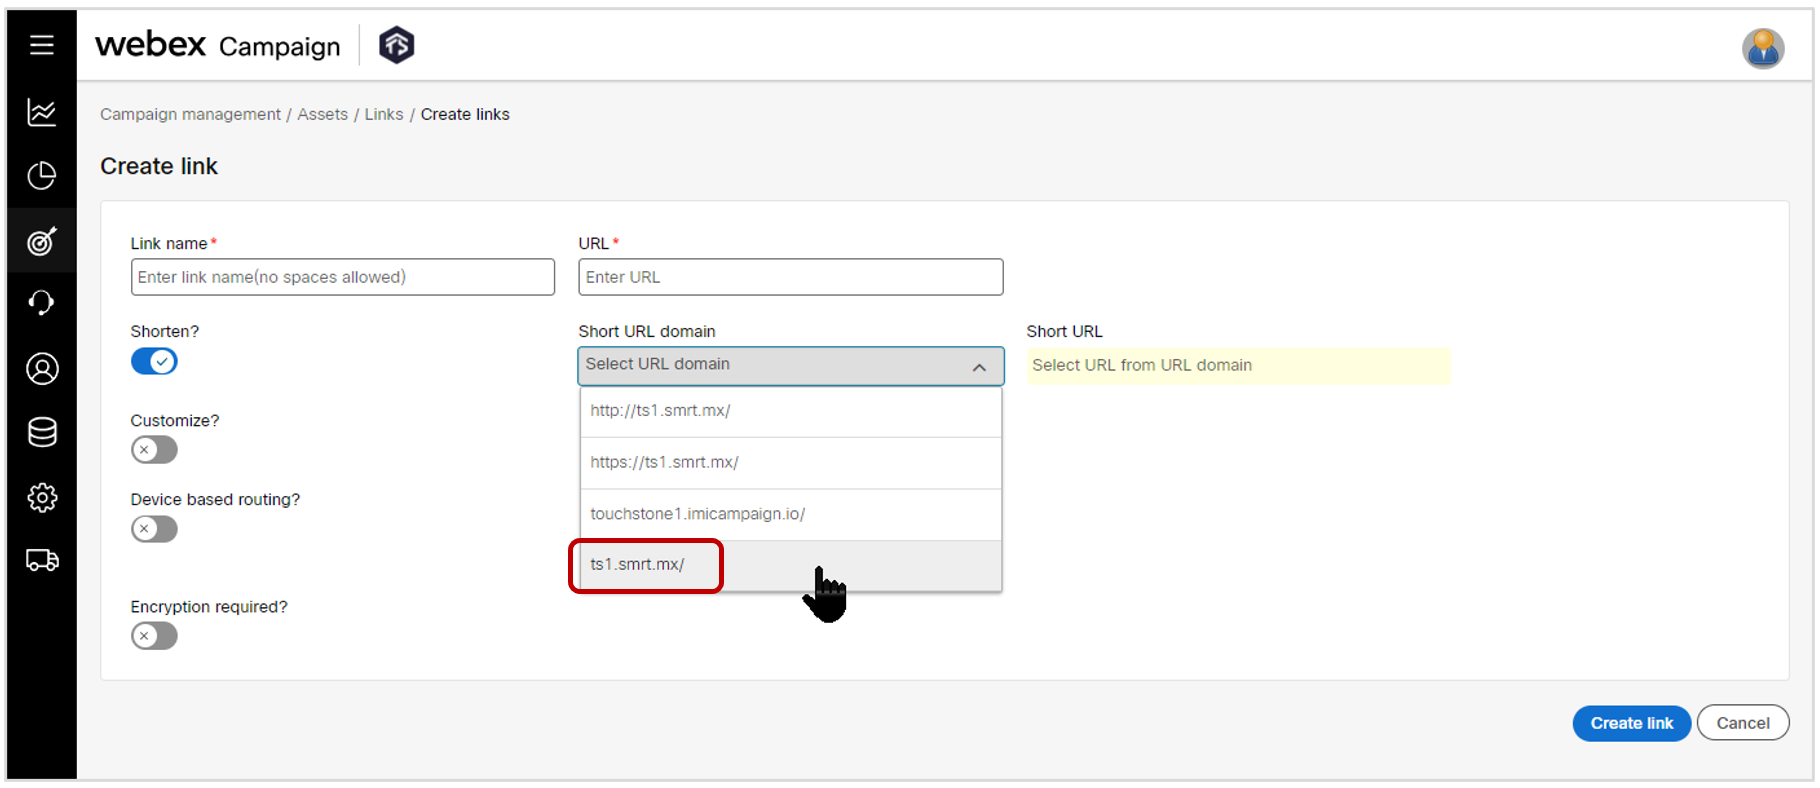
Based on feedback from some clients, we now allow the short-link domains to be created without an https:// or http:// prefix. This will save up to 8 characters for clients in their SMS outbound messages when using a short-link within the SMS message. When the SMS recipient taps on the short link, it will still redirect to the intended destination even if the https:// or http:// prefix is not present.
1.3 Increased max allowed length of Campaign Reference ID to 18 characters
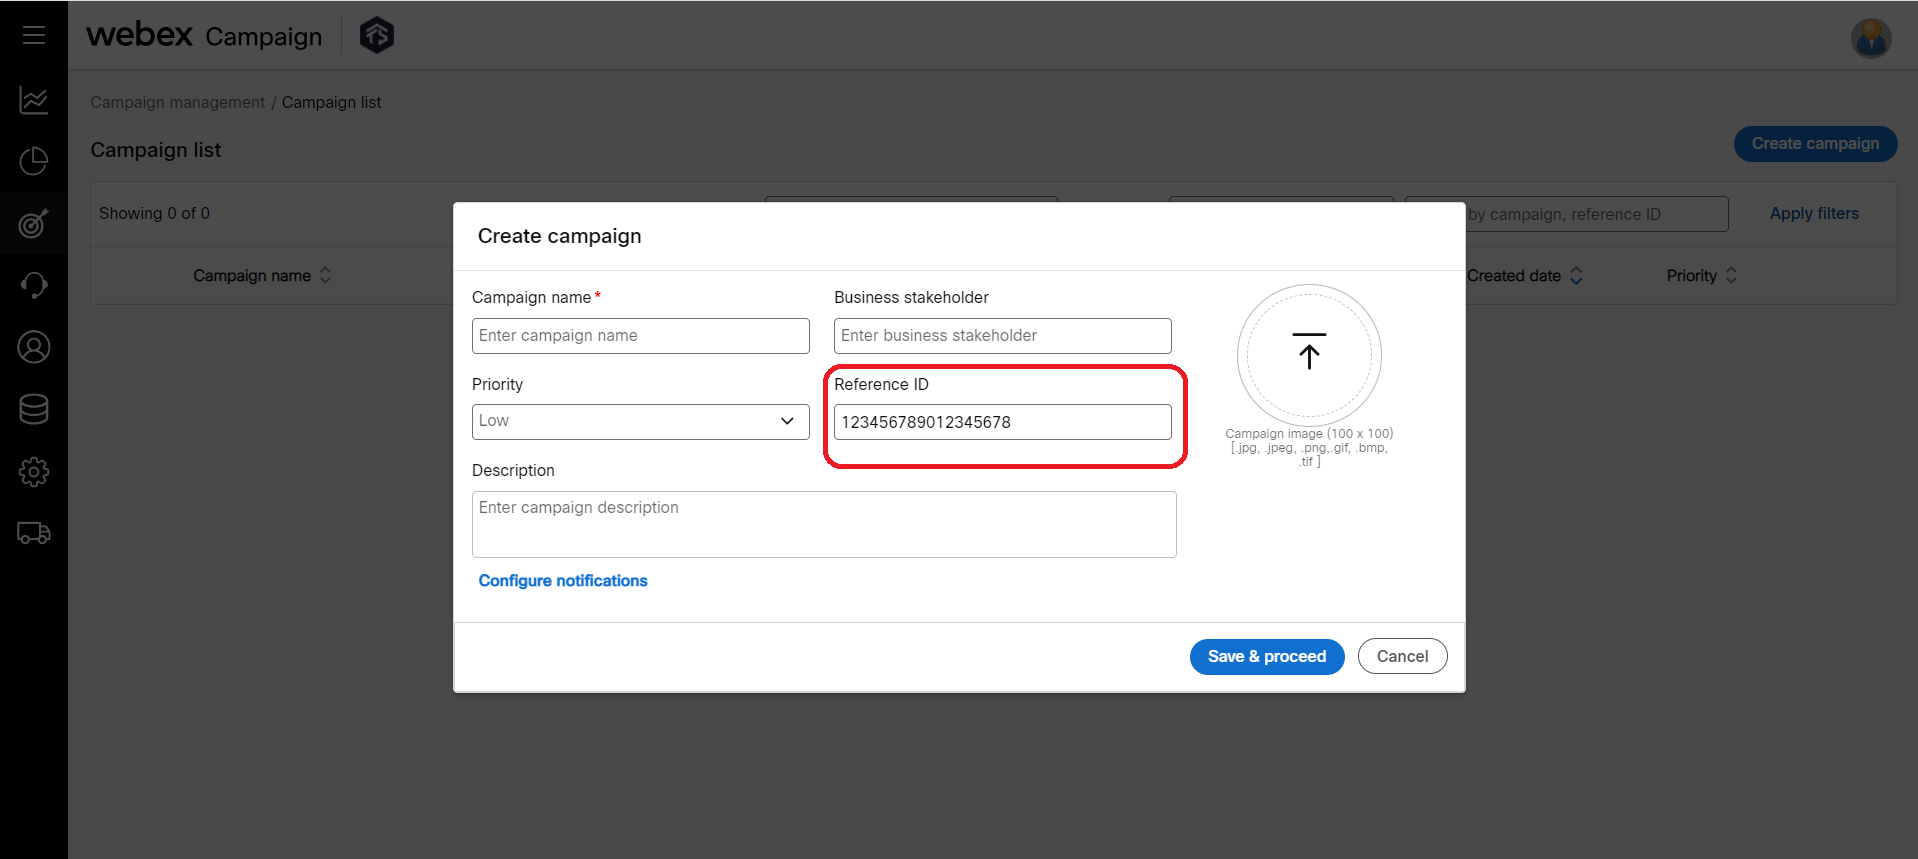
Based on feedback from some clients, we have increased the max allowed length of the ‘Reference ID’ field on the ‘Create campaign’ pop-up from 10 characters to 18 characters.
1.4 Opt-out lists: clarified that the counts displayed have 4-6 hours latency
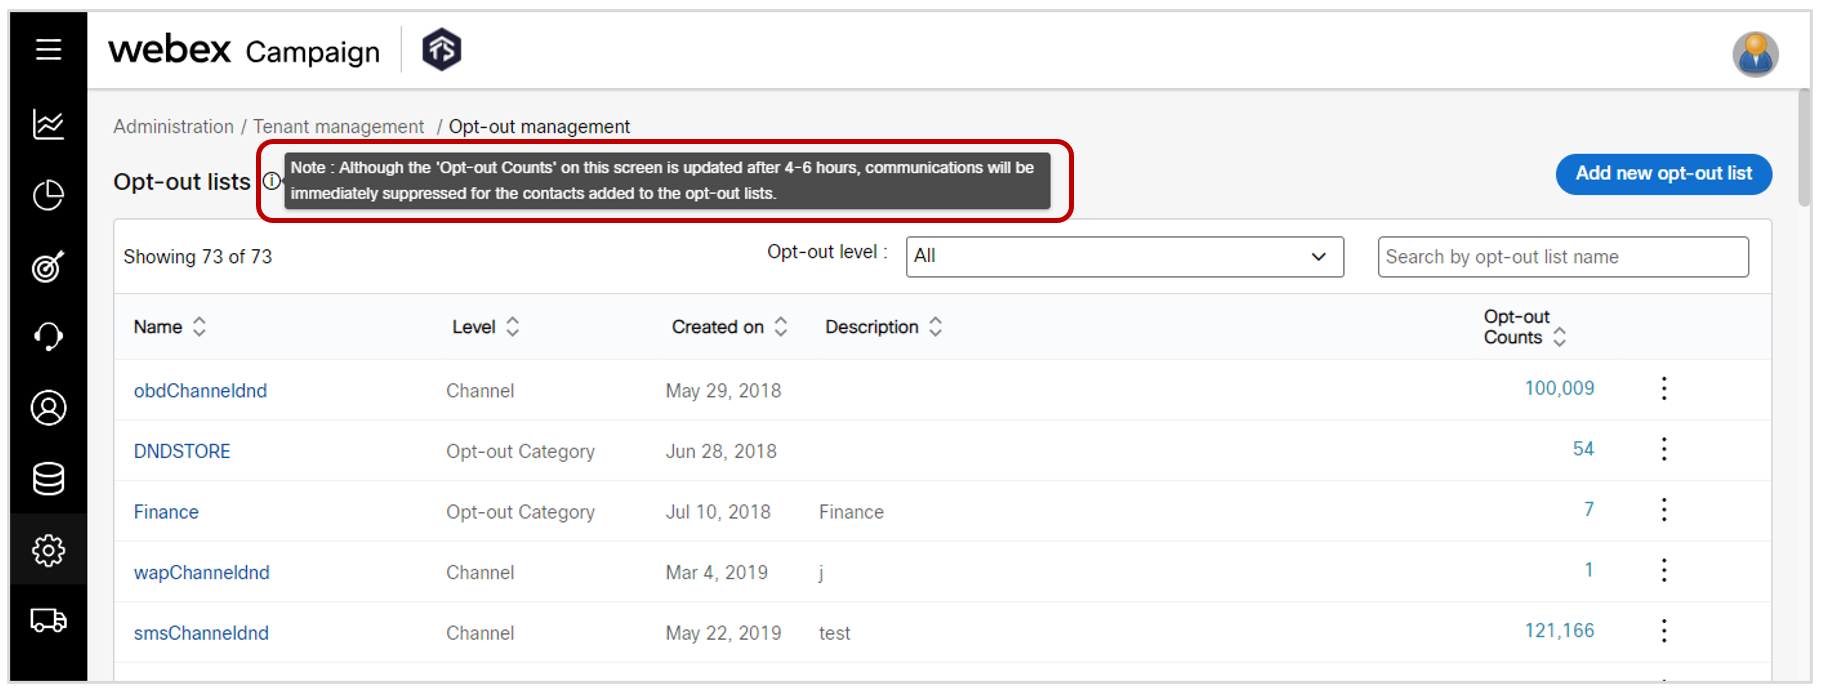
On the ‘Opt-out management’ screen, counts are displayed against each opt-out list. These counts displayed are not updated in real-time due to a limitation in the underlying AWS database technology; rather these displayed counts are updated with a latency of 4-6 hours. This was always the case and we previously had a note explaining this behavior at the bottom of this screen. However, we have now moved that note to the top of the screen to make it more prominent.
The note is visible when the mouse is hovered over the ‘info’ icon and it says:
Although the ‘Opt-out Counts’ on this screen is updated after 4-6 hours, communications will be immediately suppressed for the contacts added to the opt-out lists.
1.5 Assets >> Voice menus: UX improvements on the listing grid table
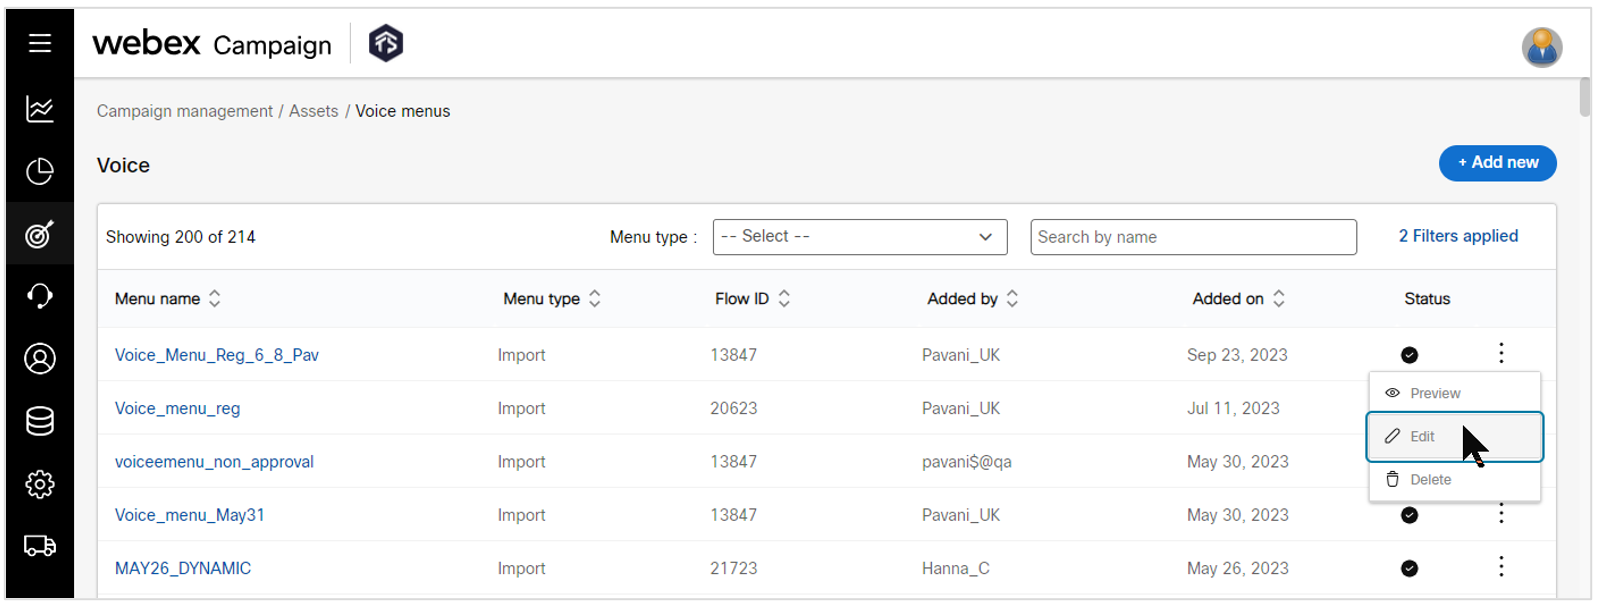
Based on user feedback, we have made the following improvements on the ‘Assets >> Voice menus’ list grid screen:
-
We have added a column to display the ‘Flow ID’ in the table.

-
The default value in the ‘Created by’ filter will be set to ‘All’.
-
The system will remember filter values until the user navigates away from this screen.
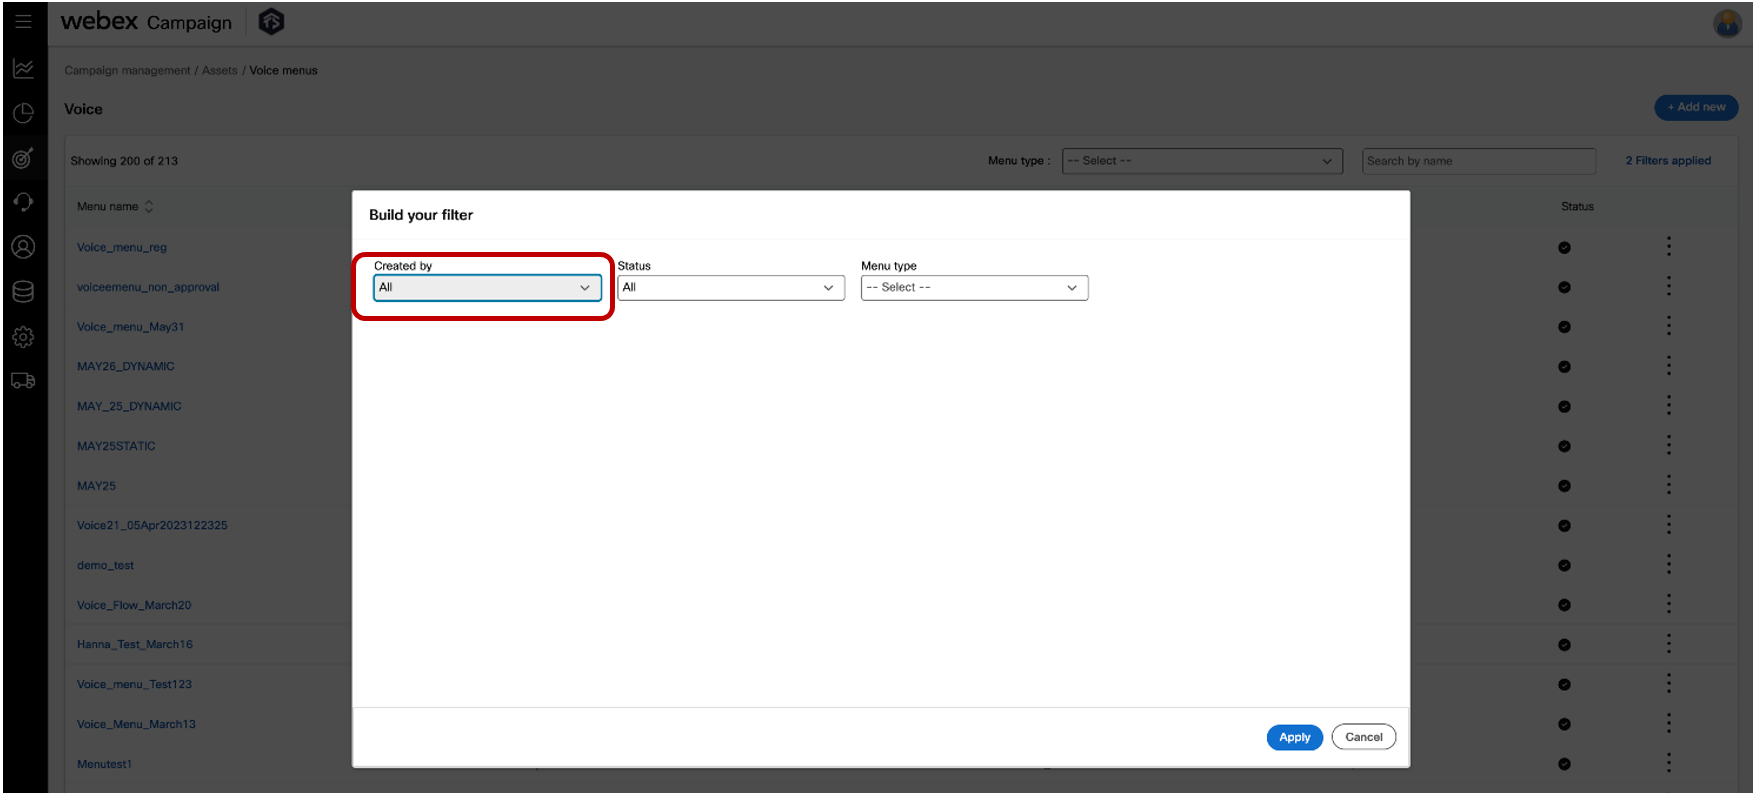
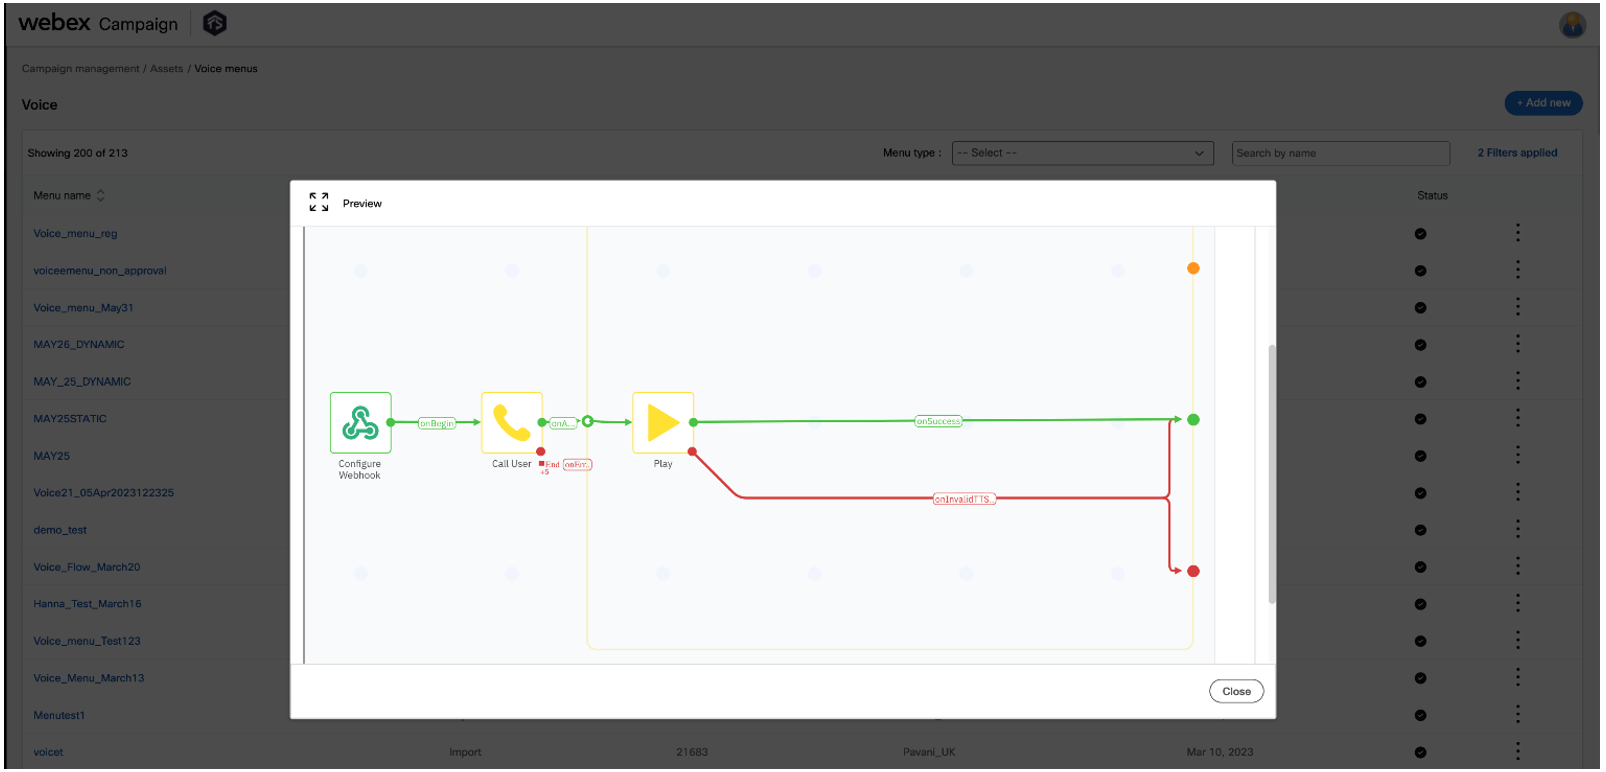
1.6 Assets >> Voice menus: Preview of the Webex Connect voice flow from the voice menu list
Now you will be able to see a preview of the Webex Connect voice flow from three-dot action menu for each ‘Voice menu’ in the list grid.
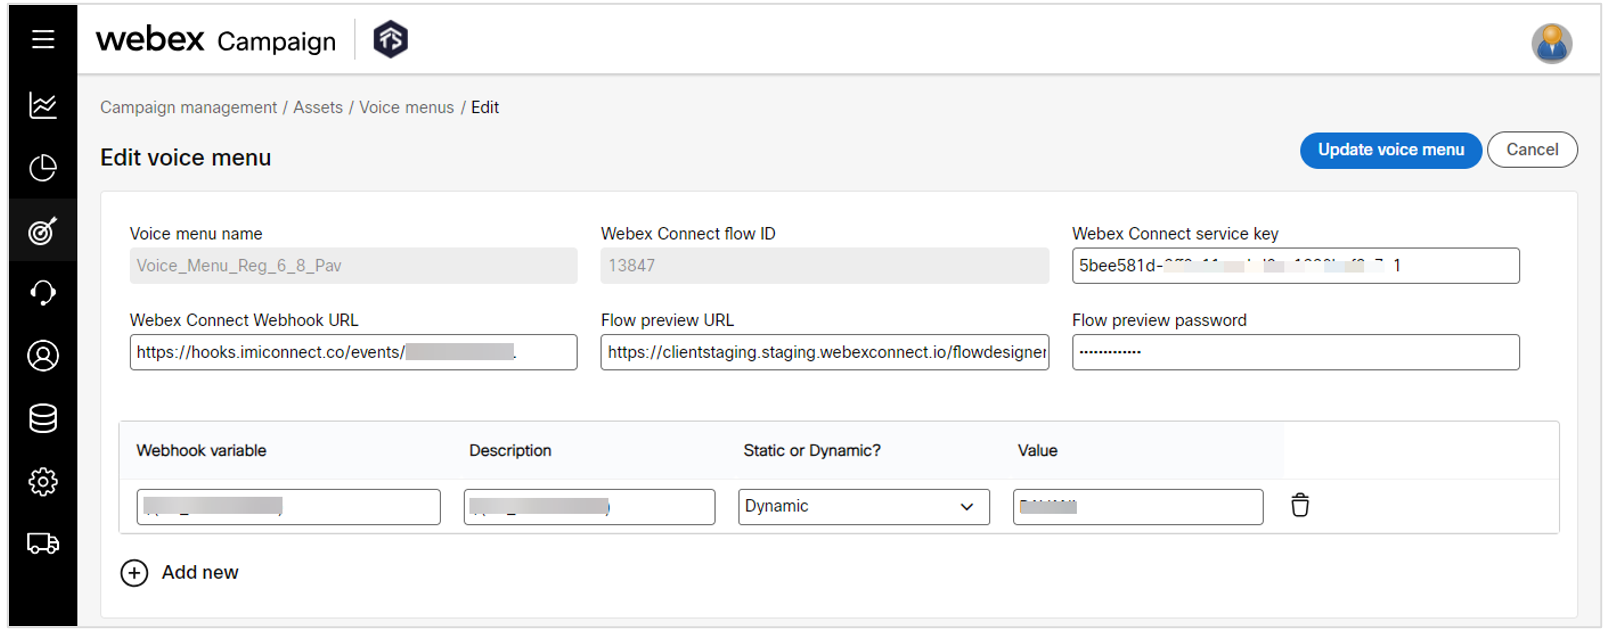
1.7 Assets >> Voice menus: Ability to edit the properties of a voice menu
We have introduced the ability to edit the following properties of a voice menu after it is initially created:
- Webex Connect Webhook URL
- Webex Connect flow ID
- Webex Connect service key
- Flow preview URL
- Flow preview password
- Webhook variables info
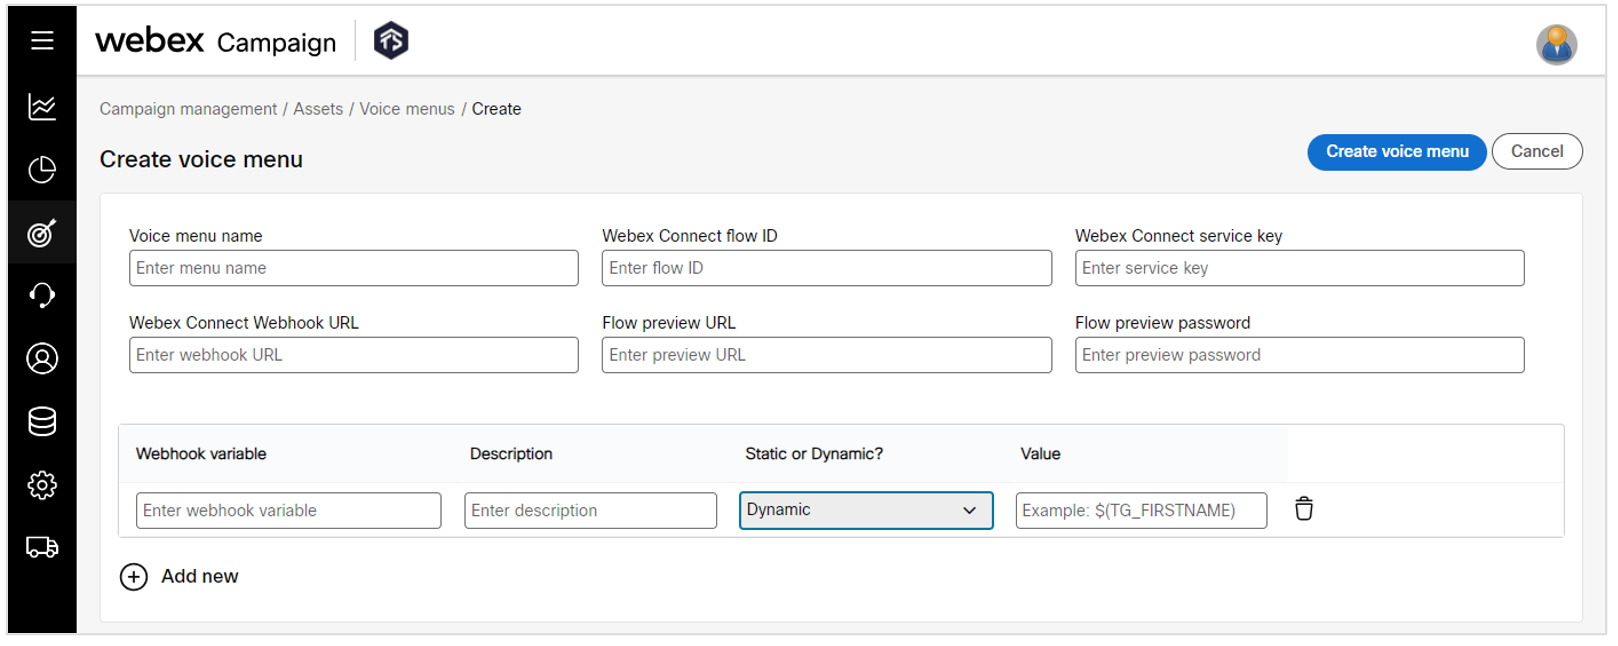
1.8 Assets >> Voice menus: Improved UX while creating a voice menu
We have improved the ‘Create voice menu’ screen to make it more intuitive by rearranging the fields on the screen.
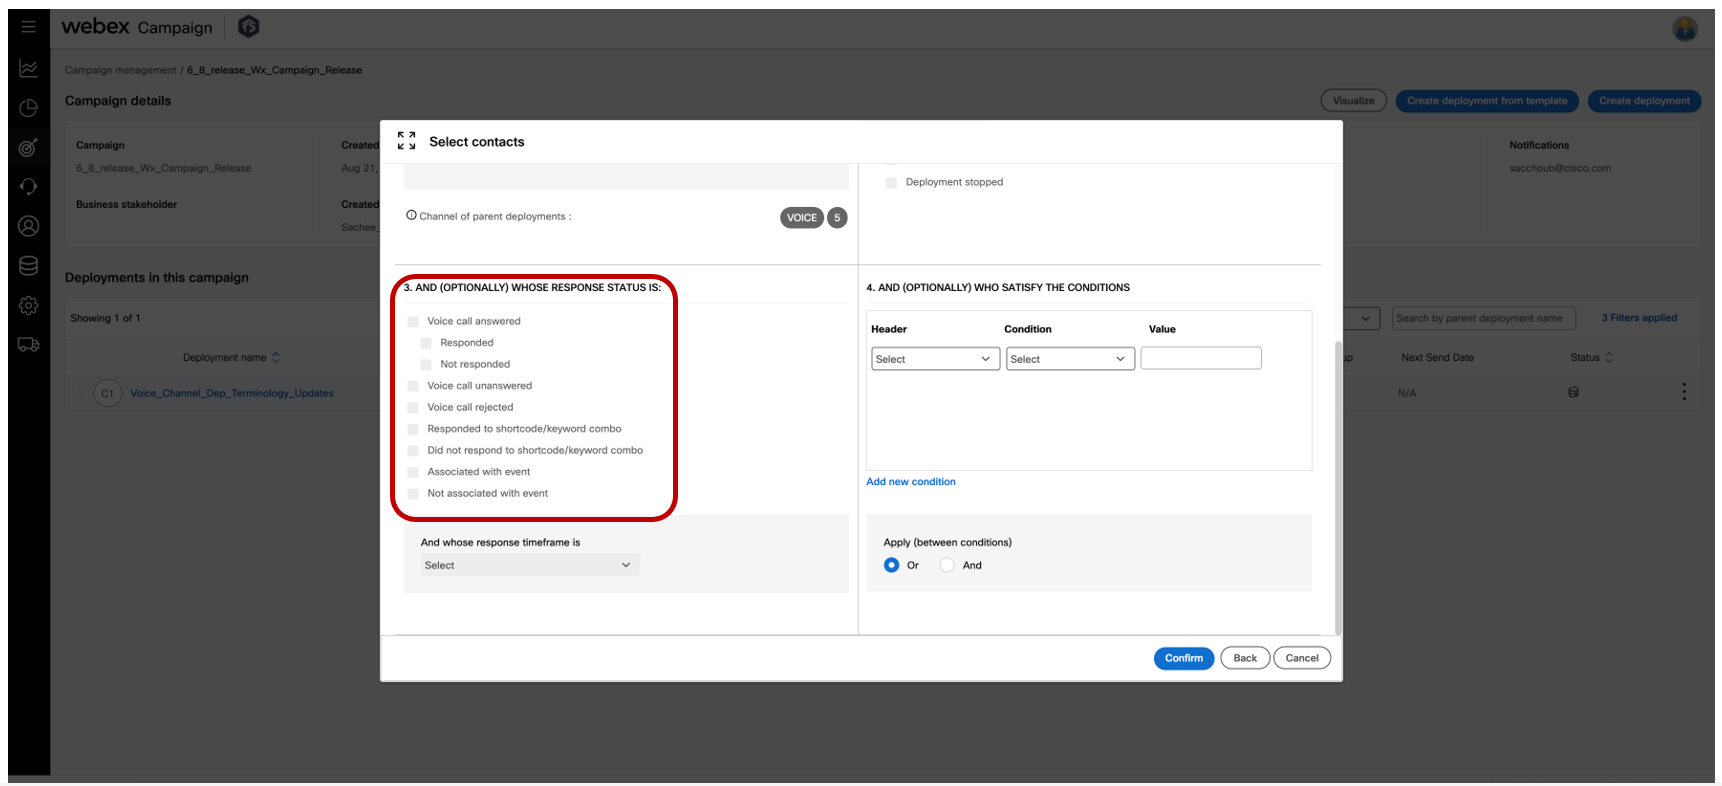
1.9 Follow-up deployments (4-quadrant screen): replaced the ‘OBD’ terminology with ‘voice call’
We have replaced the old wording of ‘OBD’ (outbound dialer) with the new wording of ‘voice call’ when setting up a follow-up deployment to a voice-channel parent deployment.
2.0 API & Integration enhancements
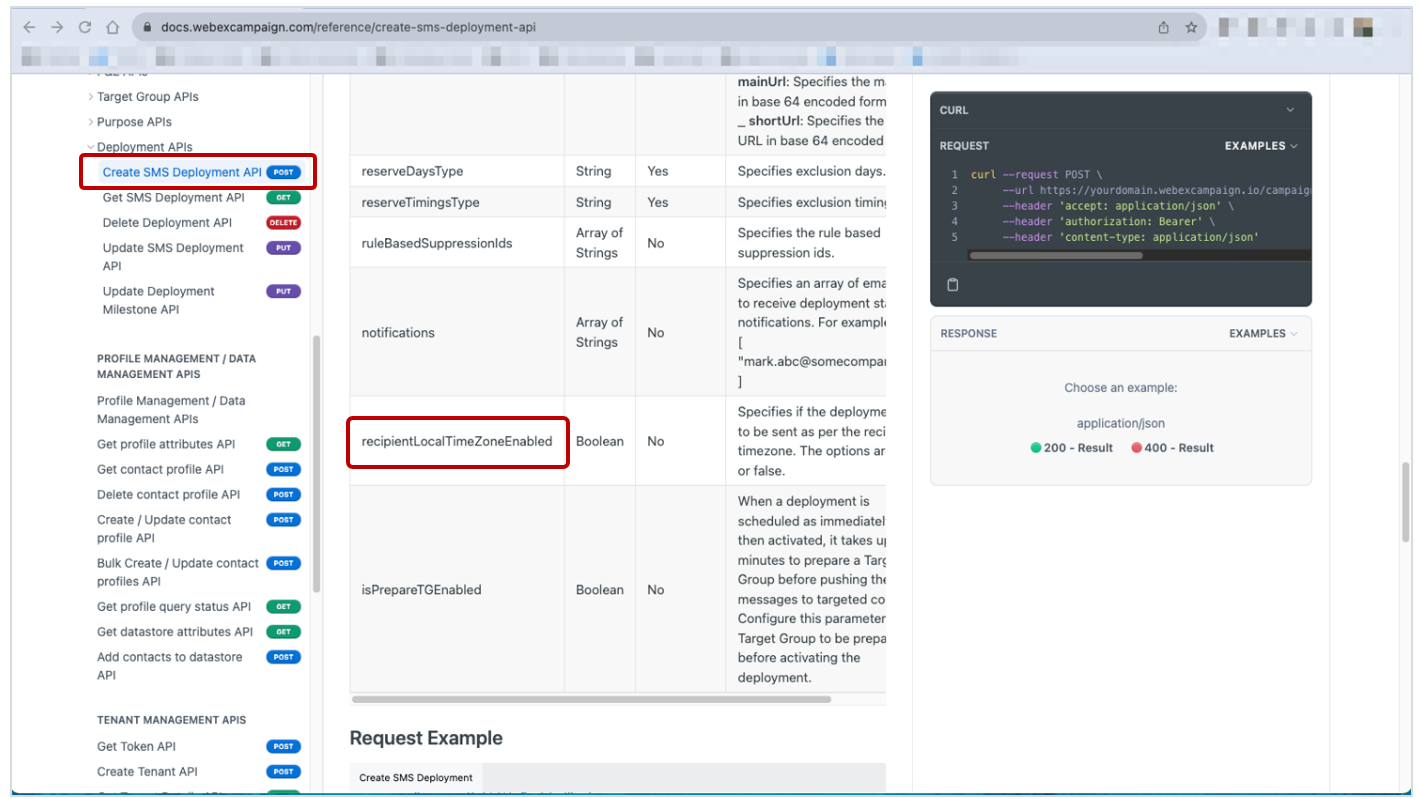
2.1 Create SMS Deployment API: Ability to enable ‘recipientLocalTimeZone’ flag
We have enhanced this API such that now you can enable the flag for “scheduling delivery of SMS messages taking into account the recipient’s local timezone”. This is applicable for clients hosted in AWS-USA and AWS-Canada.
3.0 Dashboard & Reports module enhancements
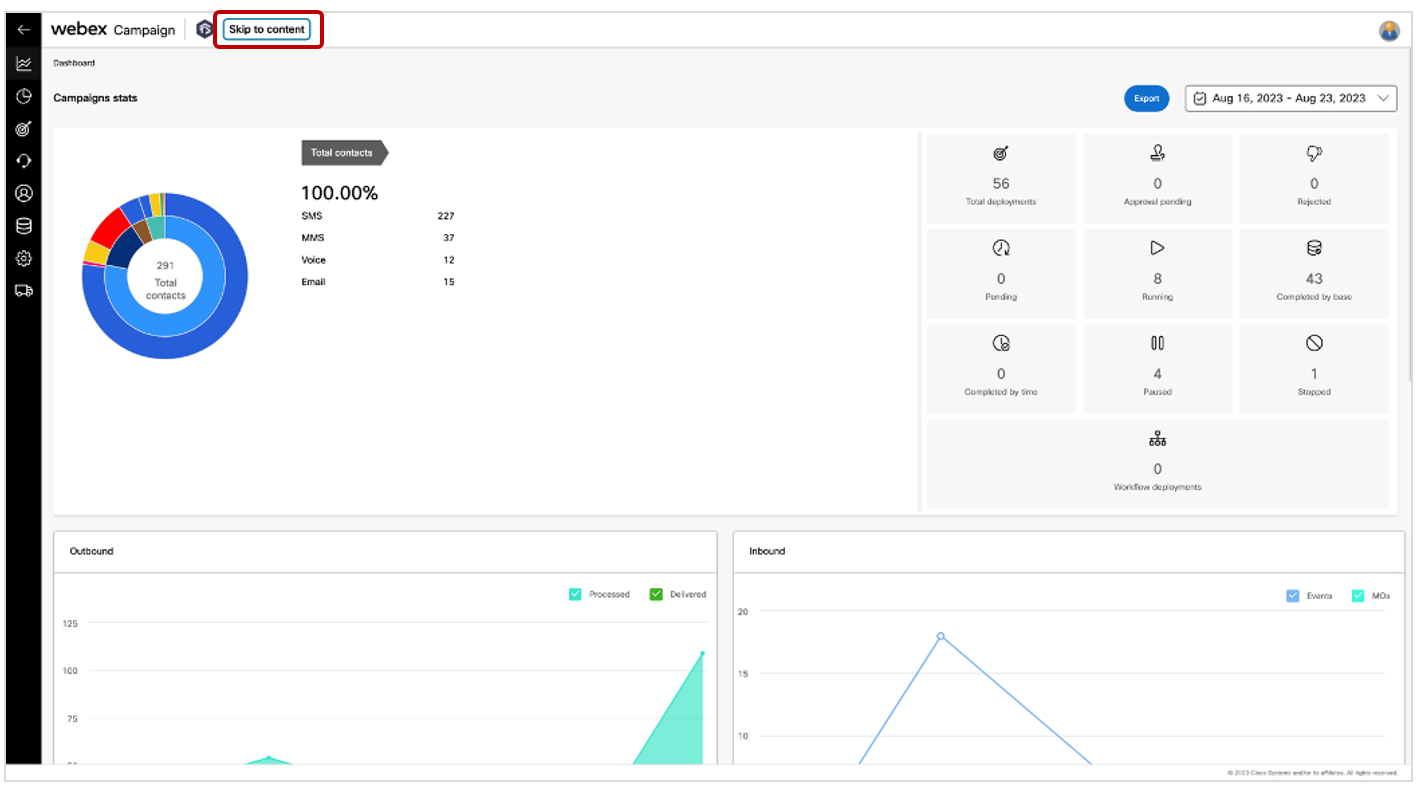
3.1 Accessibility WCAG WEB 2.4.1 (A) compliance: Added ‘bypass block’
We have continued to make progress in improving Webex Campaign’s accessibility for visually impaired users and users with limited finger dexterity. The primary mechanism for this accessibility improvement is to ensure as much of the product’s functionality as possible is accessible to users only with the use of a keyboard (without having to use the mouse) so that they can work effectively with their preferred screen reader software.
As part of this journey to improve the product’s accessibility, we have introduced the ability for keyboard-only users to ‘skip to content’, thus saving them the time and a few keystrokes of the tab key. This feature was introduced so that we can be compliant with the Web Content Accessibility Guidelines (WCAG) criterion “WEB 2.4.1 (A)”.
This “Skip to content” wording is not visible to most regular users; however, if a user is just navigating with their keyboard, then this ‘bypass block’ will become visible.
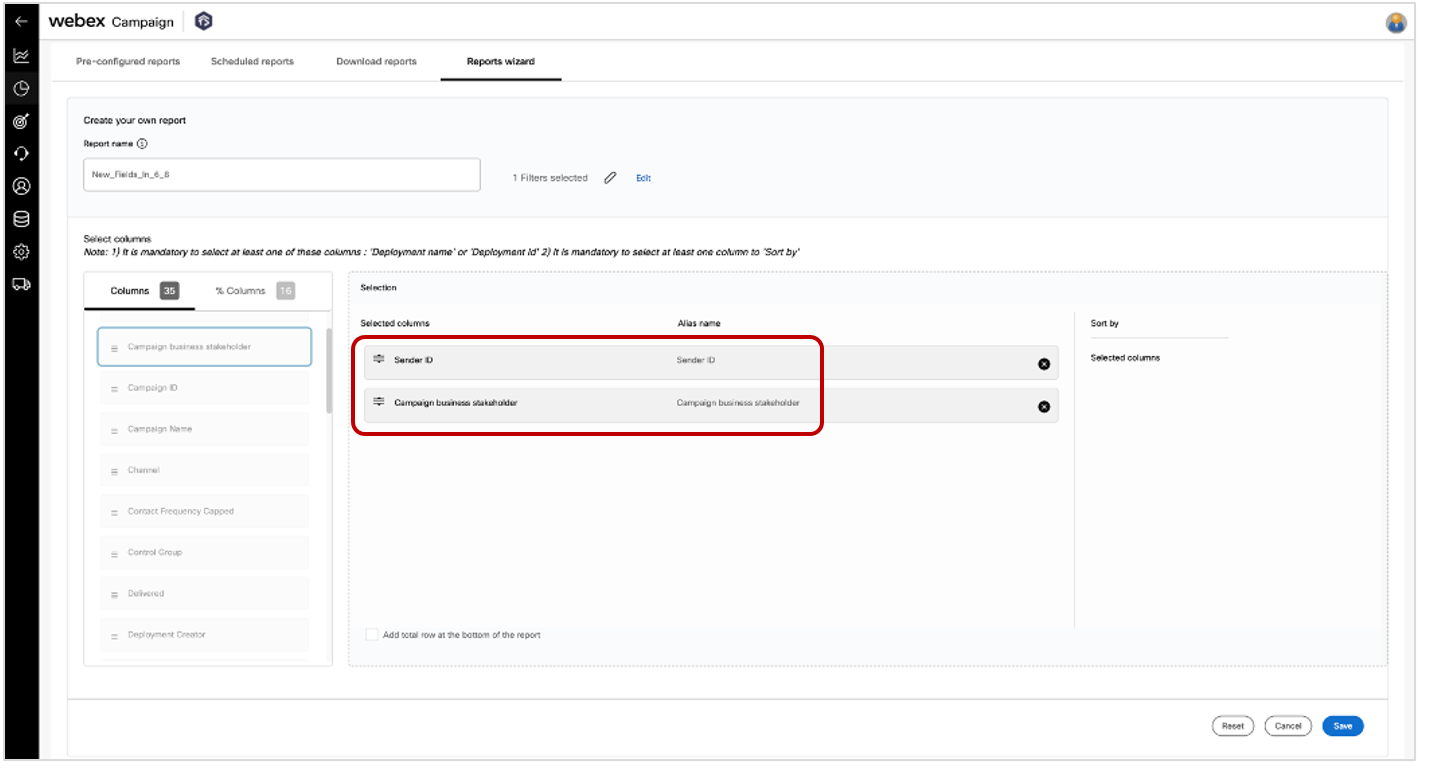
3.2 Report wizard: Added ‘Sender ID’ and ‘Campaign business stakeholder’ columns
Based on client feedback, we have added the following 2 columns in the ‘Report wizard’:
- Sender ID
- Campaign Business Stakeholder
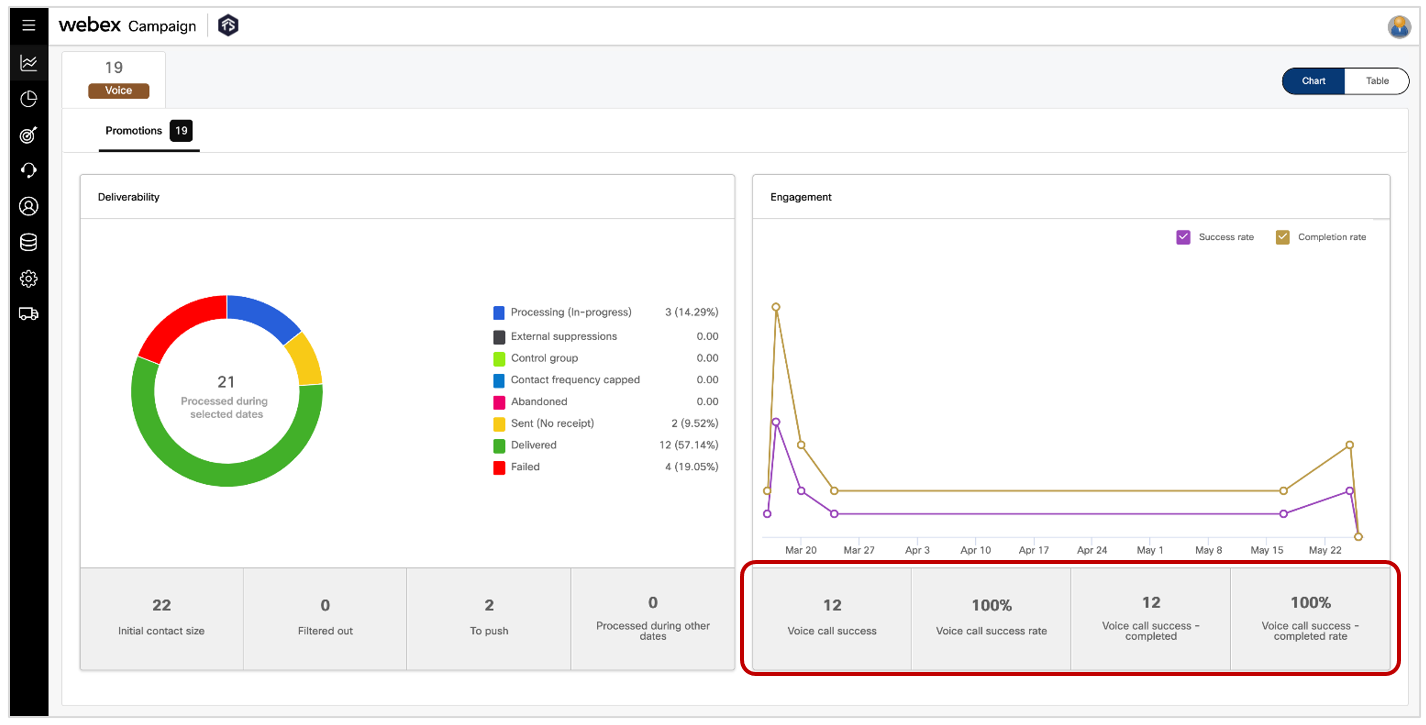
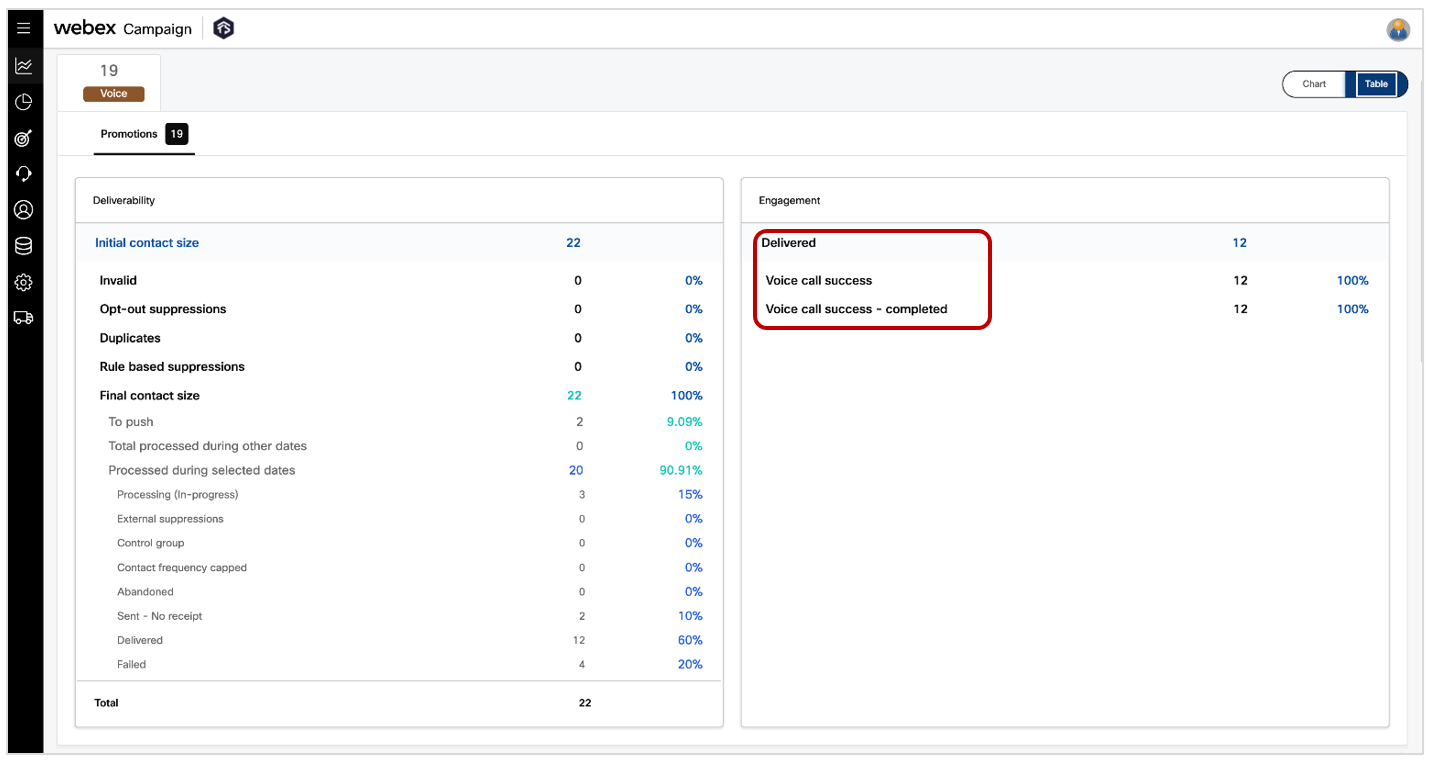
3.3 Voice channel deployments: ‘OBD’ wordings replaced by ‘Voice call’ on Dashboard & Reports
On the ‘Dashboard Deployment Details’ screen for voice channel deployments, we have changed the terminology from ‘OBD (outbound dialer’) to ‘Voice calls’.
A similar change has also been made in the pre-configured ‘Voice campaign transaction report’.
4.0 Email Composer module enhancements
4.1 Ability to select images from external ‘Canto’ digital asset management (DAM) system
This is a tenant-specific feature enabled for specific clients on request.
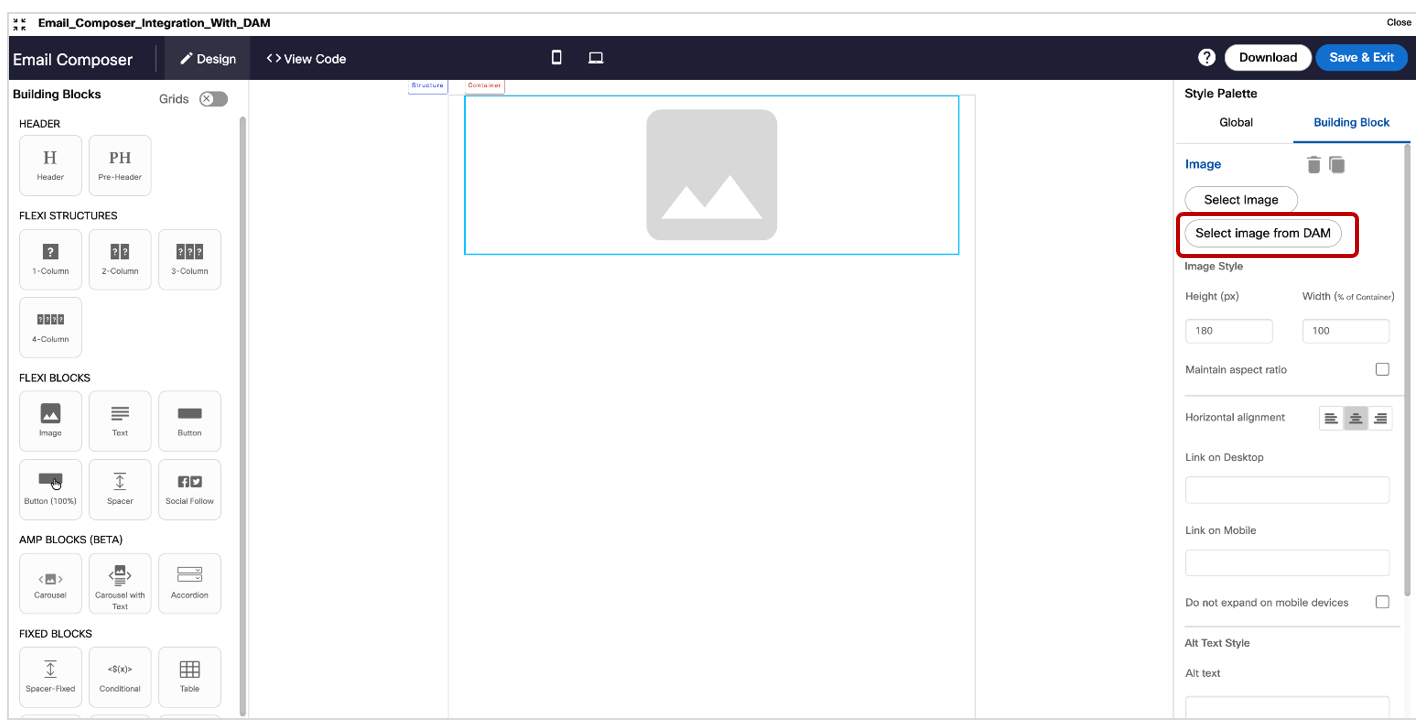
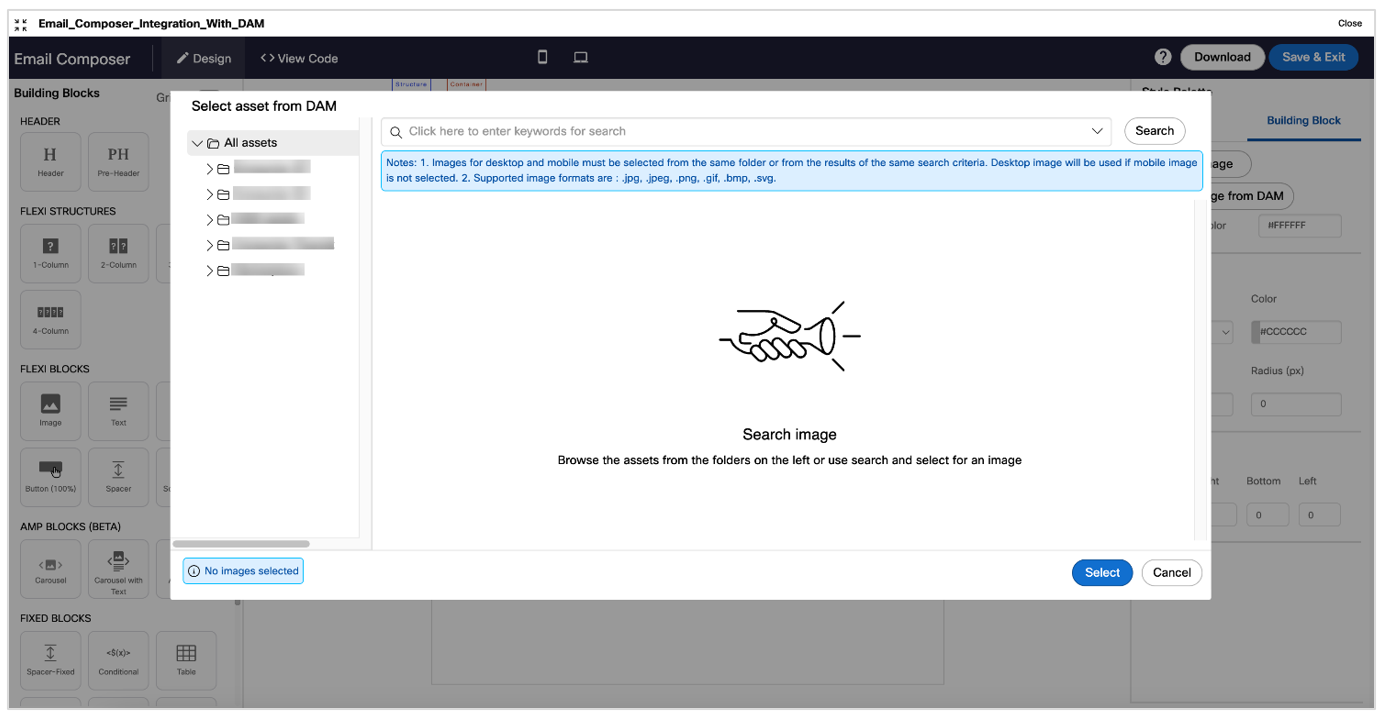
In the email composer ‘Image’ flexi block, we have implemented API-level integration with the 3rd party DAM system called ‘Canto’. In addition to the existing ‘Select image’ button, we have introduced a new button called ‘Select image from DAM’. When clicked on this new button, you will be able to retrieve digital assets (images) from your organization’s Canto DAM system and insert them within your email templates. This follows the appropriate security authentication and authorization to be able to invoke the Canto APIs.
Usage notes:
-
In the current implementation, all the asset types to be selected will be of ‘Image’ type and the formats supported for the image will be .jpg, .jpeg, .png, .gif, .bmp & .svg.
-
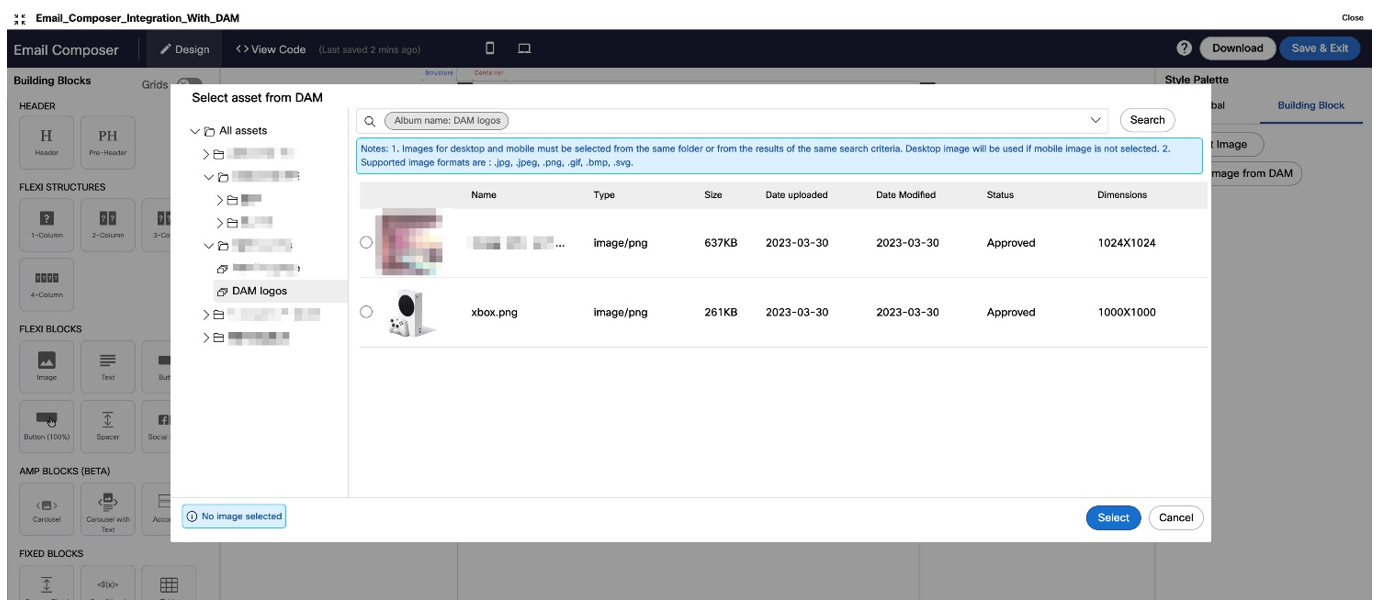
On the left panel, you will see the folder structure and will be able to expand/collapse specific folders. Canto folders and albums can be distinguished by their different icons on the left panel.
-
On the right panel, you will be able to see thumbnails of the images – with the following additional info about each image also shown:
a. Image name
b. Asset type and file extension
c. Image size
d. Date uploaded
e. Date modified on
f. Approval status
g. Image width & height dimensions (in pixels)
-
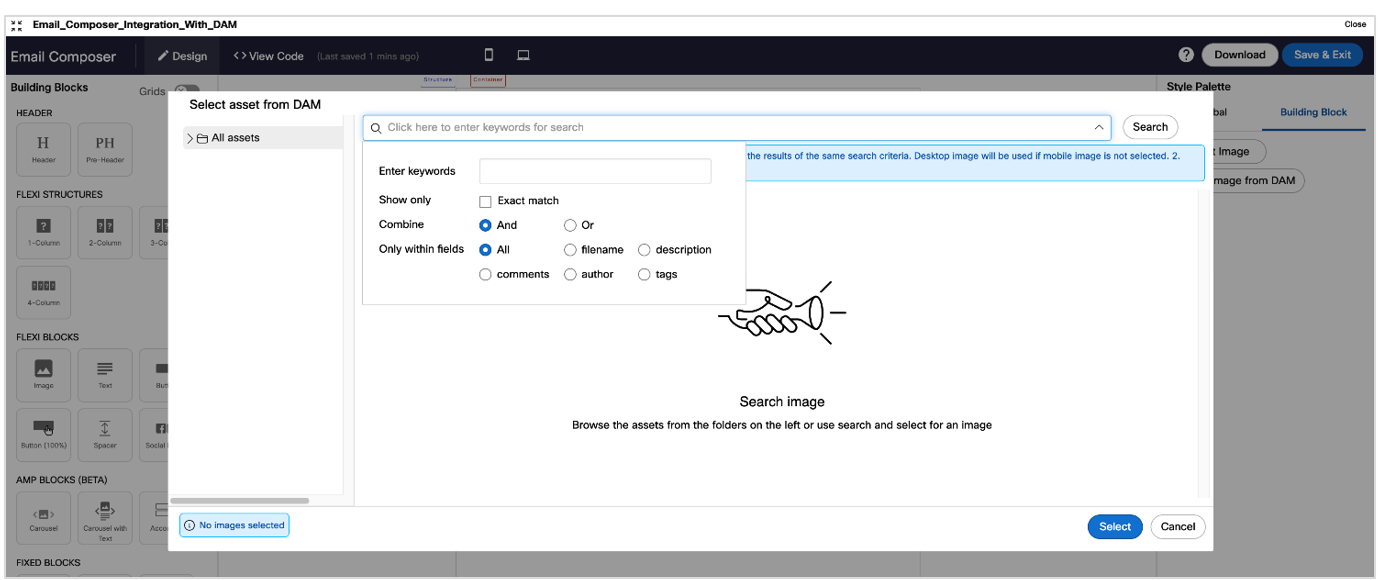
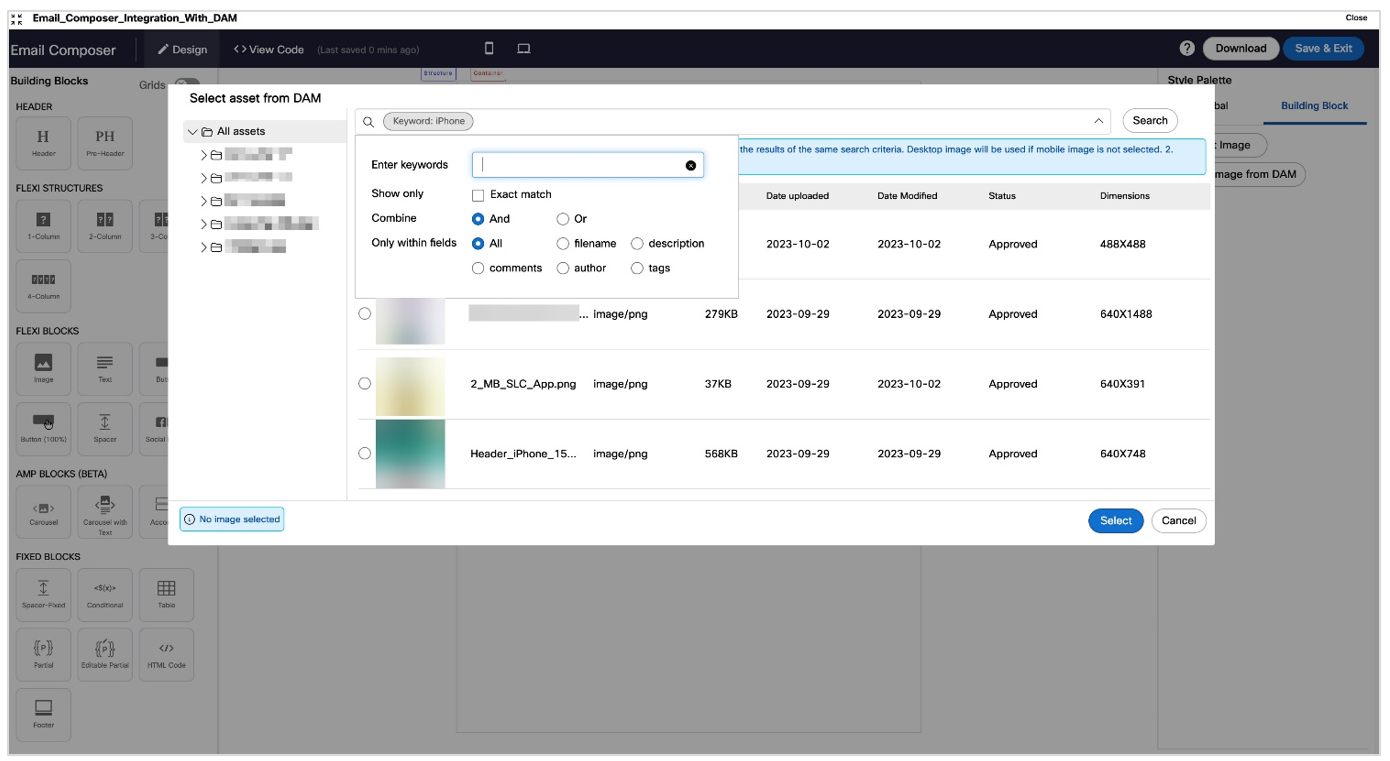
You can search for the image by filename, description, comments, author, and tags. You can just enter the keywords and select the fields in which you would like to search for the entered keyword.
-
You can optionally select the ‘Exact match’ checkbox.
-
Desktop image will be used for mobile rendering if a separate image has not been selected for when displaying the email on a mobile device.
-
Images for desktop and mobile must be selected from the same folder or from the results of the same search criteria.
4.2 Ability to select images from external ‘Liferay’ digital asset management (DAM) system
This is a tenant-specific feature enabled for specific clients on request.
In the email composer ‘Image’ flexi block, we have implemented API-level integration with the 3rd party DAM system called ‘Liferay’. In addition to the existing ‘Select image’ button, we have introduced a new button called ‘Select image from DAM’. When clicked on this new button, you will be able to retrieve digital assets (images) from your organization’s Liferay DAM system and insert them within your email templates. This follows the appropriate security authentication and authorization to be able to invoke the Liferay APIs.
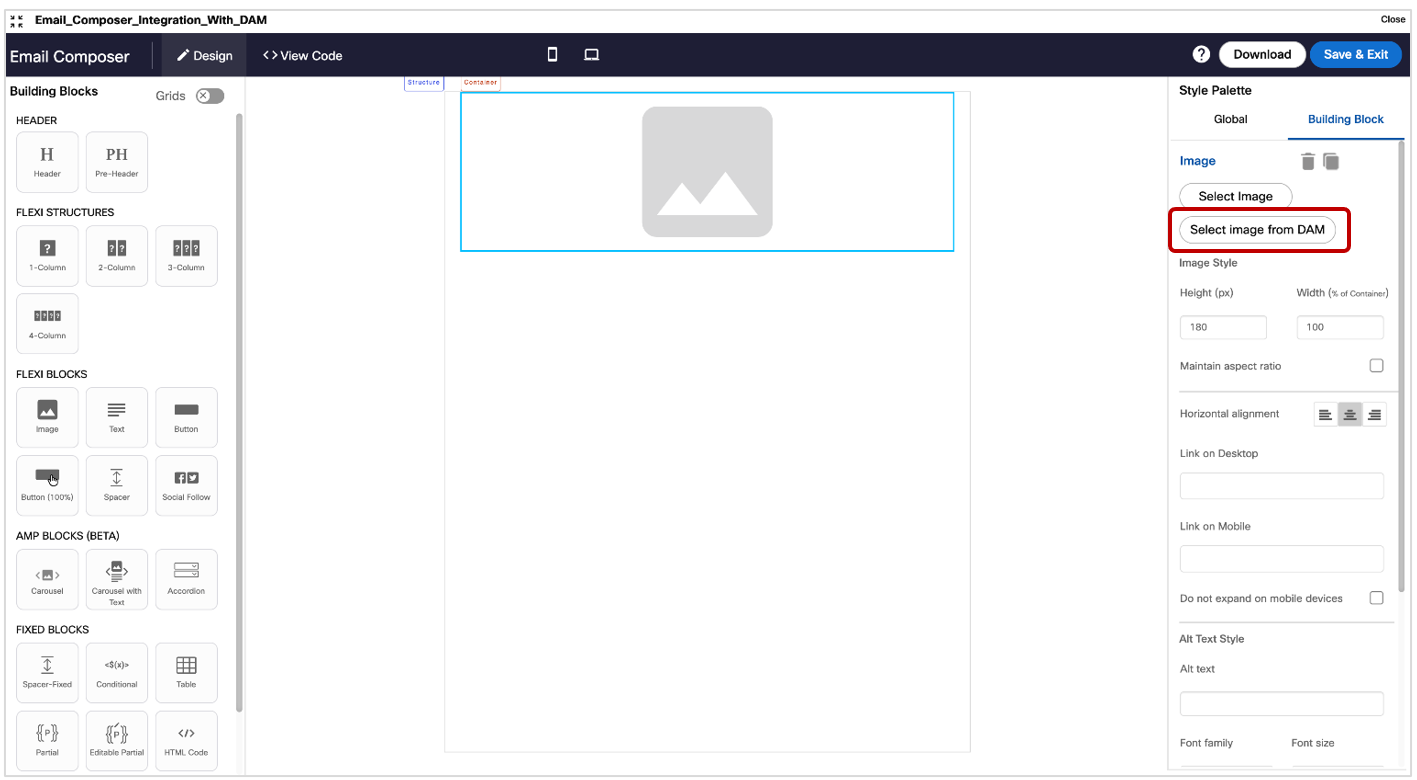
Usage notes:
-
In the current implementation, all the asset types to be selected will be of ‘Image’ type and the formats supported for the image will be .jpg, .jpeg, .png, .gif, .bmp & .svg.
-
On the left panel, you will see the folder structure and will be able to expand/collapse specific folders.
-
On the right panel, you will be able to see thumbnails of the images – with the following additional info about each image also shown:
a. Image name
b. Asset type and file extension
c. Image size
d. Date modified
e. Image width & height dimensions (in pixels)
f. Image version within Liferay DAM -
You can enter your search keywords for filename or folder name or tags.
-
Desktop image will be used for mobile rendering if a separate image has not been selected for when displaying the email on a mobile device.
-
Images for desktop and mobile must be selected from the same folder or from the results of the same search criteria.


5.0 Landing Page Composer module enhancements
5.1 Ability to generate a ‘personalized scannable barcode’ within the image-flexi block
You will now be able to generate a barcode by passing the barcode number as a parameter to an image-generation URL; an example is shown below.
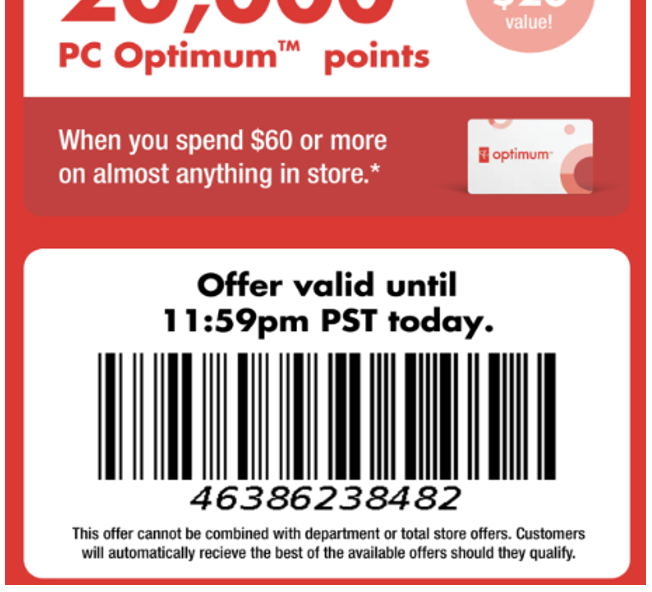
To generate a barcode, use the below URL for an image block.
Do not forget to replace the tenant and header name. In the below url, BARCODE header will be used to generate the barcode.
https://dummytenant.webexcampaign.ca/barcode/generate?text=$(ETG_BARCODE)&textPosition=1
For more information, refer to Generate barcode in landing page section.
6.0 Profile Manager module enhancements
6.1 Segment Builder: Rationalization and simplification of filter condition operator options
After conducting a thorough review of all the possible filter condition values applicable for various datatypes, we have simplified and rationalized the possible combination values for data-types, comparison operators, and right-side comparison expressions. As part of this change, the ‘TIME’ data-type attributes have been deprecated.
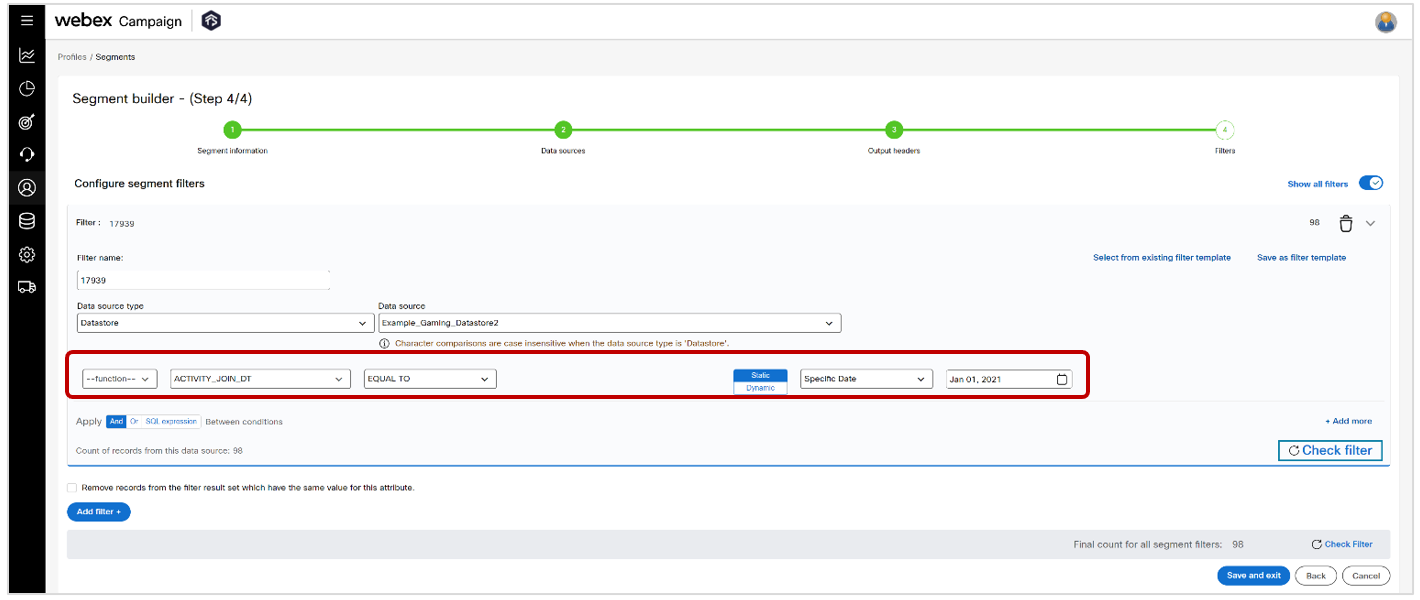
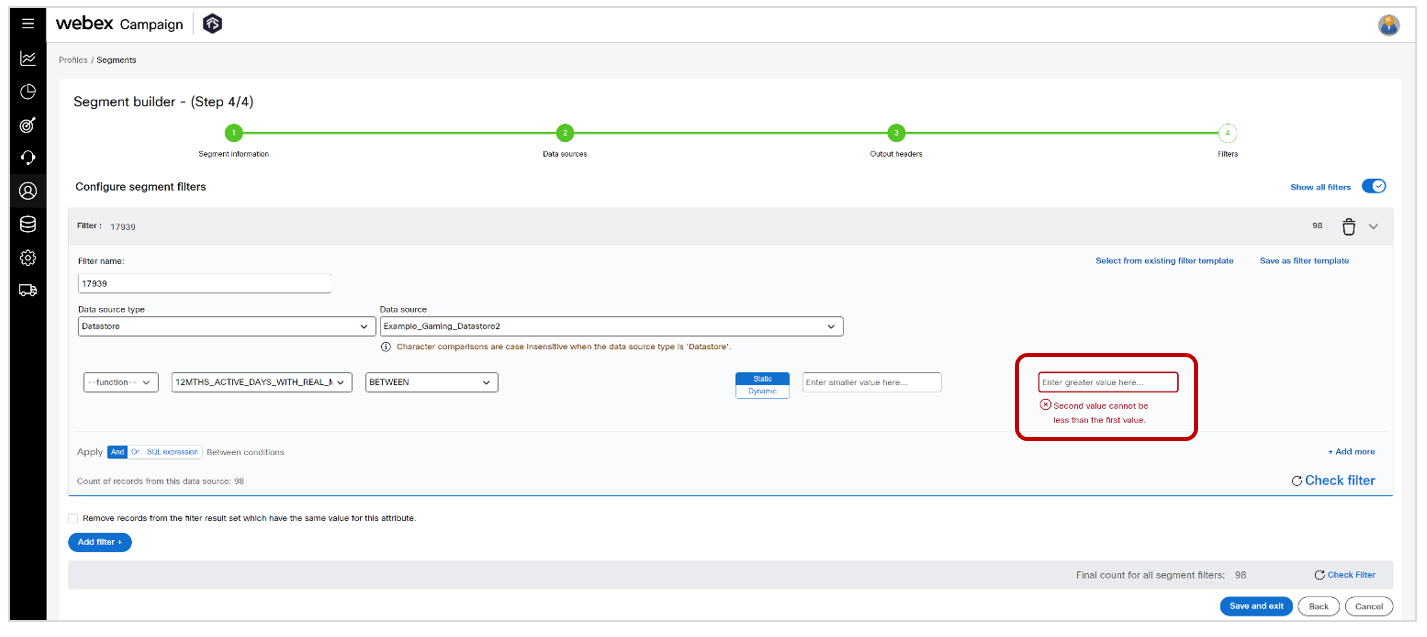
6.2 Segment Builder: Introduced additional validations for user-entered comparison values
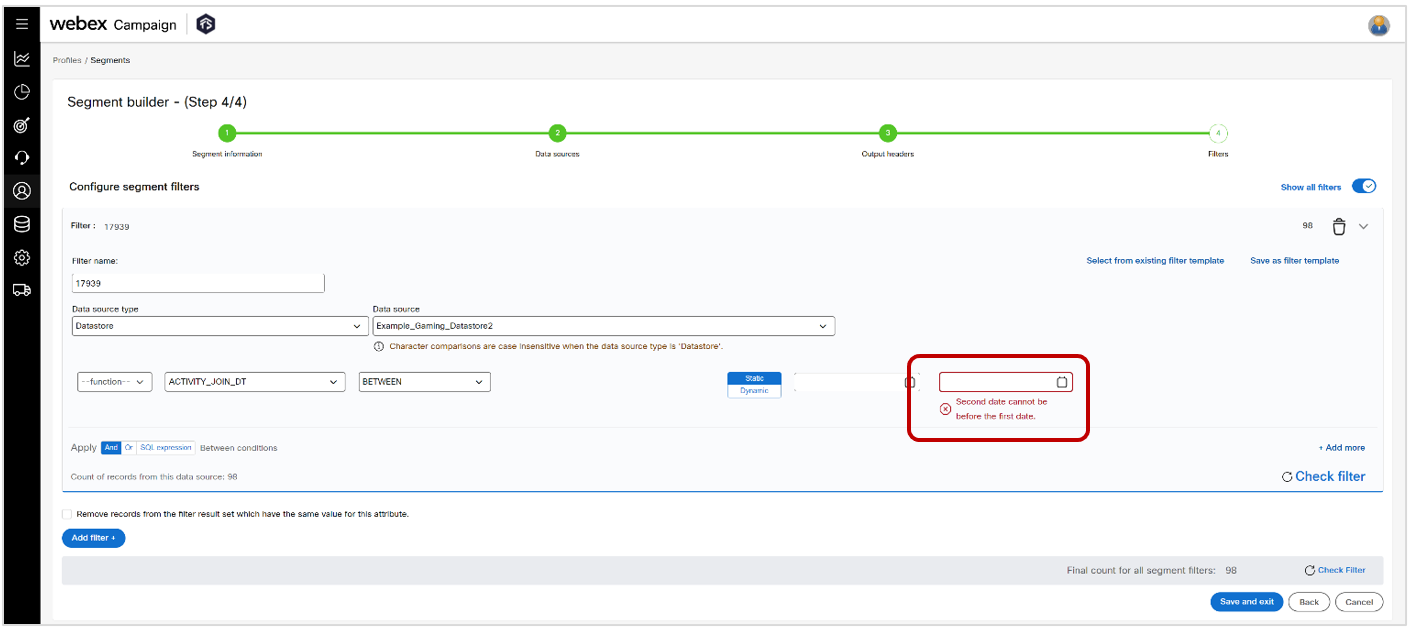
We have introduced the following additional validations on the Segment Builder screen:
- For attributes with the DATETIME data-type with the BETWEEN operator, we have added a validation to ensure that the “Second date cannot be before the first date.”.
- For attributes with the DECIMAL and BIGINT data-types with the BETWEEN operator, we have added a validation to ensure that the “Second value cannot be less than the first value.”.
- For attributes with the BIGINT data-type, we have added a validation to remind the user that “This is an Integer attribute. Please enter a valid integer value.”.
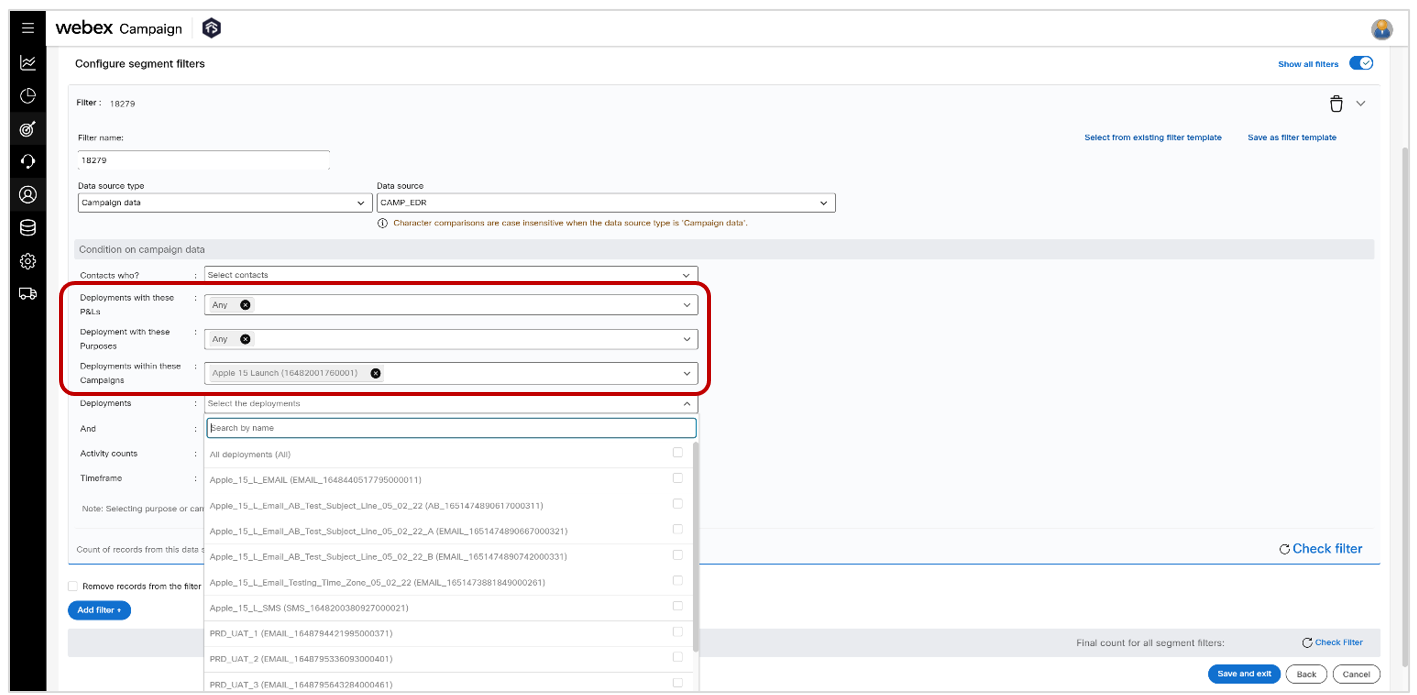
6.3 Segment Builder: Filters based on ‘CAMP_EDR’ Campaign Data source
We have clarified wordings on this screen so that the user can select deployments with ‘Any’ P&L values and/or deployments with ‘Any’ Purpose values.
This feature update is associated with Nolt enhancement idea # 359 and ServiceNow ticket INC13666005.
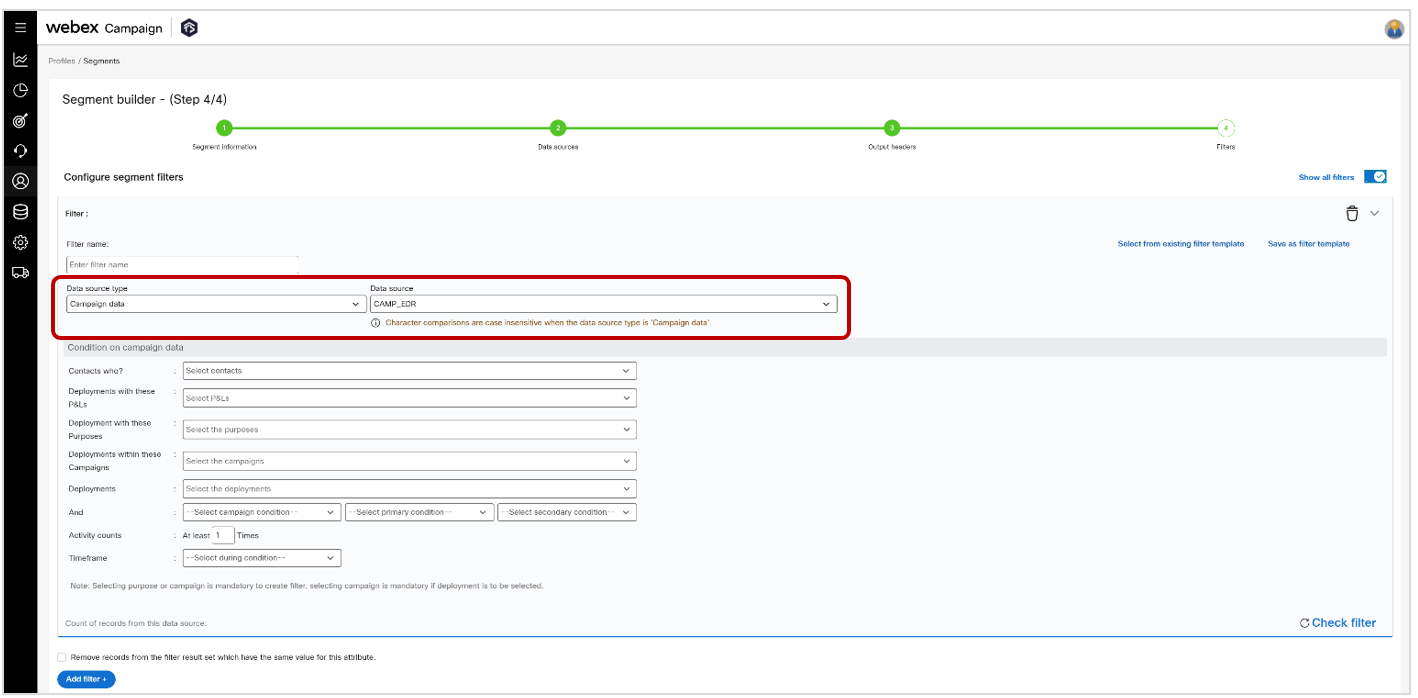
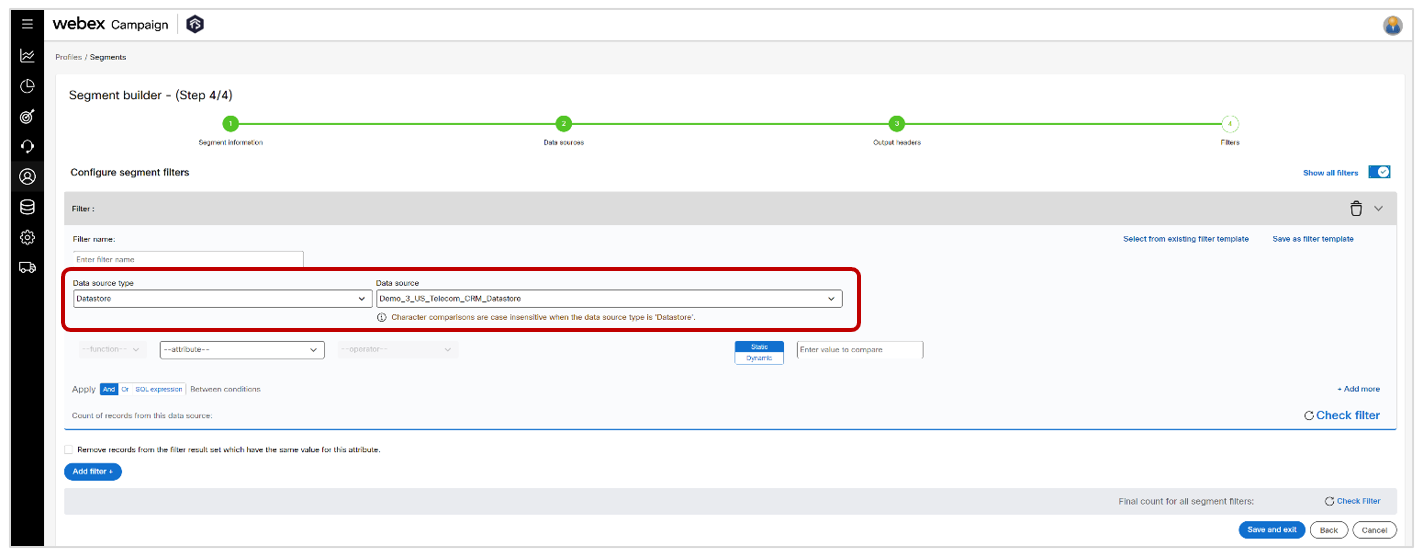
6.4 Segment Builder: Character comparison case sensitivity clarified based on the data-source
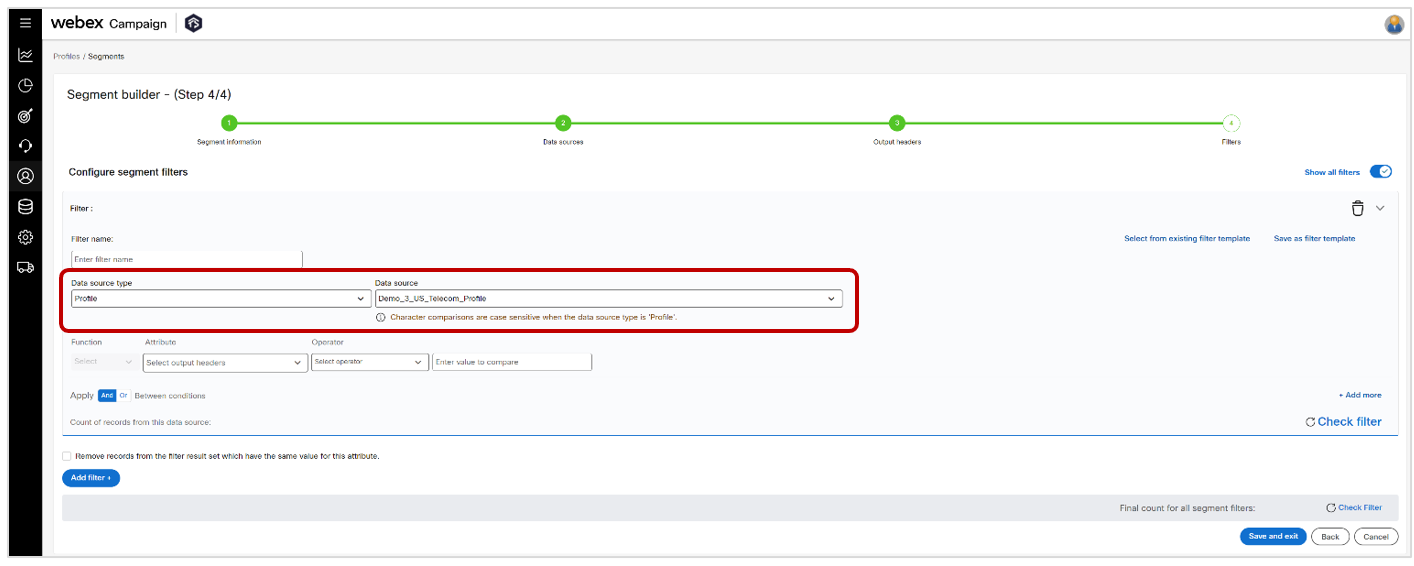
We have added the following information alerts to clarify whether the character comparisons are case-sensitive or case-insensitive depending on the data source type selected by the user.
Character comparisons are case insensitive when the data source type is 'Campaign data'.
Character comparisons are case sensitive when the data source type is 'Profile'.
Character comparisons are case insensitive when the data source type is 'Datastore'.
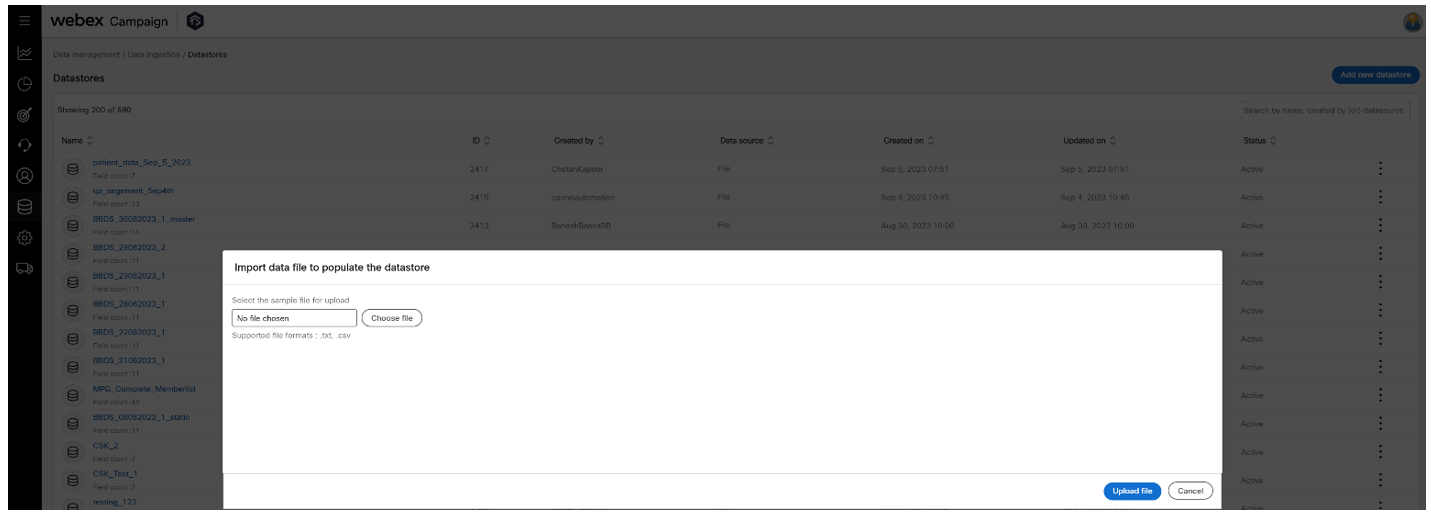
6.5 Datastore creation from a file: UX improvement to clarify the steps
We have improved the wording of the alerts to better guide the user in the steps required to create a new datastore from a file:
a) Upload a sample file to create the structure of your datastore
b) Import the actual data file into the empty datastore created.



7.0 Maintenance items in this release
To be updated soon.
8.0 Need more information?
Please contact your Cisco Webex client representative if you have questions or would like access to a new feature.
Cisco Webex technical support team can be contacted at any time by phone or email:
- Europe / Middle East / Africa:
- Phone: +44 (0) 1494 750 600
- Email: [email protected]
- North America:
- Phone: +1-855-324-0970
- Email: [email protected]