Release 7.2 - 2024 November
1.0 Campaign Manager module enhancements
1.1 Ability to create Target Groups from encrypted and zip-compressed SFTP files
This feature demonstrates our continued ongoing commitment to security and privacy for your customer data.
Prior to this release, you would have had to use the ‘Data exchange’ feature within the ‘Data management’ to ingest an encrypted file from an SFTP location, which was a somewhat cumbersome process.
With this release, you will be able to directly ingest the following types of files when creating a Target Group from files dropped in an SFTP location:
- Encrypted files (.GPG or .PGP file extensions)
- Zip-compressed and password-protected files (.ZIP file extensions)
This feature is associated with client-initiated enhancement requests Nolt #343 and Nolt #455.
How to use this feature:
-
On the ‘Target group from secure FTP’ screen, you will now see a new dropdown named ‘Incoming file format’ with the following 3 options:
• Not encrypted/compressed (this is the default option)
• Encrypted
• Zip compressed and password protected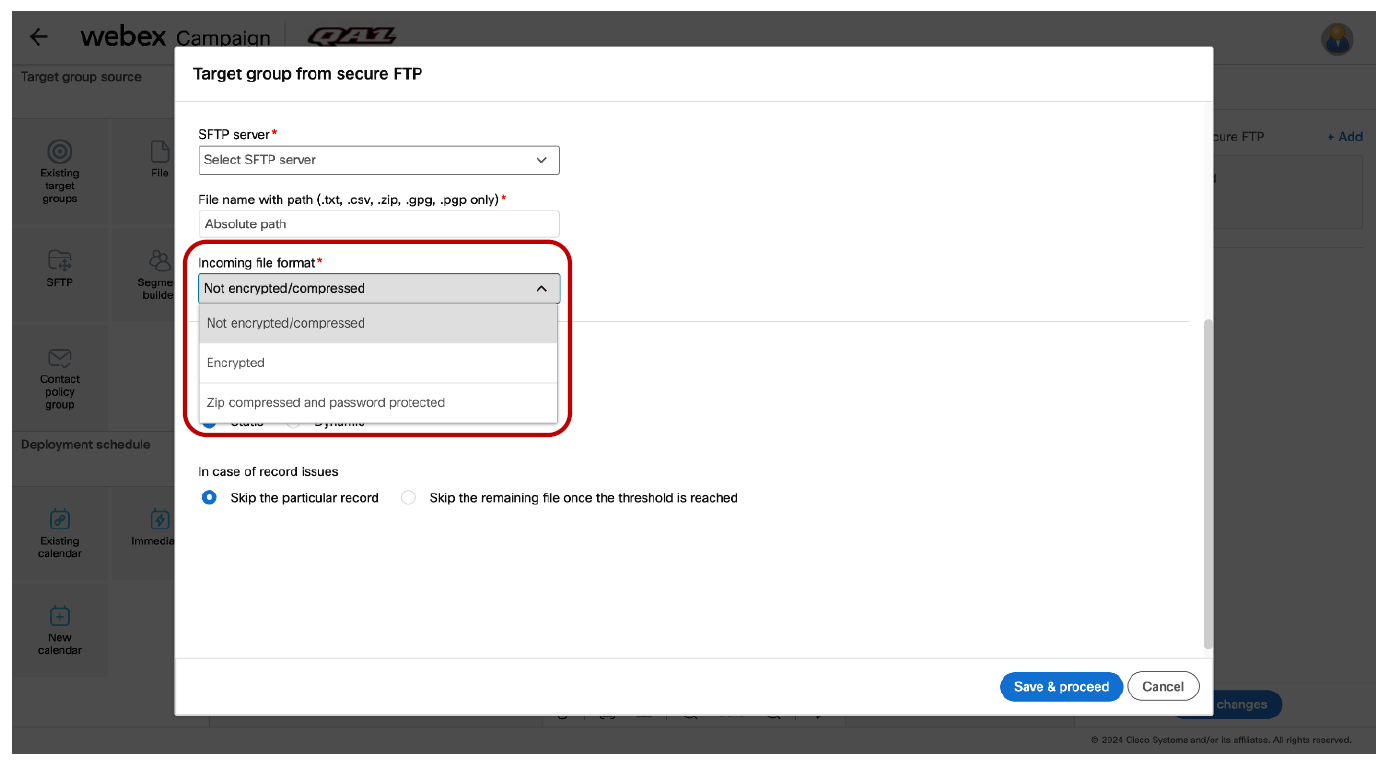
-
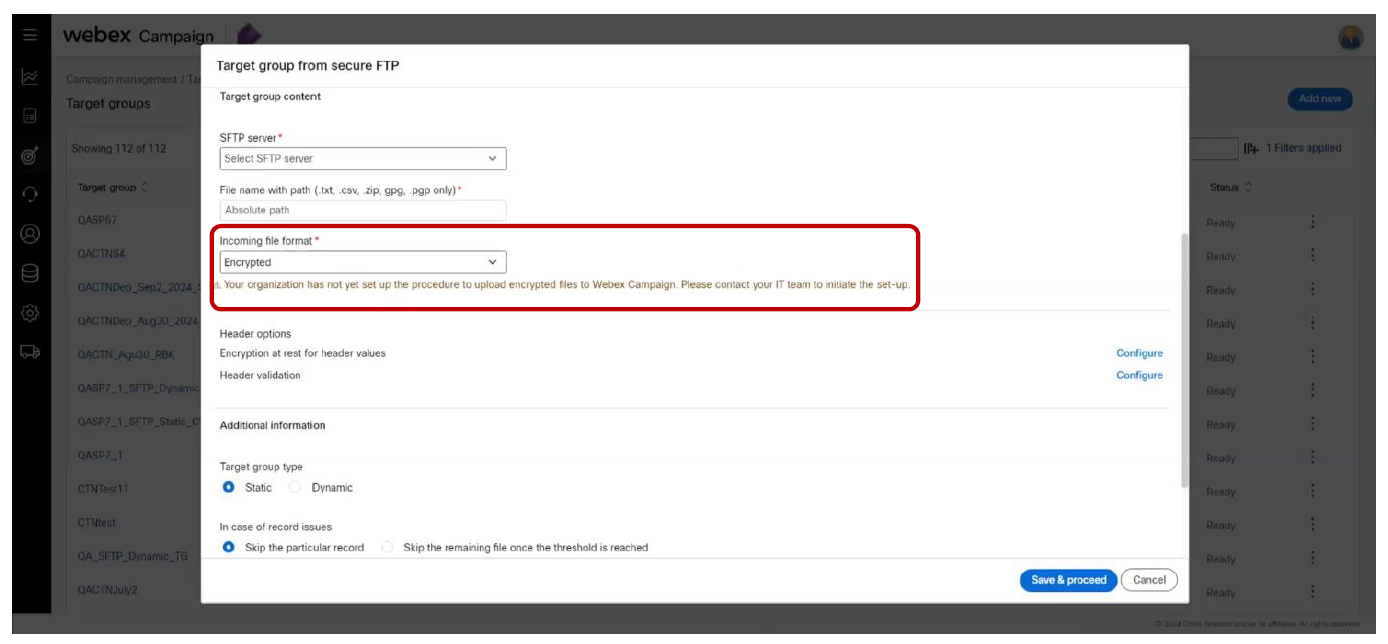
If you select the ‘Encrypted’ option in this dropdown, then the system will check whether a specific type of encryption (either GPG or PGP format) has been already configured for your tenant by your IT team. If such configuration has not yet been set up, then you will see an error message as shown below: “Your organization has not yet set up the procedure to upload encrypted files to Webex Campaign. Please contact your IT team to initiate the set-up.”
-
If your organization’s IT team has already configured the encryption mechanism, then the system will inform you which encryption mechanism is supported for your organization: either PGP or GPG format. Your SFTP file’s encryption method must match this format.
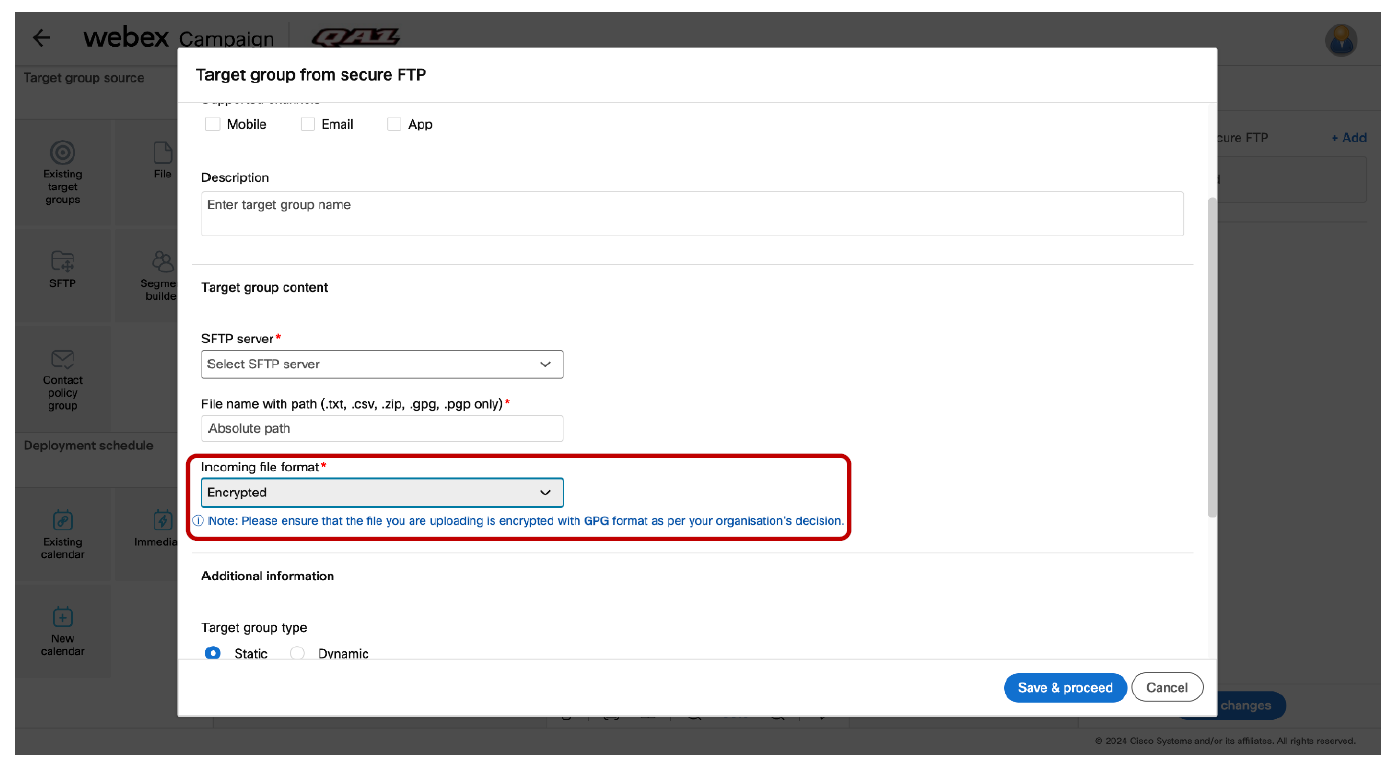
- The original file (before encryption) must be of either pipe-delimited .txt or of .csv format.
- If you select the ‘Zip compressed and password protected’ option in this dropdown, then your file in the SFTP will need to have the .zip extension. You will then need to provide the password for the zip-compressed file.
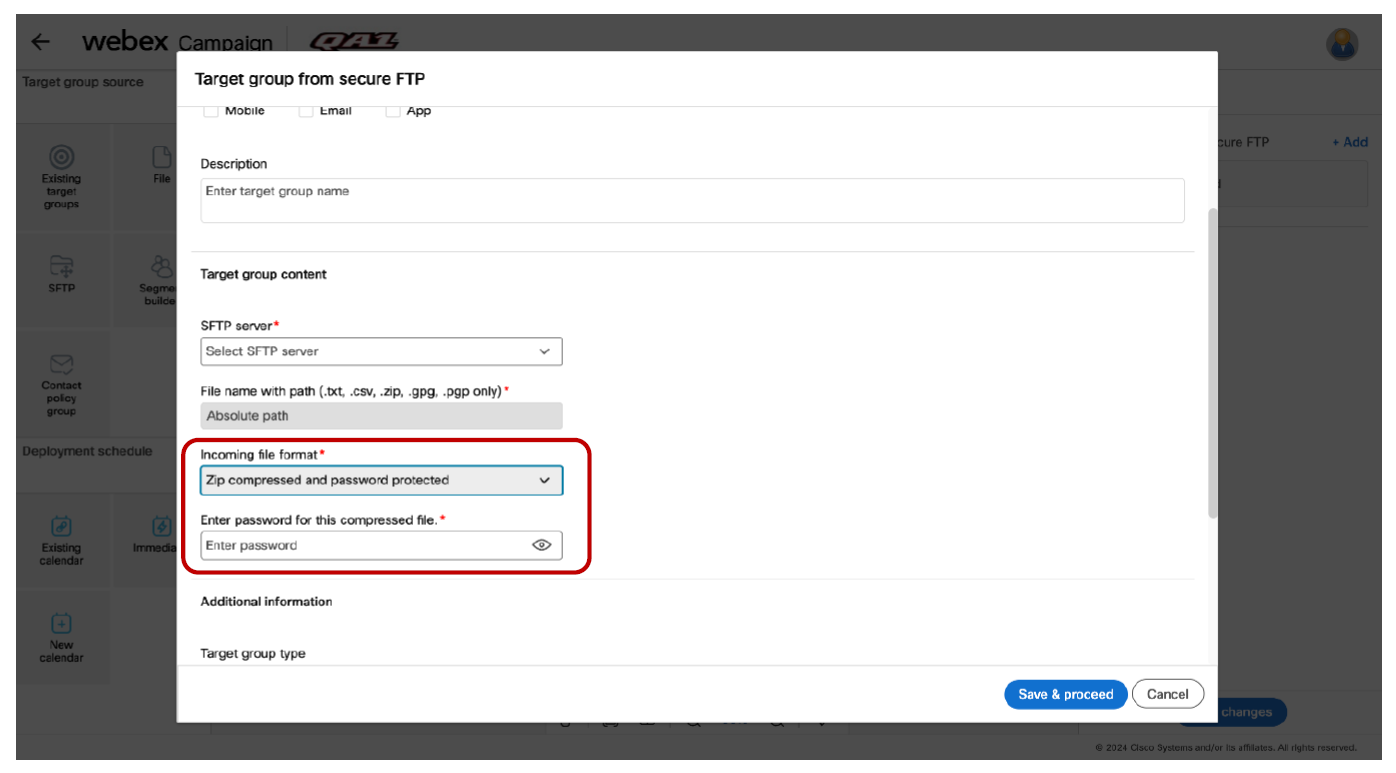
- The original file (before being zipped) must be either a pipe-delimited .txt file or a .csv file.
- The zipped file itself should contain a single file, i.e. it should not contain multiple files zipped together.
- The zipped file should not contain a file inside a folder.
- The password of the zip-compressed file must not contain any characters apart from the following: a-z, A-Z, 0-9, @, #, $.
Usage notes and restrictions:
- This feature is available from the following 2 screens within Webex Campaign:
a. Target data >> Target groups >> Add new >> Target group from secure FTP
b. Create deployment canvas >> Target group from secure FTP - This feature is available only when the Target Group is created from the UI from the above 2 screens. It is not available when using the ‘Create Target Group’ API.
- This feature also works for the ‘Target Group Splitter’ use case, i.e. target groups created from encrypted files (.gpg or .pgp file extensions) or zip-compressed files (.zip file extensions) can be split using the ‘TG Splitter’ feature.
- This feature is currently only supported for ‘Promotion’ type deployments. Instant deployments whose events are triggered by a ‘file-drop’ are not currently supported, i.e. the files used for ‘file-drop’-triggered instant deployments must be in .txt or .csv format; these files cannot be encrypted or zip-compressed.
- For this feature, files can either be encrypted or zip-compressed. Files which are both encrypted and zip-compressed are not supported.
- The following types of files are not supported:
- .zip.gpg
- dat.gpg
- gzip
1.2 Improved support for ingestion of CSV files for Target Group creation
Prior to this release, when creating a ‘Target Group’ from a CSV file, Webex Campaign could correctly process the incoming CSV file:
- if no values in the CSV file were enclosed in double-quotes or
- if all the values in the CSV file were enclosed in double-quotes
With this release, we have improved this capability and now Webex Campaign will support CSV files where some specific values in the file are enclosed in double-quotes and other values are not enclosed in double-quotes.
This enhancement is relevant in use cases where the CSV file may have some values, such as a postal address, which contain commas themselves – thus requiring those specific values to be enclosed in double-quotes.
This enhancement is associated with client-initiated enhancement request Nolt #403.
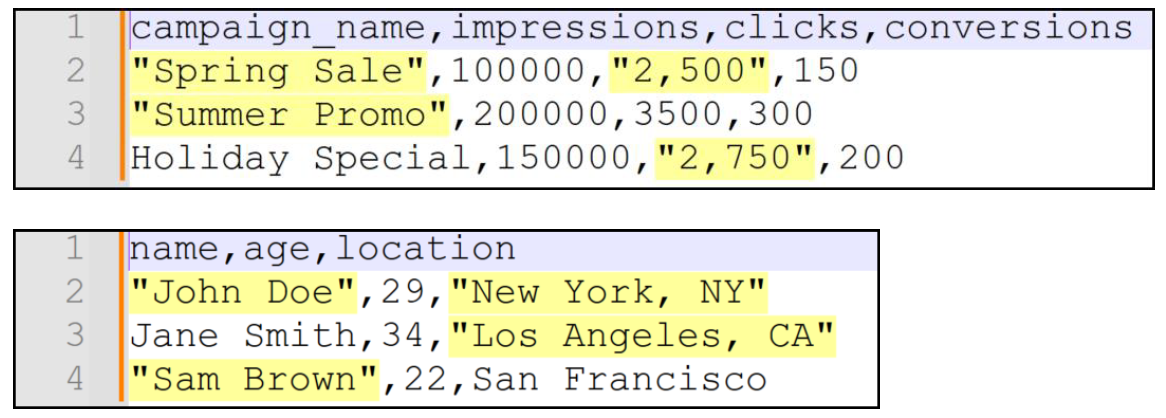
The following two CSV file snippets are examples of the types of records Webex Campaign will now be able to ingest as a result of this enhancement. As you can see in the below examples, the yellow-highlighted values are enclosed in double quotes; there are some field values that are enclosed in double-quotes whereas some other fields values in that same record are not enclosed in double-quotes.
Usage notes and restrictions:
- The incoming CSV file should not have any field values containing the pipe ( | ) character.
- CSV files are not supported for the purposes of ‘file-drop’ event triggering of instant deployments.
1.3 Email promotion deployments: use a ‘contact policy allow list’ as a target group source
This is a tenant-specific feature; it is useful for those clients:
a) who use both Webex Campaign and Webex Connect for their various marketing and non-marketing use cases and
b) who use the optional module within Webex Connect called ‘Contact Policy’ to store and manage their customers’ opt-in and opt-out preferences for receiving communications via specific channels.
You may remember, in the previous release 7.0 which went live in July 2023, we introduced the integration of Webex Campaign’s integration with this ‘Contact Policy’ module for SMS channel promotion deployments.
In this release, we are expanding that integration with the ‘Contact Policy’ module as follows: You can now use a ‘Contact Policy Allow List’ as a Target Group Source while configuring Email channel promotion deployments. This feature is associated with the client-initiated enhancement request Nolt #471.
Pre-requisites for using this feature:
a) You will need to have a valid licensed tenant on Webex Connect.
b) You will need to have enabled the usage of the optional ‘Contact Policy’ module within your Webex Connect tenant.
c) You will need to have created at least one ‘Consent Group’ with a Group Category of ‘Allow List’. This ‘Allow List’ will have the email addresses of your customers who have opted in to receive communications from you via the email channel.
d) You will need to request the Webex CPaaS Tech Support team to associate your Webex Campaign tenant with the corresponding Webex Connect tenant.
e) As this is a tenant-specific feature, you will need to request the Webex CPaaS Tech Support team to enable the ‘Contact Policy Integration’ feature on the Webex Campaign Admin Console.
How ‘Contact Policy Allow Lists’ data will be available to use within Webex Campaign:
a) As part of this integration with the ‘Contact Policy’ module, every morning once a day at approximately 5 am system time, Webex Campaign will automatically retrieve all the email opt-in records from all the ‘Allow Lists’ from your Webex Connect tenant’s Contact Policy module.
b) Only the ‘Allow Lists’ will be retrieved into Webex Campaign. i.e. ‘Deny Lists’ will not be retrieved.
c) Only those records from ‘Allow Lists’ will be retrieved into Webex Campaign which match the following criteria: ‘Channel’ = ‘email’ and ‘Consent’ = ‘true’.
d) These ‘Allow Lists’ will be fully flushed and reloaded every morning.
e) If an ‘Allow List’ has been disabled in the ‘Contact Policy’ module during the day (after it has been retrieved into Webex Campaign at 5 am), then during next morning’s refresh, this ‘Allow List’ will not be retrieved into Webex Campaign.
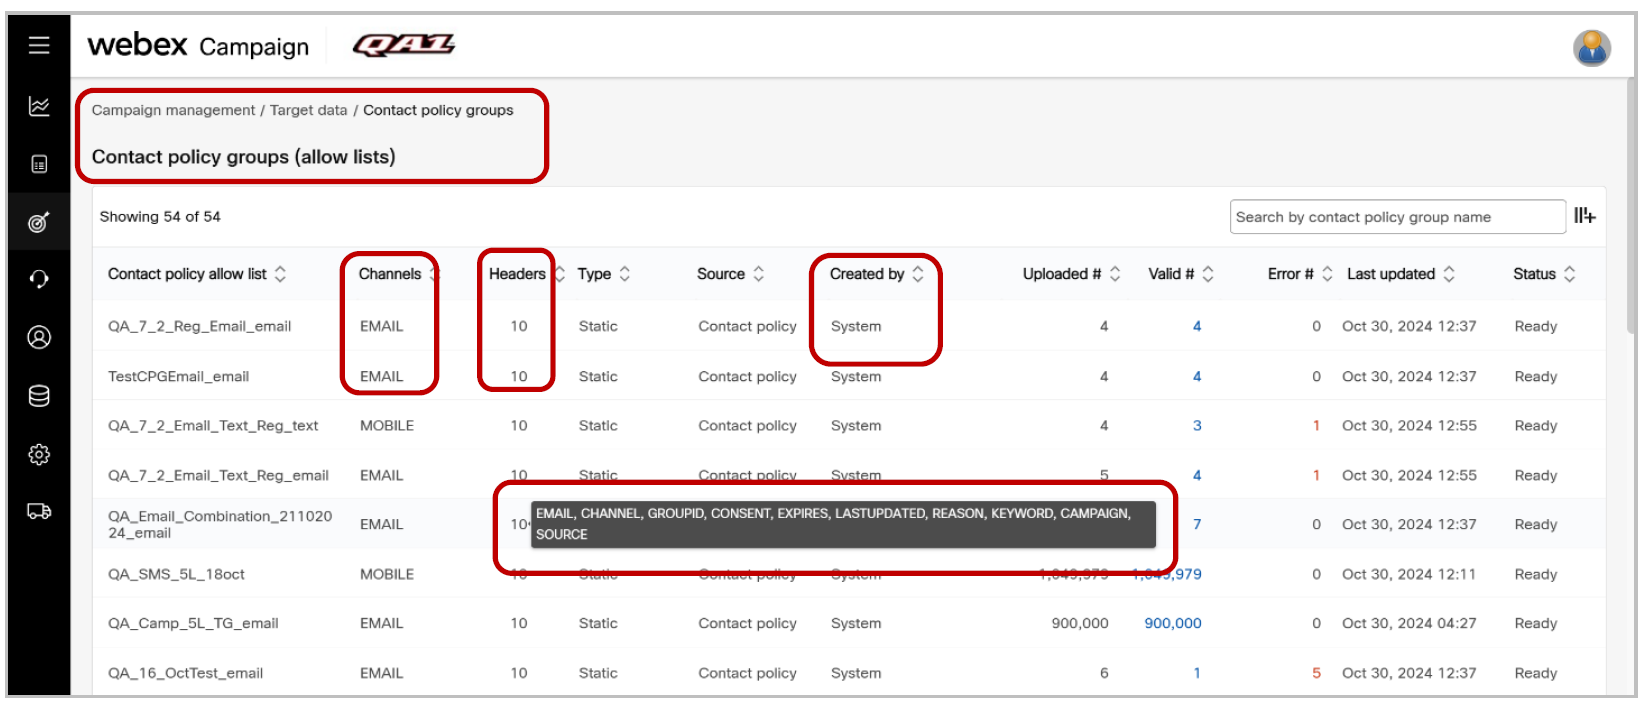
f) We have modified the existing ‘Contact policy groups’ screen to now display contact policy groups which have been retrieved from your Webex Connect Contact Policy module for both SMS & email channels. This screen is available here: Campaigns >> Target data >> Contact policy groups.
g) Any user whose role has the permission to view the ‘Target groups’ screen will also be able to view this new ‘Contact policy groups’ screen.
h) As these ‘Contact policy groups’ are system-created, they will always be visible to eligible users irrespective of which ‘User Group’ the user is currently in.
i) The ‘Last updated’ column in the above screen will show the date and time each ‘Allow List’ was refreshed within Webex Campaign. In production environments, the timestamp should be between 5 am and 5:30 am on each day.
j) The following 10 header values for each opt-in consent record will be retrieved from ‘Contact Policy’ into Webex Campaign:
i. EMAIL
ii. CHANNEL (this value will always be ‘email’)
iii. GROUPID
iv. CONSENT (this value will always be ‘true’)
v. EXPIRES (this is the date/time when the customer’s opt-in consent expires)
vi. LASTUPDATED (this is when the opt-in record within ‘Contact Policy’ was last updated)
vii. REASON
viii. KEYWORD
ix. CAMPAIGN (this is different from what a ‘Campaign’ means in Webex Campaign)
x. SOURCE
k) This means if you use a ‘Contact policy group’ as a ‘TG Source’ within a deployment, then only these 10 headers can be used for personalization and conditional content logic.
How to use this feature (i.e. use a ‘Contact Policy Allow List’ as a Target Group Source while configuring an email promotion deployment):
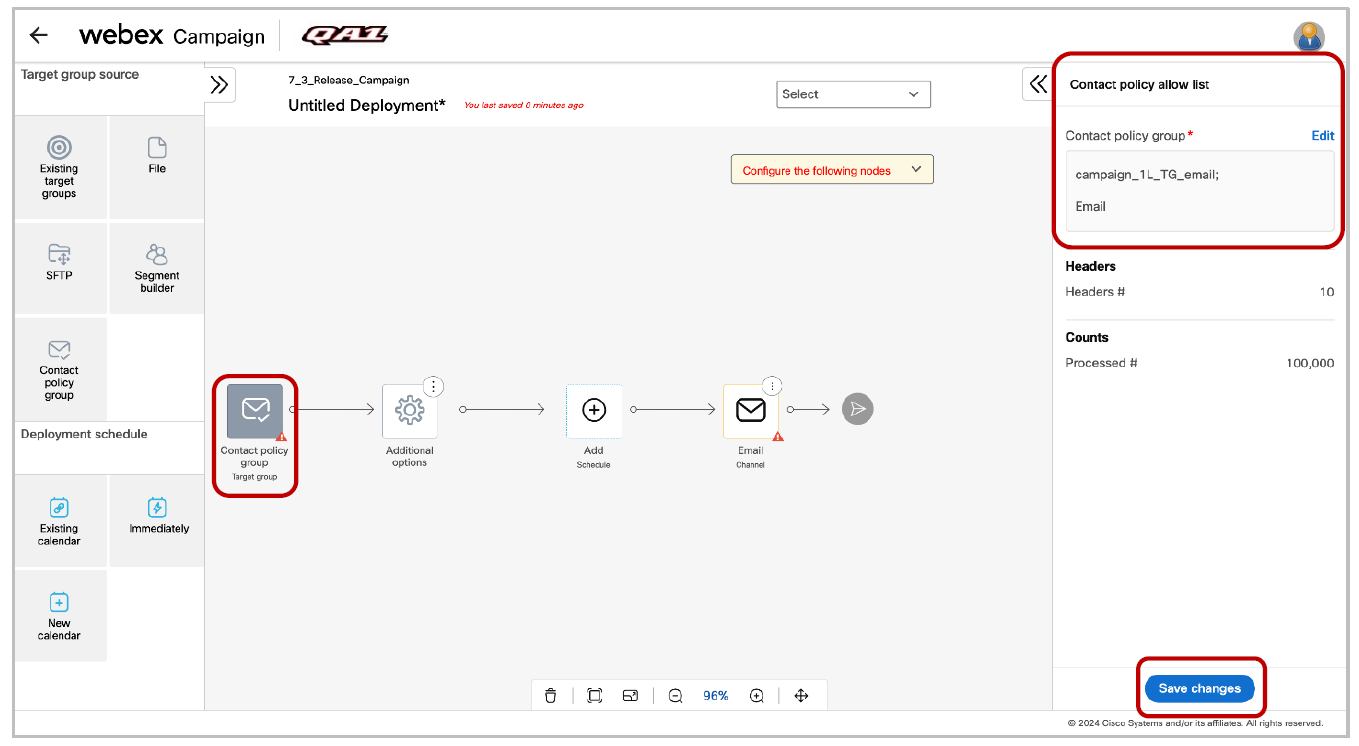
a) When creating an email Promotion deployment, on the left side, you will now see a new node for ‘Contact policy group’ as a Target Group Source. You will need to drag and drop this node on to the blank Target group placeholder in the central canvas.
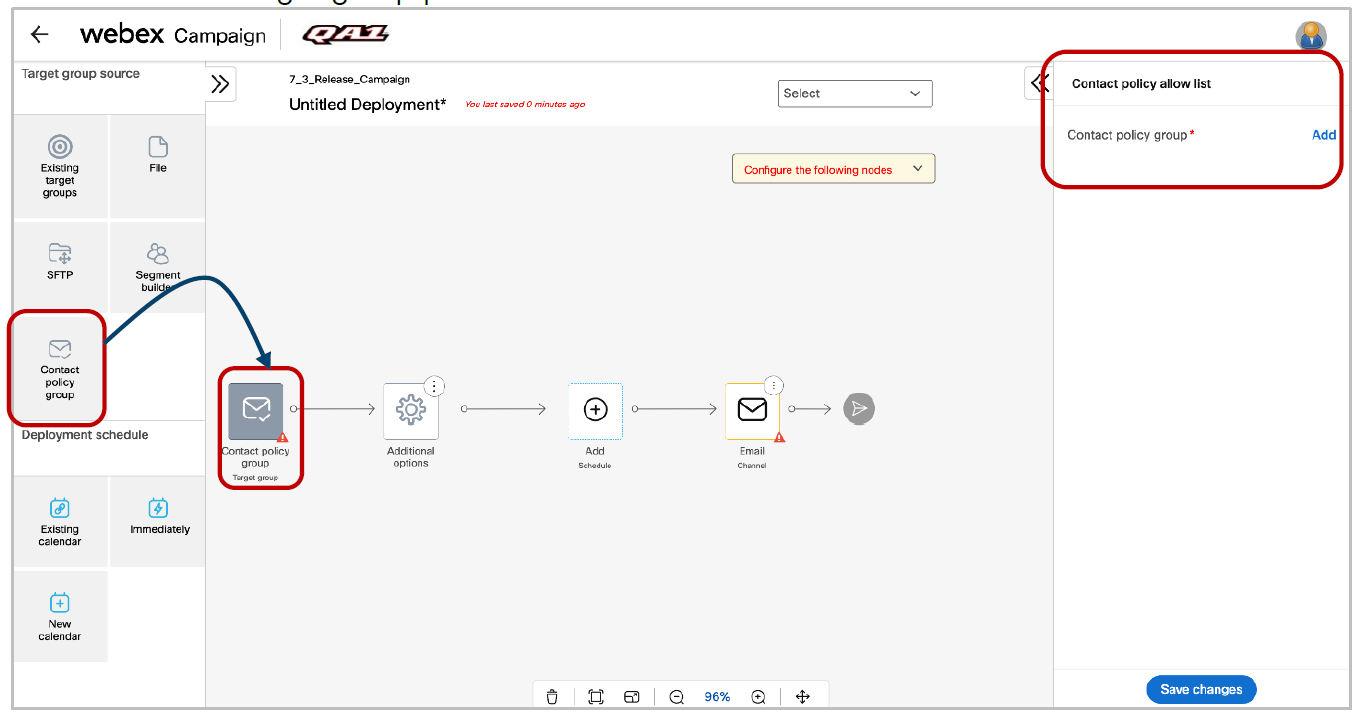
b) Next, you will need to click on the ‘Add’ link on the right-side node properties panel to select one of the allow lists. These allow lists would have been retrieved in the morning into Webex Campaign from your Webex Connect Contact Policy module.
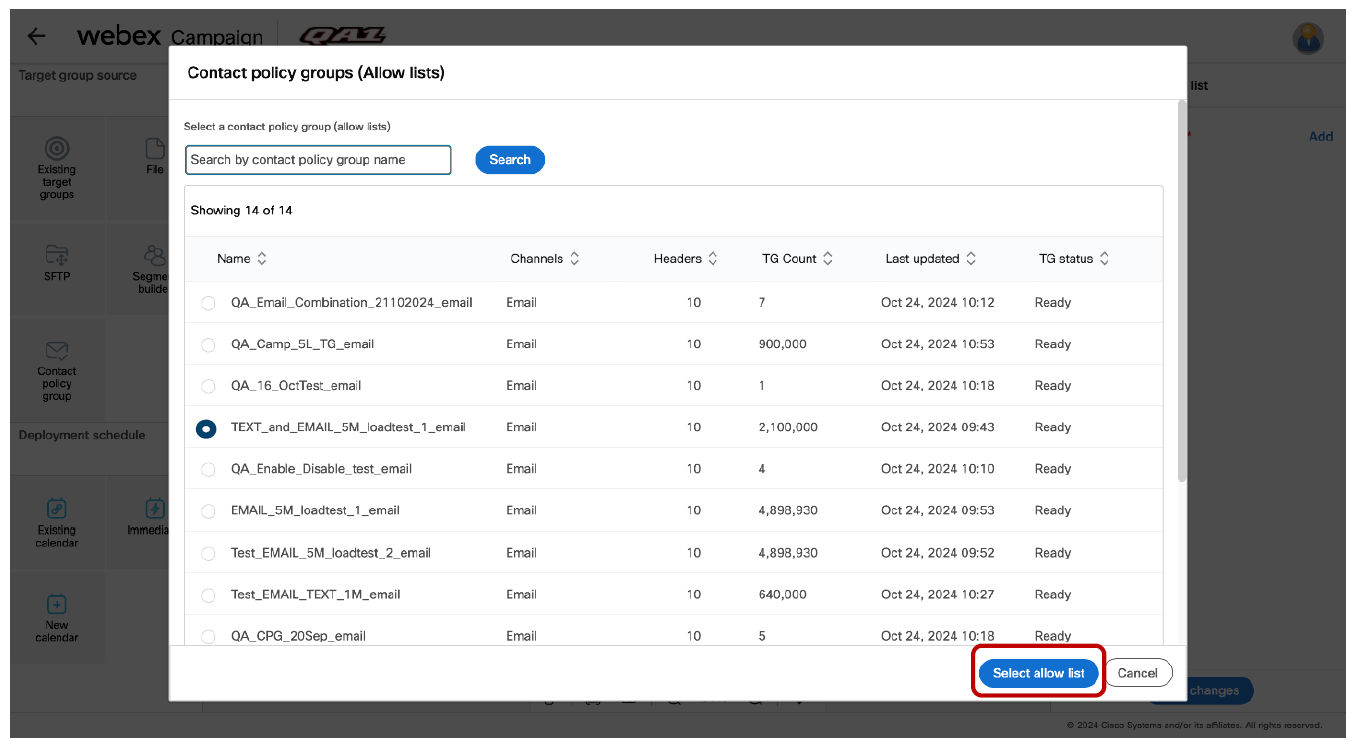
c) Next, you will need to save the ‘Contact policy group’ node. Next, you will need to configure the ‘Schedule’ and ‘Email content’ nodes as usual; then save the deployment and activate it as usual.
d) As mentioned above, the ‘Allow lists’ are retrieved into Webex Campaign from your Webex Connect Contact Policy module by approximately 5:15 am every day. Therefore, when you activate the above deployment, messages will be sent only to those email addresses which were present in the allow list (i.e. opted-in) as of ~5:15 am that morning. So any new email addresses opted-in (and added to the ‘Allow list’) after 5:15 am, will not be part of this deployment’s target group today.
e) On the other hand, any email addresses which have opted-out of the ‘Allow list’ after ~5:15 am in the morning, will still be part of this deployment’s initial target group. However, before every message is pushed to email gateway, Webex Campaign will check against the specified ‘Contact Policy Allow List’ that CONSENT value for each email address is still ‘true’ and the value of the ‘EXPIRES’ field is still in the future. Thus, Webex Campaign will automatically suppress the messages to those email addresses which have opted out since ~5:15 am in the morning.
Usage notes:
a) More information is provided later in this release note about how this ‘external suppression’ within ‘Webex Connect Contact Policy’ is represented on the Dashboard and Reports.
b) You cannot use more than one ‘Contact Policy allow list’ as a Target group source within a deployment; nor can you mix this TG source with any other type of TG source.
c) Webex Campaign will retrieve only ‘allow lists’ from your Webex Connect Contact Policy; i.e. You cannot use a ‘deny list’ as a Target group source.
d) You can use ‘Contact policy allow lists’ only within ‘Simple Promotion’ deployments, i.e. ‘Follow-up Promotions’ and ‘A/B Promotion’ deployments are out of scope for this feature. Similarly, ‘Instant Deployments’ are out of scope for this feature.
e) If, due to some unforeseen reason, the specified ‘Contact Policy Allow List’ could not be retrieved into Webex Campaign in the early morning, then:
i. For one-time (non-recurring) deployments which are using that ‘allow list’ as a Target group source, the status of those deployments will be changed to ‘Paused’. The deployment creator will receive the usual email notification alert that the status of their deployment has been changed to ‘Paused’.
ii. For recurring deployments which are using that ‘allow list’ as a Target group source, the status of those deployments will be changed to ‘Pending’. This scenario is conceptually similar to a ‘file missing from SFTP’ scenario when the TG source for a recurring deployment is SFTP. The deployment creator will receive the usual email notification alert that the status of their deployment has been changed to ‘Pending’.
f) If, due to some unforeseen reason, the specified ‘Contact Policy Allow List’ was only partially retrieved into Webex Campaign in the early morning, then, the deployments which are using that ‘allow list’ a Target group source, will run with the available (retrieved subset) of records.
1.4 Email promotion deployments: use a ‘contact policy allow list’ as an ‘inclusion list’
This is a tenant-specific feature; it is useful for those clients:
a) who use both Webex Campaign and Webex Connect for their various marketing and non-marketing use cases and
b) who use the optional module within Webex Connect called ‘Contact Policy’ to store and manage their customers’ opt-in and opt-out preferences for receiving communications via specific channels.
You may remember, in the previous release 7.0 which went live in July 2023, we introduced an ‘Inclusion List’ feature within the ‘Additional options’ node for SMS channel Promotion Deployments. This feature allowed you to select a ‘Contact Policy Allow List’ as an ‘Inclusion List’, while configuring an SMS promotion deployment.
In this release, we are expanding that integration with the ‘Contact Policy’ module for Email channel as follows: While configuring Email channel promotion deployments, you can now use a ‘Contact Policy Allow List’ as an ‘Inclusion List’ when the Target Group source is ‘File’ or ‘SFTP’ or ‘Existing TG’. This feature is associated with the client-initiated enhancement request Nolt #471.
An example use case supported by this feature is as follows: You have a Target Group file to be used for sending out email communications; and you want to scrub this file against a specific ‘Contact Policy Allow List’ stored within your Webex Connect tenant to ensure that you comply with the email channel opt-in preferences of your customers.
Pre-requisites for using this feature are the same as mentioned in the previous subsection.
How to use this feature (i.e. use a ‘Contact Policy Allow List’ as an ‘Inclusion list’ while configuring a deployment):
a) When creating an email Promotion deployment, you can drag and drop any of the following 3 nodes on the ‘Target group’ placeholder node in the central canvas : ‘Existing TG’ or ‘File’ or ‘SFTP’. Then click on the ‘Save changes’ button on the right-side properties panel for that Target group node.
b) Next, click on the 3-dots menu on the ‘Additional options’ node. Among the 6 actions available, click on the newly introduced action of ‘Add inclusion list’.
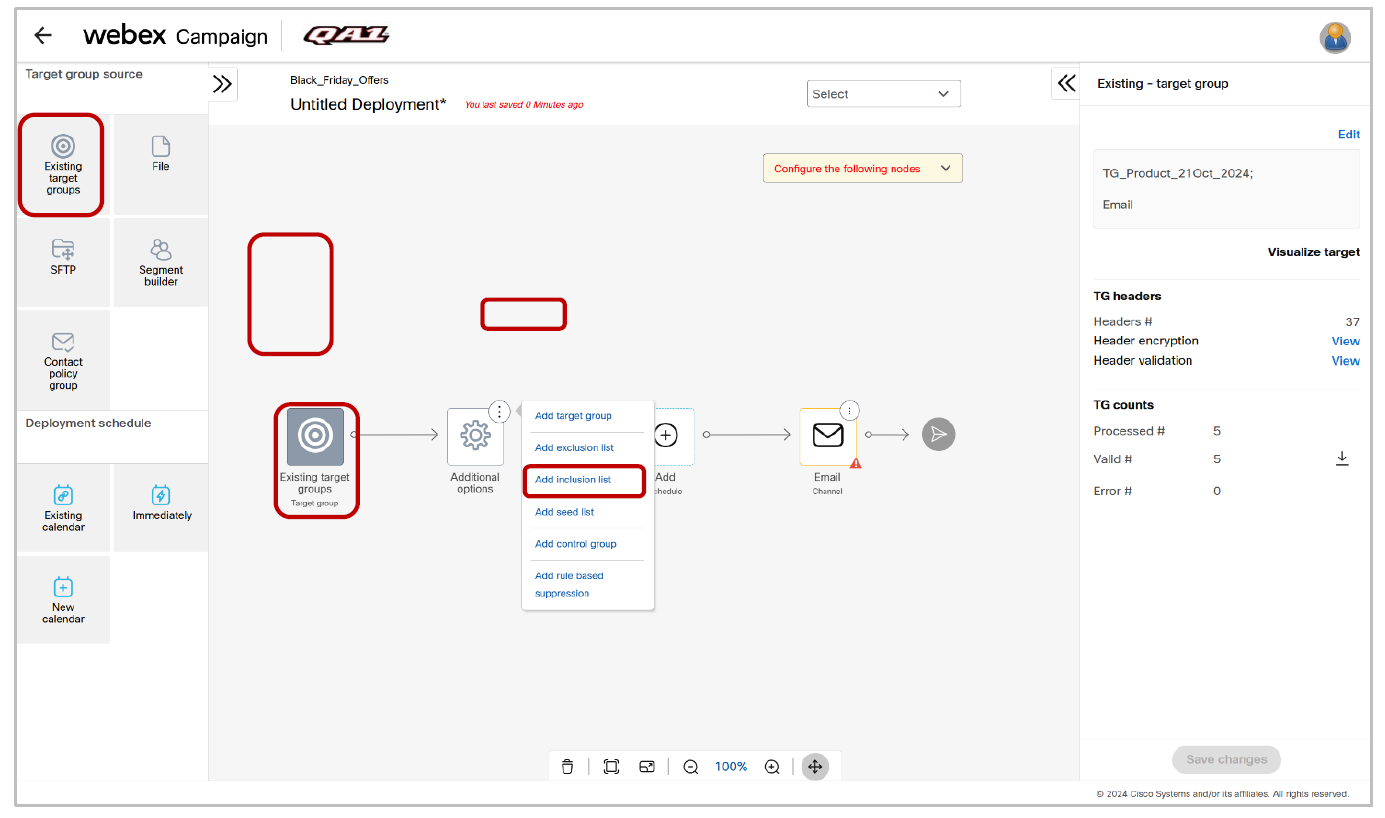
c) Then, a new placeholder node called ‘Add inclusion’ will appear to the right of the ‘Additional options’ node.
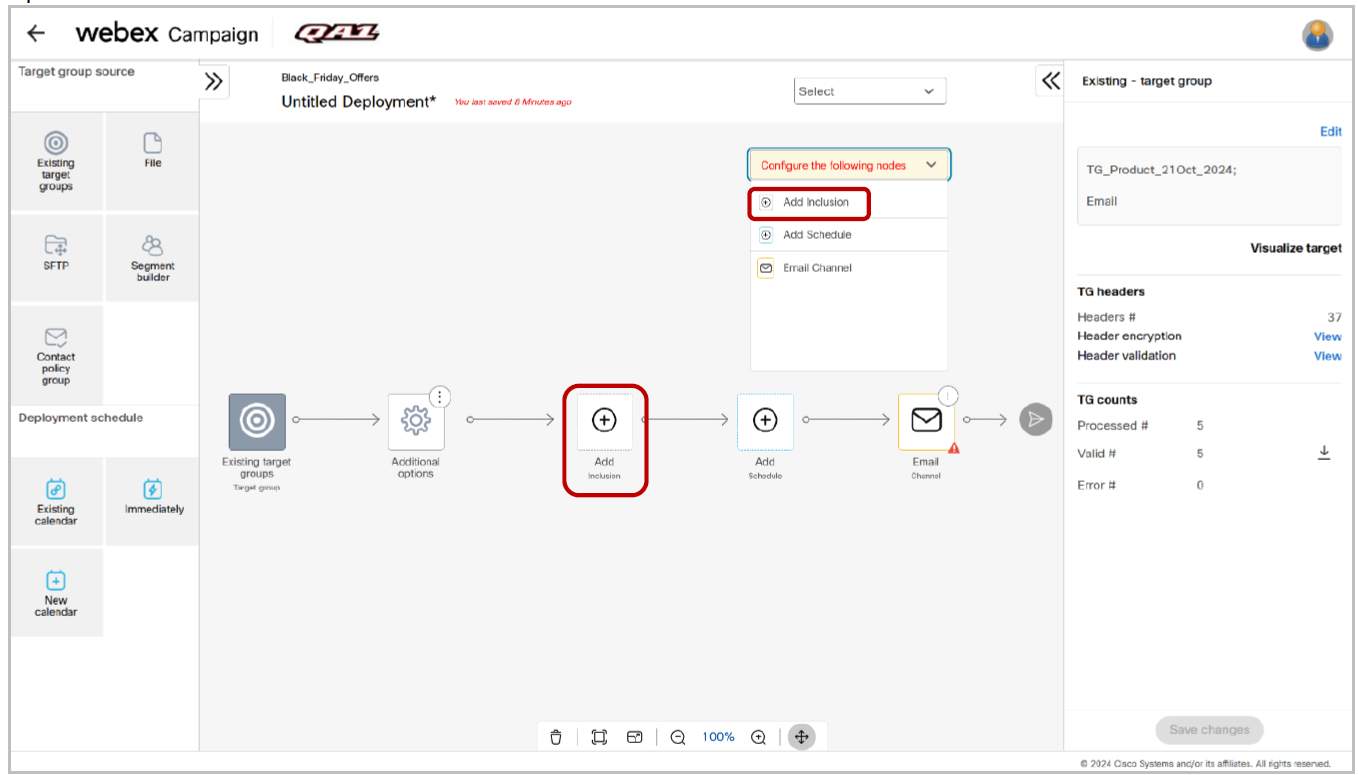
d) Next, drag and drop the newly introduced ‘Contact policy group’ node from the left panel onto the ‘Add inclusion’ placeholder node. This is the only node from the ‘Target group source’ nodes that you can use as an ‘Inclusion list’.
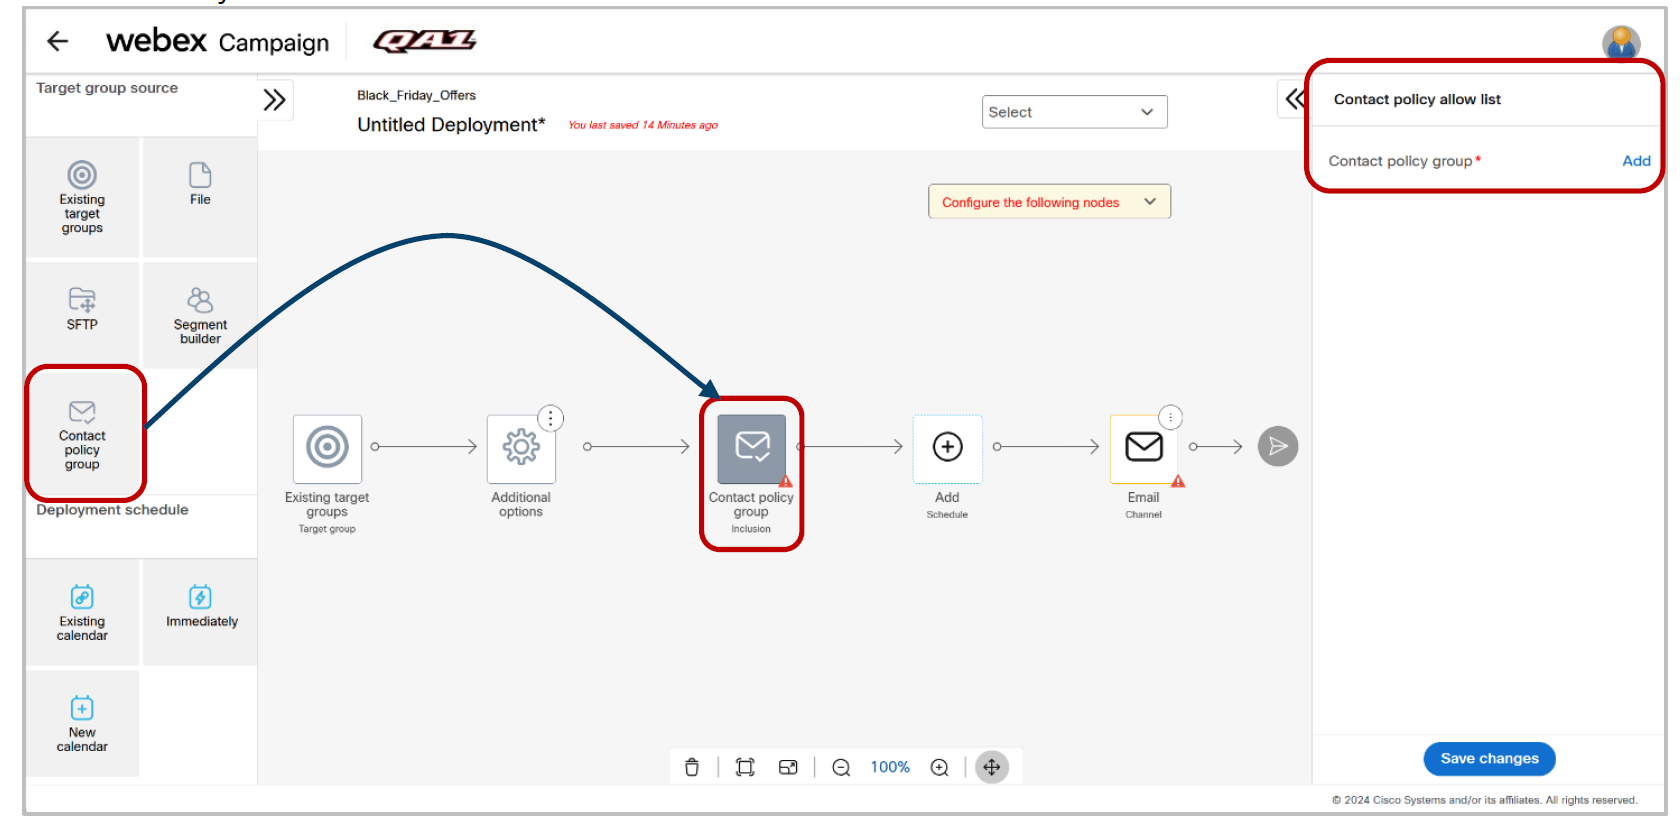
e) Next, you will need to click on the ‘Add’ link on the right-side node properties panel to select one of the allow lists. These allow lists would have been retrieved in the morning into Webex Campaign from your Webex Connect Contact Policy module.
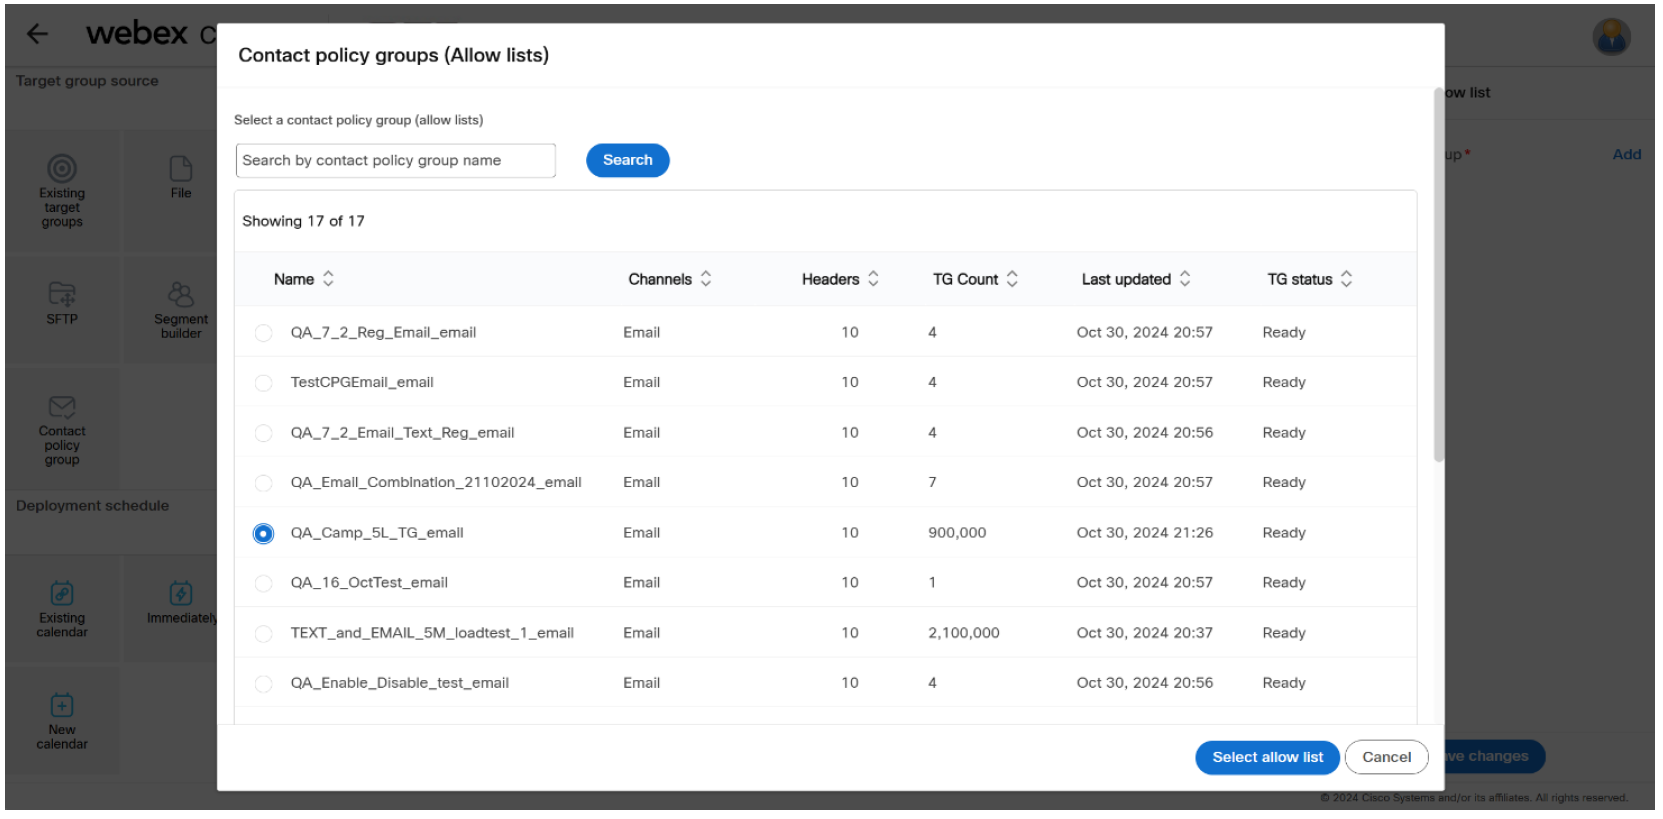
f) Next, you will need to save the ‘Contact policy group - Inclusion’ node.
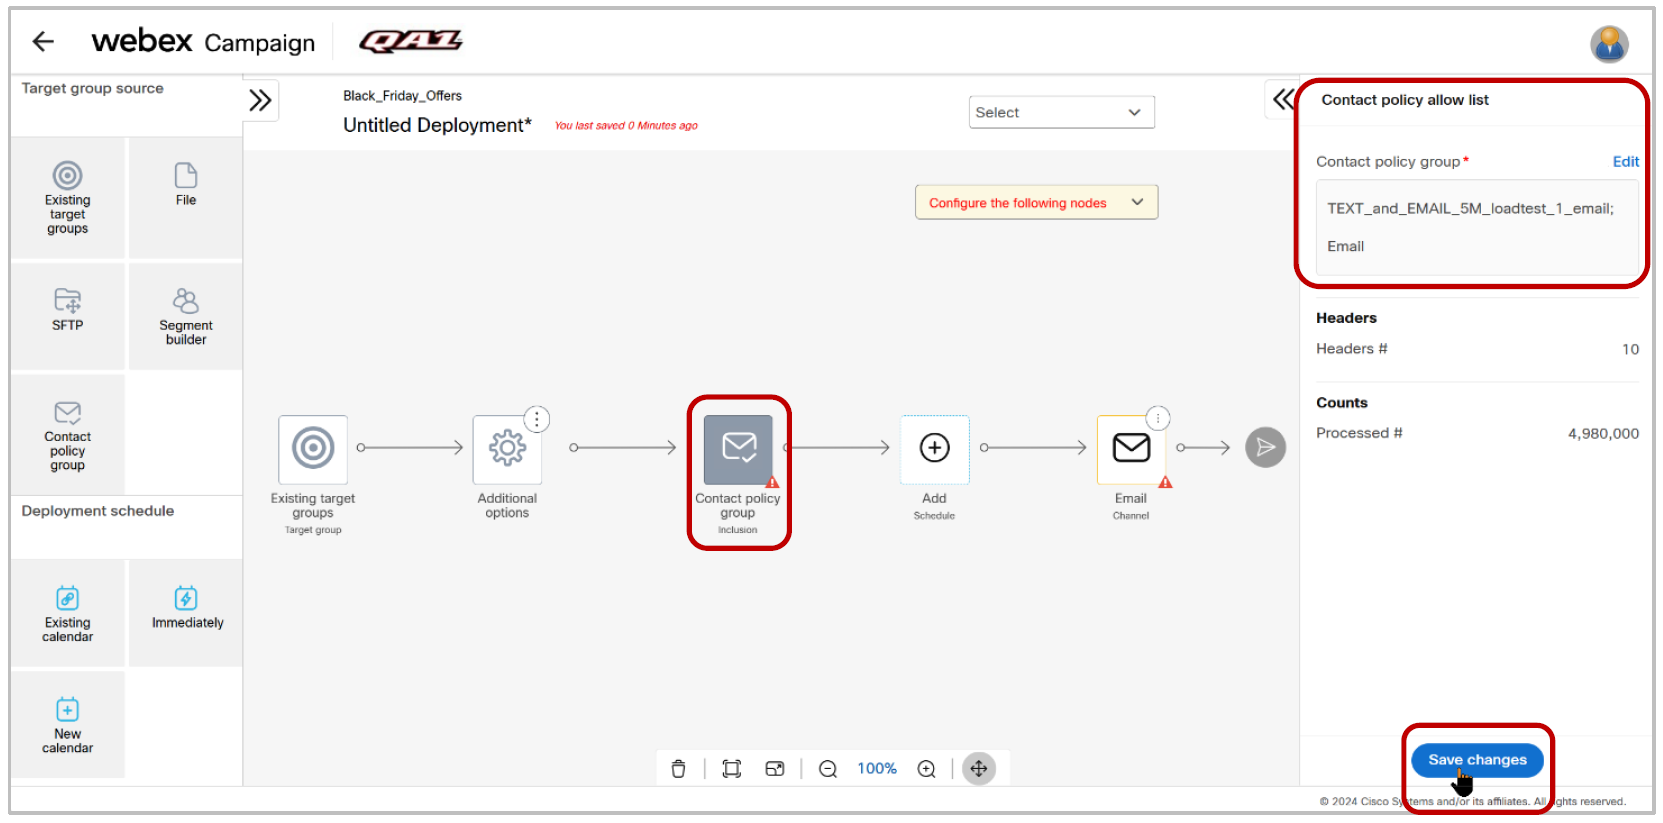
g) Next, you will need to configure the ‘Schedule’ and ‘Email content’ nodes as usual; then save the deployment and activate it as usual.
h) When you activate this deployment, Webex Campaign will first check each email address found in each record within the Target Group against the ‘Contact Policy Allow List’ that you have specified as the ‘Inclusion list’. ( i.e. it will confirm that within that ‘allow list’, the email address’s CONSENT value is still ‘true’ and the value of the ‘EXPIRES’ field is still in the future). Thus, Webex Campaign will automatically suppress the messages to those email addresses which have opted out , even if such email addresses are present in your Target Group.
i) Webex Campaign will then push the personalized email content to only those email addresses which pass the above-mentioned check.
1.5 Ability to hide/show specific columns using the ‘Columns selector’ on many screens
We have introduced a ‘Columns selector’ feature on many screens which have a tabular structure with many columns. This will allow users to hide / show specific columns on those screens. This feature will also indirectly help improve the accessibility compliance of Webex Campaign with respect to the WCAG 2.1 guideline ‘1.4.4 – Resize text’. As you increase the browser zoom % value to over 100%, the system will automatically begin to hide certain columns to ensure the columns do not overlap each other (thus ensuring compliance with the above WCAG guideline). The ‘Columns selector’ feature can then be used to see the hidden columns after you reduce the browser zoom % value back to 100%. You can also just use the browser’s refresh button to see all the columns again. Some example screenshots are shown below.
a. Campaign List:

b. Campaign details (Deployments in this campaign):
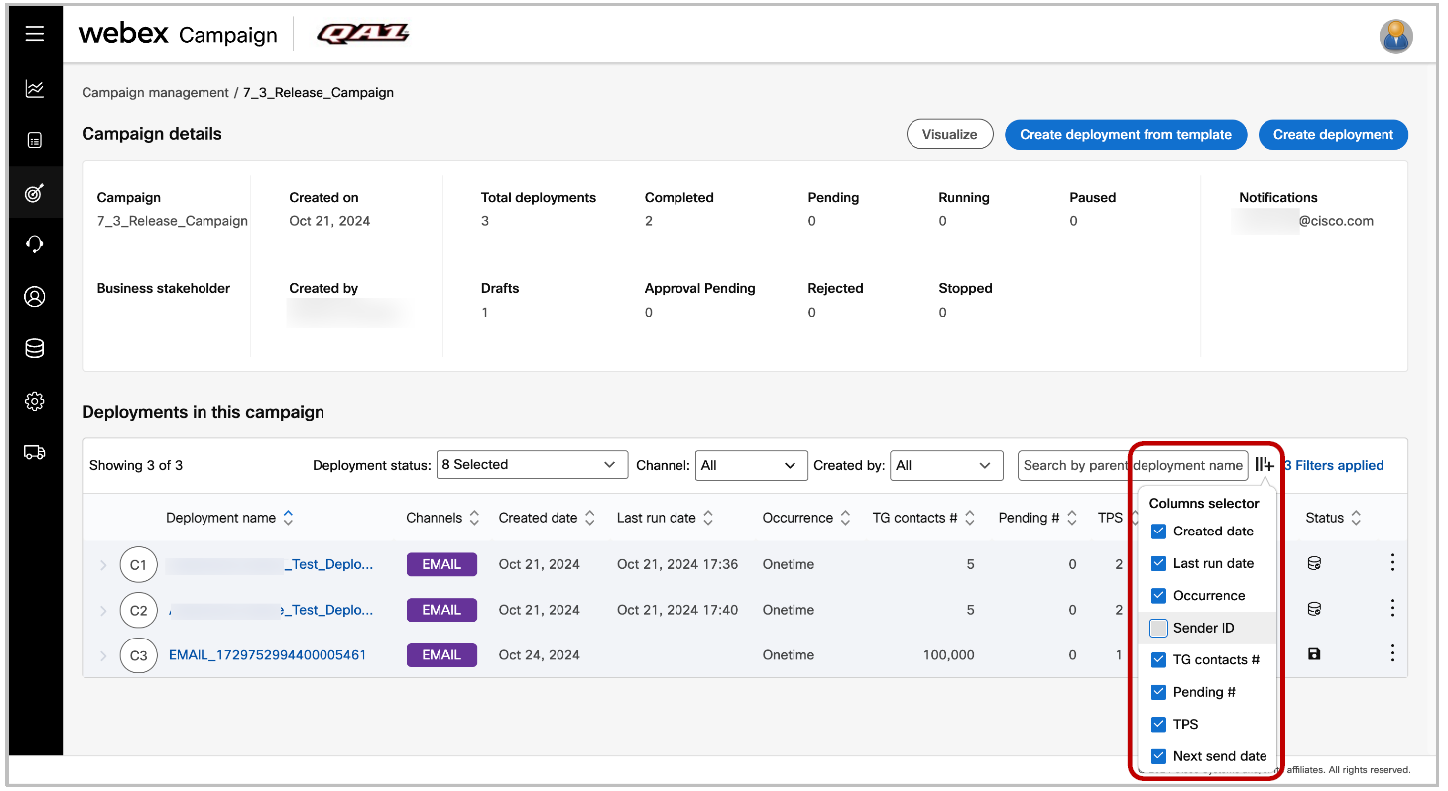
c. Target groups:
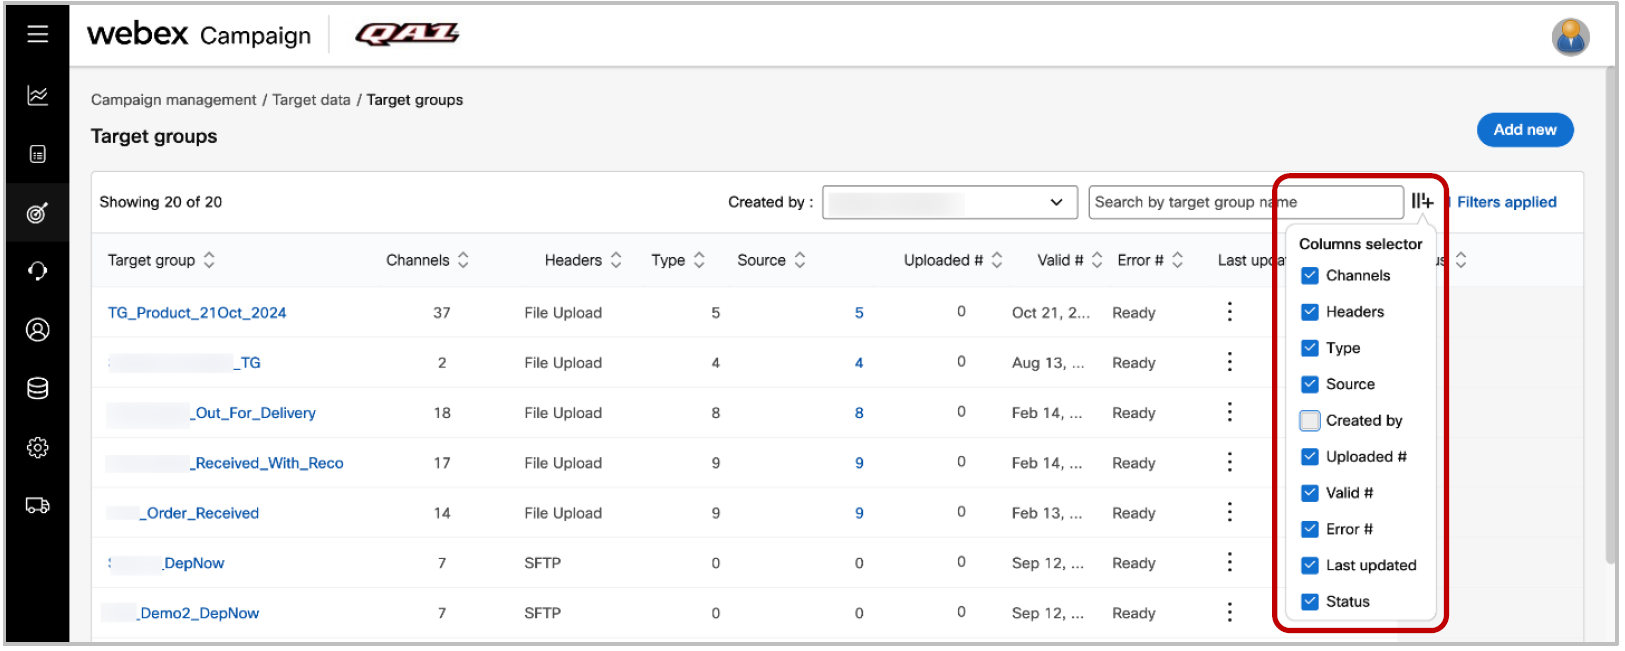
d. Assets >> Media (Images):

e. Email composer:
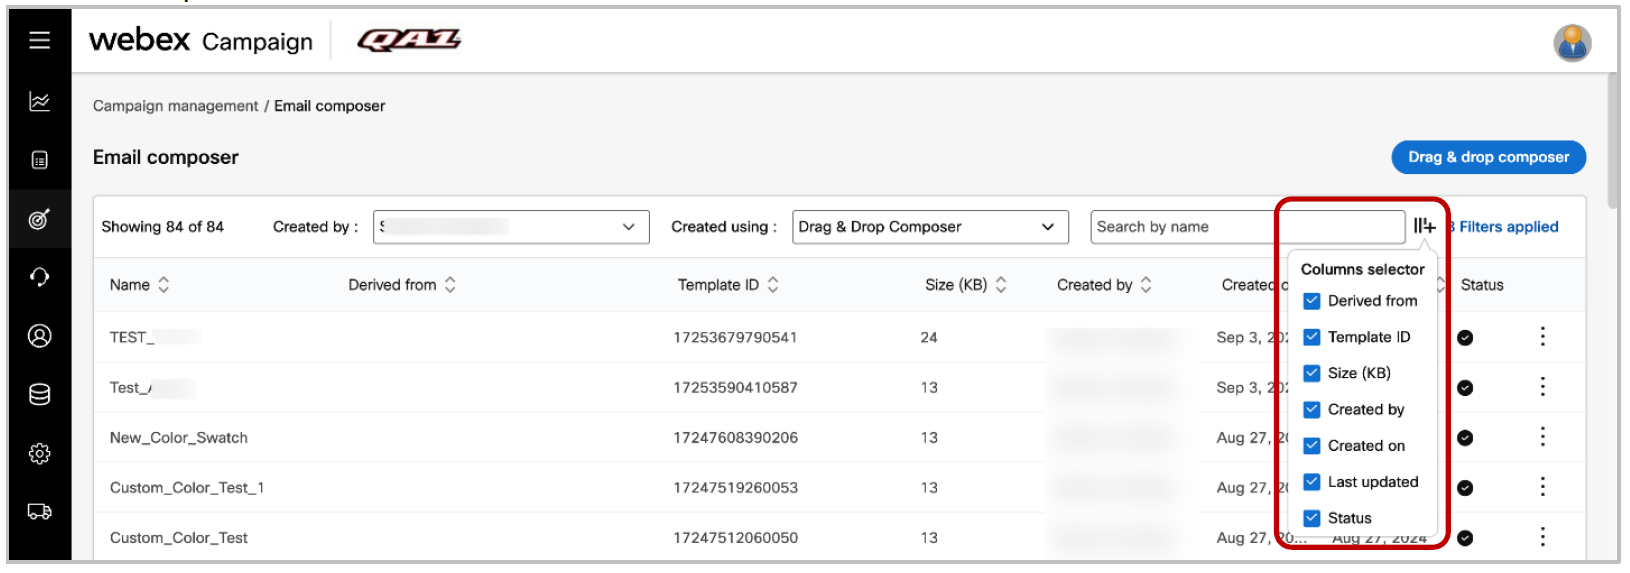
f. Landing pages:

1.6 Assets >> Media (Images): Improved how you create a new folder for images
We have improved how you create a new folder for images on the ‘Assets >> Media (Images)’ screen.
Prior to this release, let’s say, you already had a folder called ‘SOCIAL_ICONS’ and wanted to place some new images into a new folder called ‘ICONS’. Then as you typed the word ‘ICON’ into the ‘Folder’ text-entry-box, the system would find the already existing ‘SOCIAL_ICONS’ folder-name and the ‘Add new’ button would be obscured and covered by the search results. So, the result would be that you could not create a new folder called ‘ICONS’ if you already had a folder called ‘SOCIAL_ICONS’.
In this release, we have improved the UX in the above scenario. Now the ‘Add new’ button will always be visible.
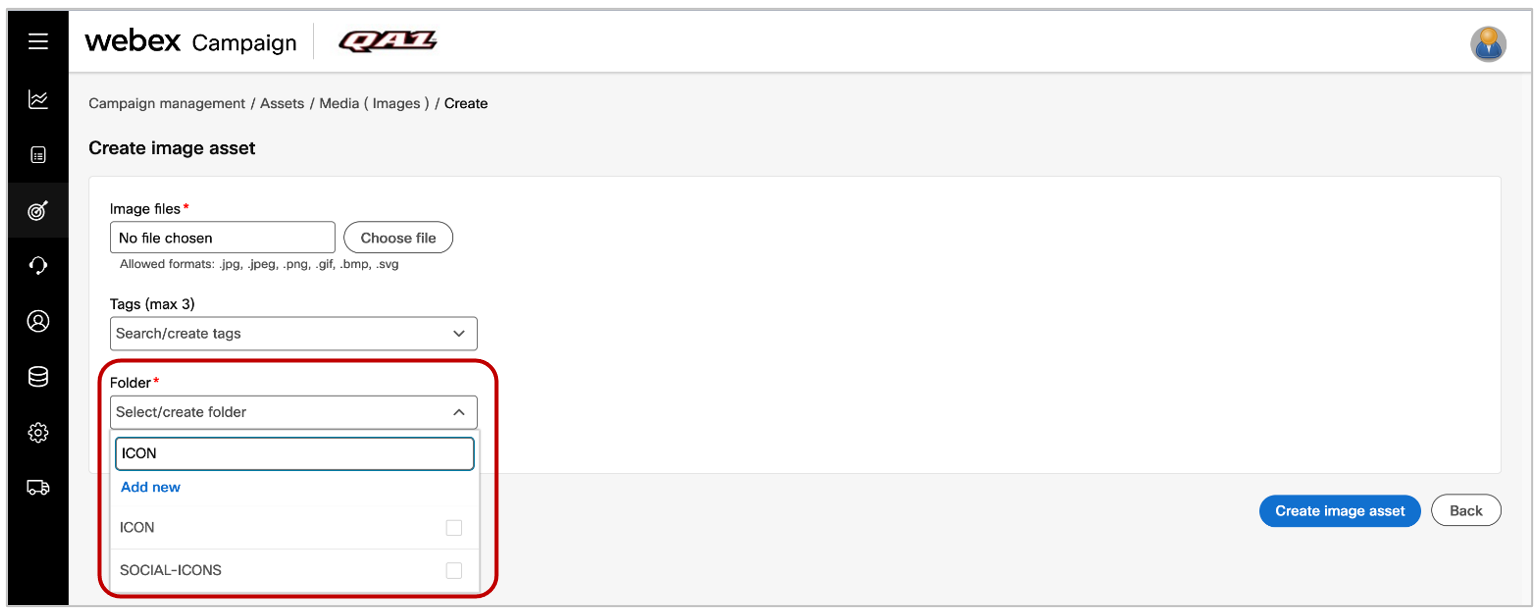
1.7 Accessibility improvements
We have continued to make numerous improvements on many Webex Campaign screens to improve the UI’s accessibility according to the WCAG guidelines (‘Web Content Accessibility Guidelines’).
Specifically, in this release, we have focused on improving compliance with the below WCAG accessibility guidelines:
• WCAG 2.1 guideline 1.4.4 (AA) Resize Text
• WCAG 2.1 guideline 1.4.11 (AA) Non-text Contrast
• WCAG 2.1 guideline 1.4.12 (AA) Text Spacing
• WCAG 2.1 guideline 2.5.8 (AA) Target Size (Minimum)
• WCAG 2.1 guideline 3.3.3 (AA) Error Suggestion
• WCAG 2.1 guideline 4.1.3 (AA) Status Message
Most of these improvements are noticeable only by users who use a screen-reader or other similar assistive technologies.
2.0 Dashboard and Reports module enhancements
2.1 Dashboard - Email Deployment Details: Email heatmap display improvement
Prior to this release, the ‘Email heatmap’ was displayed in a fixed-height section on the Dashboard ‘Email deployment details’ screen, causing the user to scroll through the email heatmap section.
In this release, we have improved this design such that you can now just use the browser’s scrollbar to scroll to the bottom of the page, rather than having to use the scrollbar within the email heatmap section.
This enhancement is associated with client-initiated enhancement request Nolt #382.
2.2 Pre-configured Transaction Reports: Generate reports with or without the report’s filter settings
Prior to this release, the pre-configured transaction reports generated in CSV format always included approximately 10 rows at the top showing the filter values that were used to generate the report. These filter values are very useful and essential when the generated transaction report is viewed by a human user. However, some clients may want to automate the consumption of these pre-configured transaction reports by other systems such as a data warehouse.
With this release, we have introduced an option for you to specify whether you want the include or exclude the filter values rows when the report is generated as a CSV file export.
This enhancement is associated with client-initiated enhancement request Nolt #401.
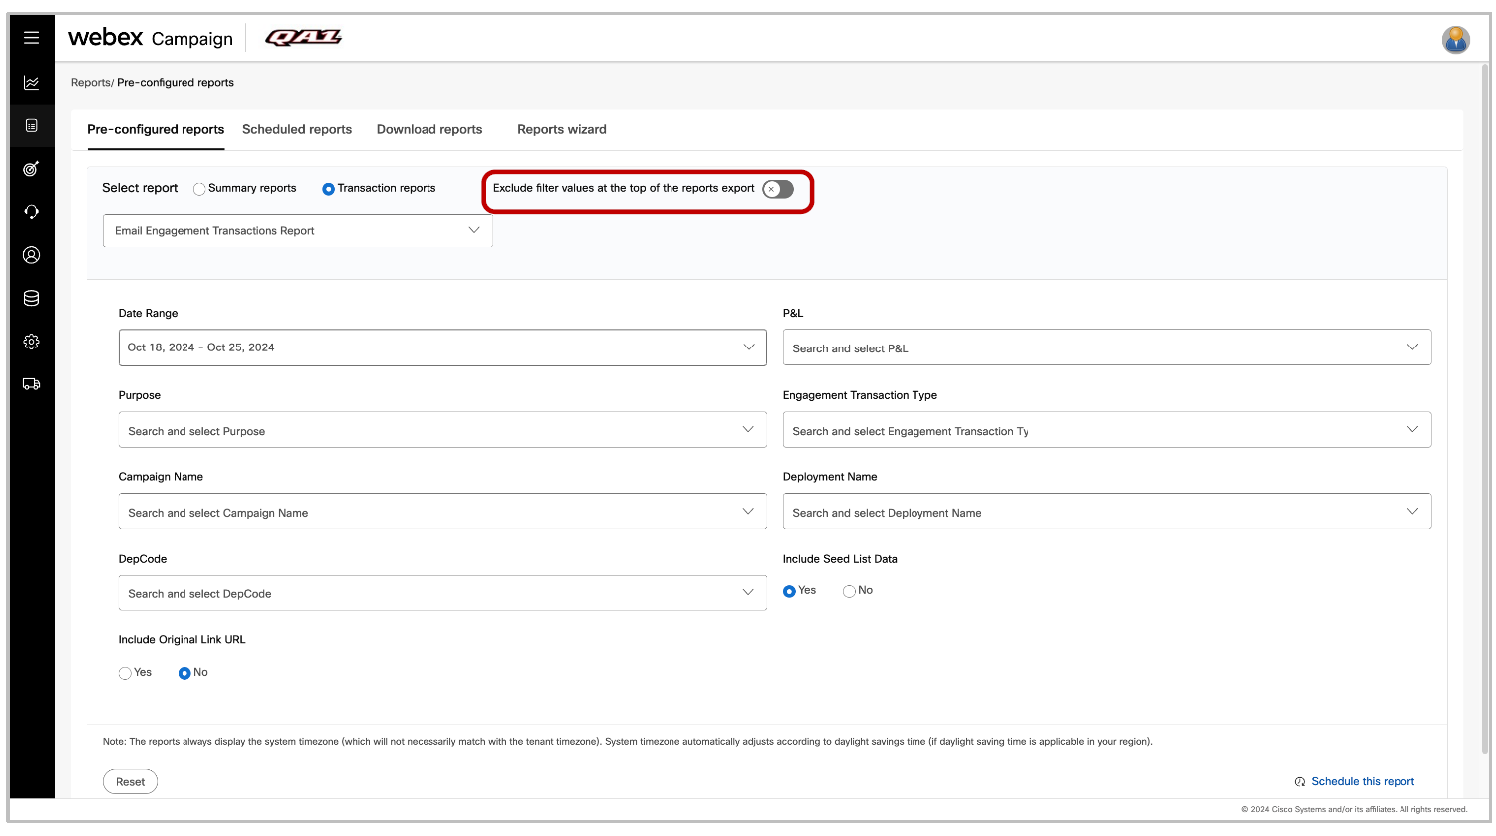
3.0 Email Composer and Landing Page Composer module enhancements
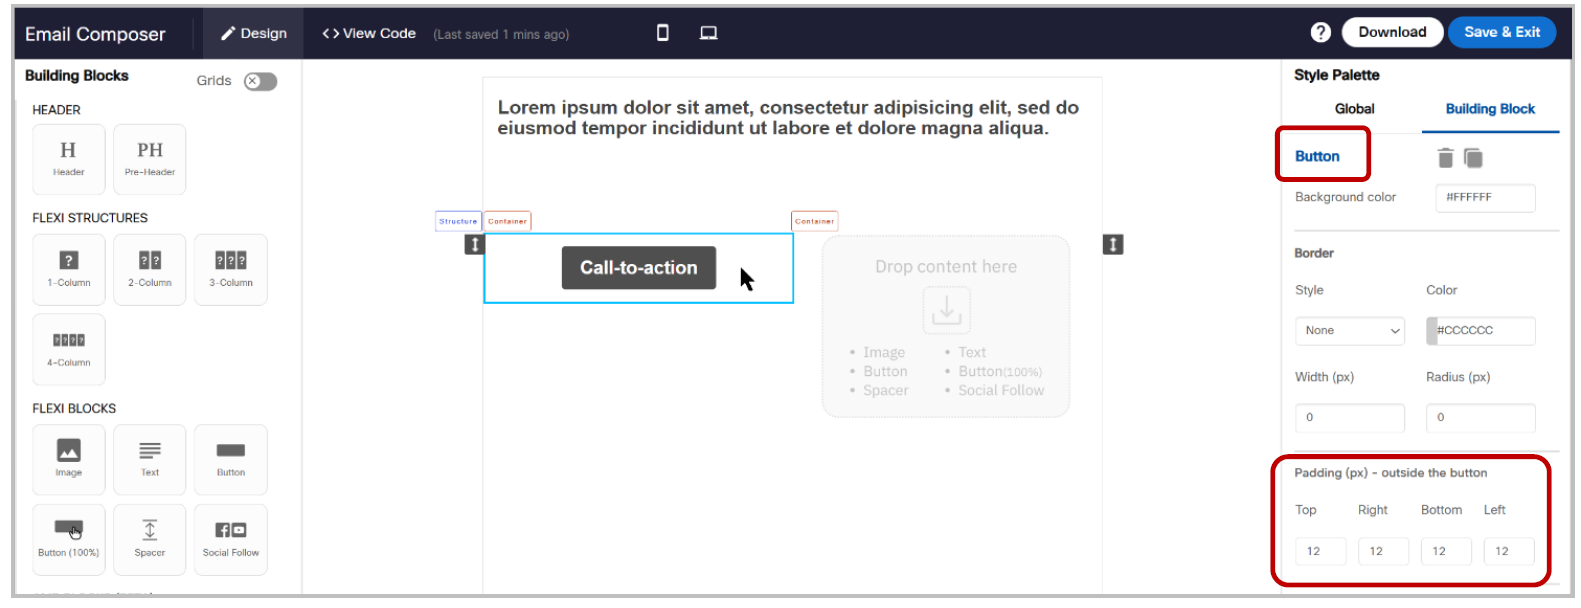
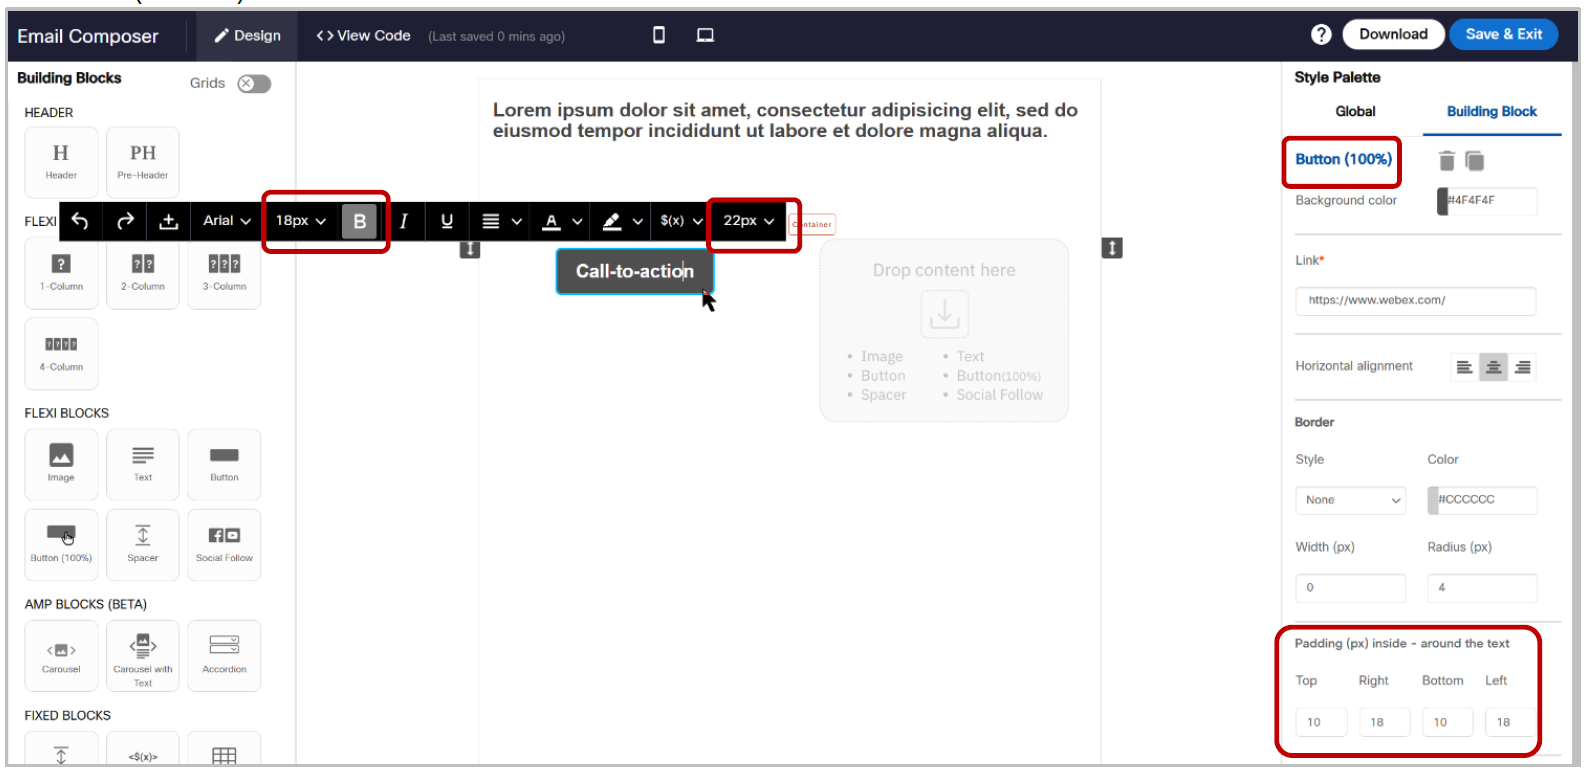
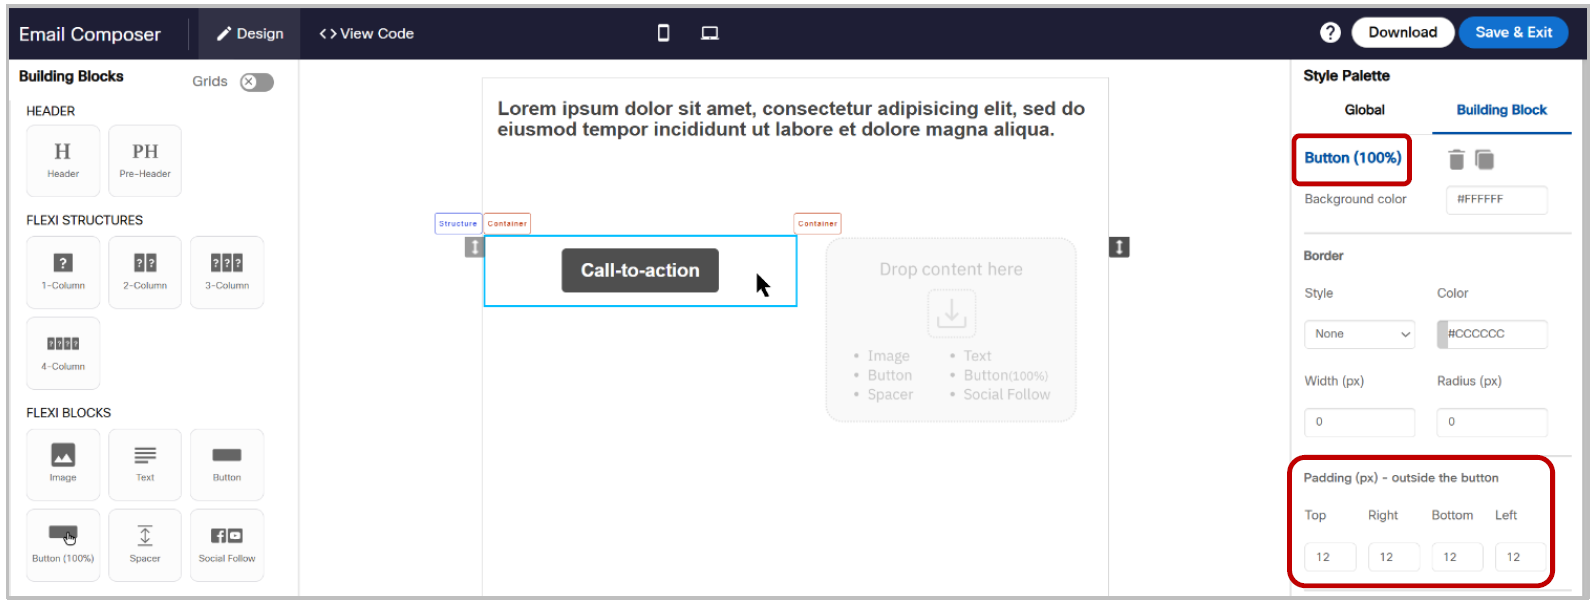
3.1 ‘Button’ and ‘Button (100%)’ blocks: changes to multiple default settings
In the Email Composer, Landing Page Composer and Email-Partial Composer modules, we have modified many default settings for the ‘Button’ and ‘Button (100%)’ blocks based on feedback from client users. These changes will save time for most users as the below default settings are likely to not require further changes for most email and landing page designs.
The new default settings for the ‘Button’ and ‘Button (100%)’ blocks are as follows:
a. Label text : ‘Call-to-action’. (Previously, this used to be ‘Read more’)
b. Label font : ‘Arial (unchanged)
c. Label font size: 18px (Previously, this used to be 13px)
d. Label line height: 22px (Previously, this used to be 20px)
e. Label style: Bold (Previously, this used to be ‘no style’)
f. Padding (px) inside the button (around the text) : Top=10; Right =18; Bottom=10; Left=18 (Previously, these were 5, 18, 5, 18 respectively).
g. Container block Padding (px) outside the button: Top=12; Right=12; Bottom=12; Left=12 (Previously, these were 0, 0, 0, 0 respectively).
‘Button’ block screenshots:
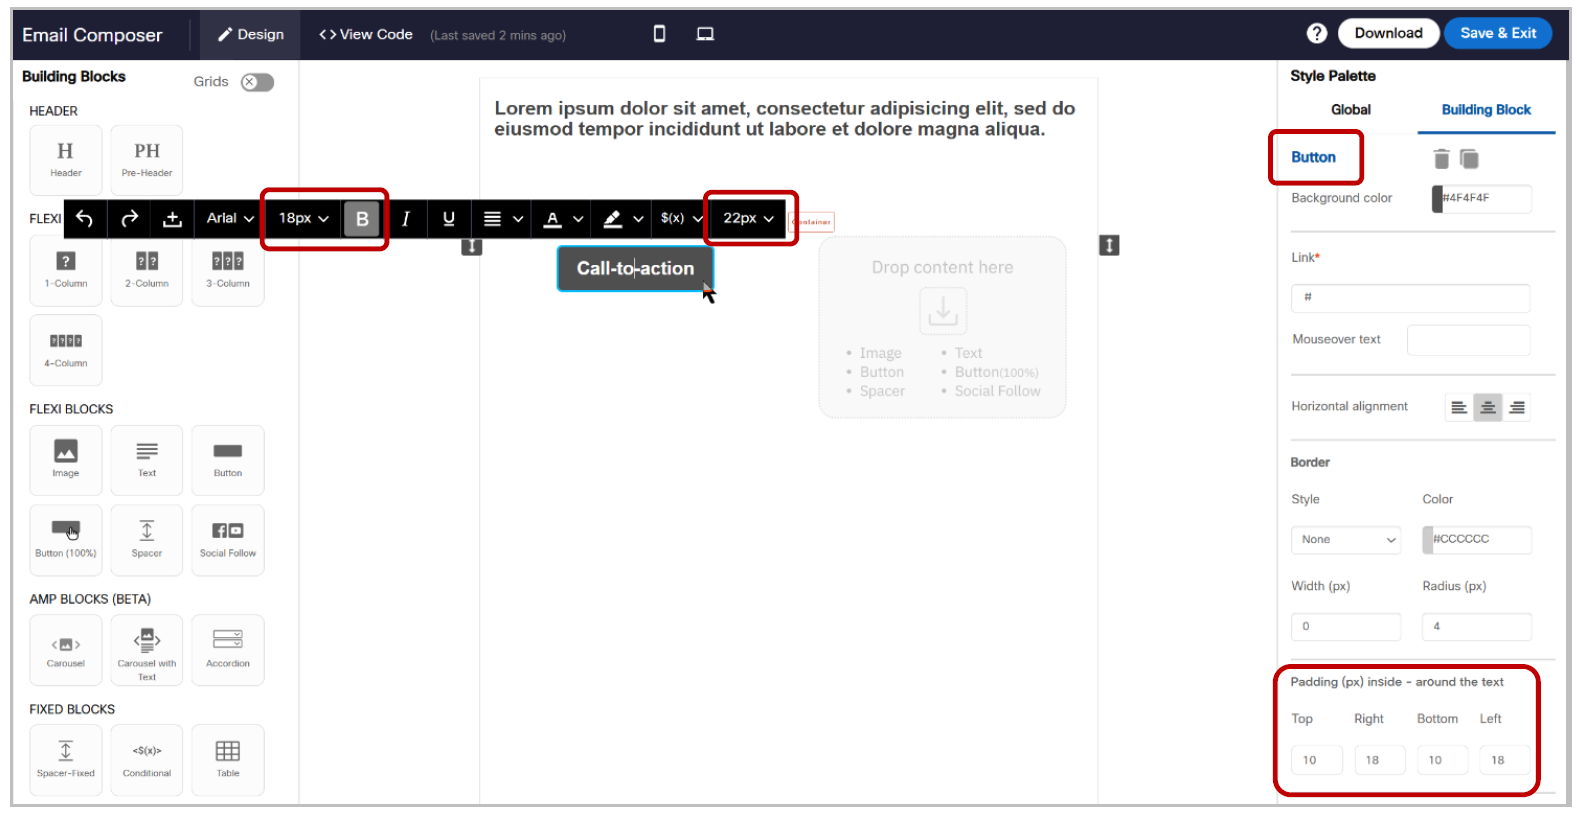
`‘Button (100%)’ block screenshots:
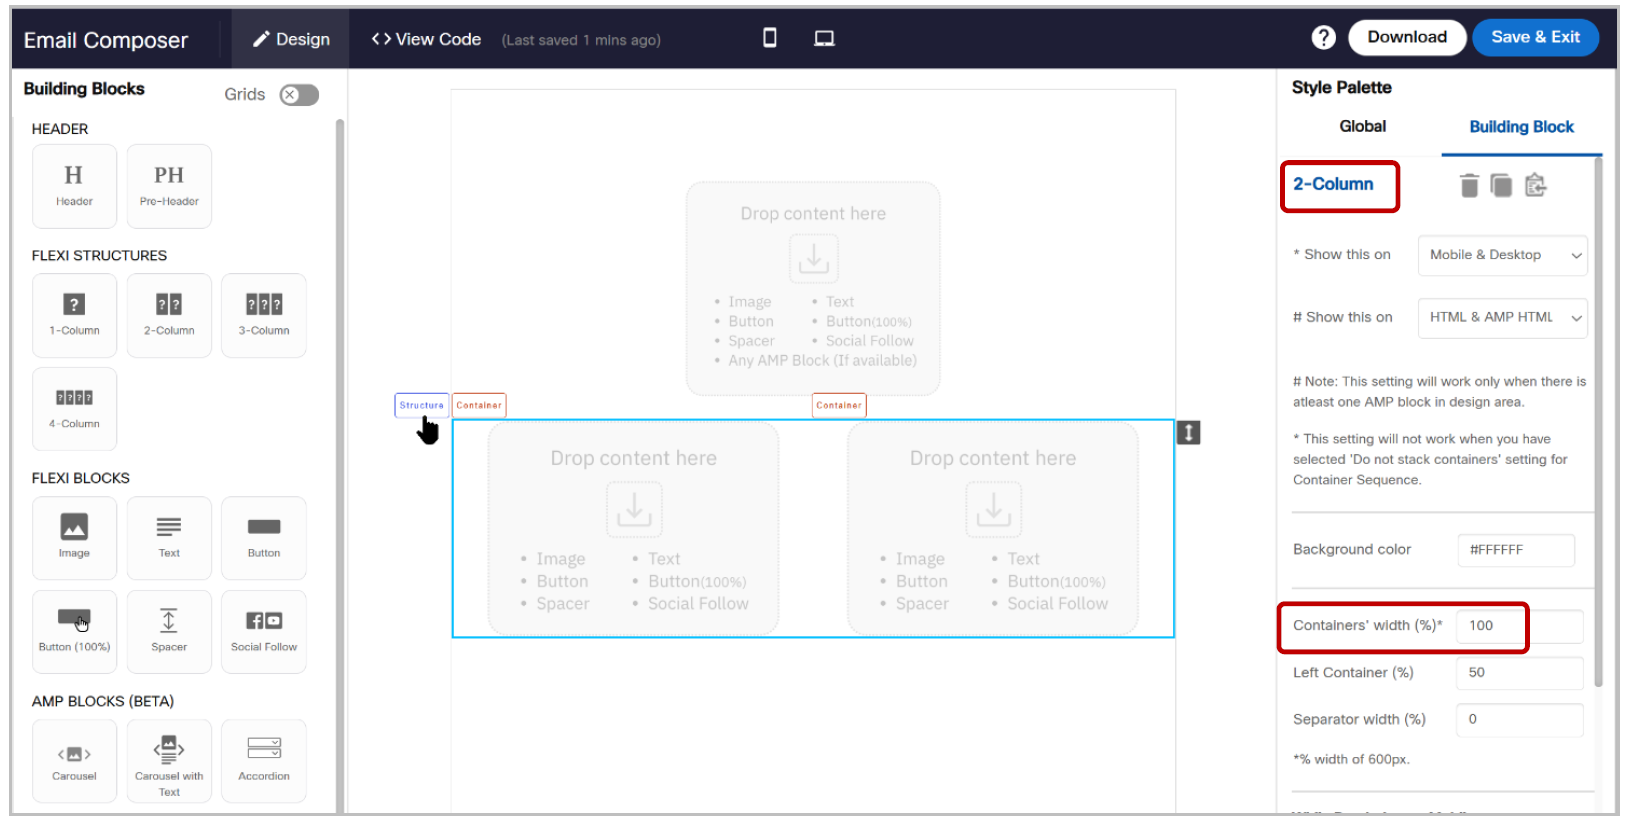
3.2 ‘1-Column’ & ‘2-Column’ Structures: Changed default ‘Container Width’ to 100%
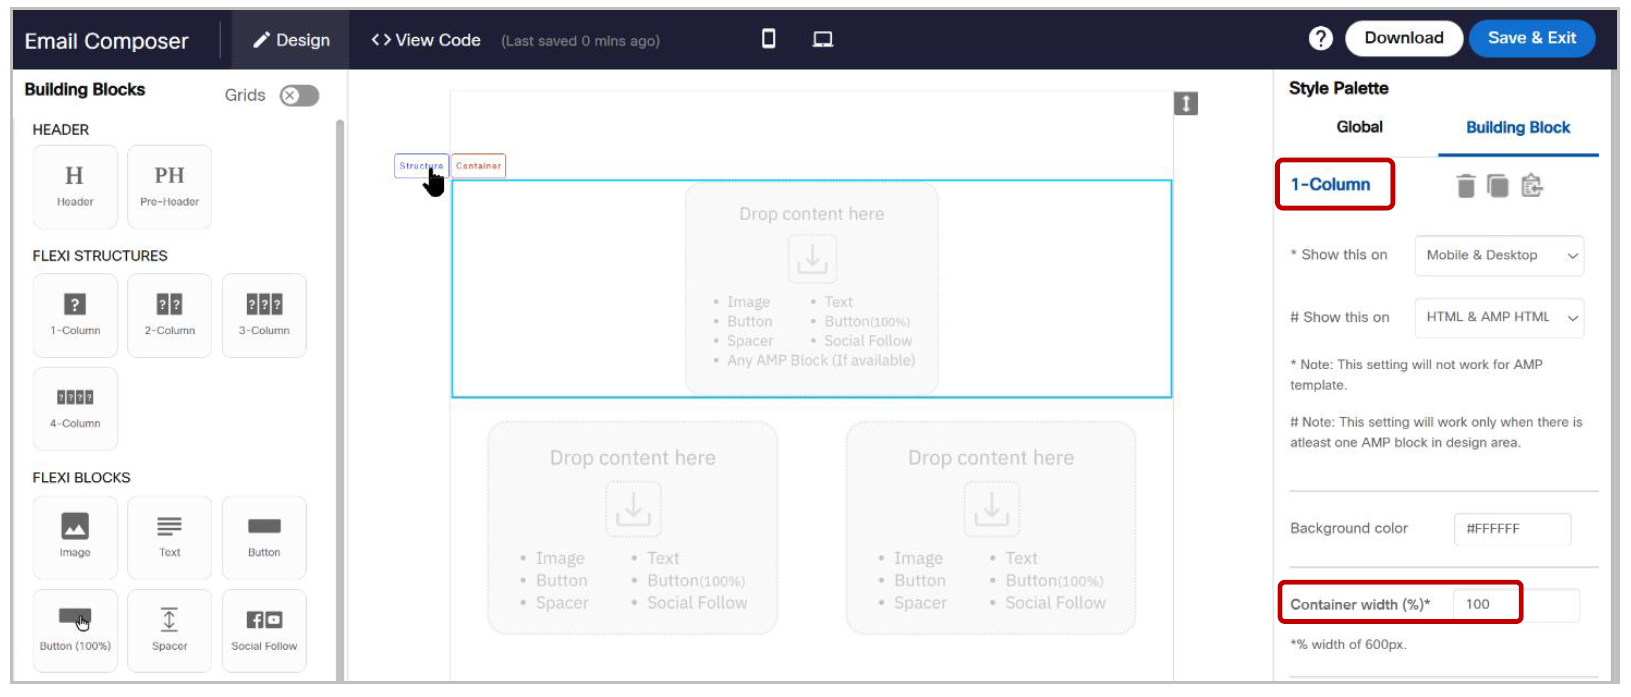
In the Email Composer, Landing Page Composer and Email-Partial Composer modules, for the ‘1-Column Structure’ and ‘2-Column Structure’ blocks, we have changed the default value for ‘Container Width’ to 100% (replacing the previous value of 94%). These changes have been made based on feedback from client users. These changes will save time for most users as these default settings are likely to not require further changes for most email and landing page designs.
‘1-Column’ Structure screenshot:
‘2-Column’ Structure screenshot:
3.3 ‘Text’ block: changes to multiple default settings
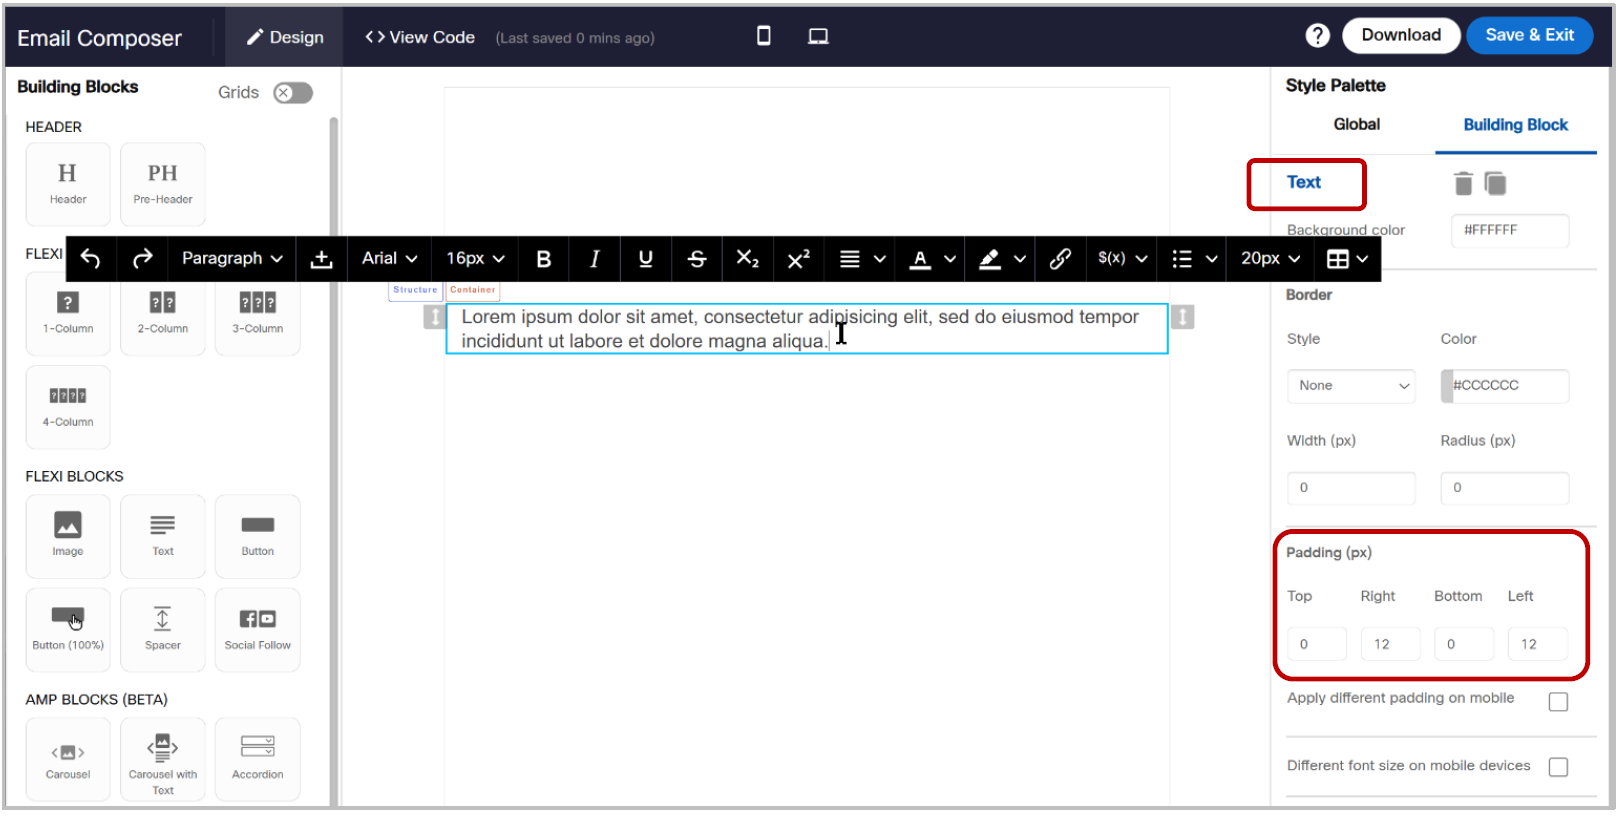
In the Email Composer, Landing Page Composer and Email-Partial Composer modules, we have modified many default settings for the ‘Text’ block based on feedback from client users. These changes will save time for most users as the below default settings are likely to not require further changes for most email and landing page designs.
The new default settings for the ‘Text’ block are as follows:
a. Typography tag : ‘Paragraph’. (unchanged)
b. Font : ‘Arial (unchanged)
c. Font size: 16px (Previously, this used to be 12px)
d. Font color: #444444 (Previously, this used to be a slightly lighter shade of grey #333333)
e. Line height: 20px (unchanged)
f. Text style: Regular (unchanged)
g. Horizontal alignment: Left (Previously, this used to be ‘Justified’)
h. Padding (px): Top=0; Right=12; Bottom=0; Left=12 (Previously, these were 0,0,0,0 respectively).
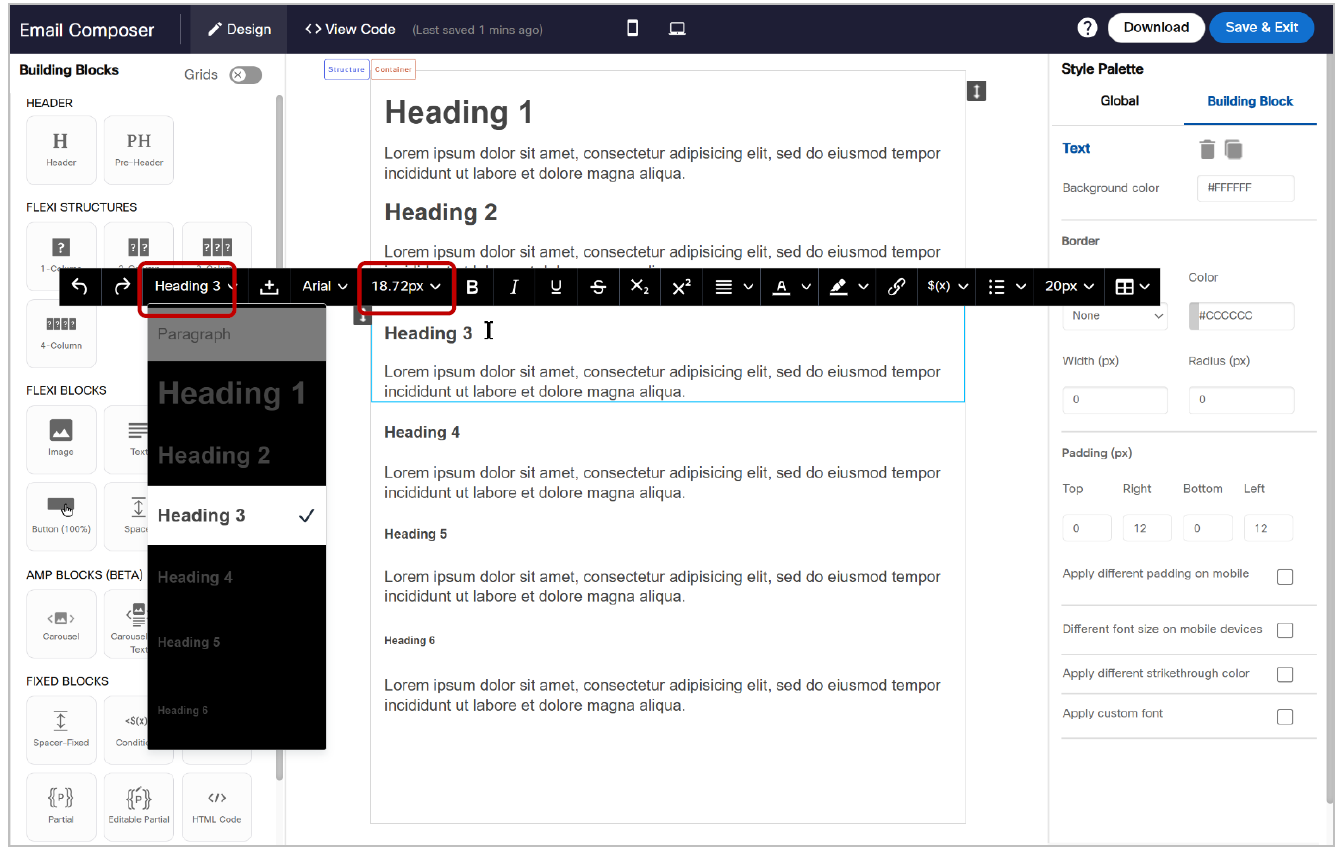
As we have increased the default text font size to 16px from 12px, the default font sizes of the ‘Heading’ tags will also proportionally increase as shown in the table below:
| Heading | New Default font size | Previous Default font size |
|---|---|---|
| Heading 1 | 32px | 24px |
| Heading 2 | 24px | 18px |
| Heading 3 | 18.72px | 14.04px |
| Heading 4 | 16px | 12px |
| Heading 5 | 13.29px | 9.96px |
| Heading 6 | 10.72px | 8.04px |
4.0 Profile Manager module enhancements
4.1 Improved support for ingestion of CSV files for Datastore creation
Prior to this release, when creating a ‘Datastore’ from a CSV file, Webex Campaign could correctly process the incoming CSV file:
- if no values in the CSV file were enclosed in double-quotes or
- if all the values in the CSV file were enclosed in double-quotes
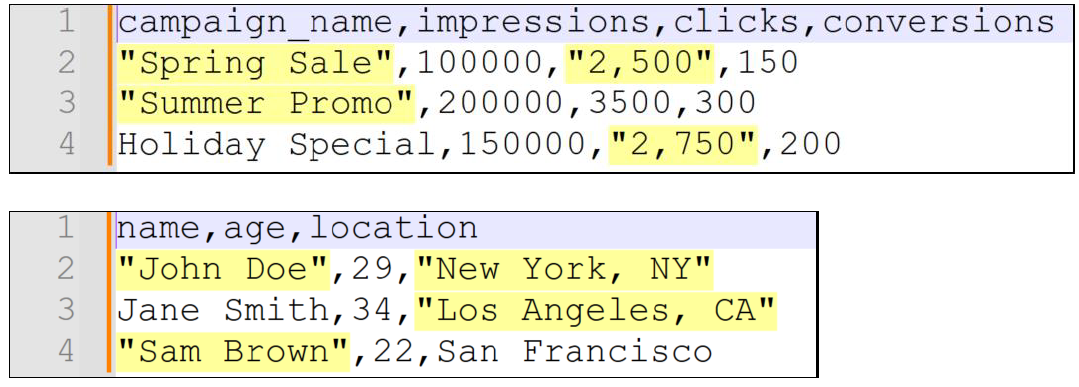
With this release, we have improved this capability and now Webex Campaign will support CSV files where some specific values in the file are enclosed in double-quotes and other values are not enclosed in double-quotes.
This enhancement is relevant in use cases where the CSV file may have some values, such as a postal address, which contain commas themselves – thus requiring those specific values to be enclosed in double-quotes.
This enhancement is associated with client-initiated enhancement request Nolt #403.
The following two CSV file snippets are examples of the types of records Webex Campaign will now be able to ingest as a result of this enhancement. As you can see in the below examples, the yellow-highlighted values are enclosed in double quotes; there are some field values that are enclosed in double-quotes whereas some other fields values in that same record are not enclosed in double-quotes.
Usage notes and restrictions:
- The incoming CSV file should not have any field values containing the pipe ( | ) character.
5.0 Maintenance items in this release
| # | Module | Change Type | Description |
|---|---|---|---|
| 1 | Campaign Manager | Improved | As usual, we have continued to make many security improvements as recommended by Cisco InfoSec team. One such enhancement is that now we display the same message to the user on the UI when the user submits their email (username) as part of the ‘Forgot password’ journey – irrespective of whether that email is associated with a valid user or not. [CMPN-21987] |
| 2 | Campaign Manager | Improved | [SMS Inbound Mos]: We have improved how inbound SMS MO messages received into Webex Connect are then received into Webex Campaign [CMPN-21710] |
| 3 | Campaign Manager | Improved | We have updated the notification emails sent out from Webex Campaign to reflect the new email of the tech support team. [PRB0012444 / INC0810121 / CMPN-22196] |
| 4 | Campaign Manager | Improved | [Seed list messages]: We have changed the prefix for seed list messages to “Seed list message:”. Previously, this prefix used to be “seed list configured |”. The ‘pipe’ ( | ) symbol in the previous seed list prefix message was causing some problems in the SMS networks in Canada, which should be resolved by this change. This improvement is applicable for SMS, MMS and email channel deployments. [CMPN-22027] |
| 5 | Campaign Manager | Fixed | [Email deployments with large TGs] Fixed a bug that, under certain conditions, was causing email deployments with very large target groups to be paused by the system due to high memory usage while fetching the ‘Sender-ID’ for the Email deployments. [PRB0012359 / INC0801018/ CMPN-22134] |
| 6 | Campaign Manager | Fixed | [A/B promotion deployments with a Dynamic TG]: Fixed a bug that, under certain conditions, was causing an incorrect alert being shown to the user that ‘Test contact size should be less than 40%.’ when the A/B deployment was associated with a Dynamic Target Group with the TG Source = Segment Builder. [INC0743734 / CMPN-22121] |
| 7 | Campaign Manager | Fixed | [A/B promotion deployments with a Dynamic TG]: Fixed a bug that, under certain conditions, was causing the content of the ‘A/B Split’ node not to be saved correctly if the user edited the A/B deployment after initially creating it. [WxC-PRB0012272 / WxC-INC0761107 / CMPN-21935] |
| 8 | Campaign Manager | Fixed | [A/B promotion deployments – paused, then resumed]: Fixed a bug that, under certain conditions, was causing A/B promotion deployments to be paused by the system with the error “Final target details cannot be empty for winner campaign.” This bug occurred if the user paused the A/B deployment after the TG was prepared for the A/B variants and then changed the schedule or email content before resuming the deployment. [PRB0012268 / INC0767207 / CMPN-22110] |
| 9 | Campaign Manager | Fixed | [A/B promotion deployments – A/B split info]: Fixed a bug that, under certain conditions, was causing the A/B Split node info to be not saved correctly if the user updated the ‘Winner Identification schedule’. [PRB0012272 / INC0761107 / CMPN-21935] |
| 10 | Campaign Manager | Fixed | [App Push channel preview tests]: Fixed a bug that, under certain conditions, was causing App push channel preview tests not to work correctly. [PRB0012320 / INC0785652 / CMPN-22094 / CMPN-22061] |
| 11 | Campaign Manager | Fixed | Fixed a bug that, under certain conditions, was causing the ‘drop-&-drop composer’ option to be not available to the user in the drop-down if the user switched from a ‘dashboard’ page over to one of the following ‘Assets’ pages: ‘Message templates (Email)’ or ‘Landing pages’ or ‘Email partials’. [PRB0012361 / INC0791827 / CMPN-21816 / CMPN-22232] |
| 12 | Campaign Manager | Fixed | [SSO]: Fixed a bug that, under certain conditions, was causing the SSO (Single-Sign-On) integration with some clients’ Azure Active Directory to not work correctly. [INC0793333 / CMPN-22207] |
| 13 | Campaign Manager | Fixed | Fixed a bug that, under certain conditions, was causing errors in client-specific campaign history data-feeds generation for specific clients.[ PRB0012384 / INC0811006 / CMPN-22183] |
| 14 | Campaign Manager | Fixed | Fixed an issue which was causing some types of ‘sentinel’ monitoring alerts to be missed due to access restrictions for RDS database. [PRB0011304 / INC0468049 / INC0467777 / CMPN-21896] |
| 15 | Campaign Manager | Fixed | Fixed a bug that, under certain conditions, was causing SMS clicks not to be captured by the ‘DSL data receiver’ module. [PRB0011682 / INC0627740 / INC0714328 / CMPN-21888] |
| 16 | Campaign Manager | Fixed | Fixed a bug that, under certain conditions, was causing ‘AMP Email’ content to be lost from the ‘AMP HTML’ tab after the deployment is saved. [PRB0012178 / INC0722345 / CMPN-21789] |
| 17 | Campaign Manager | Fixed | Fixed a bug in the Webex Campaign ‘Change Deployment Status API’ that, under certain conditions, was retuning errors when a 3rd party system would invoke this API to activate a deployment. [PRB0011511 / INC0540371 / CMPN-21179] |
| 18 | Dashboard / Reports | Fixed | Fixed a bug that, under certain conditions, was causing incorrect SMS link-click counts to be displayed on the dashboard for some clients who use a non-standard way of shortening and tracking SMS links. [PRB0011677 / INC0570335 / CMPN-21892] |
| 19 | Email Composer | Fixed | Fixed a bug that, under certain conditions, was causing a newly created email template to be immediately closed and the user would then be redirected to the ‘Email template list’ screen. This issue was occurring if the user had been assigned a role called ‘Admin’ which is a system-reserved word. To prevent this issue from re-occurring, we have introduced a validation, and users cannot create a role with the role-name as ‘Admin’. [PRB0012269 / INC0768066 / CMPN-22000] |
| 20 | Email Composer | Fixed | Fixed a bug that, under certain conditions, was causing the email template not to be automatically updated after an email partial within it was updated. [PRB0011610 / INC0567486 / CMPN-21169] |
| 21 | Profile Manager | Fixed | Fixed a bug that, under certain conditions, was causing values containing special characters not to be displayed correctly in the Segment Builder step#4 (Filter conditions screen). [CMPN-21911] |
| 22 | Profile Manager | Fixed | Fixed a bug that, under certain conditions, was causing some values in the Segment exports to be incorrectly shown in encrypted format. [PRB0012124 / INC0699186 / CMPN-21884] |
The below-listed fixes are nominally part of a separate patch release ; however, this patch release 7.2.1 will be deployed in production along with release 7.2 on the same day.
| # | Module | Change Type | Description |
|---|---|---|---|
| 1 | Campaign Manager | Fixed | [A/B promotion deployments] : Fixed a bug that, under certain conditions, was causing the “% difference” field value on the ‘Winner identification’ node not to be saved correctly if the user edited this value after initially creating the deployment. [CMPN-22542] |
| 2 | Campaign Manager | Fixed | [A/B promotion deployments] : Fixed a bug in the ‘Create deployment’ 3-step wizard that, under certain conditions, was causing the ‘A/B test on variation of’ dropdown value not to be saved correctly if the user clicked on the ‘Back’ button. [CMPN-22548] |
| 3 | Campaign Manager | Fixed | [A/B promotion deployments] : Fixed a bug that, under certain conditions, was causing the A/B deployment not to be displayed correctly on the deployment-canvas after the user has drafted the deployment after configuring the ‘Winner identification’ node, but while leaving other nodes un-configured. [PRB0012535 / INC0836868 / CMPN-22623] |
| 4 | Campaign Manager | Fixed | [App Push A/B deployments]: Fixed a bug that, under certain conditions, was causing the App Push A/B deployment variant-A & variant-B node content to be not saved correctly after the user has edited a draft deployment and the ‘Title’ field value is left blank within the App Push content. [WxC-PRB0012478 / WxC-INC0836904 / CMPN-22547] |
| 5 | Profile Manager | Fixed | Prior to this bug fix, while applying ‘Condition on campaign data’ within the Segment Builder, the _W (winner) deployment was not available to the user to select in this filter before the A/B Winner is decided and the winner deployment is created by the system. This bug has been fixed as follows: In the Segment Builder step#4, on the 'Condition on Campaign Data' screen, within the dropdown list of deployments, we will not show separate deployments for A-variant , B-variant and Winner deployment. Instead, the overall A/B deployment will be shown. [WxC-PRB0012587 / WxC-INC0849846 / CMPN-22340 / Nolt# 491] |
| 6 | Profile Manager | Fixed | Fixed a bug that, under certain conditions, was causing the Segment Builder application to incorrectly query a local version of MongoDB. [CMPN-22408] |
| 7 | Profile Manager | Fixed | Fixed a bug that, under certain conditions, was causing ‘secondary condition’ value to be not saved correctly on the Segment Builder step#4 while applying ‘Condition on campaign data’. [INC0831228 / CMPN-19609] |
6.0 Need more information?
Please contact your Cisco Webex client representative if you have questions or would like access to a new feature.
Cisco Webex technical support team can be contacted at any time by phone or email:
- Europe / Middle East / Africa:
- Phone: +44 (0) 1494 750 600
- Email: [email protected]
- North America:
- Phone: +1-855-324-0970
- Email: [email protected]