

Release 6.7 - 2023 August-September
1.0 Campaign Manager module enhancements
1.1 Duplicate an existing deployment with just two clicks
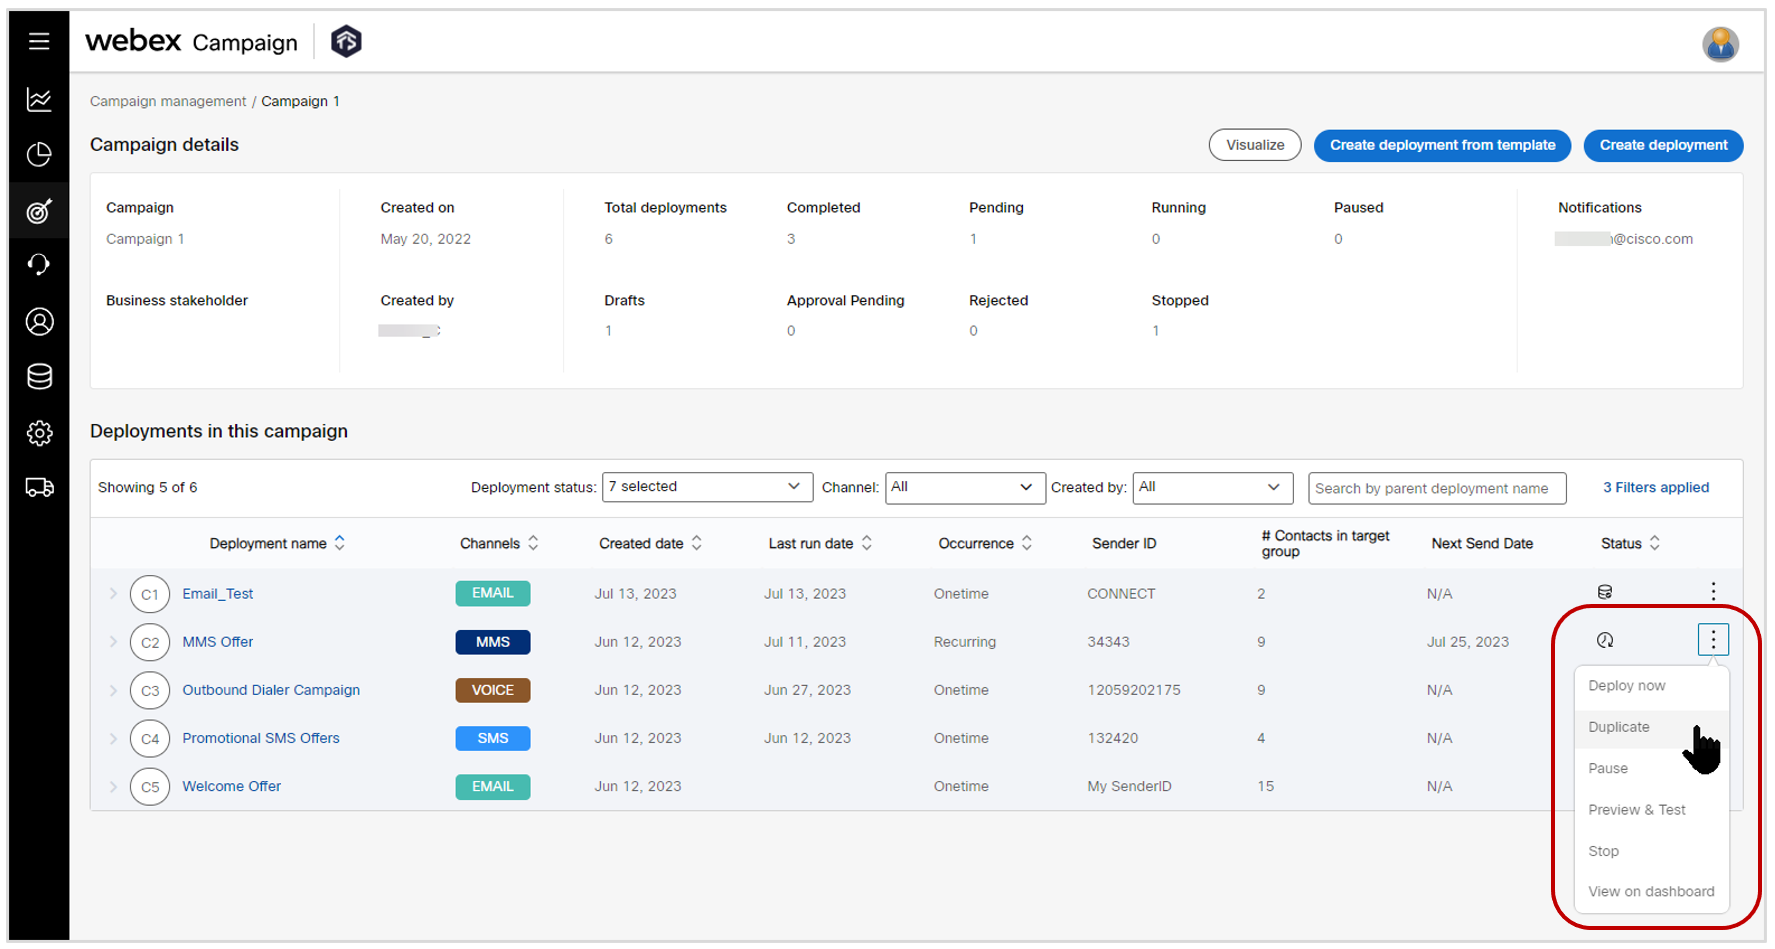
You will now be able to create a copy of an existing deployment very easily.
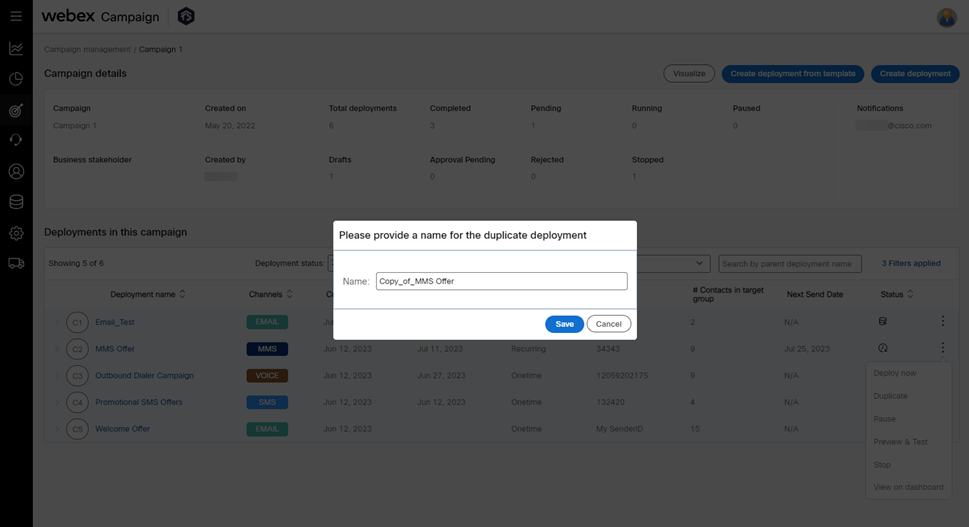
When you select the newly introduced ‘Duplicate’ option in the 3-dot action menu for a deployment, a pop-up will appear where you can provide a name for your duplicated deployment. Once the duplicated deployment is saved in the ‘Draft’ status, then you can make changes to it as required.
1.2 Campaign details: a floating panel & 3 new columns to show more info about deployments
This feature will help you more quickly review and compare multiple deployments within a campaign – thus potentially saving you a lot of time every day.
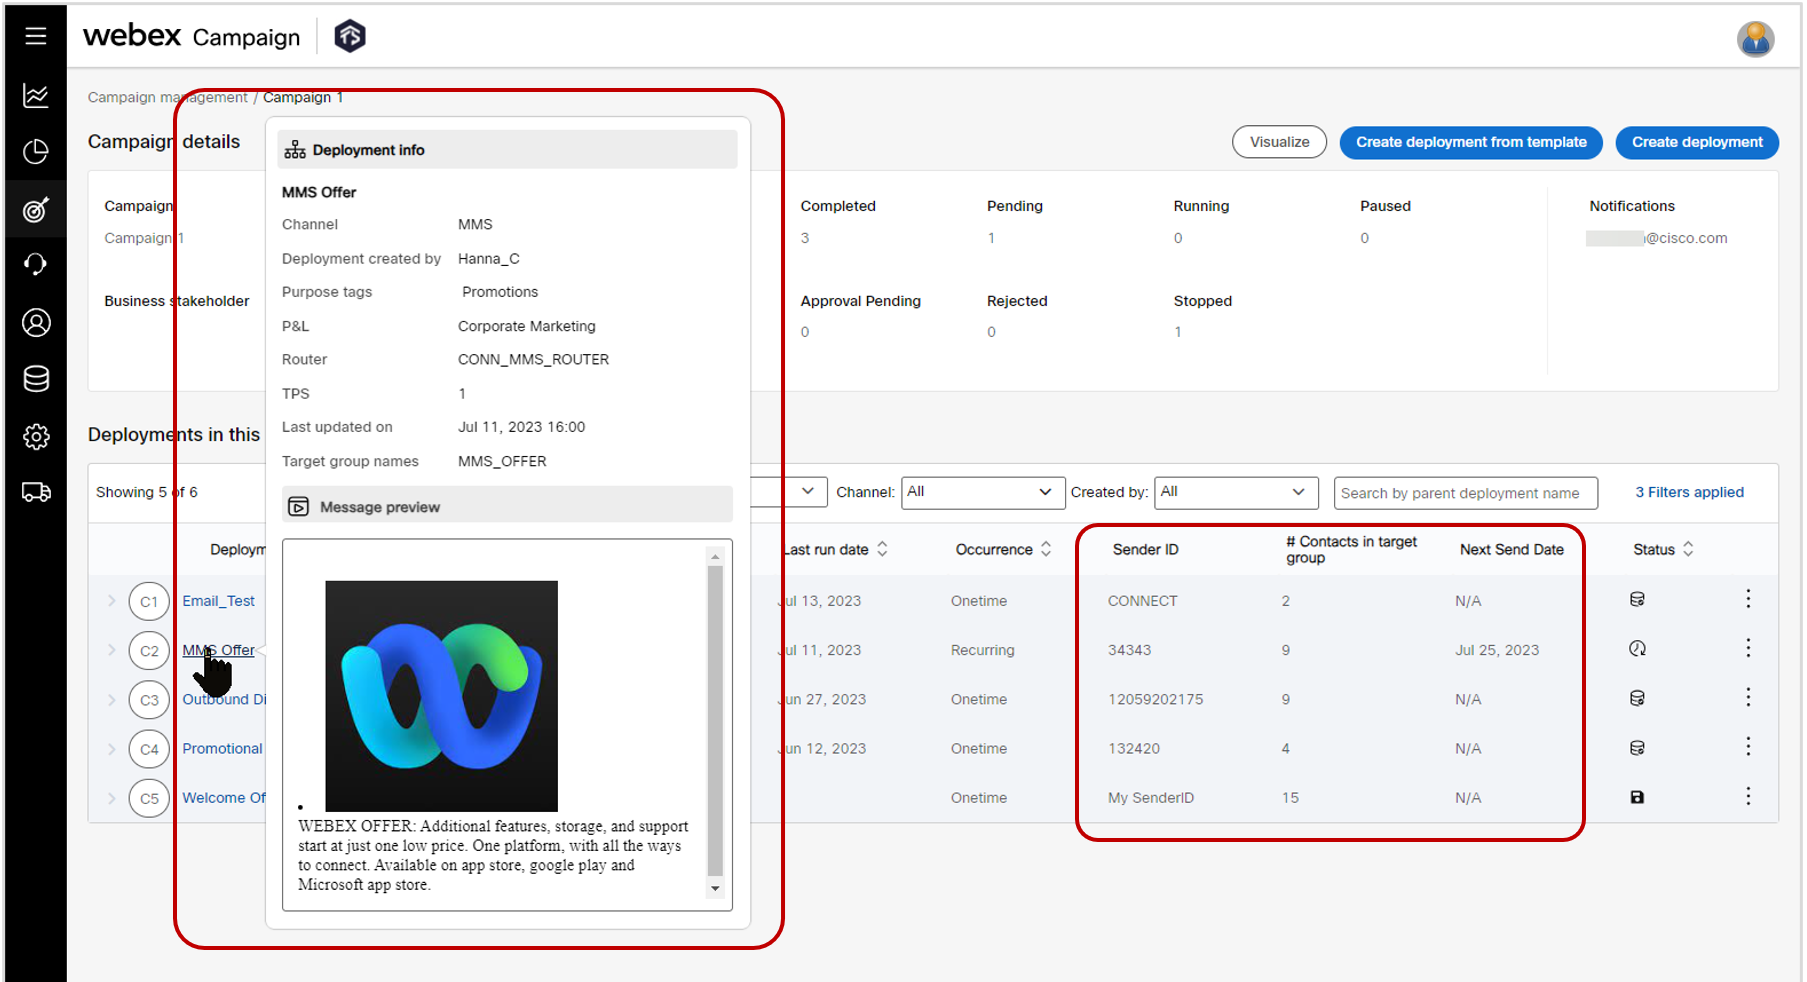
We have introduced a floating panel which will be shown when you hover your mouse over the deployment name. This panel will show the following info about the deployment:
a) Channel
b) Deployment creator
c) Purpose tags
d) P&L tag
e) Router
f) TPS
g) Last updated on
h) Names of target groups associated with the deployment
i) Message preview: This is shown only in case of SMS & MMS channel deployments.
This floating panel will disappear when you click somewhere on the screen away from the deployment name.
In addition, we have introduced the following 3 new columns on the table grid on this screen:
a) Sender ID
b) Number of contacts in the target group (if a TG has been associated with the deployment). This value is shown only when the TG-Source = File and Occurrence = Onetime. For all other values of TG-Sources and for Recurring/Instant deployments, this column value is shown as ‘N/A’.
c) Next Send Date (if a schedule has been configured for the deployment and if the deployment status is not ‘Paused’, ‘Completed’, or ‘Stopped’. )
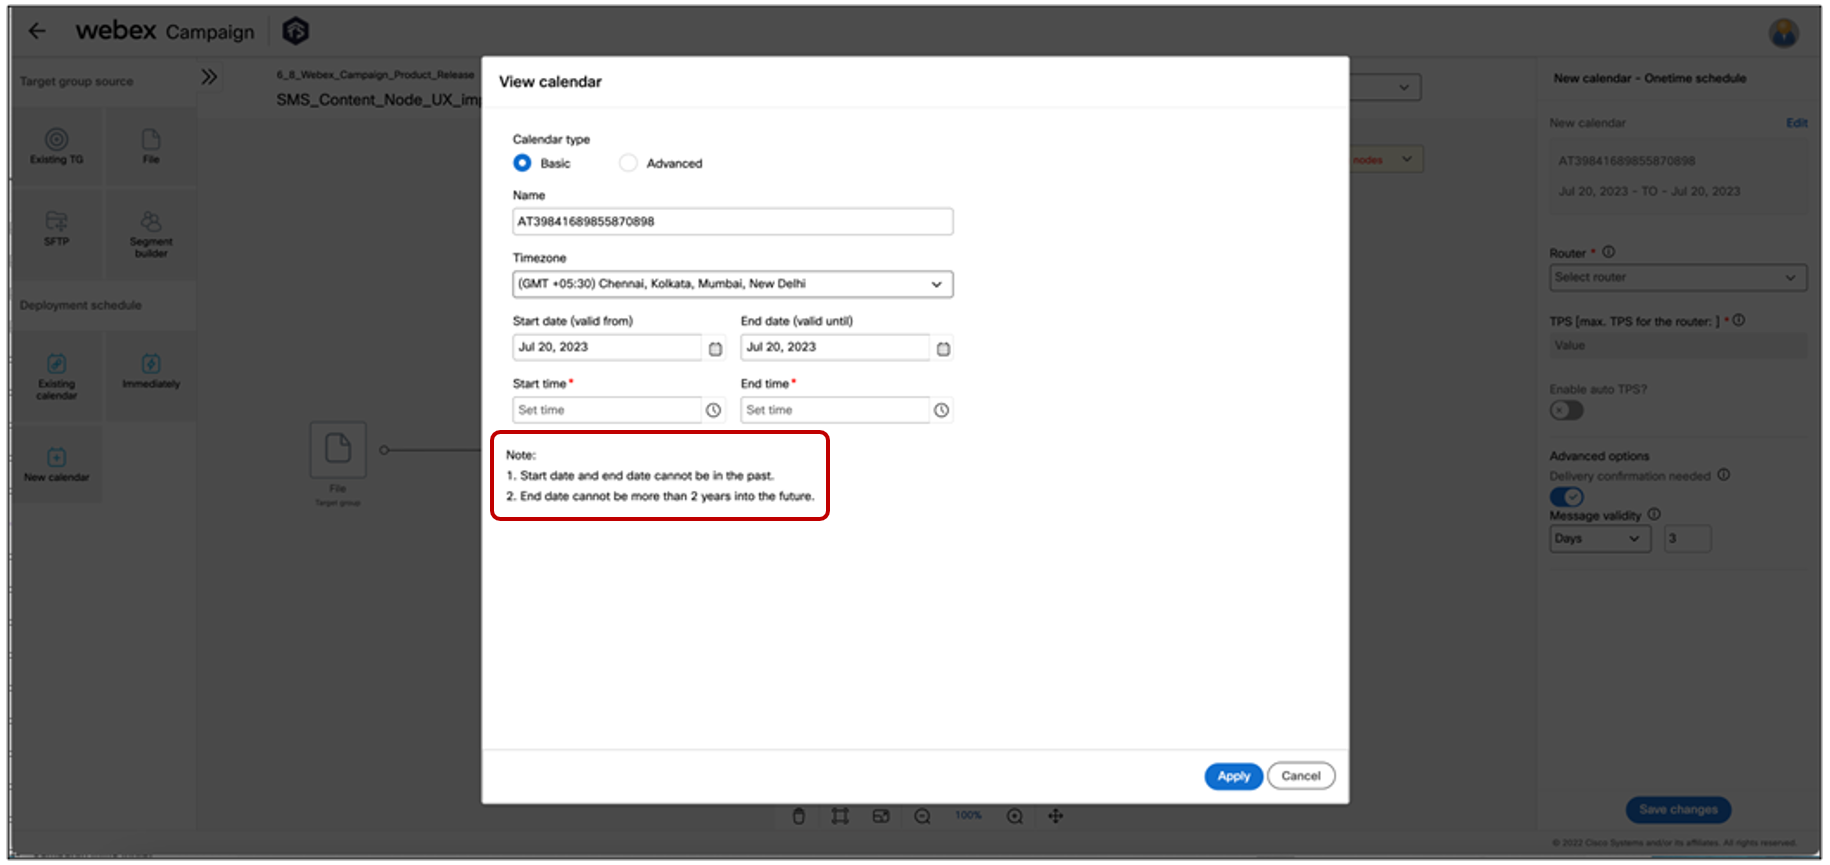
1.3 Deployment creation canvas: calendar date picker UX improvements
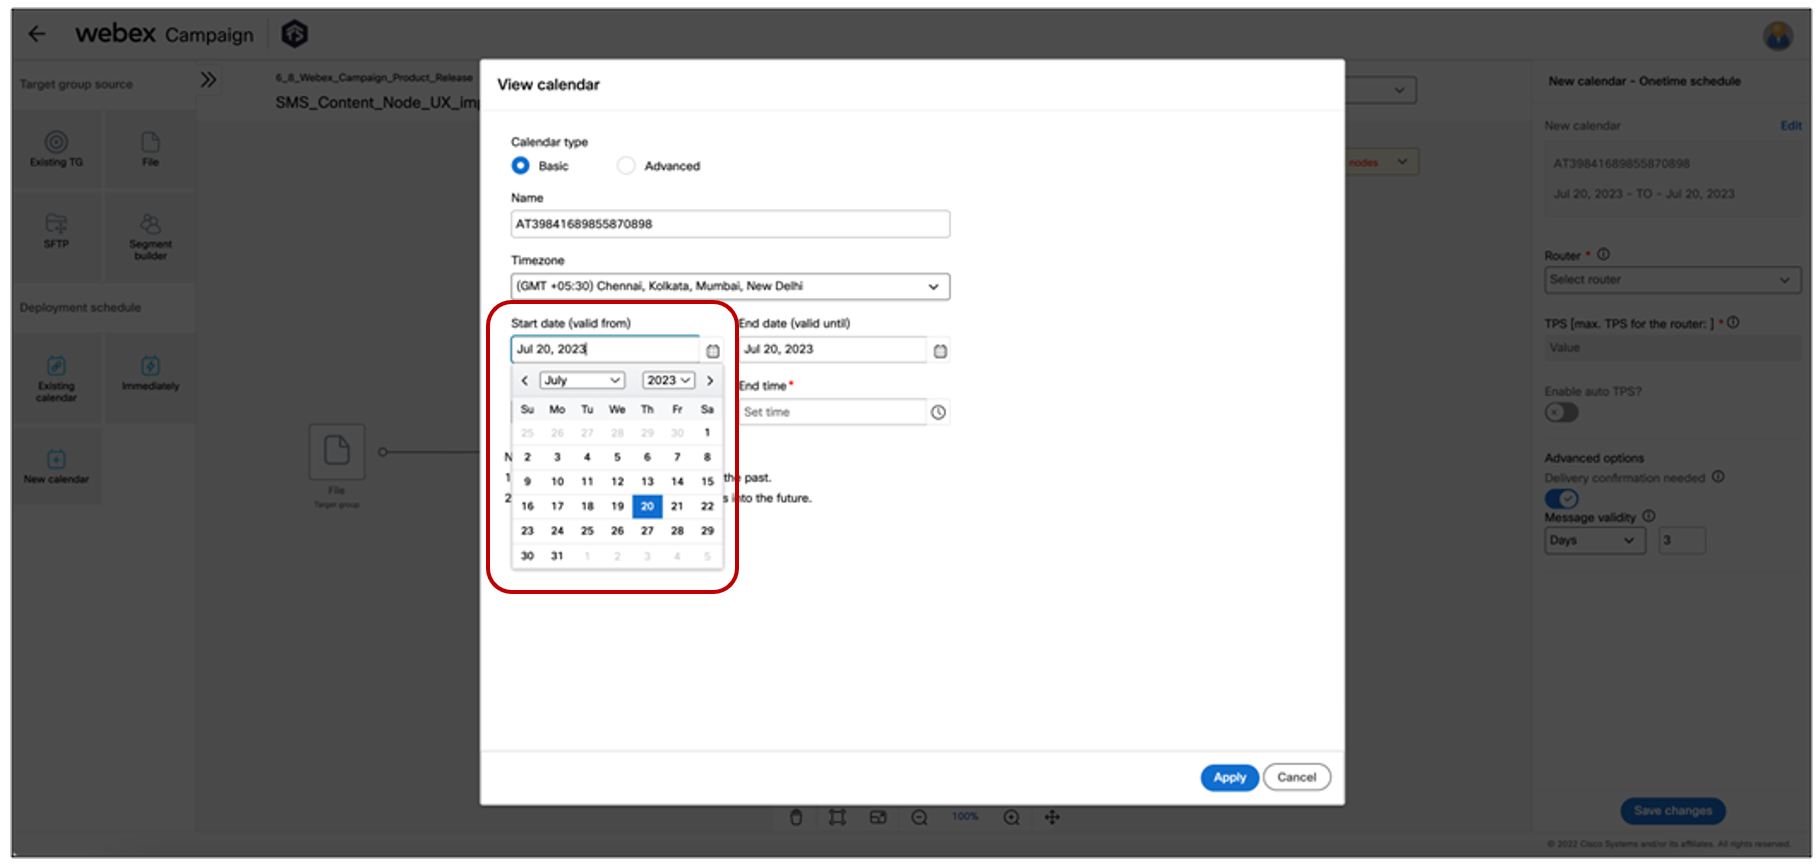
We have improved the date-picker within the ‘Schedule’ node on the deployment creation canvas; it’s now easier to select month and year values from separate dropdowns. Previously, you had to scroll through the months by clicking multiple times to get to the year you wanted to select.
This enhancement has been implemented for all the variations of the ‘Schedule’ node e.g. Basic, Advanced, Daily, Weekly, Monthly, etc. You will be able to select a date up to 2 years in the future. We have also added notes to inform users about the validations that will be performed by the system.
This enhancement is associated with the client-suggested Nolt idea #304.
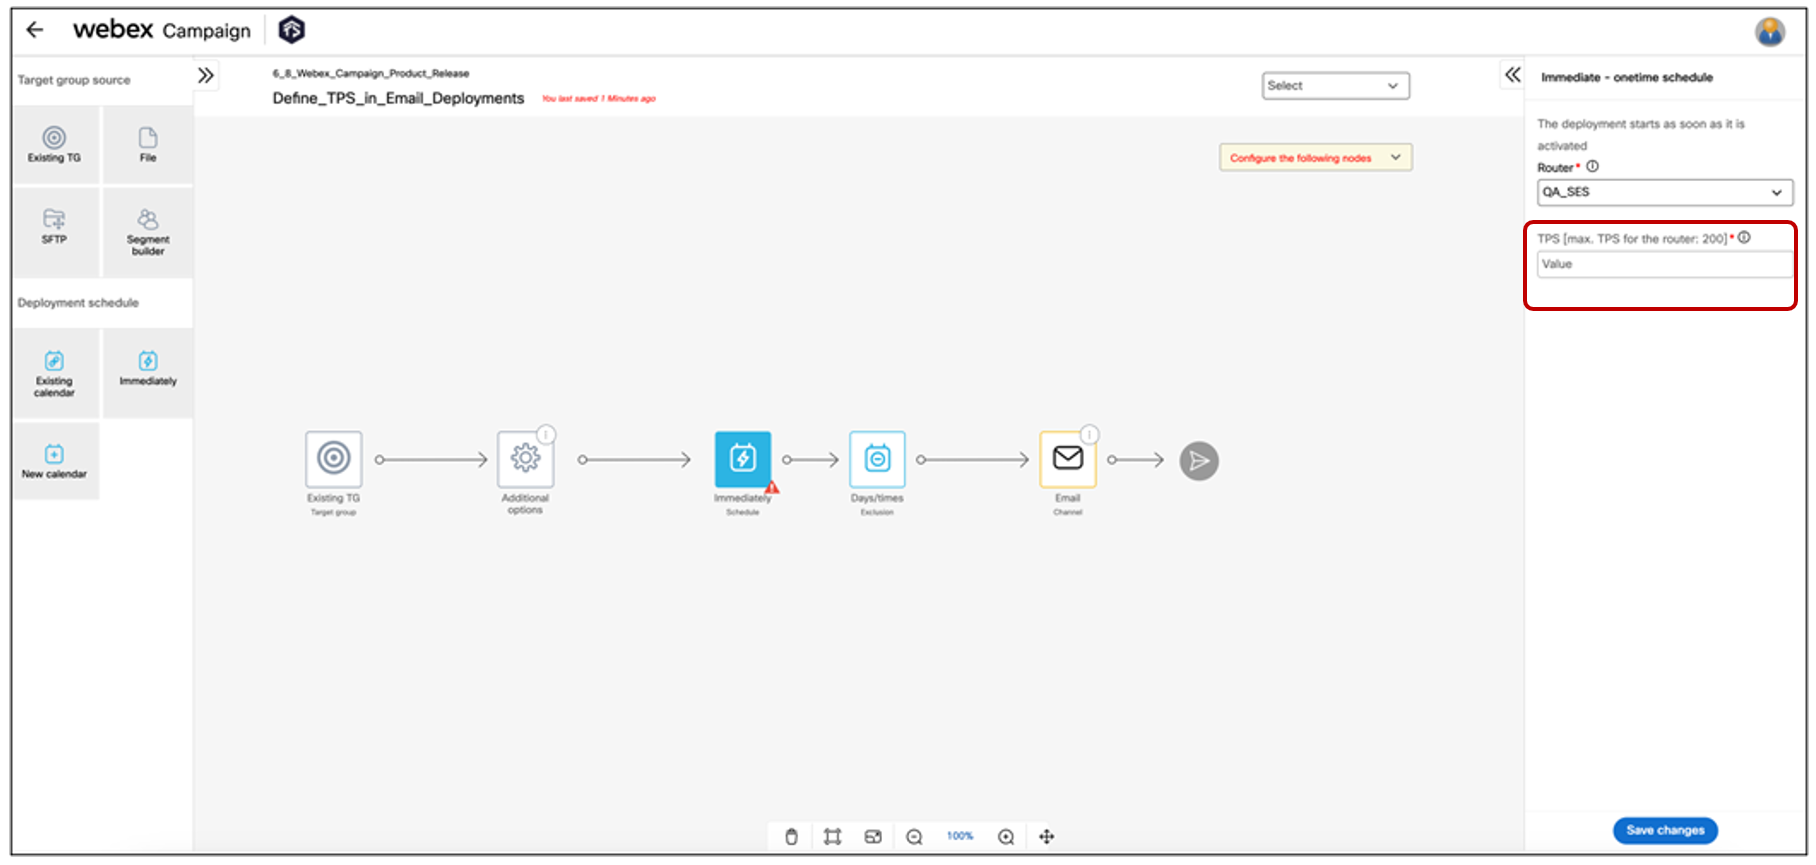
1.4 Email deployments (Schedule node): Ability to specify outbound throughput (TPS)
Now you will be able to specify the TPS in email deployments.
1.5 Email deployments: Litmus Inbox Previews: Updated list of email clients
We have added several new email clients / OS options for Inbox Previews, e.g., iPhone 14, iPhone 14 Pro Max, iPhone 14 (dark mode), and iPhone 14 Pro Max (dark mode). We have also removed some older email clients. We have also made some changes to the list of email clients / OS options that are selected by default.
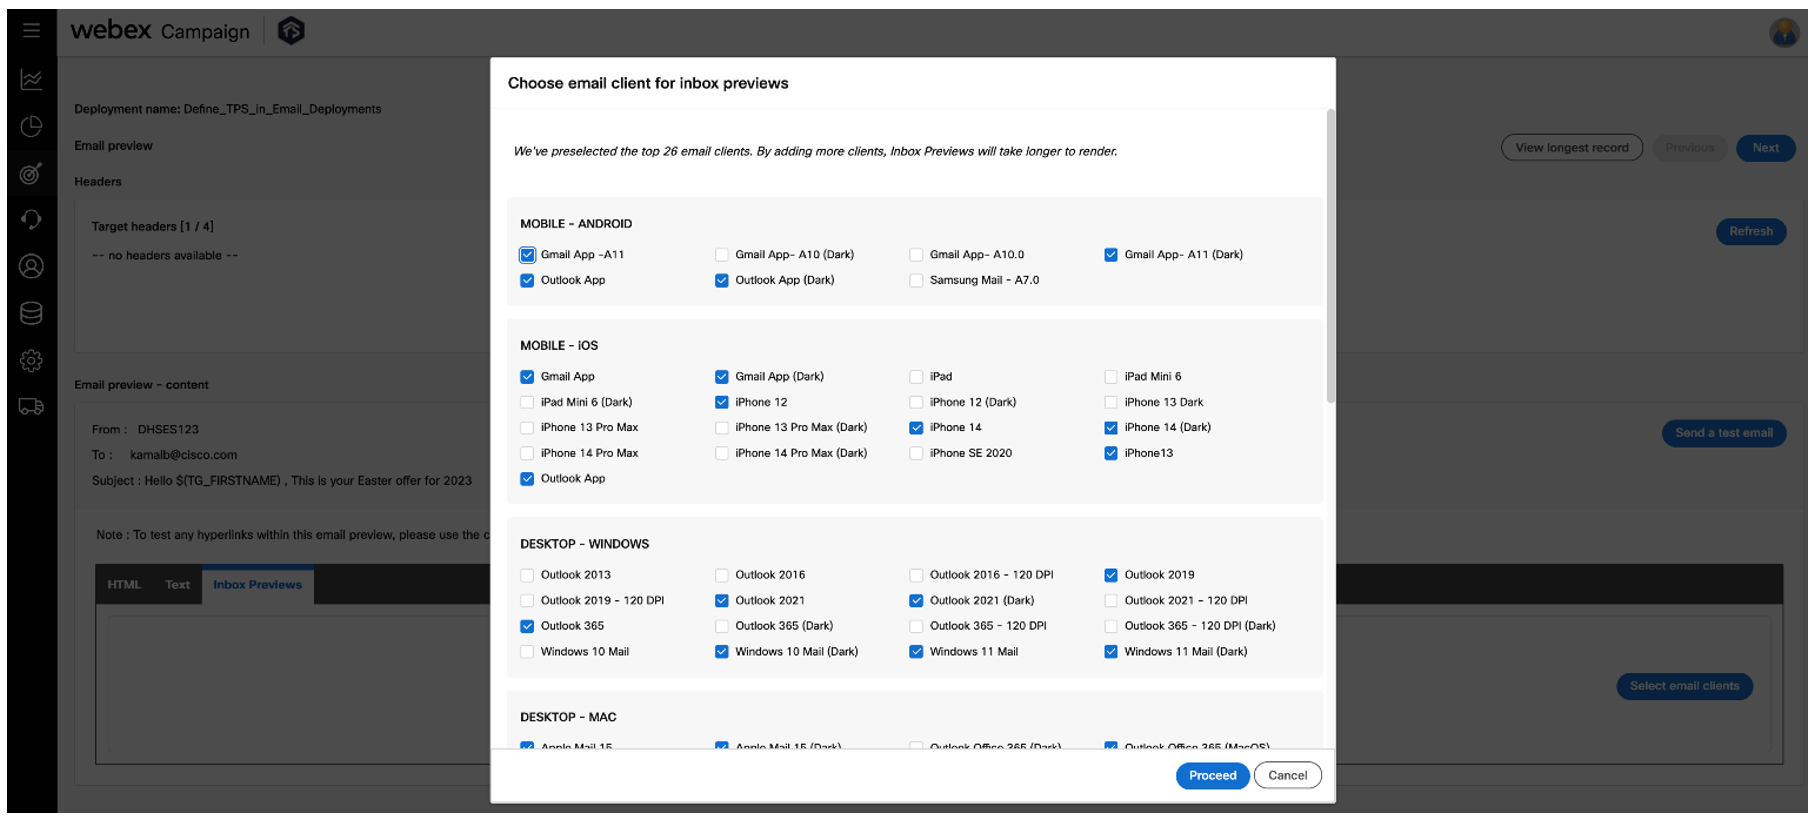
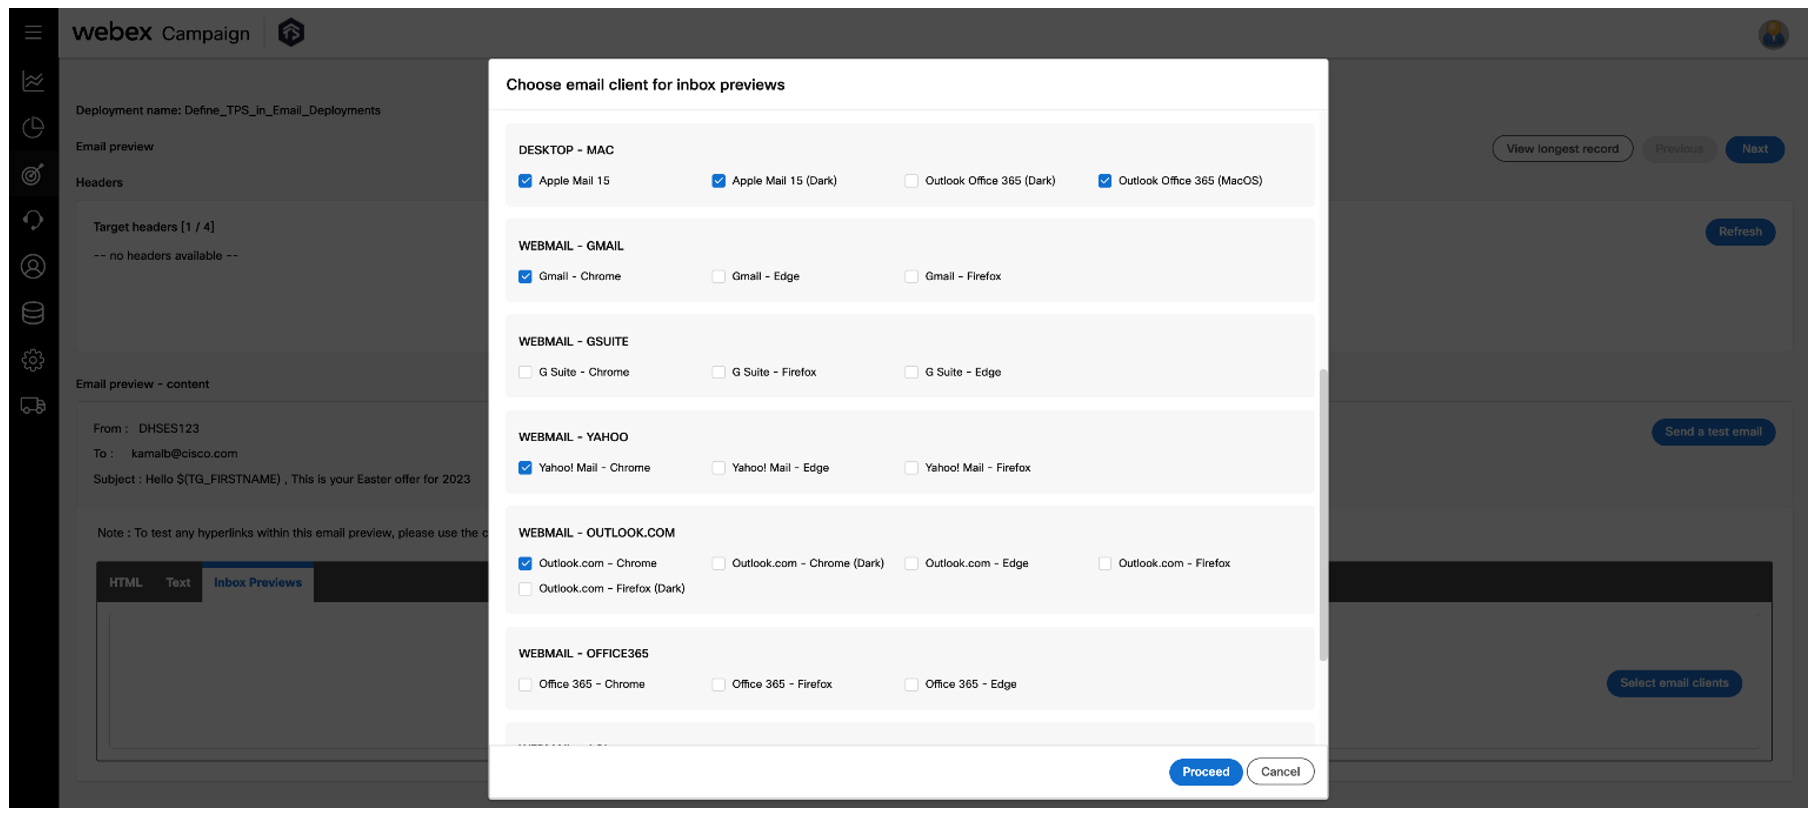
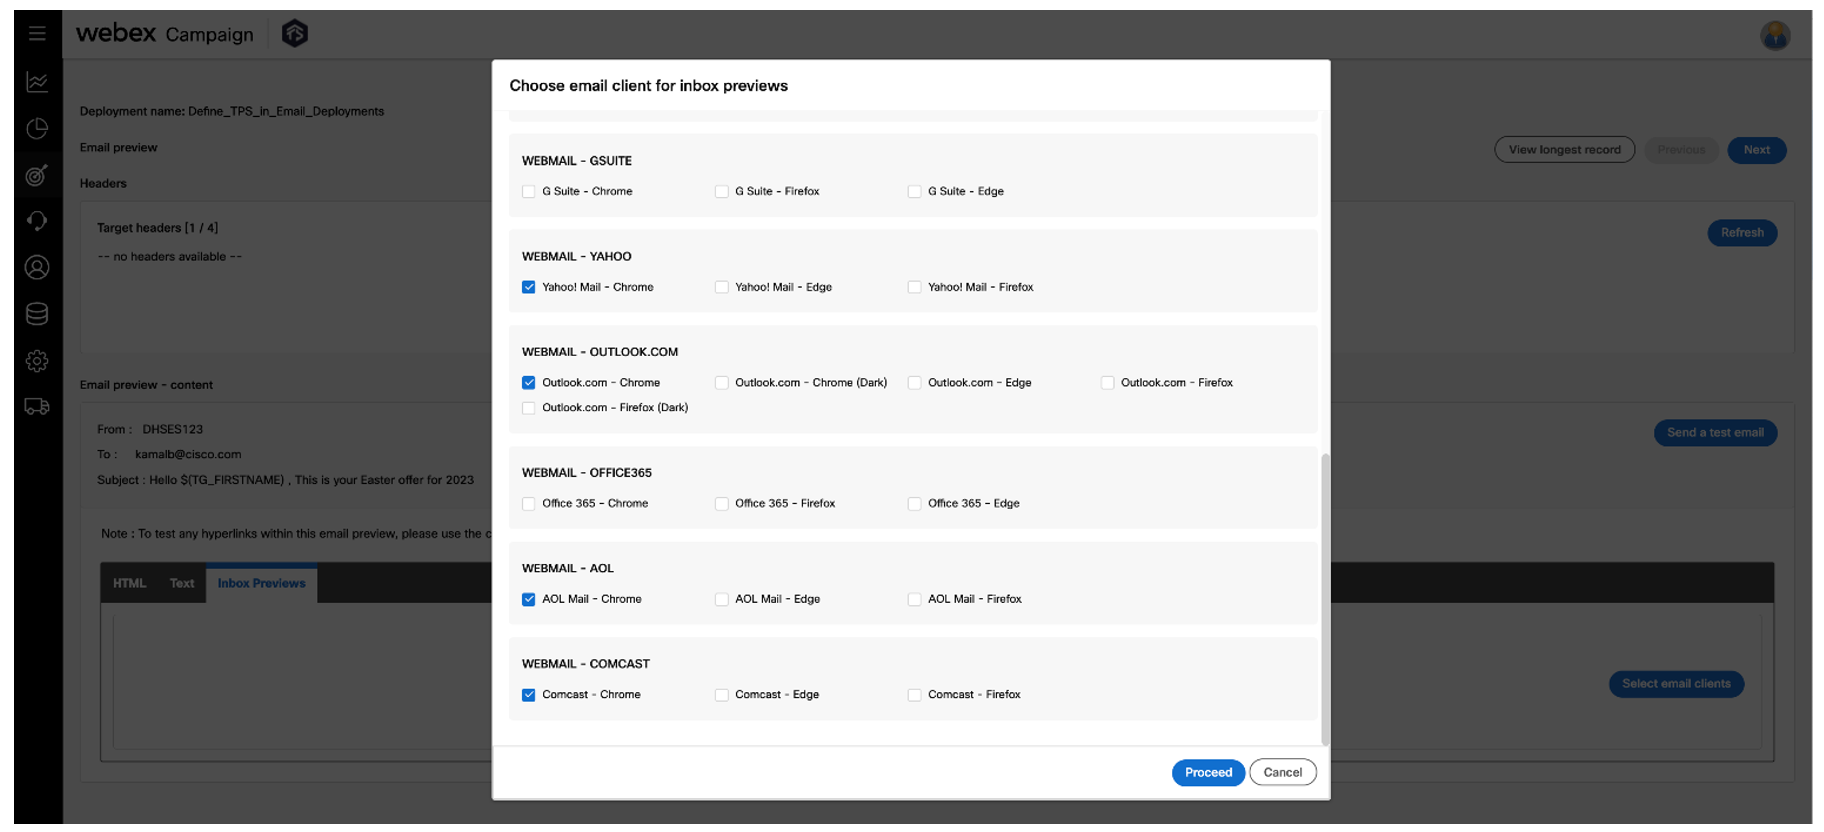
Please note that ‘Webmail – AOL’ and ‘Webmail – Comcast’ email clients are not available for Inbox Previews if your account is hosted in AWS-UK or AWS-Ireland. These email clients are available only if your account is hosted in AWS-USA or AWS-Canada.
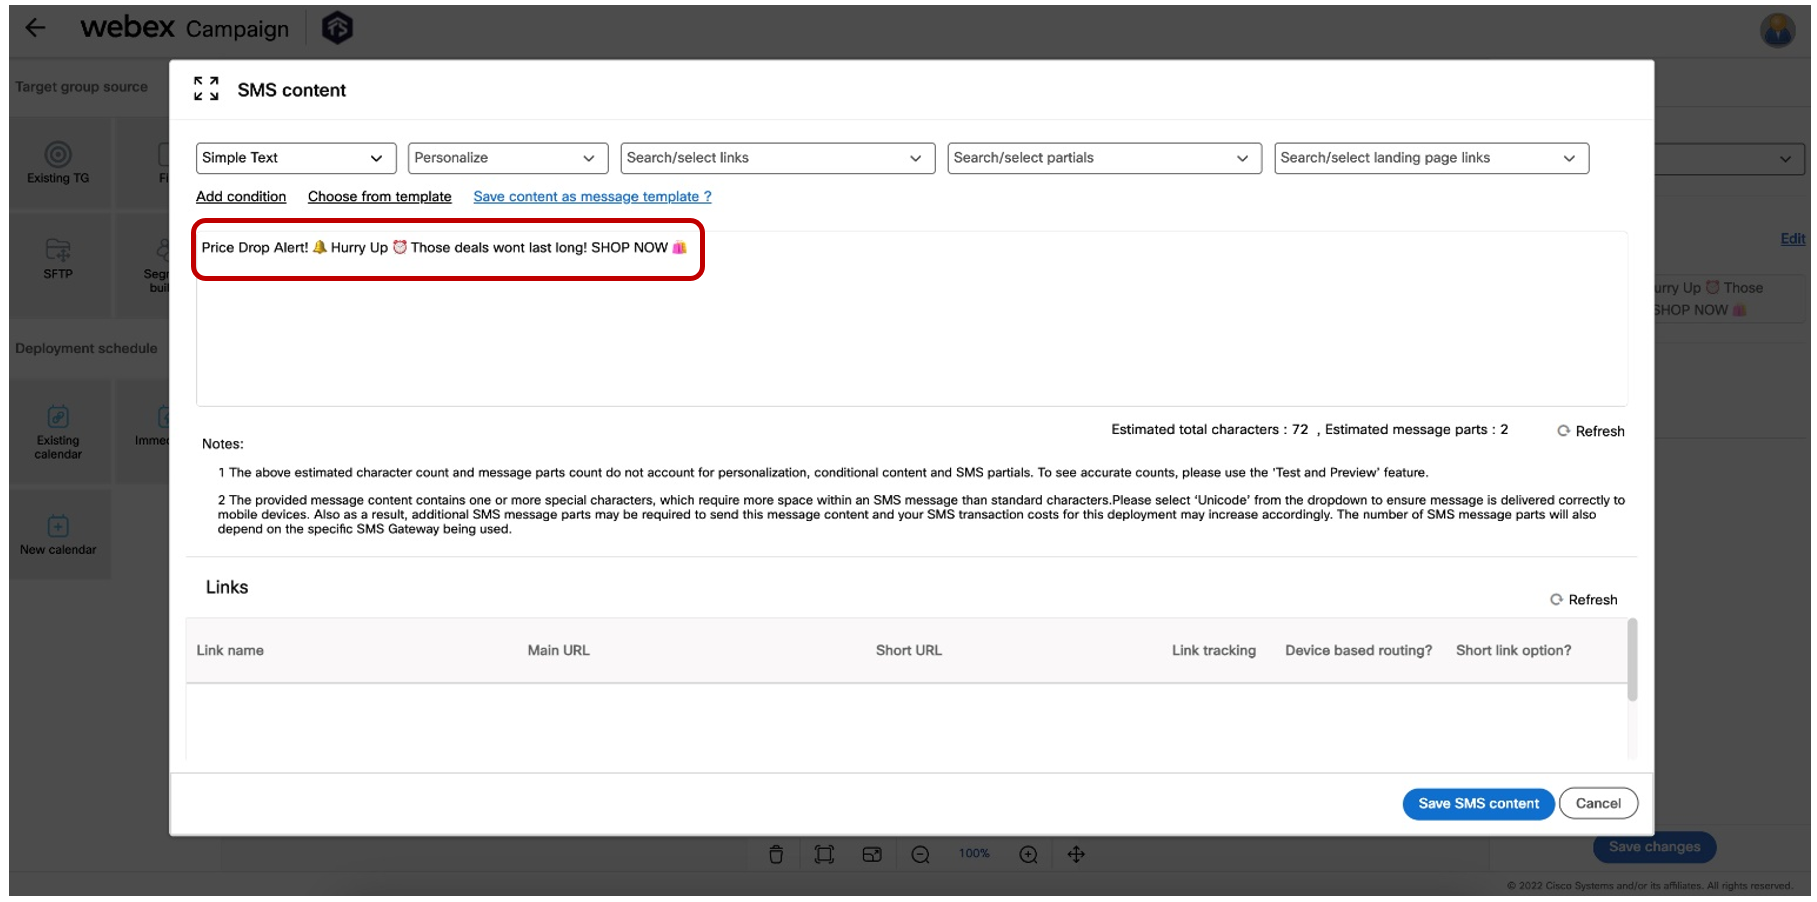
1.6 SMS deployments (Content node): Emoji support in USA & Canada
With this release, users whose accounts are hosted in AWS-USA and AWS-Canada will be able to include emojis within their SMS messages. This feature is supported only in North America because currently, mobile networks outside of North America do not support the inclusion of emojis within SMS messages. Your SMS messages are more likely to resonate with your customer base if they include appropriate emojis (when used judiciously 😊).
You can copy emojis from a reputable third party website (such as https://www.emojicopy.com/ ) and paste those into the message copy within the SMS content node.
Since emojis are considered ‘special characters’, you will need to change the type of SMS message from ‘Simple Text’ to ‘Unicode’ in the dropdown in the top left corner of the SMS content pop-up. As a result, the effective number of SMS message-parts needed to send such a message is at least likely to be double compared to the message-parts needed to send an SMS message without emojis. Please keep these additional costs in mind when using emojis within SMS messages.
1.7 SMS deployments (Content node): auto-detect special characters and show estimated message parts
Clients in Canada and USA are likely to send SMS messages to a subset of their customers in French or Spanish language. Some characters within these languages are considered ‘special characters’. SMS messages containing such special characters need to be designated as ‘Unicode’ messages and will effectively require extra characters and extra message parts – thus potentially increasing the cost of that SMS campaign substantially. Similar considerations apply if an SMS message contains emojis.
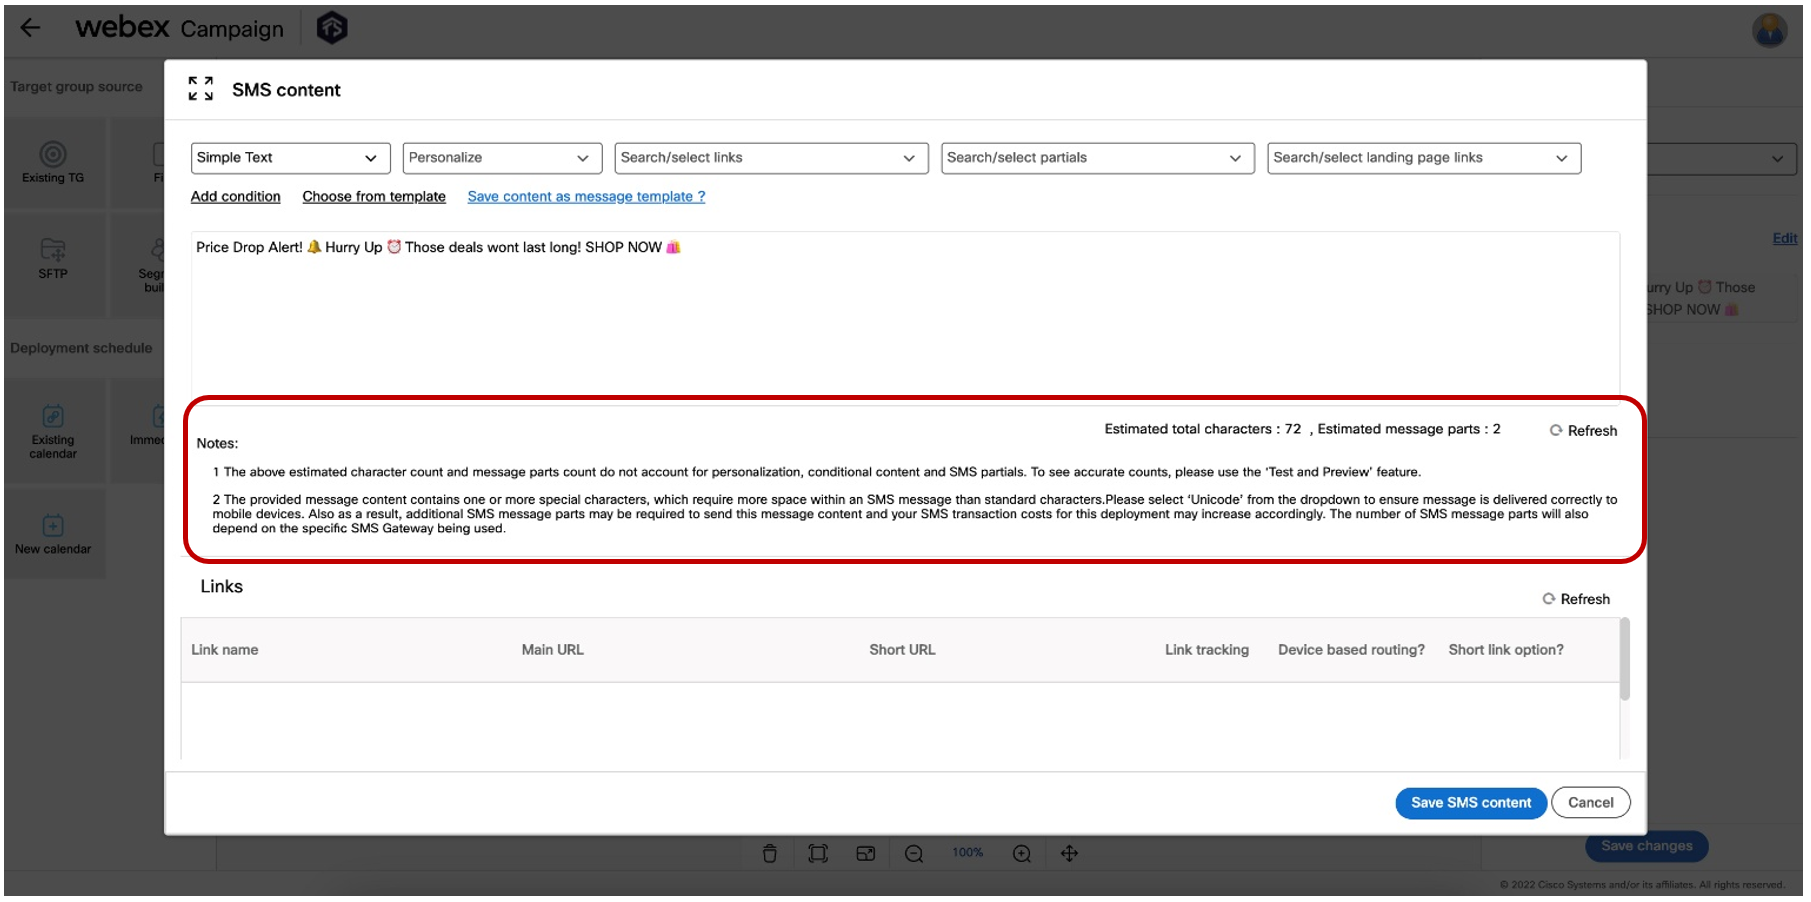
Therefore with this release, we have improved the ‘SMS content’ pop-up to show the following additional info:
a) Estimated total characters.
b) Estimated message parts.
In addition, if the system detects special characters or emojis within the SMS content message, then the user will be shown an alert that they need to change the message type from ‘Simple Text’ to ‘Unicode’.
These enhancements will help you decide whether the additional costs for the SMS message containing special characters or emojis is worth it. If not, then you can reword your message copy to remove the special characters or emojis if they are not needed and reduce your message-send costs.
You will need to click the ‘Refresh’ button after you have made changes to the message copy to see the updated values of the estimated character count and estimated message parts count.
Also, please note that these values of estimated characters and estimated message parts do not account for personalization, conditional content, and SMS Partials.
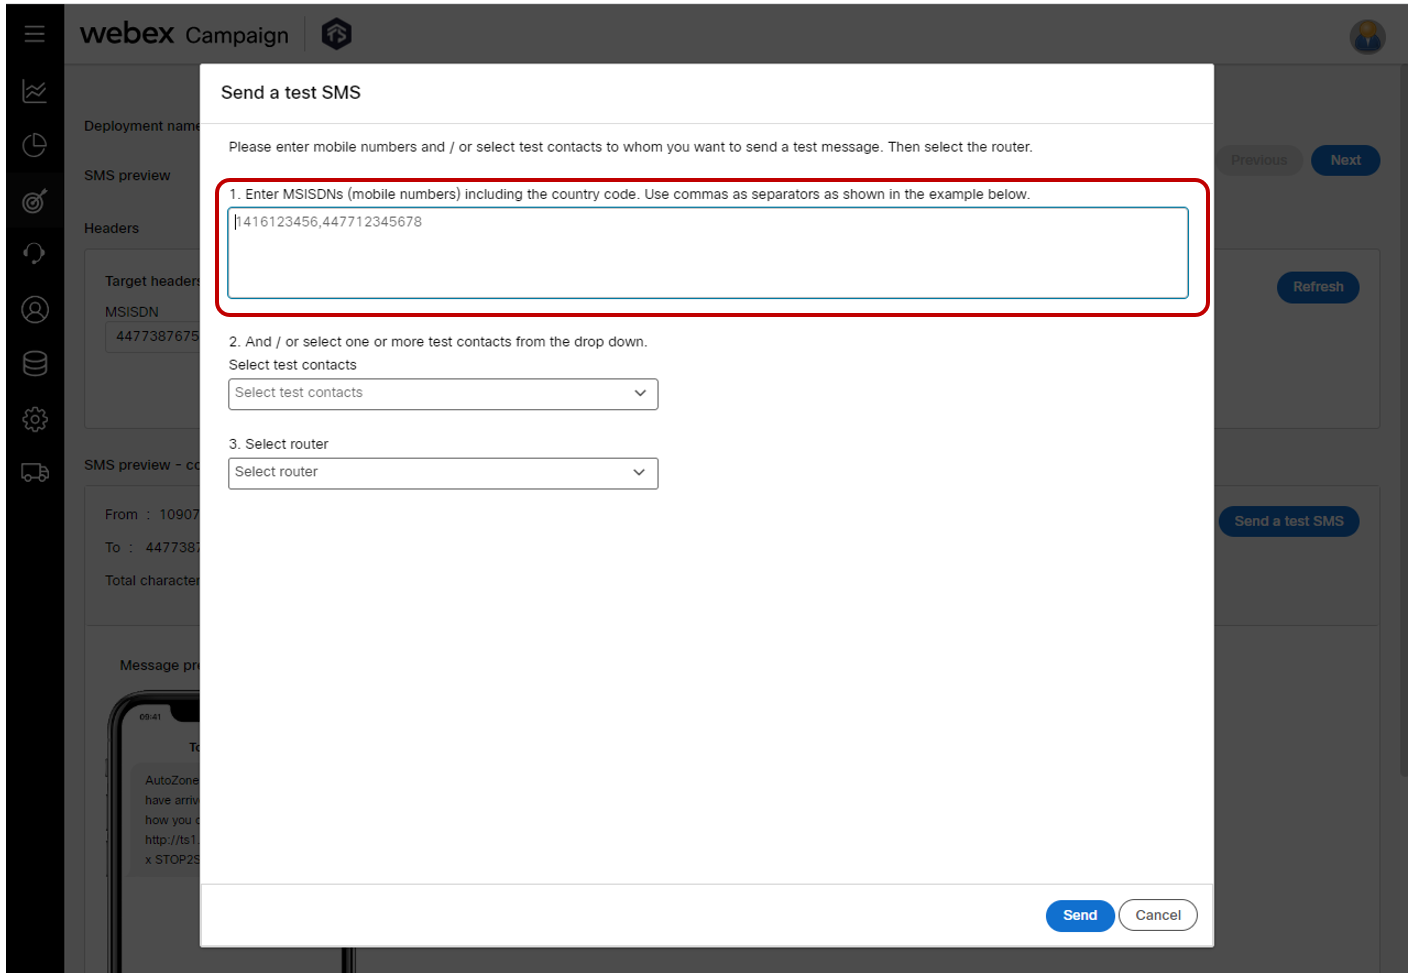
1.8 SMS & MMS deployments: Sending a test message: ability to specify mobile numbers
You will now be able to specify mobile numbers directly while sending an SMS / MMS test message to yourself or to your colleagues and campaign approvers within your marketing team. Previously, to be able to send an SMS / MMS test message to someone, you first had to save that person as a ‘Test contact’ within the ‘Target data’ section.
This feature is especially useful if your test message recipients change on an ad-hoc basis for every campaign; so there’s not much benefit in saving these as test contacts as they are not frequently reusable for future campaign deployment testing.
When entering multiple test mobile numbers, please separate those by a comma and use the mobile number format including the country-code, but without prefixing it with a plus sign. (e.g. 12014849989, 12014845683, 12014849134, 447753928685).
In addition to sending SMS/MMS test messages to ad-hoc numbers, you can also select previously saved test contacts from the dropdown.
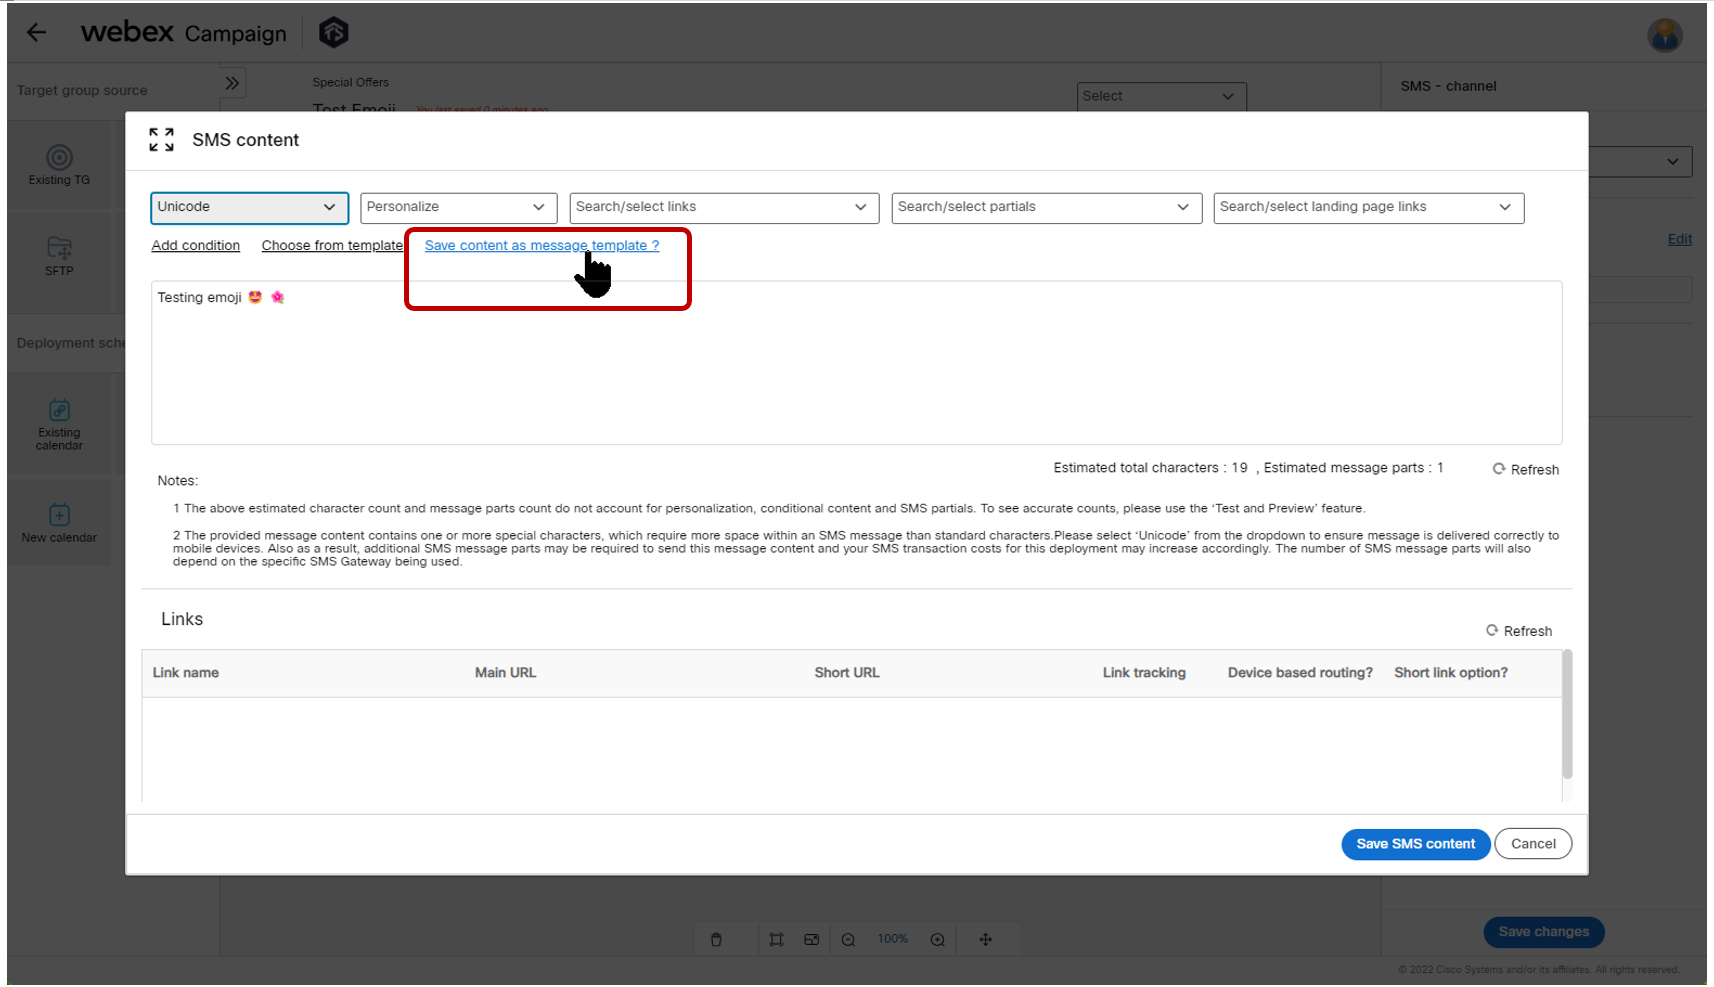
1.9 SMS deployments: Save content as a message template
Within the ‘SMS content’ node, on the ‘SMS content’ pop-up, you will now see a new link called 'Save content as message template ?'.
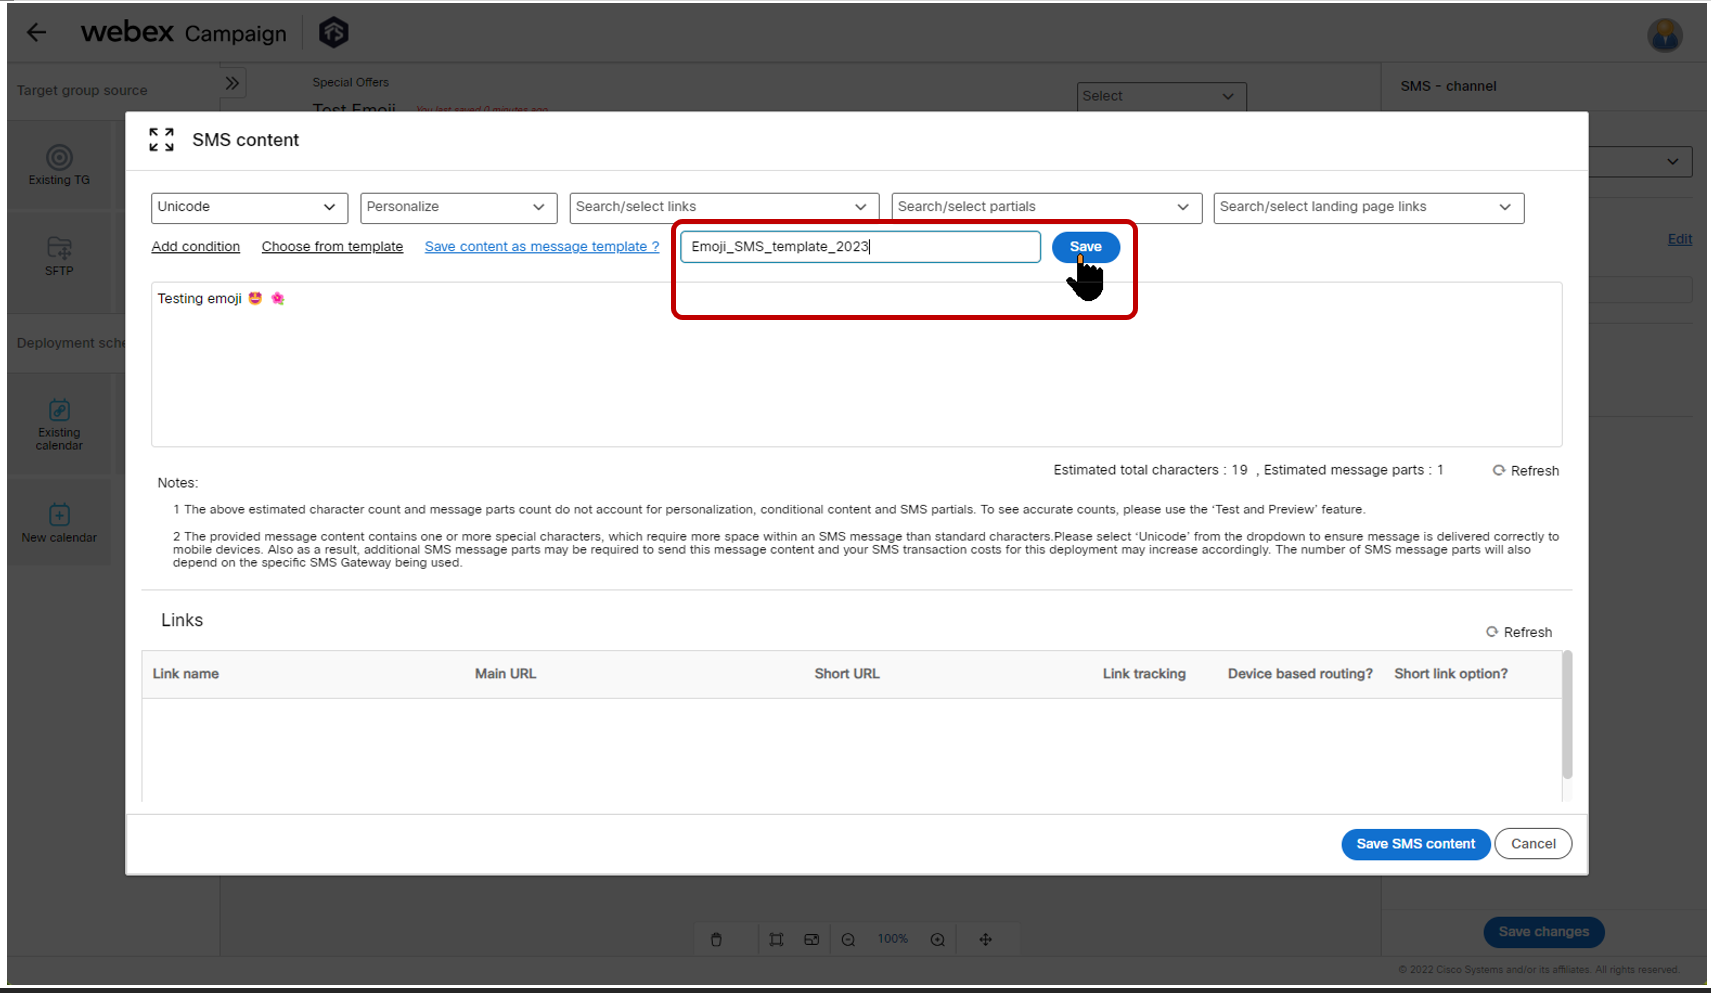
When you click this link, a text box will appear next to this link where you can type a name for your SMS message template and then save your message template. This SMS message template will then be available from the ‘Message templates’ screen.
This message template is saved under your current user group; so it will only be available to you and other colleagues when you are under this same user group.
If you give a template that already exists with the name that you give on this screen, then the system will show an alert stating ‘Another SMS template exists with the same name.’
This feature is associated with the user-requested Nolt idea # 314.
1.10 SMS & MMS: timezone-based delivery: times for each timezone now visible for ‘Draft’ deployments
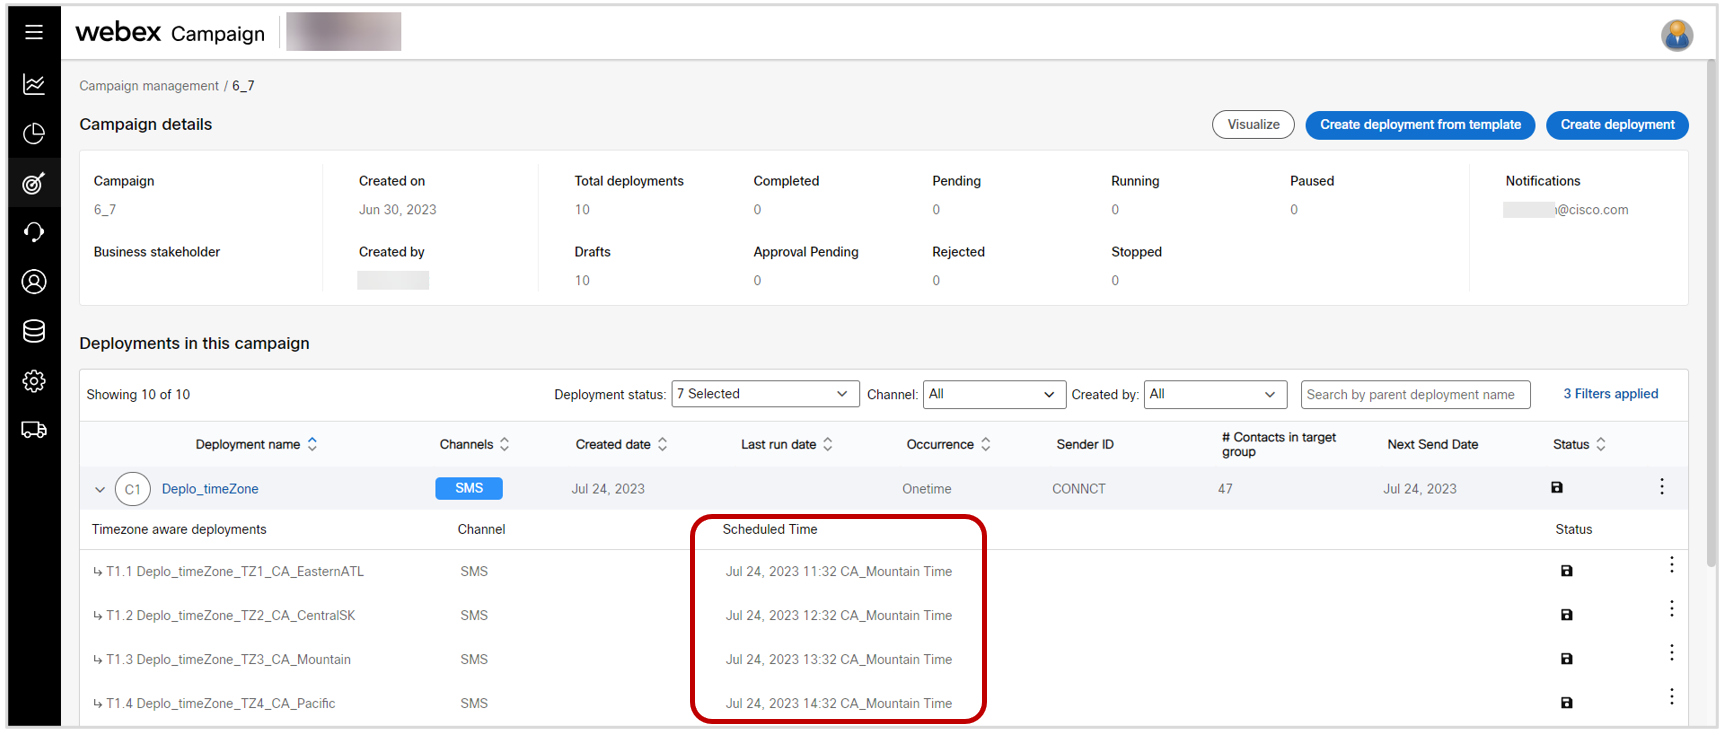
As you may recall, in release 6.6 we introduced the feature for our clients in the USA & Canada to be able to ‘Send using the local time zone of recipient’ as a simple toggle option to be enabled within the ‘Schedule’ node.
Until now, you could see the scheduled delivery times for each timezone on the ‘Deployments in this campaign’ screen only after the deployment is activated.
With this release, we have enhanced this feature so that the scheduled delivery times for each timezone are now easily visible while the deployment is in ‘Draft’ status. These times are displayed in the timezone of the logged-in user, e.g. in the below screenshot, the user who has logged in is in the Canadian Mountain timezone; so the scheduled times for the 4 timezone-based sub-deployments are being shown in Mountain times.
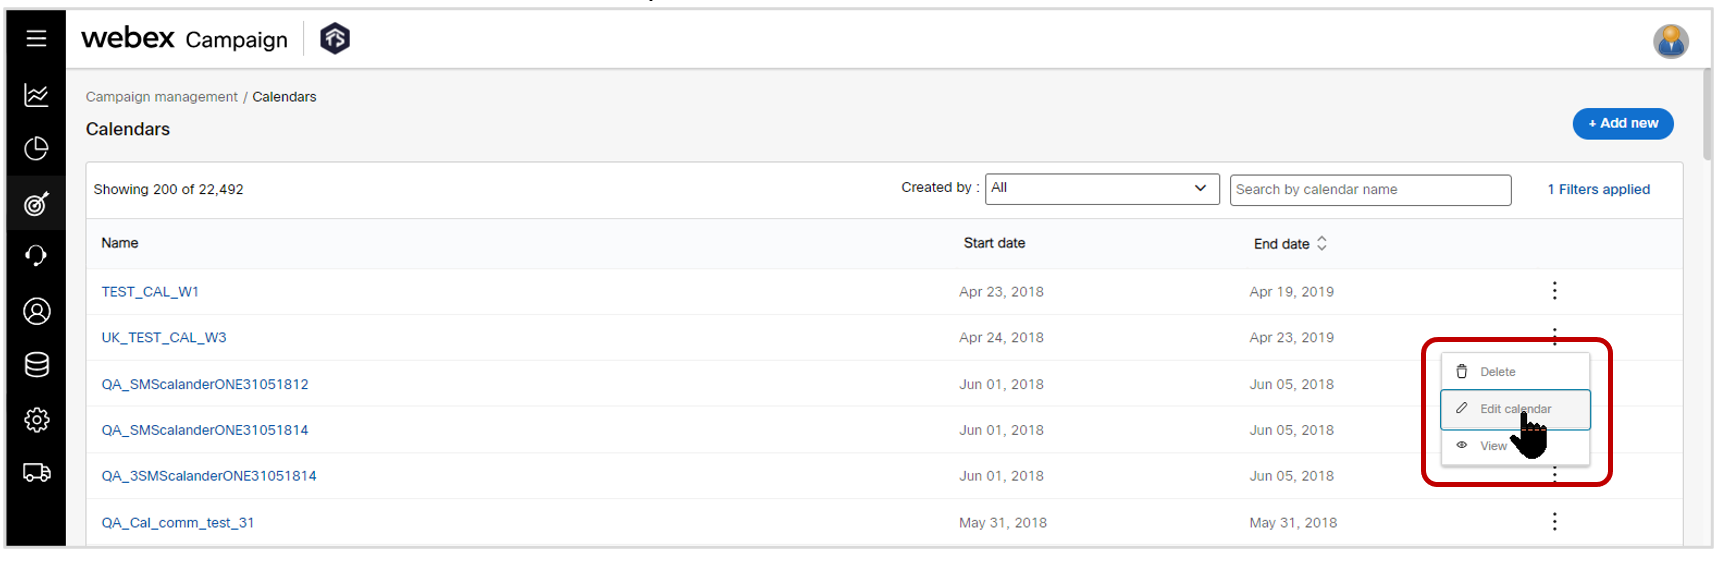
1.11 Calendars: Ability to edit a calendar
On the ‘Calendars’ screen, you will now be able to click on the ‘Edit calendar’ option within the 3-dot action menu and then make changes to an already existing calendar.
This feature is associated with the user-requested Nolt idea # 303.
1.12 Message templates: UX improvements
We have improved the user experience on the ‘Message templates’ screen such that the system will now ‘remember’ the values selected by you for the following filters on this screen:
a) Message template channel (SMS / MMS / Email)
b) Created by
c) Created using (in case of email channel, whether the template was created using the drag-&-drop composer or using the HTML editor).
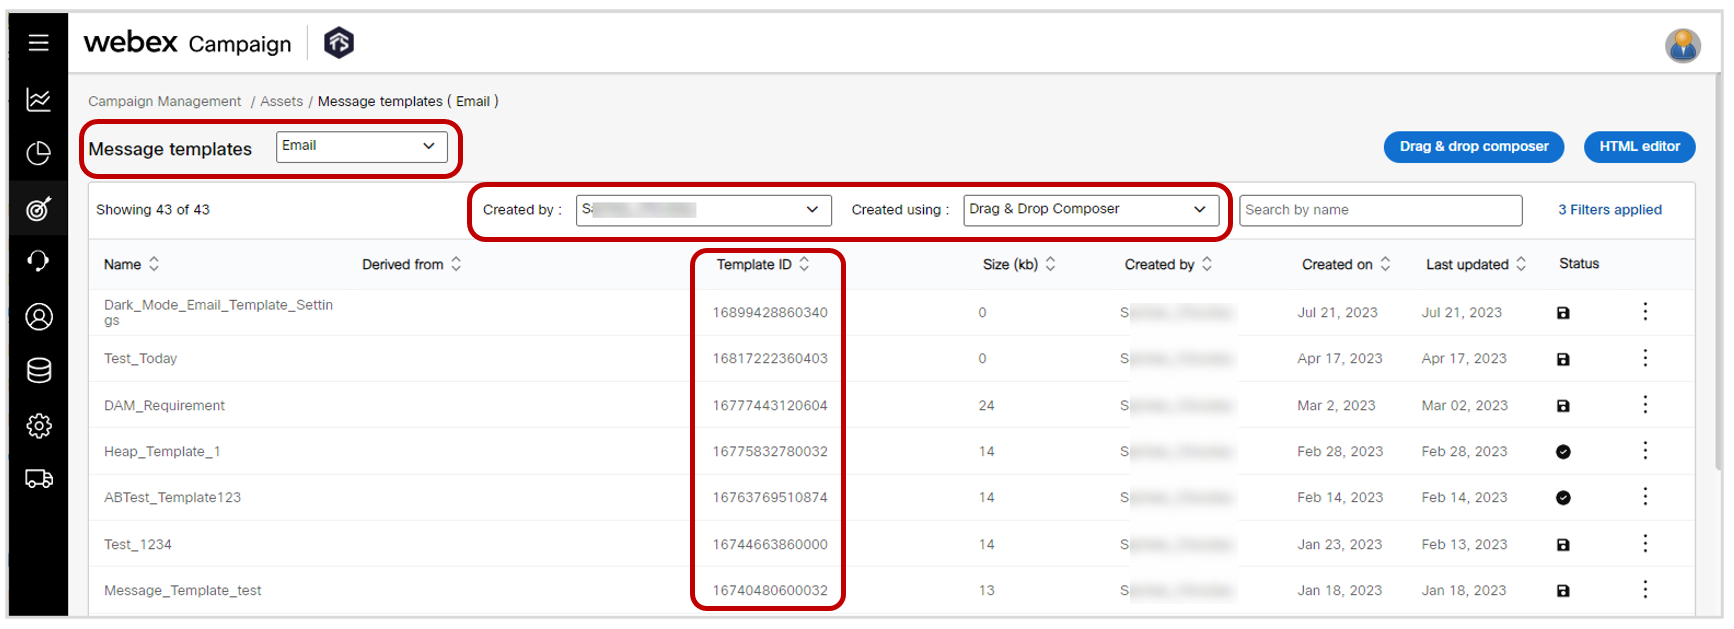
In addition, we have added the ‘Template ID’ column to this table; which will be useful for clients who prefer to create or update message templates using our newly introduced APIs for programmatic creation and management of message templates.
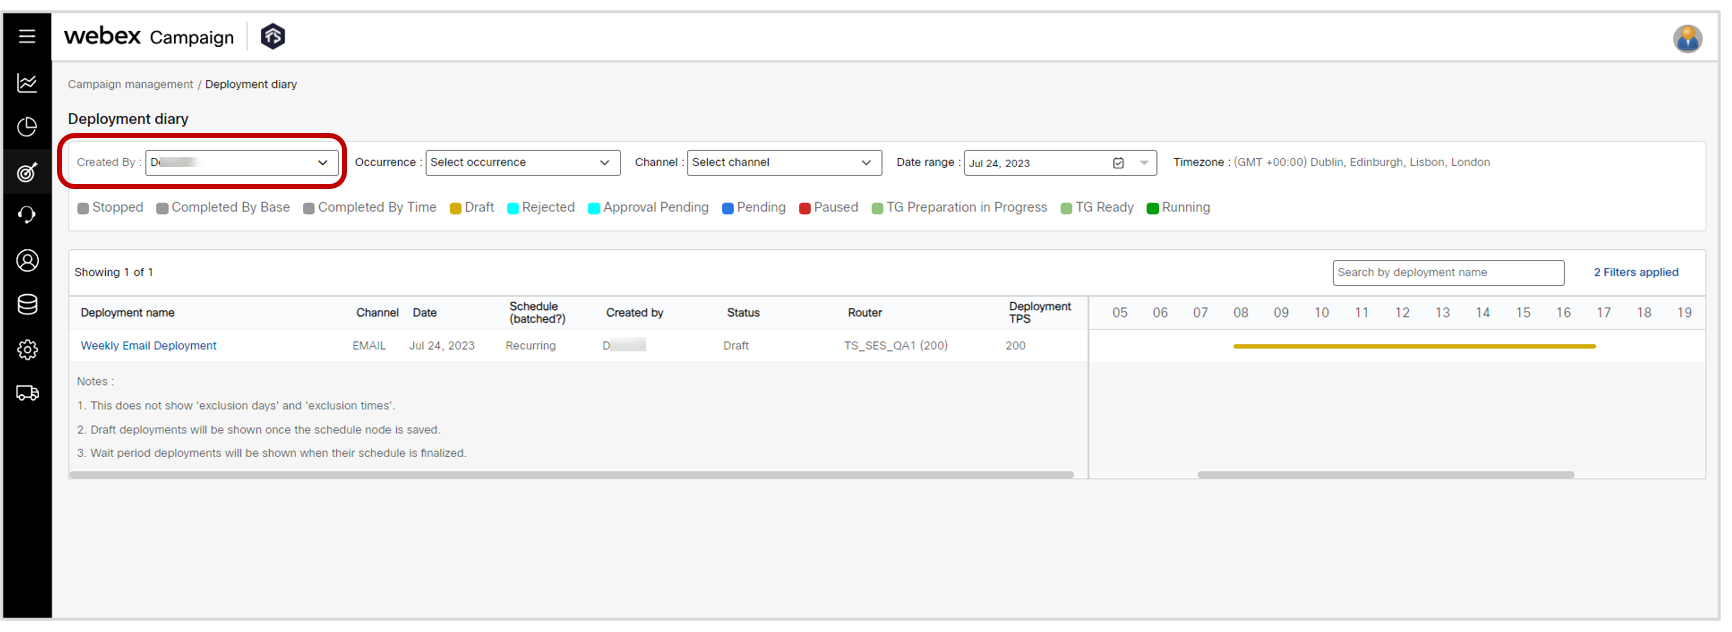
1.13 Deployment diary: Added ‘Created by’ filter
We have introduced a new filter on the ‘Deployment diary’ screen so that you can choose to display deployments created by a specific user. By default, the filter value will be set to the logged-in user.
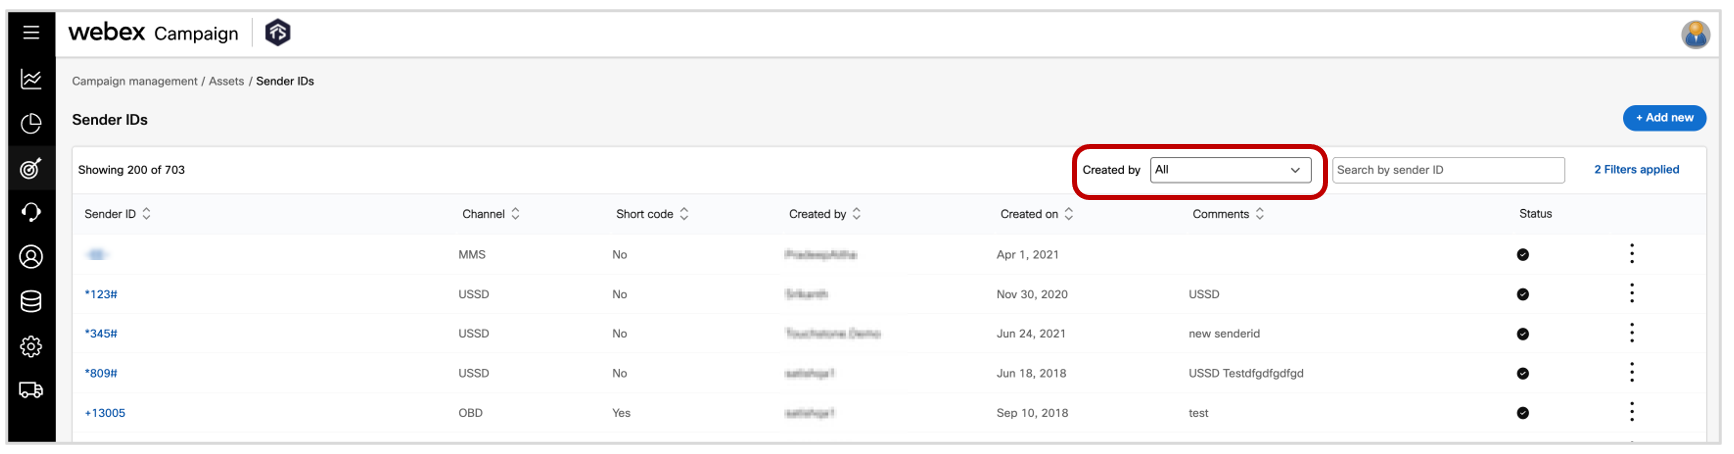
1.14 Sender IDs: Added ‘Created by’ filter
We have introduced a new filter on the ‘Sender IDs’ screen so that you can choose to display deployments created by a specific user. By default, the filter value will be set to ‘All users’.
1.15 Admin: UI User creation: Max TPS for a user no longer limited to the TPS of the creator
We have removed the hierarchical constraint that was present whereby the TPS (max number of outbound messages per sec) value that was allowed for a new user was limited to the max TPS value of the person who was creating the new user.
With this enhancement, you will be able to assign max TPS for a user up to the max TPS available for your organization (tenant) - irrespective of what the max TPS value is for yourself.
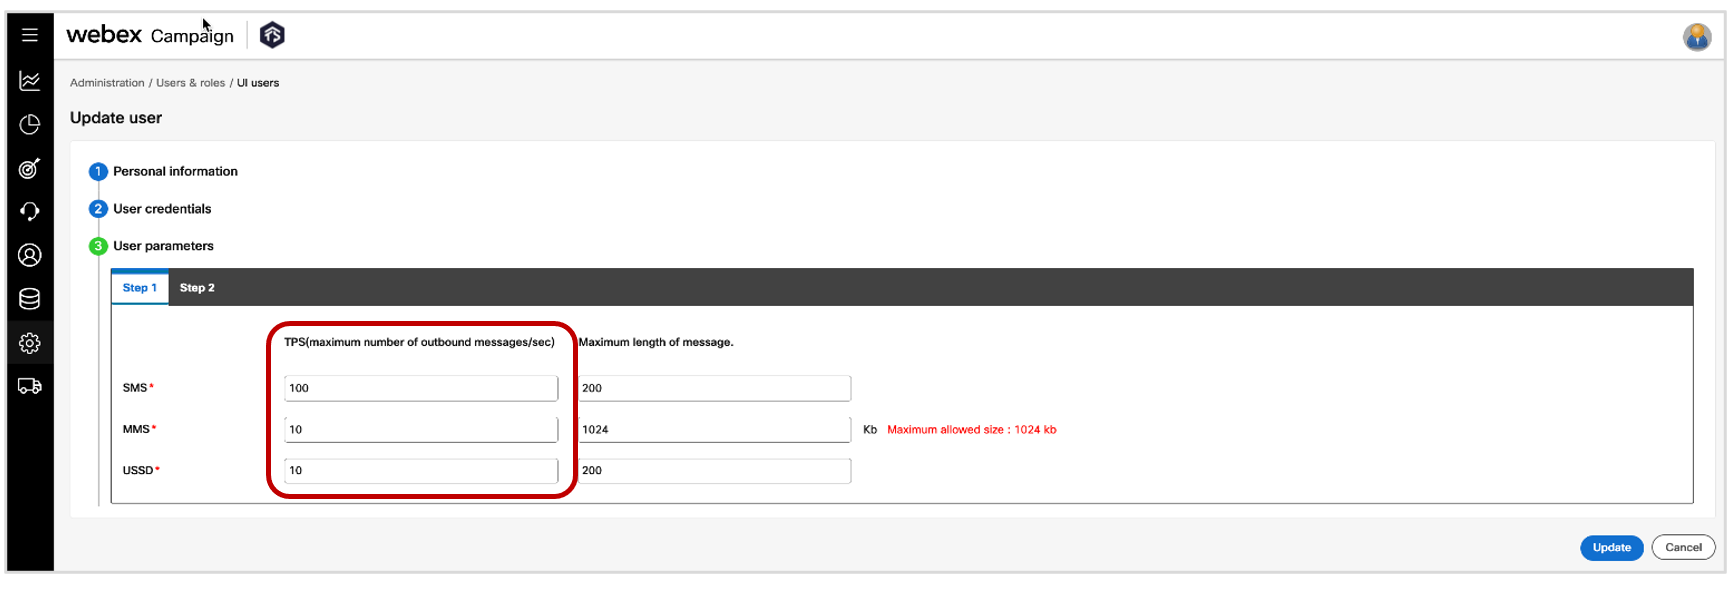
As an example, let’s say an organization has an overall SMS TPS available of 200/sec.
User A within this organization has been assigned a max TPS of 50/sec (which means any SMS deployment created by A can have a max TPS of 50/sec).
Previously, if User A were to create 2 additional users B and C within this tenant, then the max TPS that can be given to users B & C would have been 50/sec.
After release 6.7, users B & C could each be given a max TPS of 200/sec even if user A has a max TPS value of 50/sec.
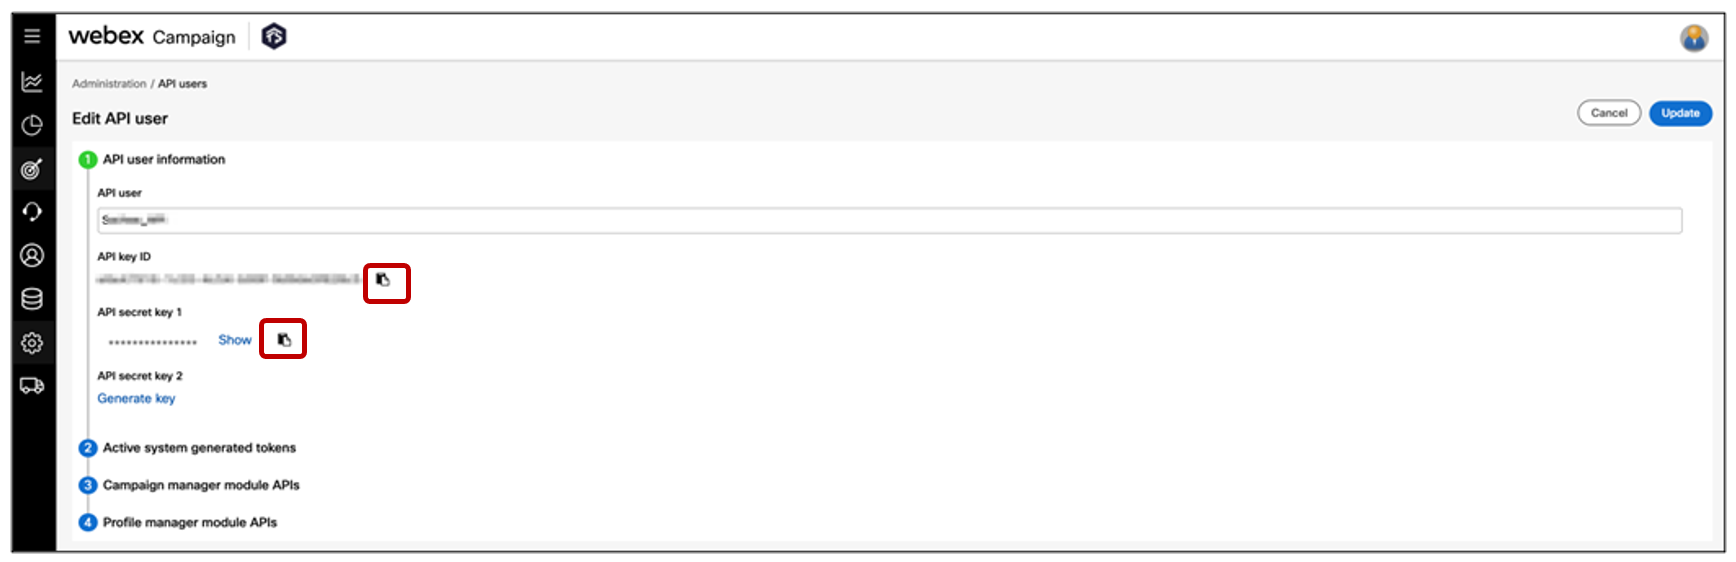
1.16 Admin: API User creation: Easily copy to clipboard ‘API key’ and ‘API secret value’
We have improved the UX while creating or updating an ‘API User’. Now you can easily copy the ‘API key’ and ‘API secret value’ to the clipboard by clicking on the clipboard icon.
1.17 UX improvement in the pop-up alerts shown at the top of the screen
We have reduced the size of the alert pop-ups which are shown at the top of the screen.
Previously, these pop-up alert messages used to cover the hamburger control button on the left and the ‘personal settings’ menu at the top right.
With this enhancement, you can more quickly access all the navigation options on the left and right side of the screen even while a pop-up alert is visible at the top of the screen. (e.g. expand the left navigation menu or switch user groups or access online help documentation from the drop-down menu at the top right.)

This enhancement is associated with the user-requested Nolt idea # 323.
2.0 Dashboard & Reports module enhancements
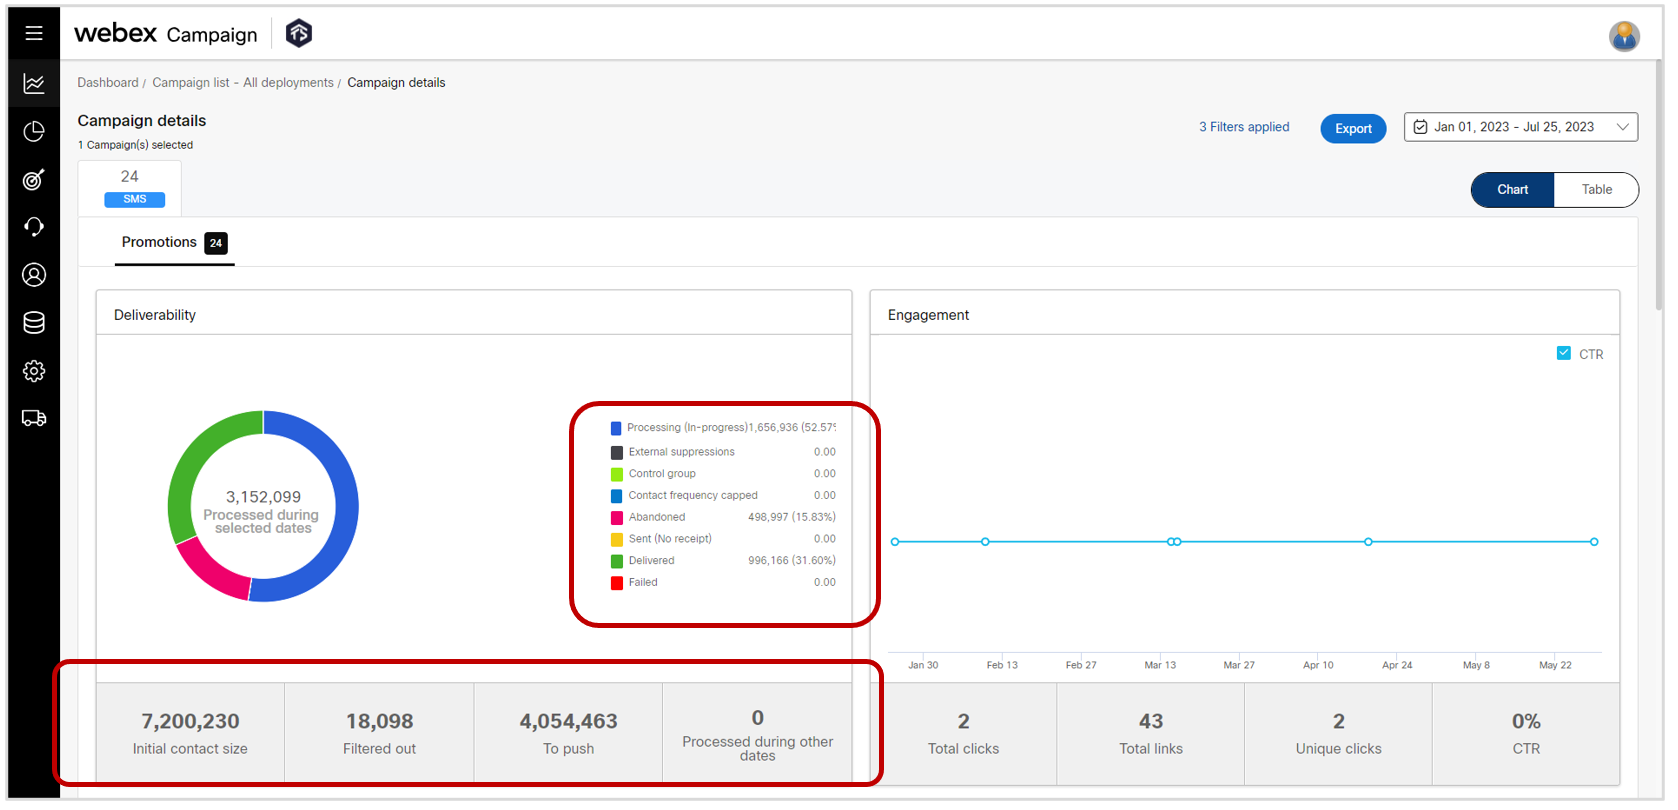
2.1 Dashboard: Show full counts instead of showing as thousands (K) or millions (M)
Based on user feedback, we have changed the design of the ‘Campaign Details’ and ‘Deployment Details’ pages on the Dashboard such that we will now show the count values in full, rather than converting them into thousands (K) or millions (M). However, if a count value is 1 Billion or above, then it will be converted to thousands (K).
This enhancement is associated with the user-requested Nolt idea # 307.
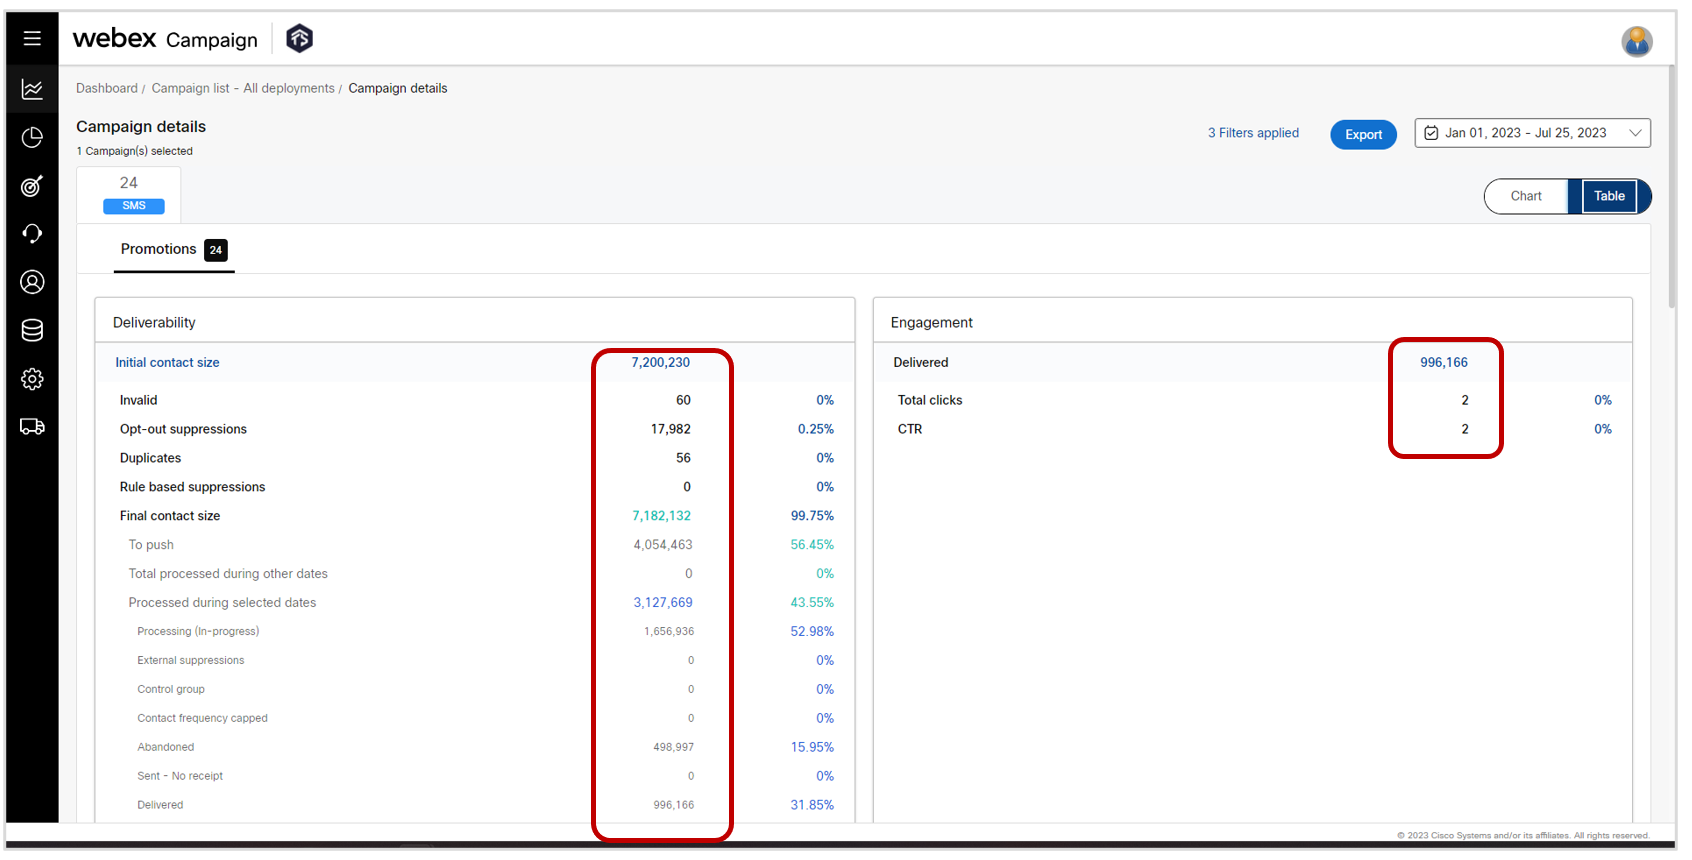
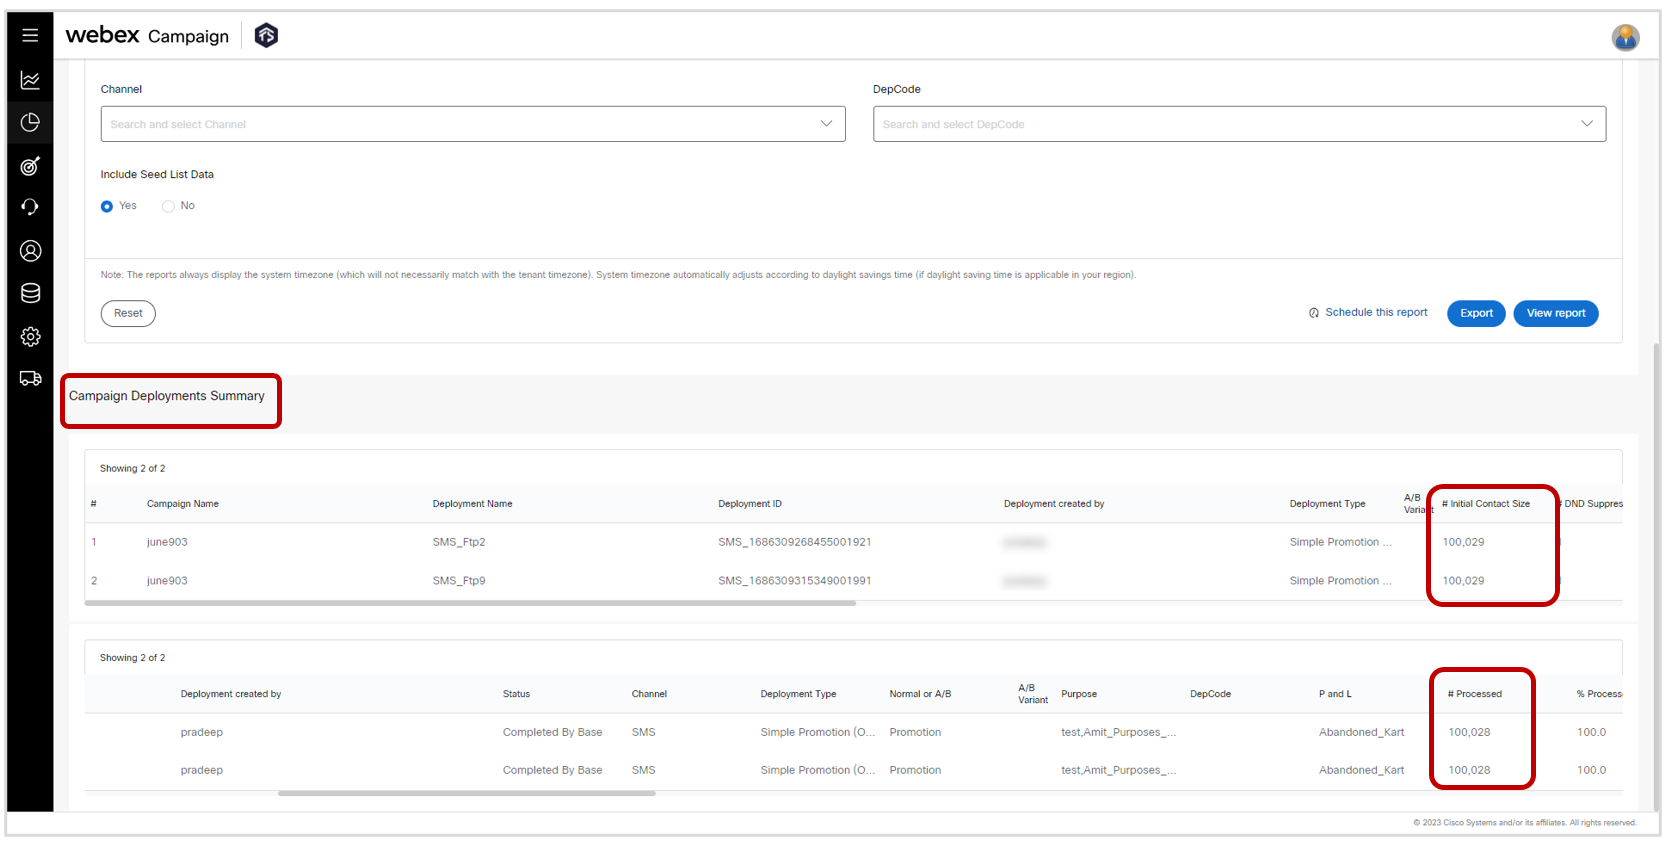
2.2 Pre-configured Reports: Show full counts instead of showing as thousands (K) or millions (M).
In all the ‘Summary Reports’, we will now display counts as we will now show the count values in full, rather than converting them into thousands (K) or millions (M). However, if a count value is 1 Billion or above, then it will be converted to thousands (K).
This enhancement is associated with the user-requested Nolt idea # 307.
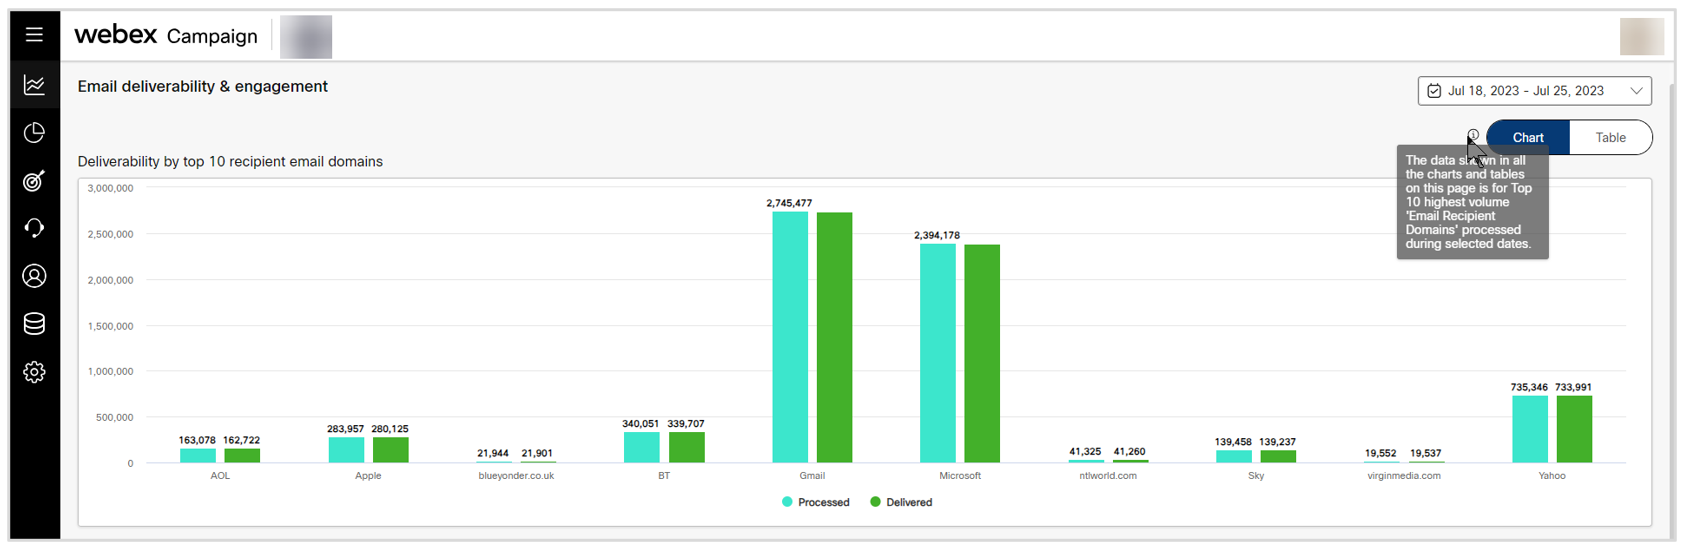
2.3 Dashboard: Email Deliverability & Engagement: Exclude emails sent to seed-lists from the displayed counts.
Based on user feedback, we have excluded the emails sent to seed lists from the counts displayed on the ‘Email Deliverability & Engagement’ charts.
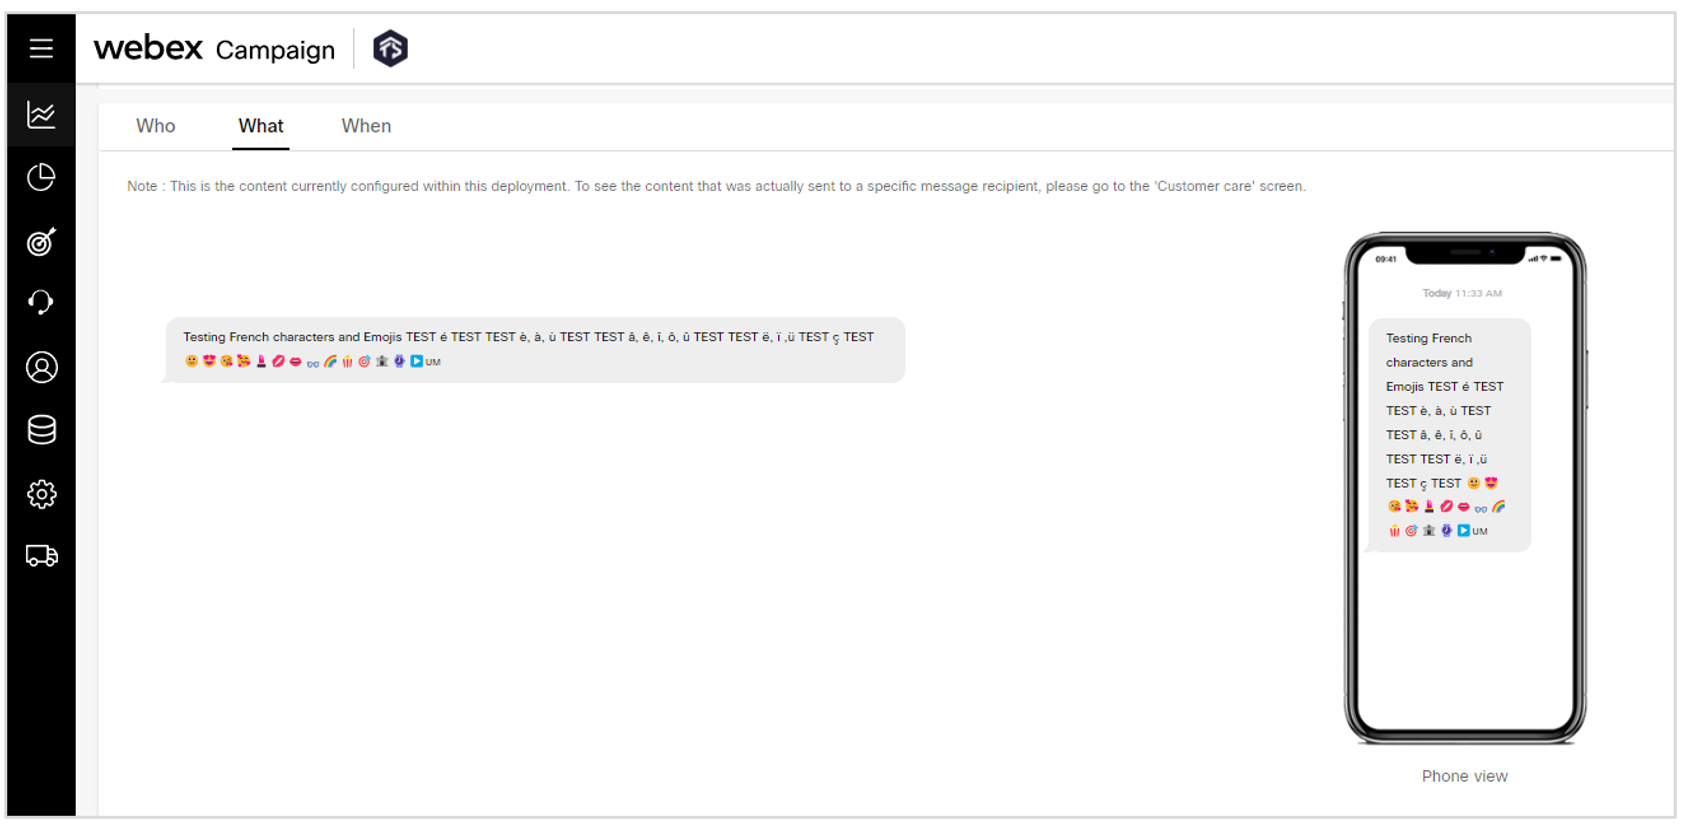
2.4 Dashboard: SMS Deployment Details: Support for emojis in SMS content (only in USA and Canada)
As previously mentioned in the release note, we are introducing support for emojis within SMS content for clients who are hosted in USA and Canada. Correspondingly, the ‘What’ tab on the ‘SMS Deployment Details’ page on the Dashboard has been enhanced to show the SMS content including any emojis.
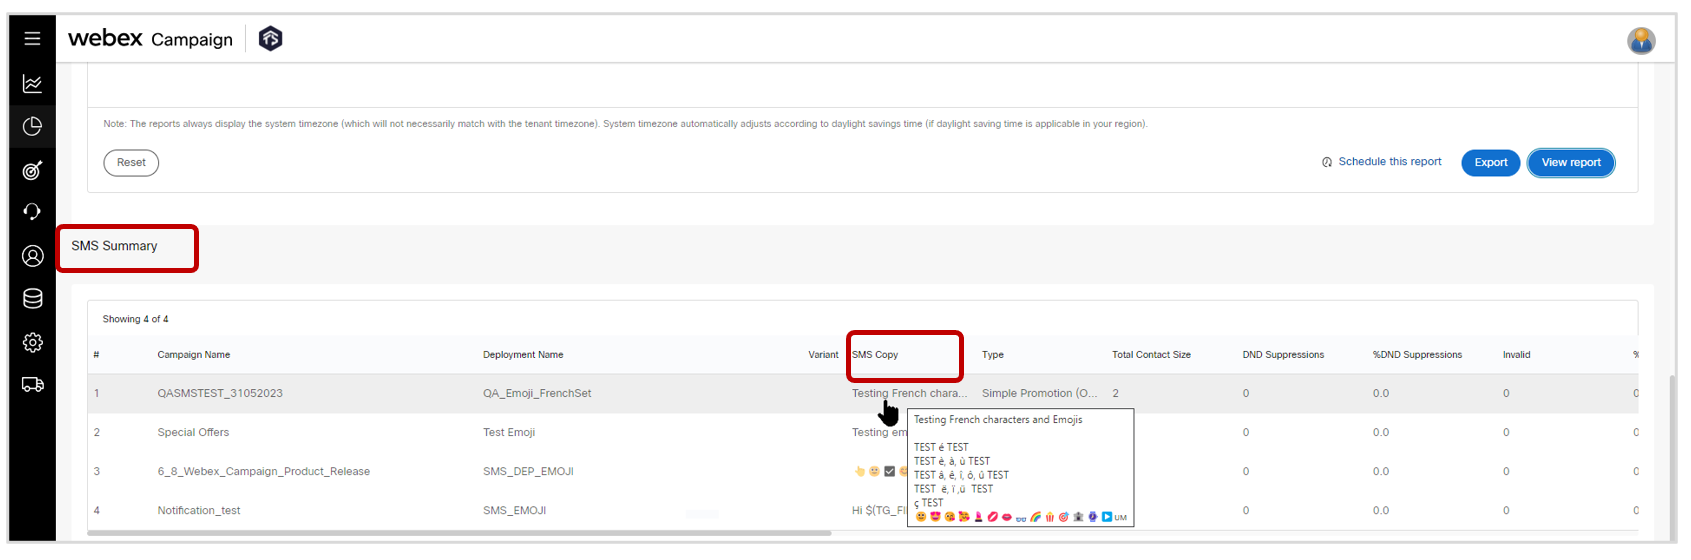
2.5 Pre-configured Reports: SMS Summary Report: Support for emojis in SMS content (only in USA & Canada).
As previously mentioned in the release note, we are introducing support for emojis within SMS content for clients who are hosted in USA and Canada. Correspondingly, the ‘SMS Summary Report’ has been enhanced to show the SMS content including any emojis.
Please note that the emojis are visible only in the online web version of the ‘SMS Summary Report’; they will not be visible when this report is exported to Microsoft Excel format.
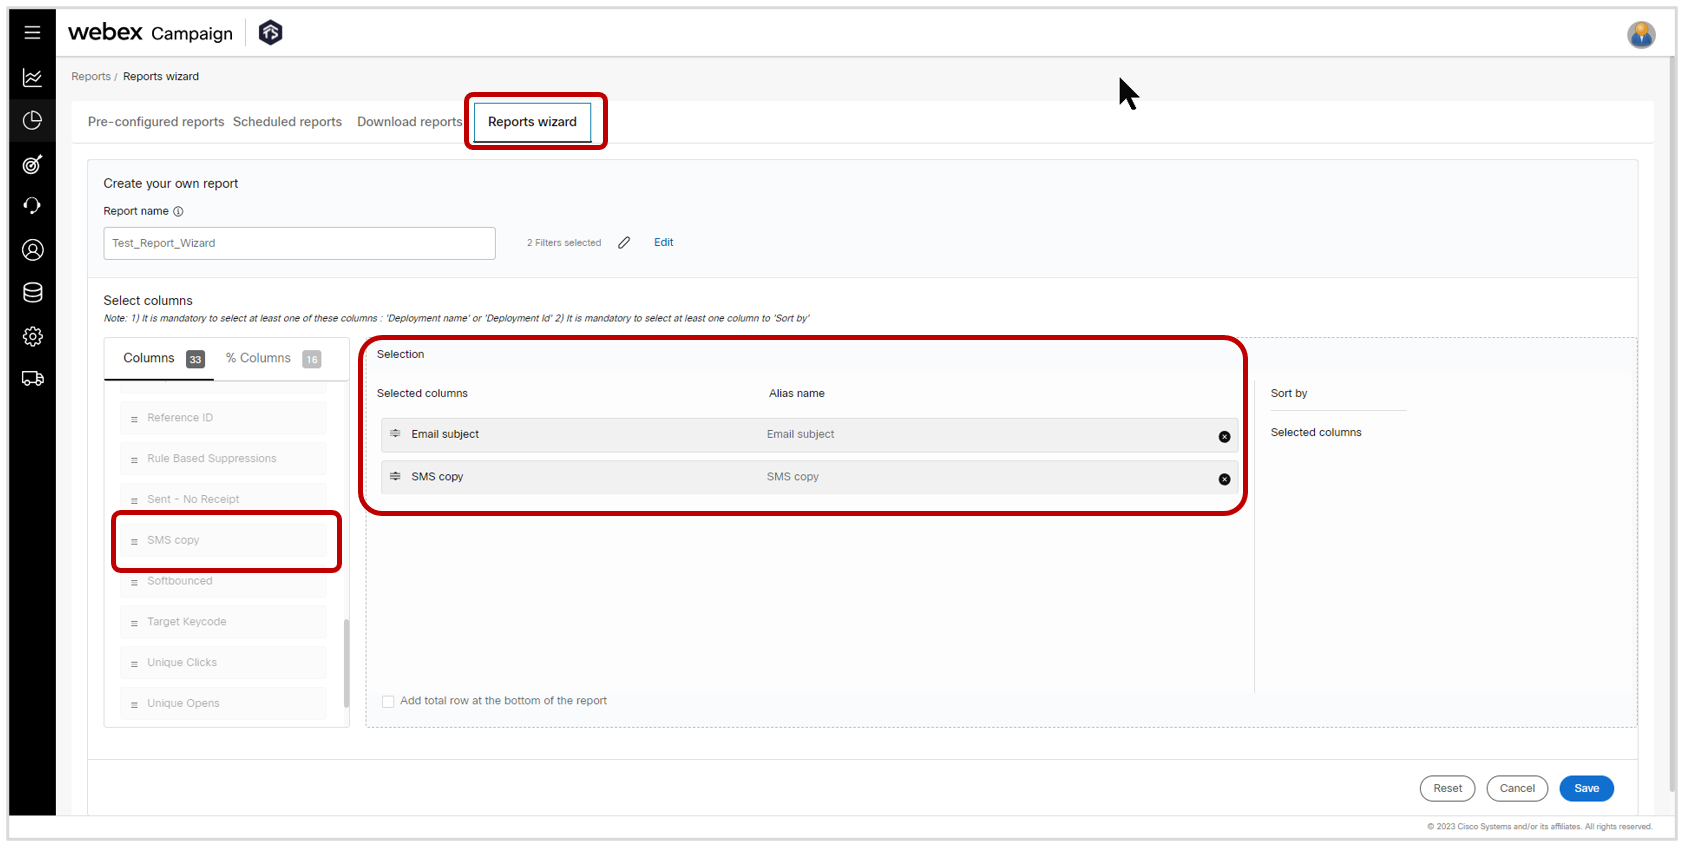
2.6 Report Wizard: Added 2 new columns: ‘Email subject’ and ‘SMS copy’
You will now have 2 new columns available to choose from for our custom report within the ‘Report Wizard’ feature: ‘Email subject’ and ‘SMS copy’.
Please note that this report will display the latest versions of the email subject line and the SMS copy within a deployment. So if the deployment was paused and the email subject line or SMS copy was changed before resuming the deployment, then this report will display the updated versions and not the original versions of the email subject line and SMS copy.
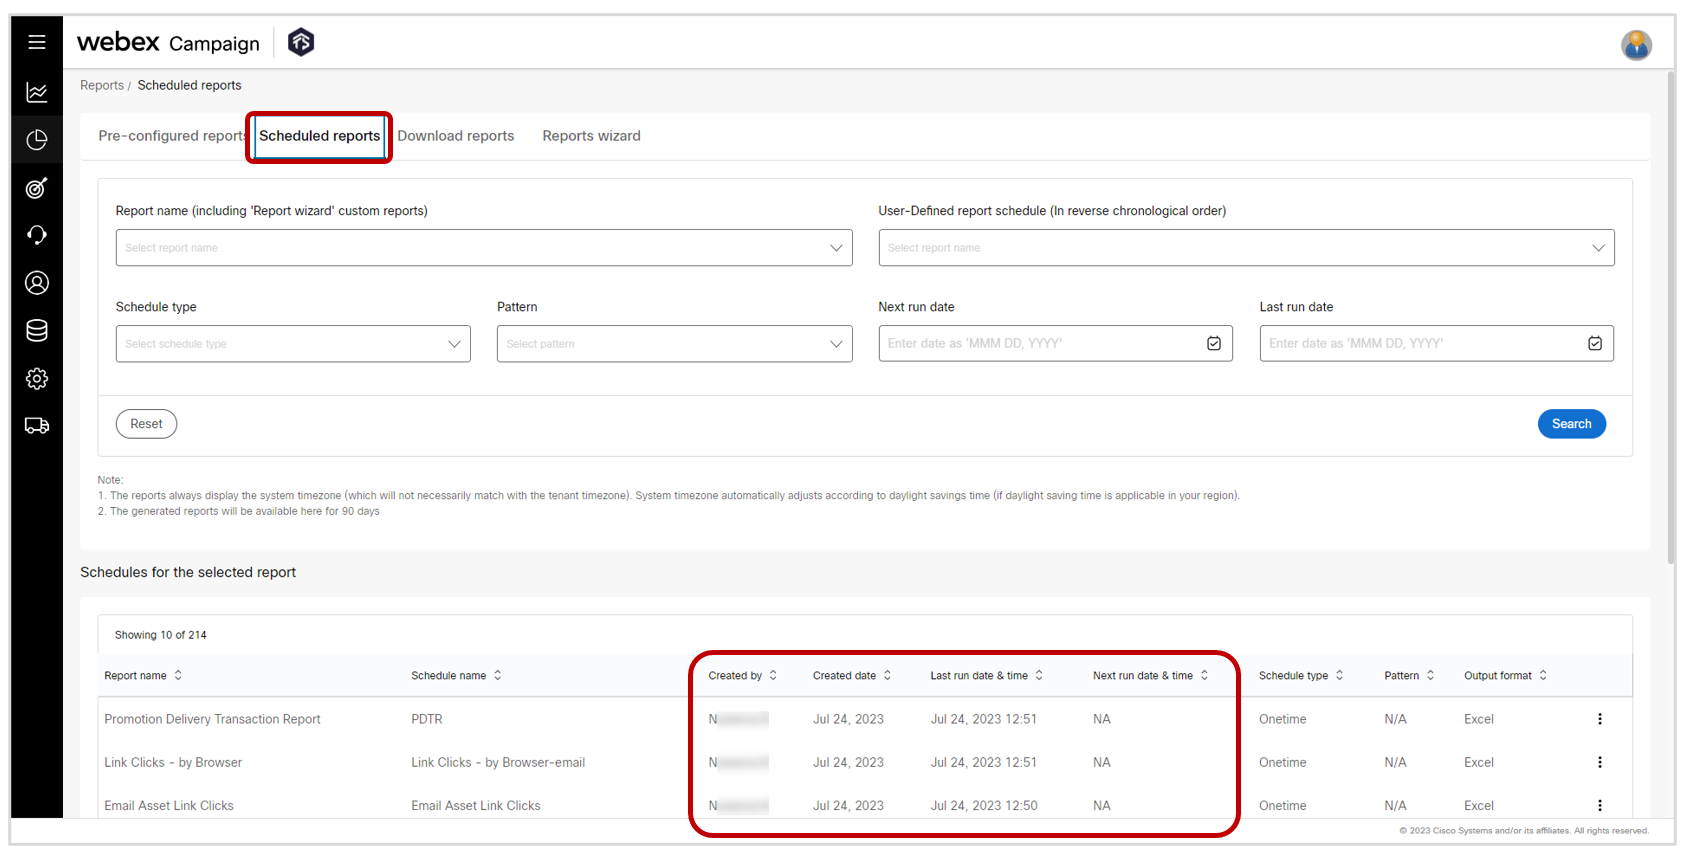
2.7 Scheduled Reports: Added 4 new columns to show more info about each scheduled report
We have added the following 4 columns to the ‘Scheduled reports’ screen:
a) Created by
b) Created date
c) Last run date & time
d) Next run date & time
We have also re-arranged the columns in a more logical order.
3.0 Profile Manager module enhancements
3.1 Data Ingestion: Easier creation of Datastores using ‘Segments’ as source
Previously, loading a segment output into a datastore was a two-step process:
a) Exporting the segment output to SFTP.
b) Loading the file from SFTP to the Data Store.
We have streamlined this process of creating datastores from ‘Segments’ to enable you to directly load a Segment’s output into a Datastore in a single step.
Usage Notes:
-
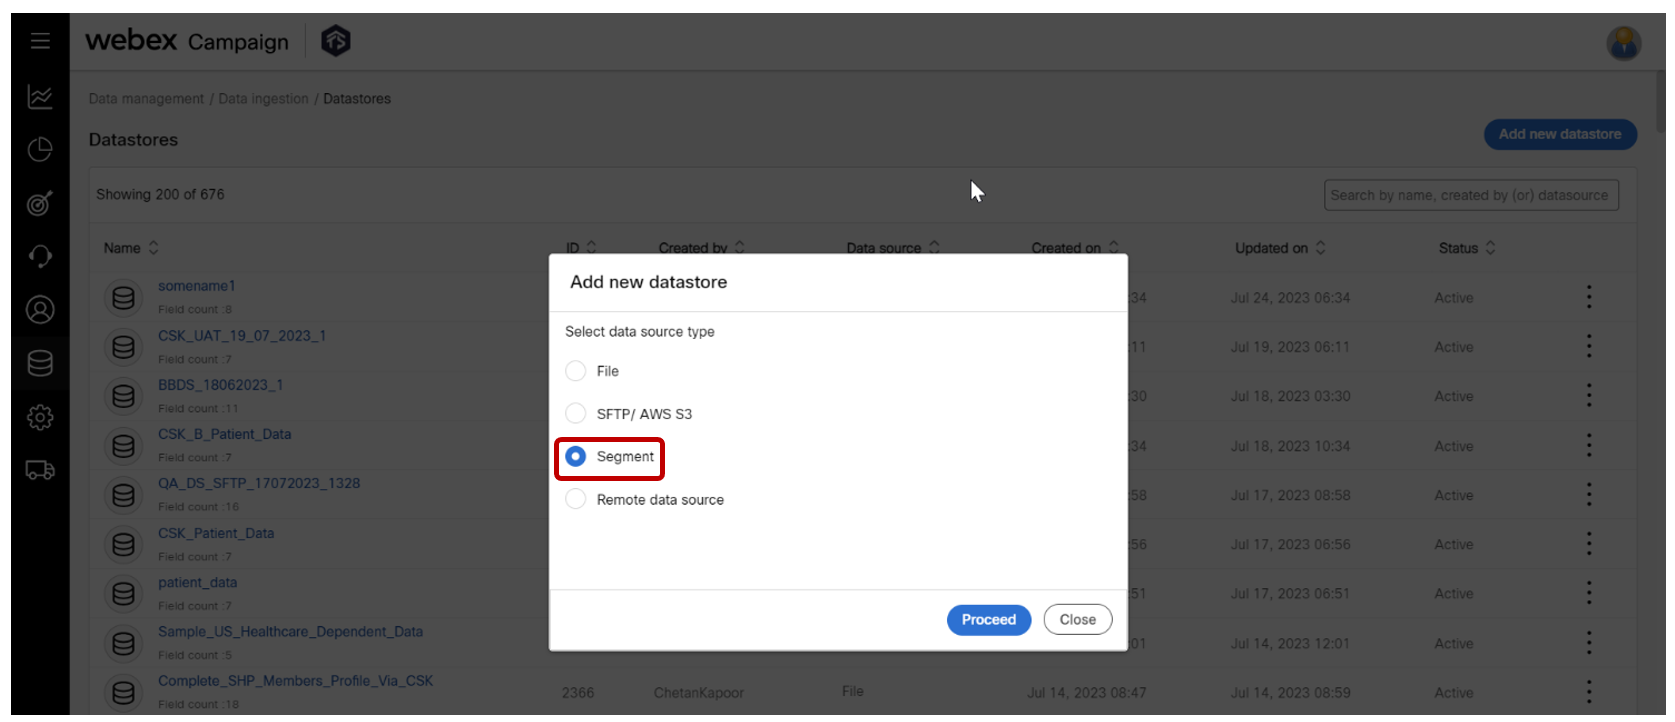
Begin by navigating to the following location: Data Management > Data Ingestion > Datastores > Add New Datastore.
-
In the 'Add New Datastore' modal, choose 'Segment' as your Data Source Type. Once done, click 'Proceed'.
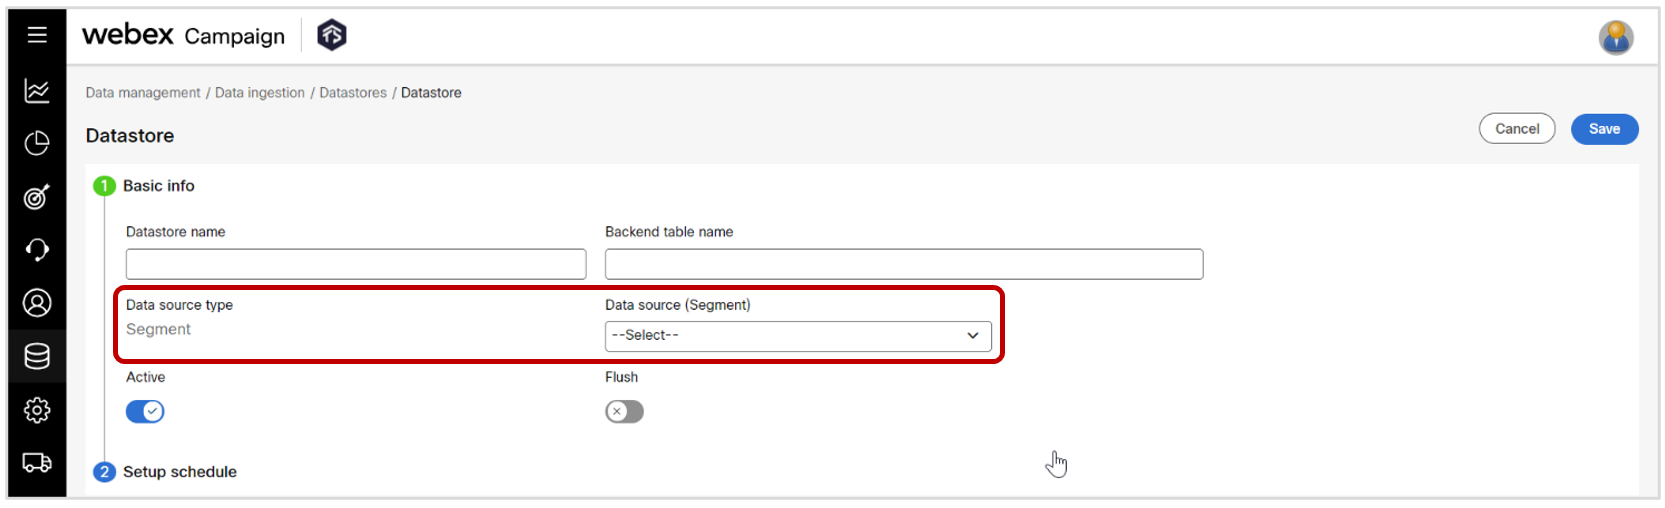
-
Enter the necessary details, paying particular attention to the 'Data source (Segment)' field. This is where you specify the segment you want to use to create the datastore.
-
After filling in all the information, click 'Save'. Now, your newly created datastore, using segments as the source type, is ready for use.
-
Please be aware that you will not be able to change the segment's 'Output headers' once the segment has been chosen as a Data-source.
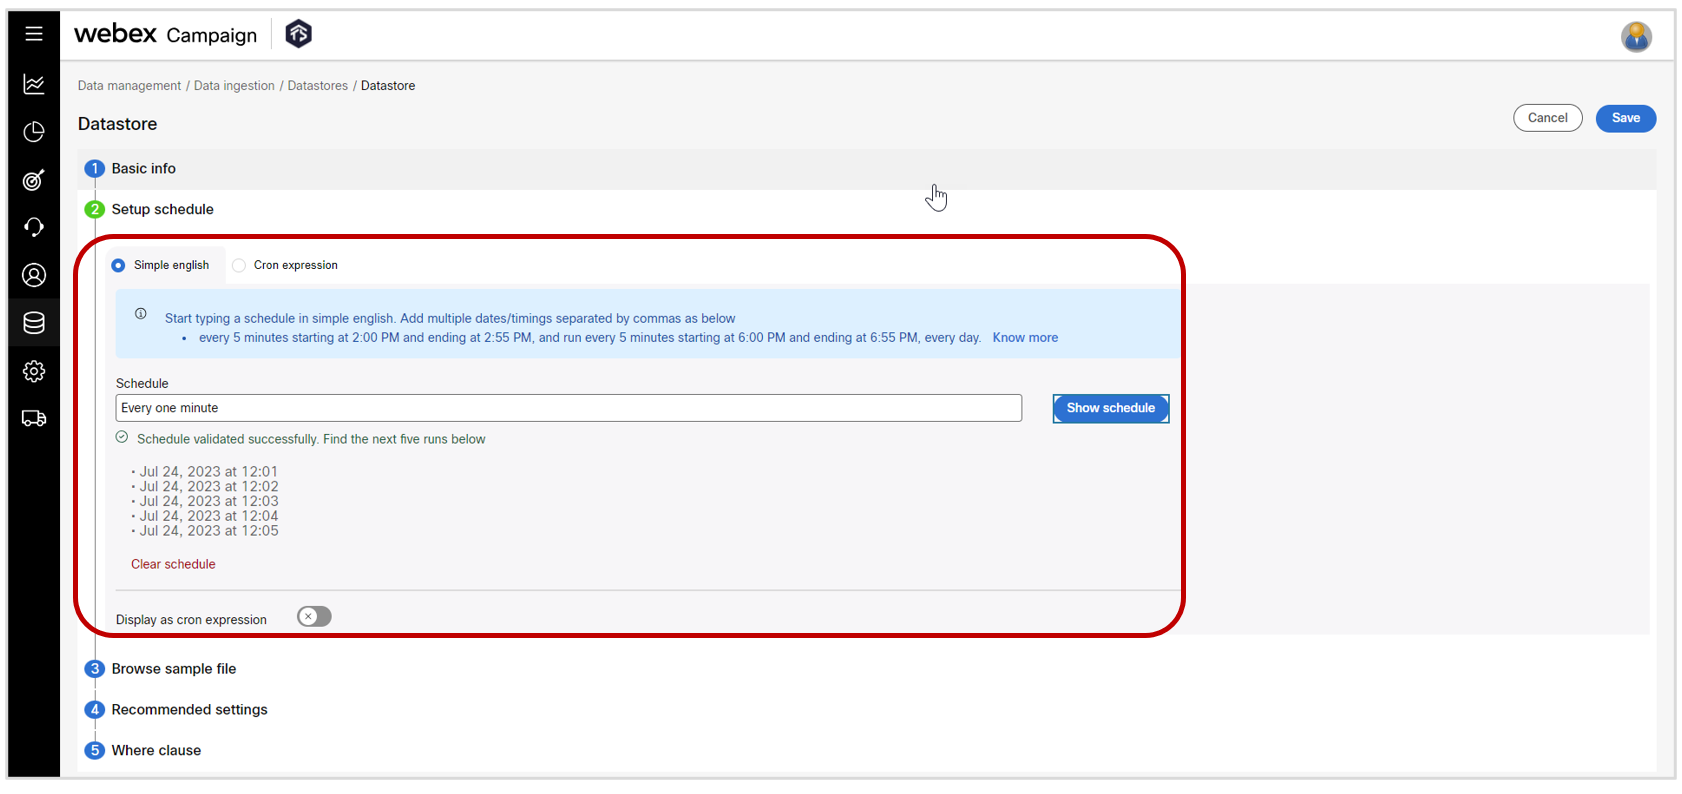
3.2 Data Ingestion: Easier schedule set-up while creating a new datastore
Previously, our datastore loading schedule setup tool was optimized for users who understood the ‘cron-expression’ syntax for automating data loads but might not have been comfortable directly initiating a schedule setup using the cron expression syntax. To help such users, we had a Natural Language Interface (NLI) to set up schedules and enabled the viewing of the corresponding auto-generated cron expression on the same screen. Despite being somewhat user-friendly, the accuracy of this NLI tool wasn't always perfect.
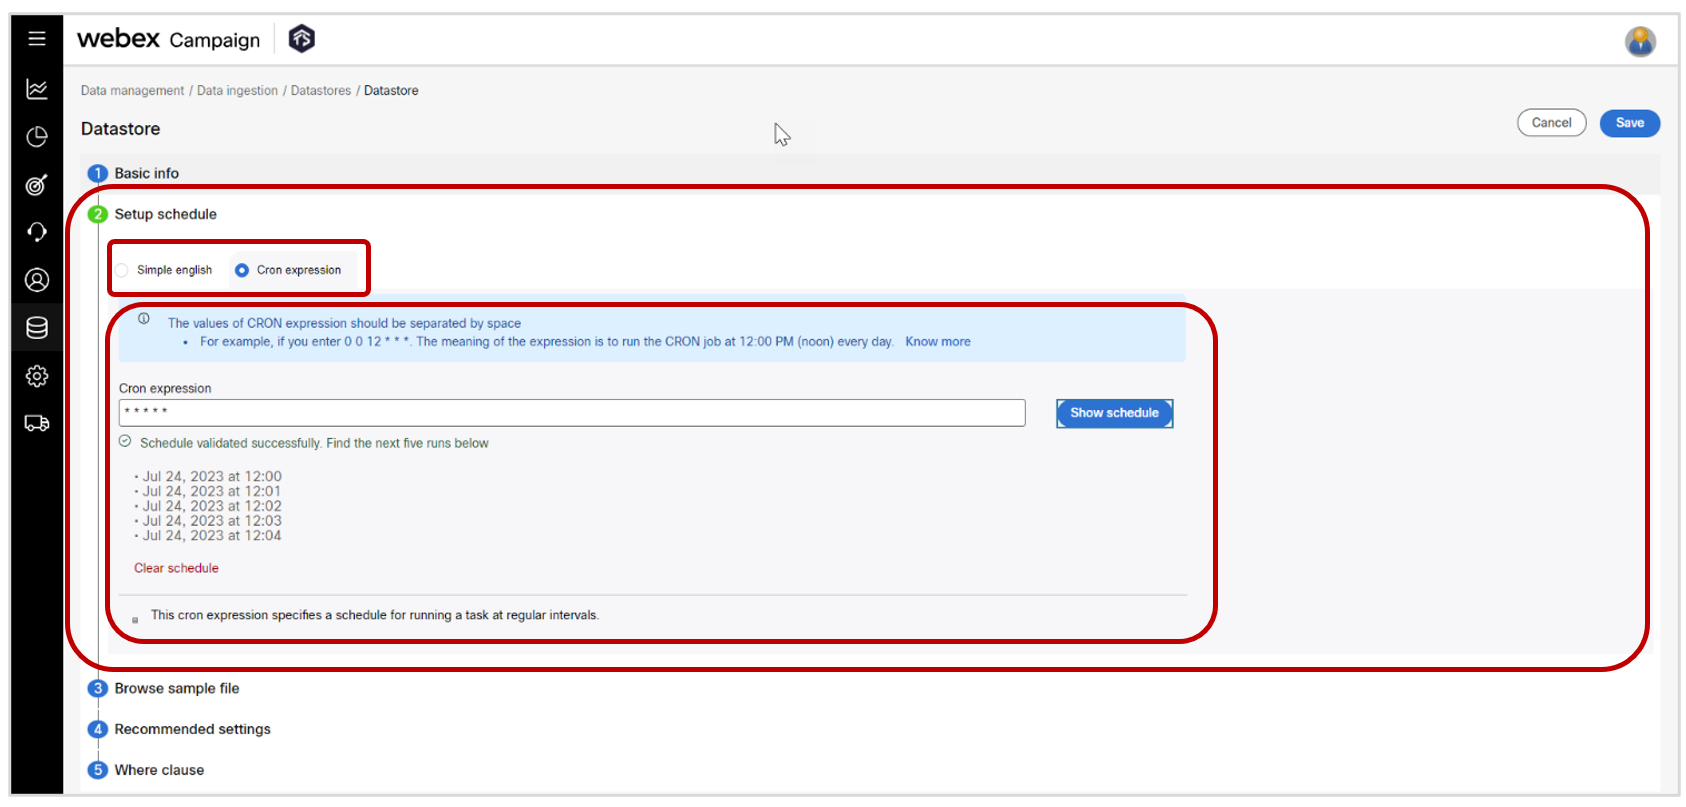
In this release, we have introduced two clearly separated UI options to accommodate different levels of technical proficiencies of users. One interface is tailored for users who are proficient with cron-expressions and prefer to setup schedules using this syntax directly. The second interface retains the Natural Language Interface (NLI), making the schedule setup process more straightforward for users who prefer not to use cron-expressions.
We've further enhanced the datastore schedule setup function as follows:
• ‘Setup schedule" is now an independent section during the datastore creation process.
• Both ‘Write’ and "Read" modes are available for each interface (NLI and cron-expression) to setup schedules.
• Contextual help documentation has been improved.
• You can confirm that you have indeed configured the schedule as you actually intended by clicking on the ‘Show schedule’ button. This will show you the ‘next five runs’.
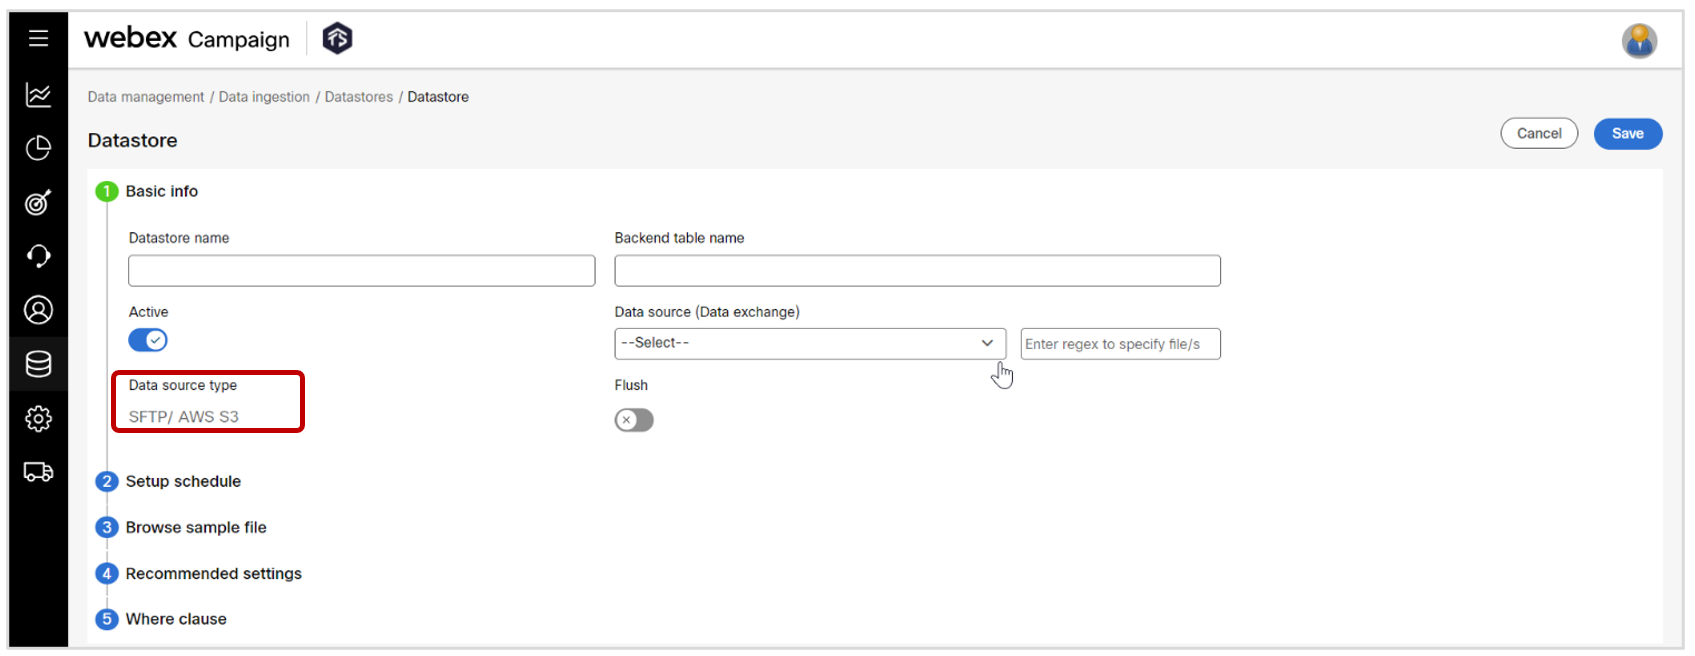
3.3 Data Ingestion: UX improvements in Datastore creation from ‘SFTP/AWS S3’ data-sources
We have made the following enhancements in the process of creating datastores from ‘SFTP/ AWS S3’ as a data source:
a) 'Sources' has been renamed to 'Data source type'.
b) 'Setup schedule' is now an independent section during the datastore creation process (as mentioned in the previous sub-section).
c) ‘Flush’ related settings have now been moved under the ‘Basic Info’ section.
d) ‘Data validation’ setting under Recommended settings > Feed settings has been deprecated.
e) ‘Preprocessed’ setting under Recommended settings > Extra settings has been deprecated.
f) ‘Datastore location’ has been renamed to 'Data source (Data exchange)'.
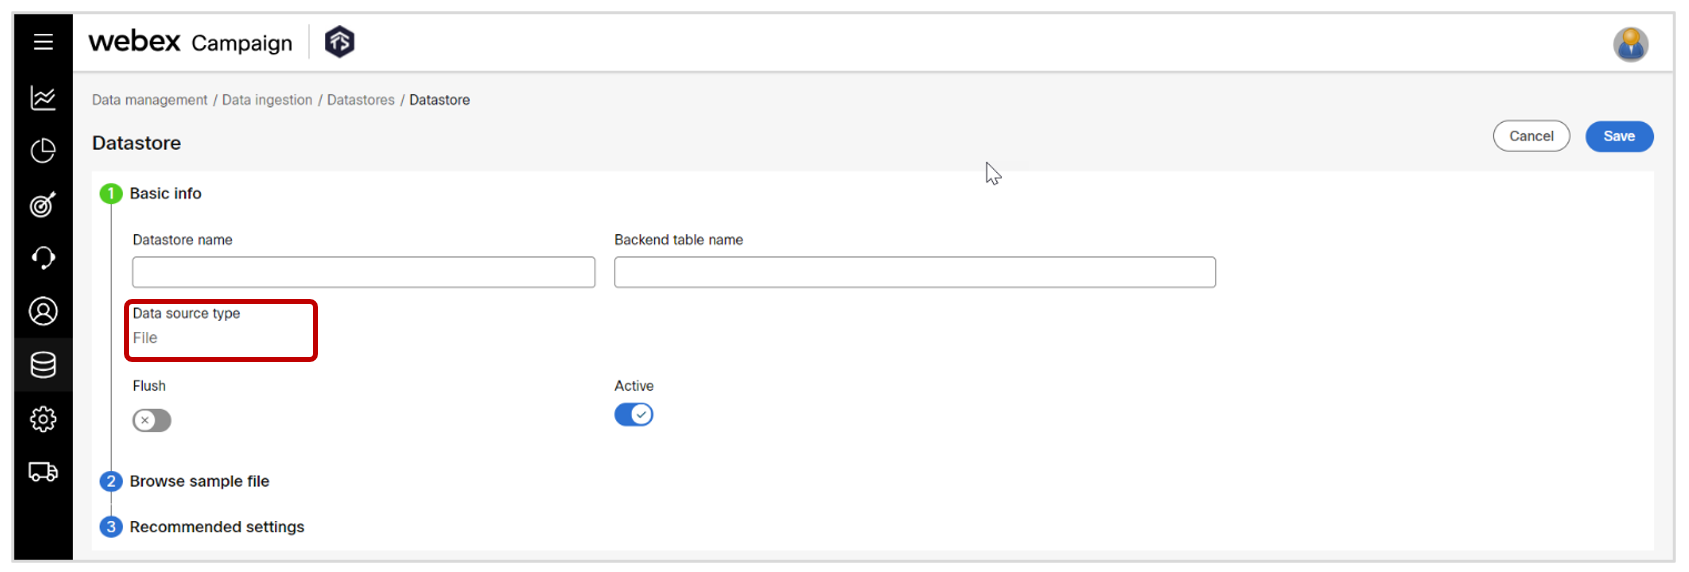
3.4 Data Ingestion: UX improvements in Datastore creation from ‘File’ data-sources
We have made the following enhancements in the process of creating datastores from ‘File’ as a data-source:
a) 'Sources' has been renamed to 'Data source type'.
b) ‘Flush’ related settings have now been moved under the ‘Basic Info’ section.
c) ‘Data validation’ setting under Recommended settings > Feed settings has now been deprecated.
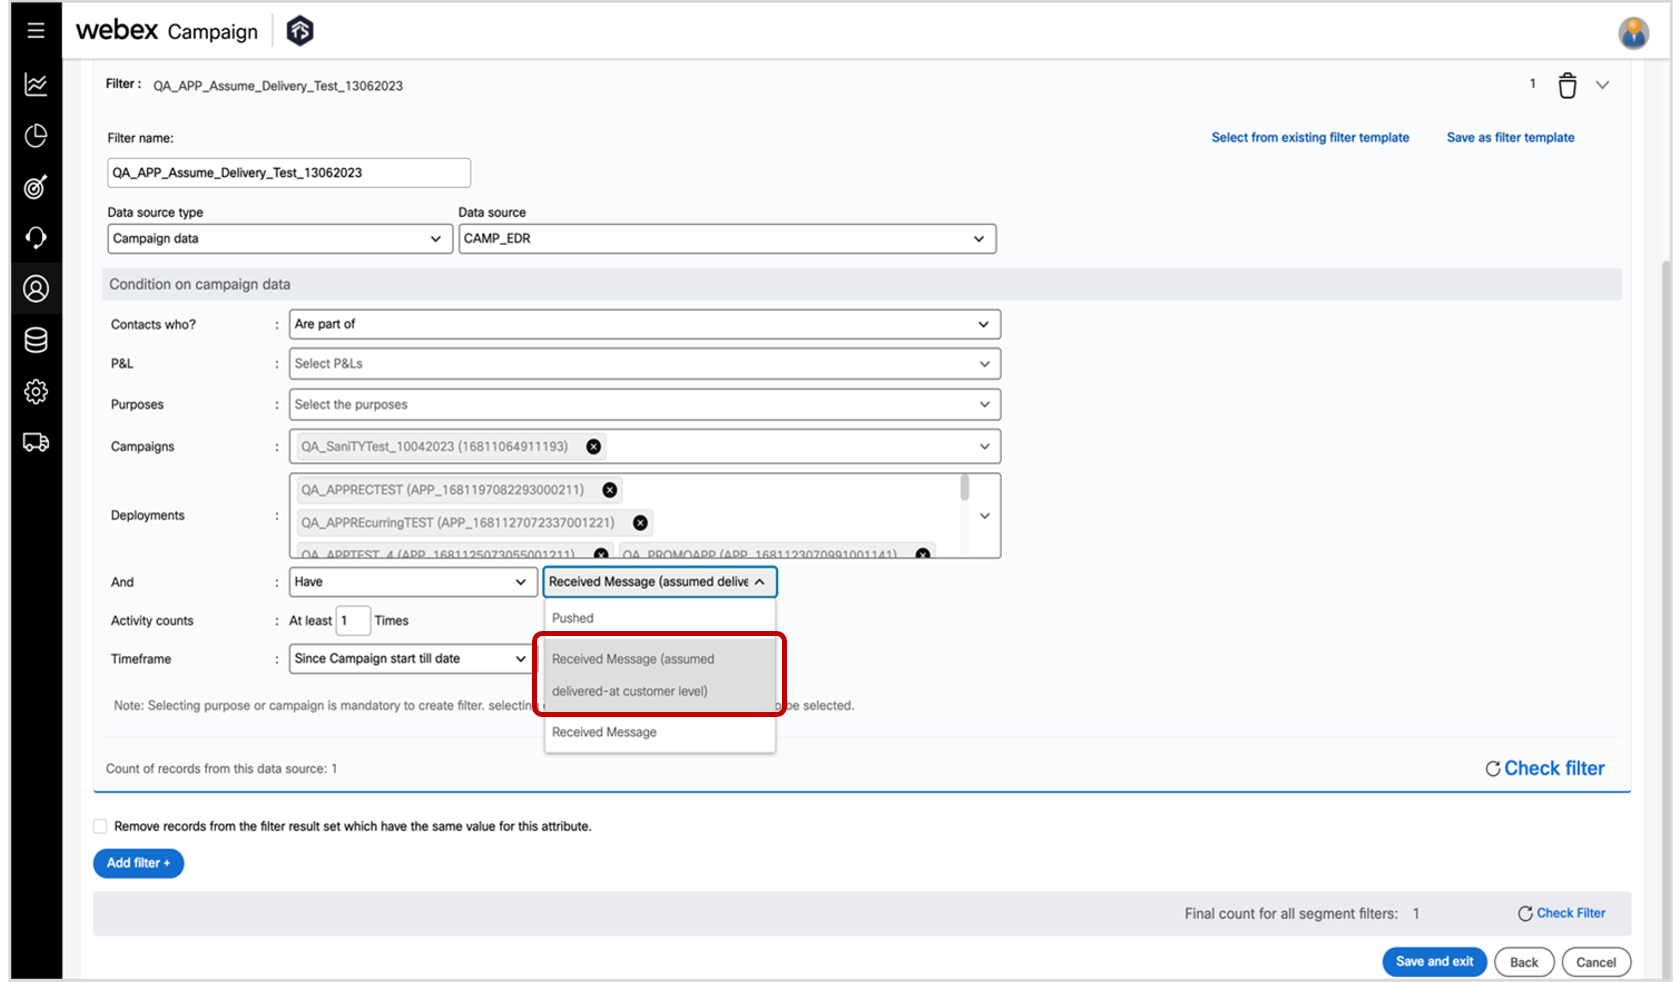
3.5 Segment Builder: Additional filter condition to support App Push Notifications
On the Segment Builder Step 4, in case of the ‘Campaign Data – CAMP_EDR’ data source, if you select App Push channel deployments, then you will now be able to select the condition-verb specific to App Push channel called “Received Message (Assumed delivered – at customer level)”.
4.0 Email Composer module enhancements
In this release, we have made several enhancements in the Email Composer module to better render emails within the ‘dark mode’ settings of email clients.
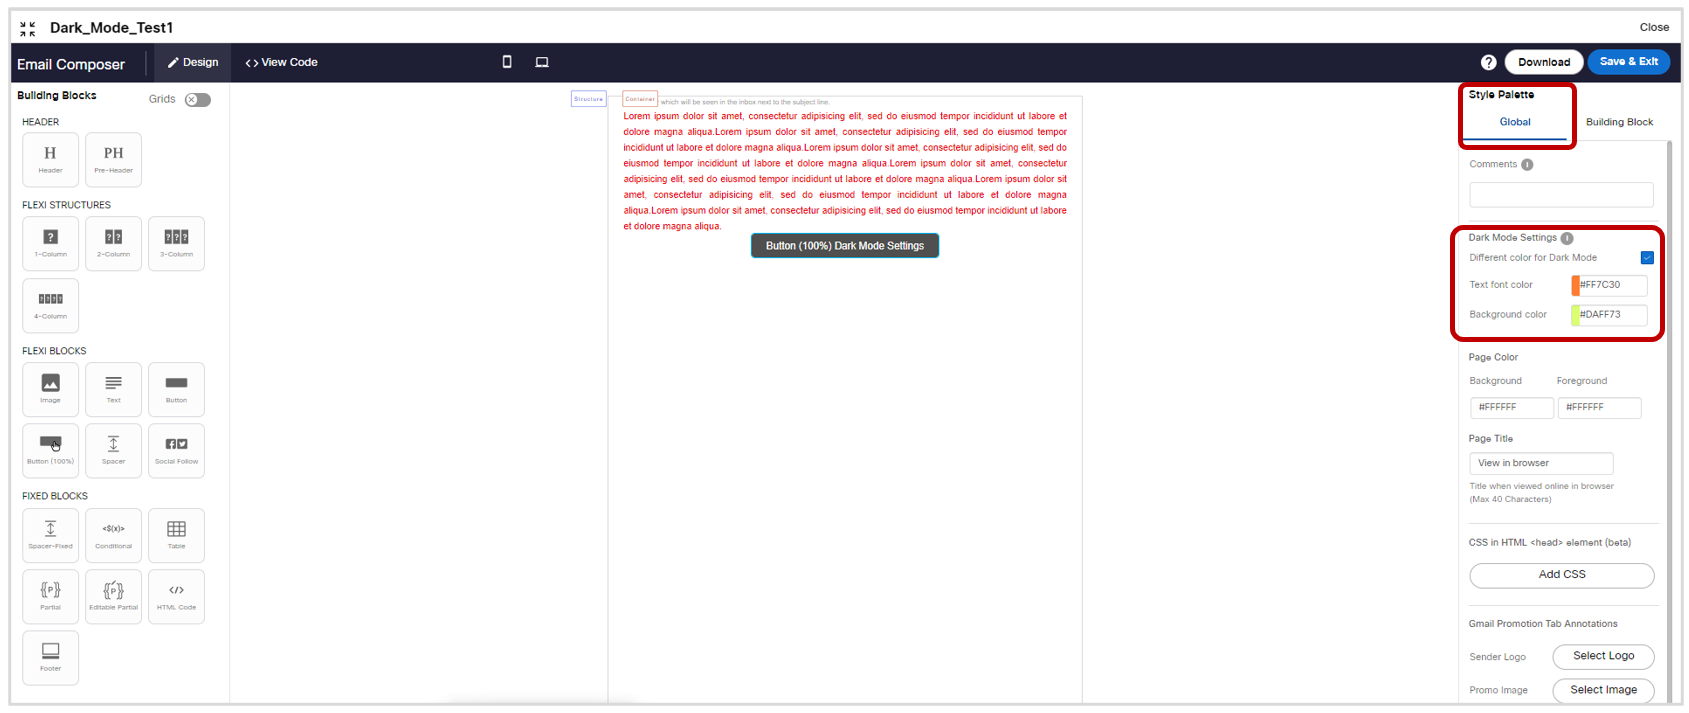
4.1 Email Composer: Global tab: 2 Dark mode settings introduced applicable for multiple blocks
Now, on the ‘Global’ tab, you will be able to specify different colors for the following 2 elements within your email when the email is viewed by the email recipient in the dark mode when you select the checkbox called Different color for Dark Mode :
a) Text font color
b) Background color
Usage notes:
a) These dark mode settings are only applicable when the email is viewed within the native Apple email app on iOS, iPadOS, and MacOS. They are not yet interpreted reliably by other email clients (i.e. these settings do not work for dark mode on Android or Windows devices; nor do they work on non-Apple email apps (e.g., Gmail / Outlook) on iOS devices).
This is not a limitation of the email composer; rather this is an industry-wide challenge that marketers are facing because other email inbox providers have implemented their dark modes in a manner that makes it hard to reliably specify different colors for dark mode for those non-Apple clients.
Please keep this in mind when you are designing your emails i.e. please test your text font colors and background colors across a variety of email clients in standard mode as well as dark mode. The ‘Inbox Preview’ feature within Webex Campaign could help you in this testing.
b) At present, we have implemented these ‘dark mode settings’ only for the following 3 blocks because these blocks are most commonly impacted by email recipients’ dark-mode settings :
i. Text block (please see section 4.2 later in this release note)
ii. Button block (please see section 4.3 later in this release note)
iii. Button-100% block (please see section 4.4 later in this release note)
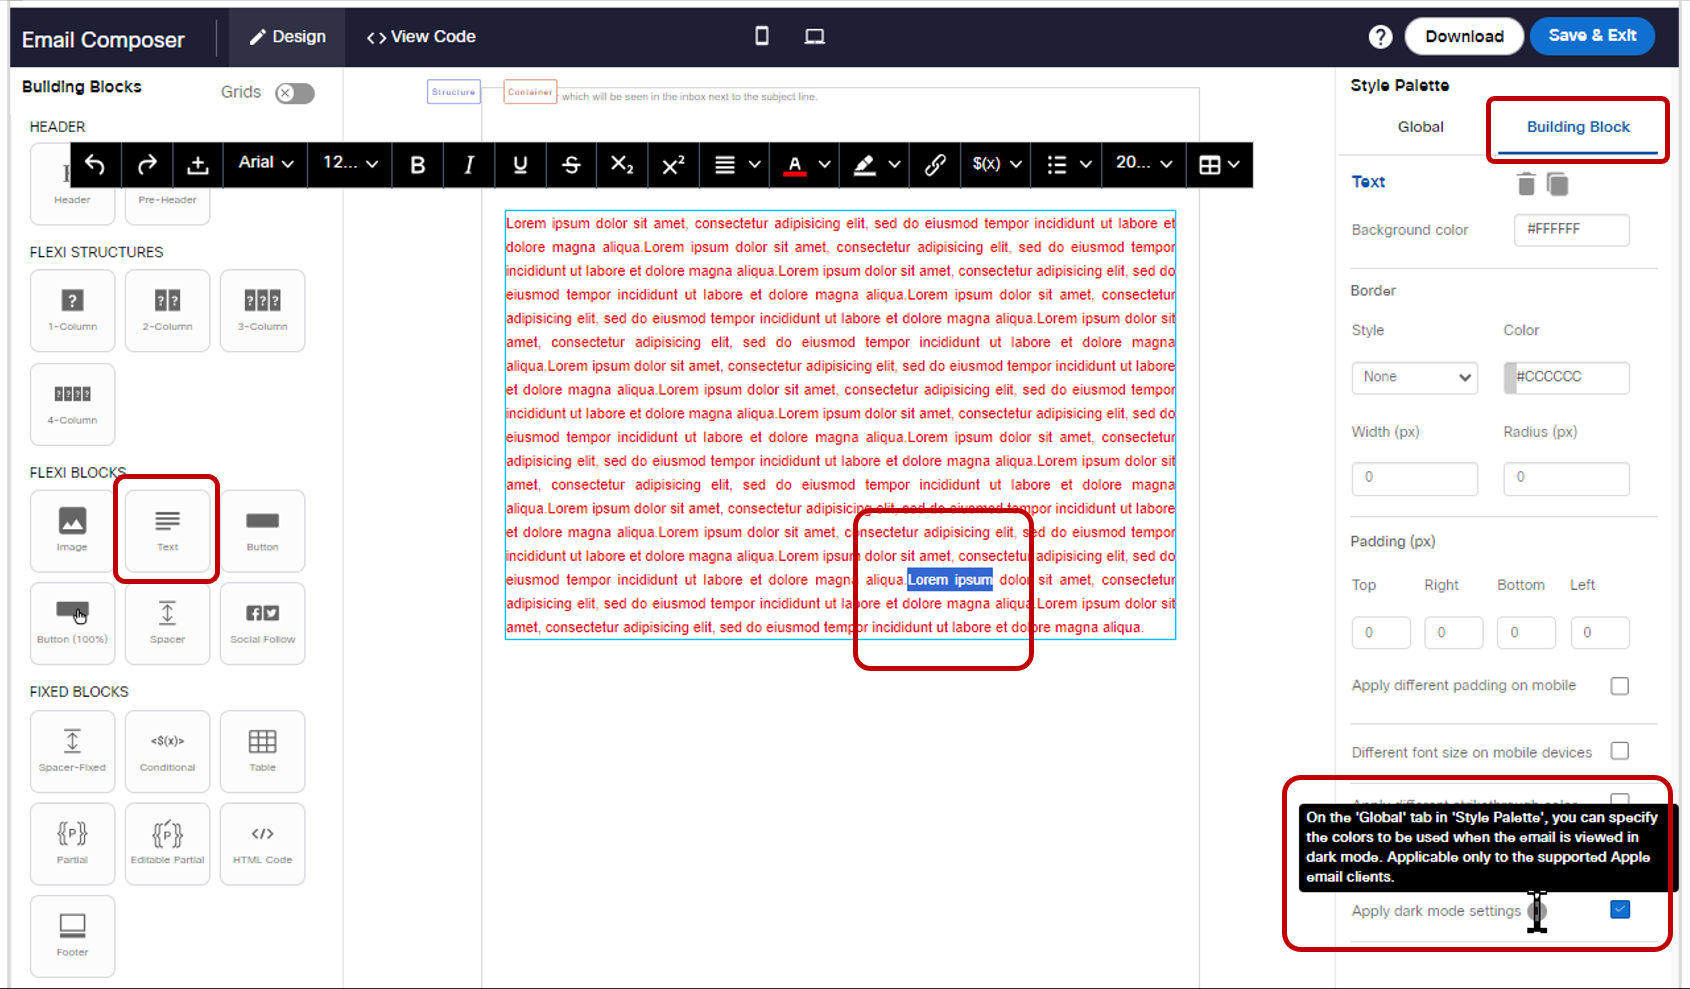
4.2 Email Composer: Text block: ‘Dark mode settings’ checkbox
As mentioned in the earlier section 4.1, after you have configured the text-font color and background color to be used on Apple Mail clients when your email is viewed in dark mode, in order to actually apply those colors to a specific Text building block, you will need to select the checkbox called Apply dark mode settings on the right-side properties’ panel for that specific Text block.
This checkbox is visible only when your cursor is positioned somewhere inside the text block.
4.3 Email Composer: Button block: ‘Dark mode settings’ checkbox
As mentioned in the earlier section 4.1, after you have configured the text-font color and background color to be used on Apple Mail clients when your email is viewed in dark mode, in order to actually apply those colors to a specific Button building block, you will need to select the checkbox called Apply dark mode settings on the right-side properties’ panel for that specific ‘Button’ block.
This checkbox is visible only when your cursor is positioned somewhere inside the button block.

5.0 Maintenance items in this release
It will be updated soon.
6.0 Need more information?
Please contact your Cisco Webex client representative if you have questions or would like access to a new feature.
Cisco Webex technical support team can be contacted at any time by phone or email:
- Europe / Middle East / Africa:
- Phone: +44 (0) 1494 750 600
- Email: [email protected]
- North America:
- Phone: +1-855-324-0970
- Email: [email protected]