Release 6.0.1 - 2021 Aug
1.0 imicampaign’s New UI (‘Limited GA’)
In the previous Release 6.0, we made available over 95% of the most used features on the New UI. With this Rel 6.0.1, more than 99% of the features will now be available on the New UI.
In this 6.0.1 mini-release we are introducing the following features on the New UI.
Campaign Manager module :
• Voice channel deployments (only for voice-flows created in imiconnect v4.x)
• USSD channel deployments
• Email Channel : AMP Interactive Emails
Profile Manager module :
• Segment Builder Filters : custom expressions builder
Currently, the New UI has been made available as ‘Limited GA’ to specific clients. We recommend that you should contact your local imimobile Client Success team to begin planning your transition to the imicampaign New UI.
The New UI can be accessed using the ‘nextgen/’ context of your usual imicampaign URL; e.g. https://client-xyz.imicampaign.io/nextgen/.
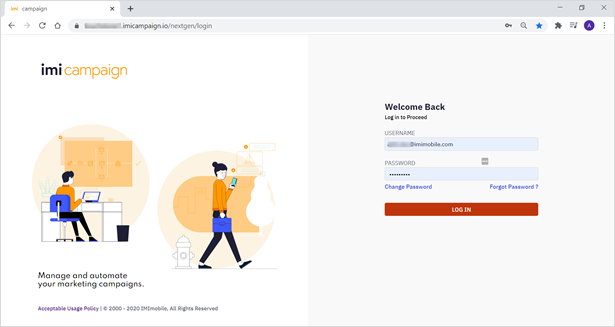
- Going forward, new product features will only be introduced on the New UI.
- After the New UI is fully developed, we will decommission the Old UI ( ~Nov 2021).
- Any Campaigns, Deployments, and Assets that you have previously created on the Old UI will be available to view and edit on the New UI.
- Similarly, any Campaigns, Deployments, and Assets you create on the New UI will be available on the Old UI for the next few months (until the Old UI is decommissioned).
The following sections introduce the key features of the New UI:
1.1 Left Navigation Menu
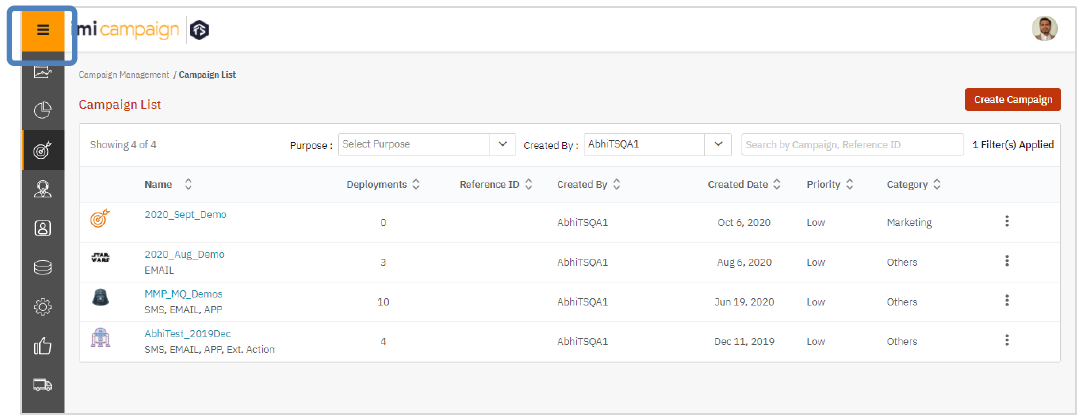
The Left Navigation Menu can be expanded by clicking on the ‘three-lines / burger’ icon in the top-left corner of the screen. And it can be collapsed again by clicking on the arrow icon.
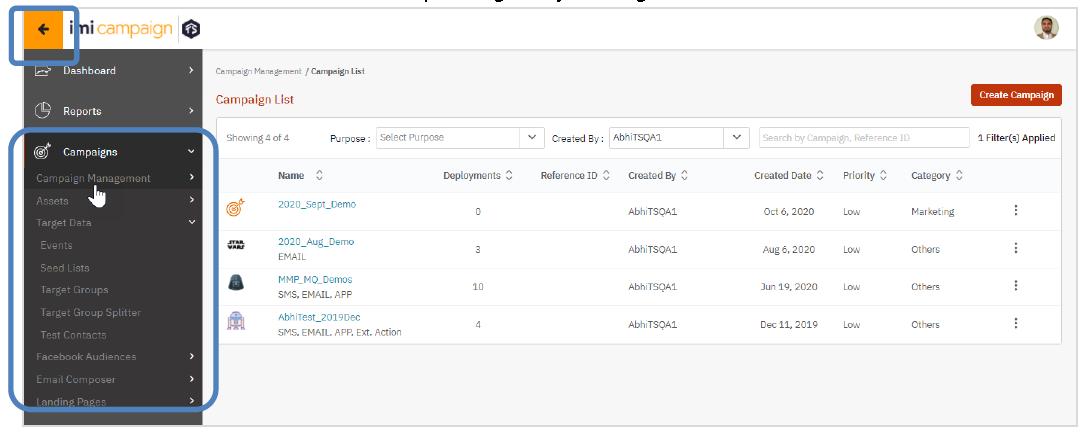
The top-level menu has been slightly reorganized relative to the menu options on the Old UI; e.g.
- Dashboard & Reports are now separate top-level menu items.
- Under the ‘Campaigns’ → ‘Target Data’ menu, the following features have been consolidated: Events, Seed Lists, Target Groups, Target Group Splitter, and Test Contacts.
- Using the ‘Email Composer’ top-level menu, you can directly go to the ‘Email Message Templates’.
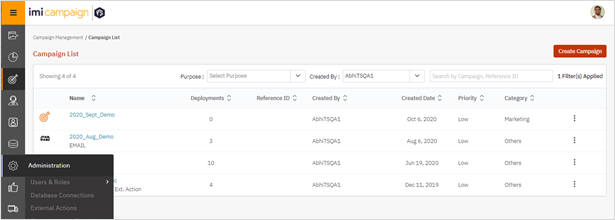
You can also navigate the menu by hovering the mouse over the menu options without expanding it fully.
1.2 Campaign Details & Deployment Listing
On the ‘Campaign List’ page (shown in the screenshot above), when you click on any specific Campaign Name, you can see the Deployments under that Campaign. This is similar to the ‘Campaign Flow’ screen on the Old UI.
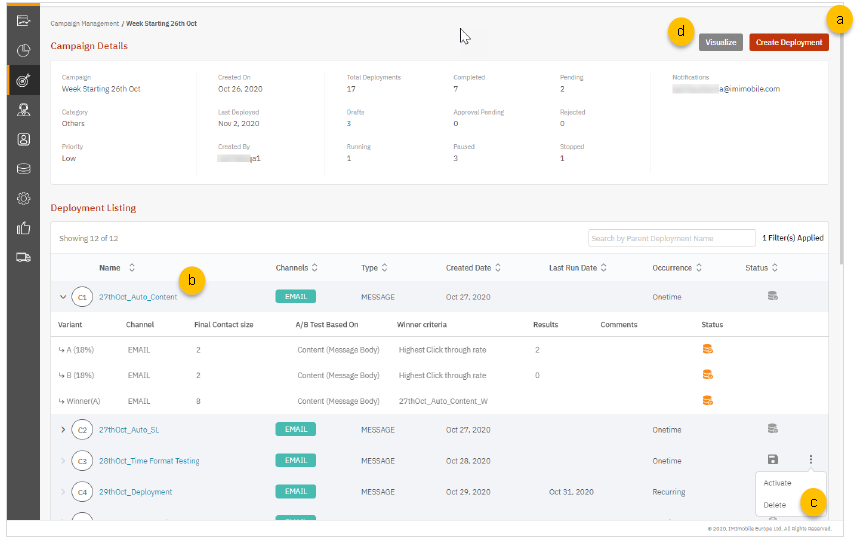
On this screen, you can use the following features:
a) Create a New Deployment under this Campaign (see section 1.3)
b) View ‘Deployment Summary’ by clicking on the Deployment Name (see sections 1.4 & 1.5)
c) Activate / Delete an existing Deployment by clicking on the ‘three-dot’ Actions menu
d) Visualise the relationships between all the Deployments within this Campaign
(see section 1.7)
1.3 Create a New Deployment in ‘Draft’ status
The following series of screenshots shows the steps in creating a new deployment:
1.3.1 Create a skeleton deployment
A ‘Deployment Wizard’ guides you through the 3 steps to create a new skeleton deployment on the ‘Deployment Canvas’.
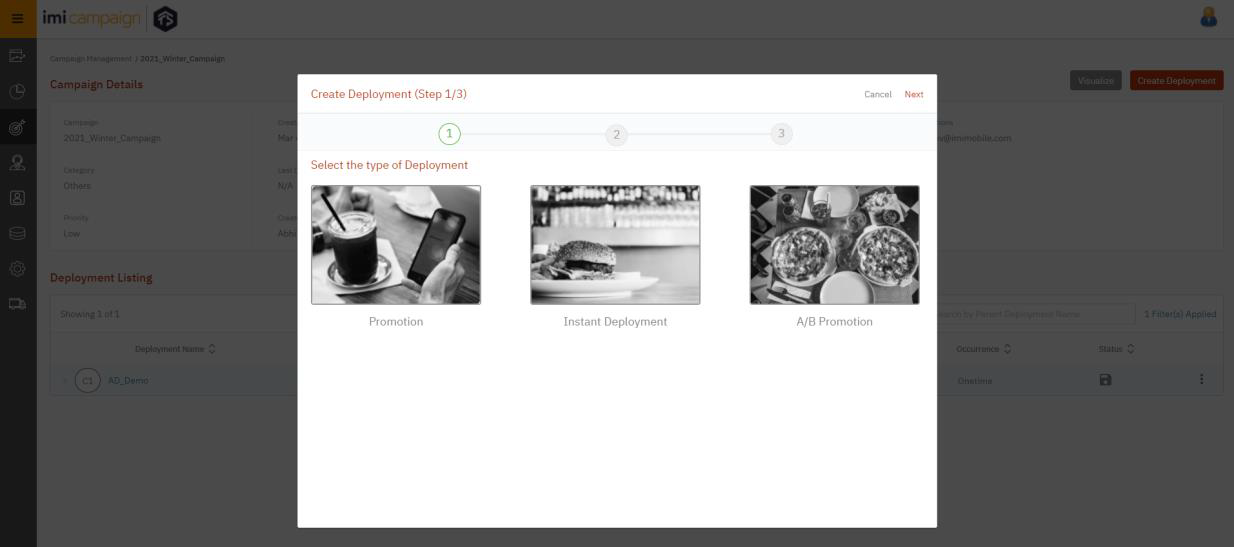
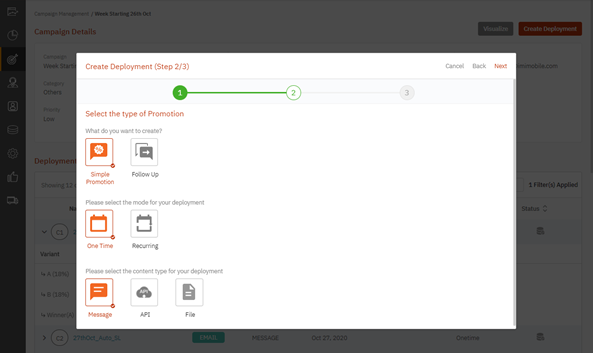
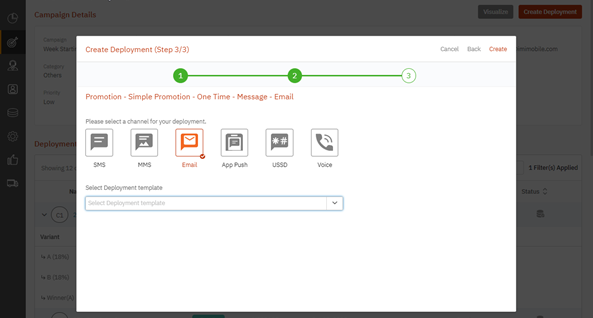
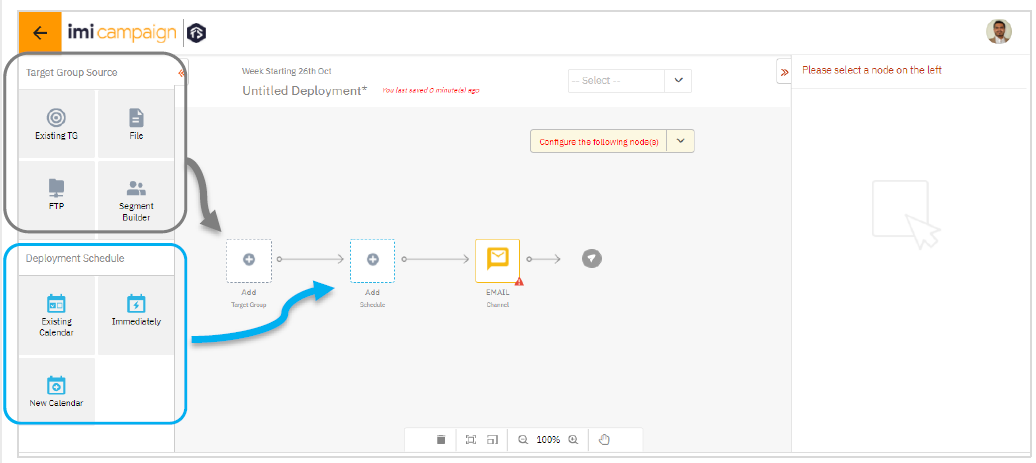
Now, you can drag-&-drop one of the ‘Target Group Source’ nodes onto the grey-colored ‘Add Target Group’ placeholder node. Then you can complete the TG Source configuration on the right-side panel by selecting this node. (This is similar to what you would have done on the ‘WHO’ tab on the Old UI).
Similarly, you can drag-&-drop one of the ‘Deployment Schedule’ nodes onto the blue-colored ‘Add Schedule’ placeholder node and complete the Schedule configuration on the right-side panel. (This is similar to what you would have done on the ‘WHEN’ tab on the Old UI).
Finally, when you select the ‘Email’ node, you will be able to specify the Email content (similar to how you would have configured it on the ‘WHAT’ tab on the Old UI).
The following subsections cover these steps.
1.3.2 Configure TG Source Nodes
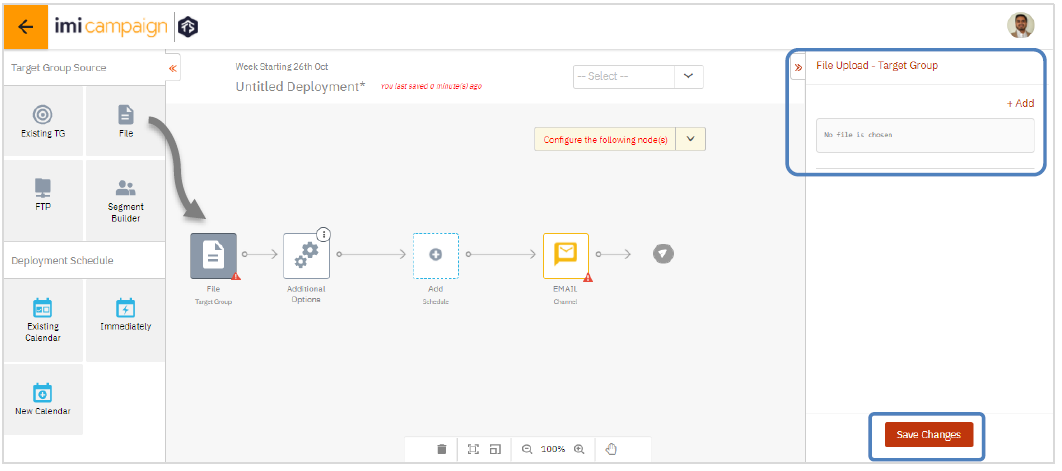
In this example, the TG source is a ‘File’. After you drag the ‘File’ icon from the ‘Node Selector Panel’ on the left side onto the central canvas, you can select that node and specify the details about the File in the right panel a.k.a. ‘Node Properties Panel’.
The red triangular ‘attention’ icon will remain on a node until you have configured that node completely and clicked on the ‘Save Changes’ button.

1.3.3 Configure Schedule Nodes
In this example, the user has dragged and dropped the ‘Existing Calendar’ node onto the central Deployment Canvas.
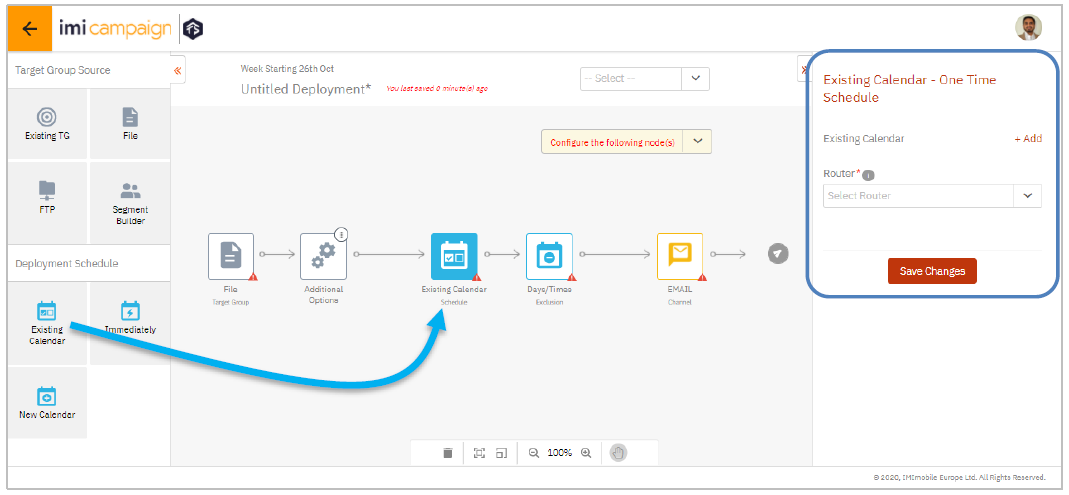
The system will automatically add an extra node for ‘Days / Times Exclusion’ where you can confirm whether you want to stick to your company’s default exclusion-days and exclusion times or you can choose to apply different values for your specific deployment.
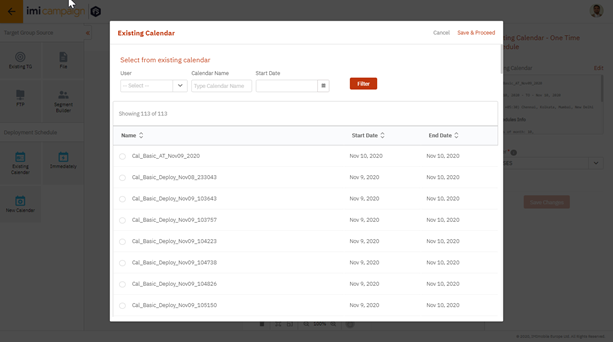
Again, the configuration for the ‘Existing Calendar’ node will need to be completed on the ‘Node Properties Panel’ on the right side.
1.3.4 Configure Email Content Node
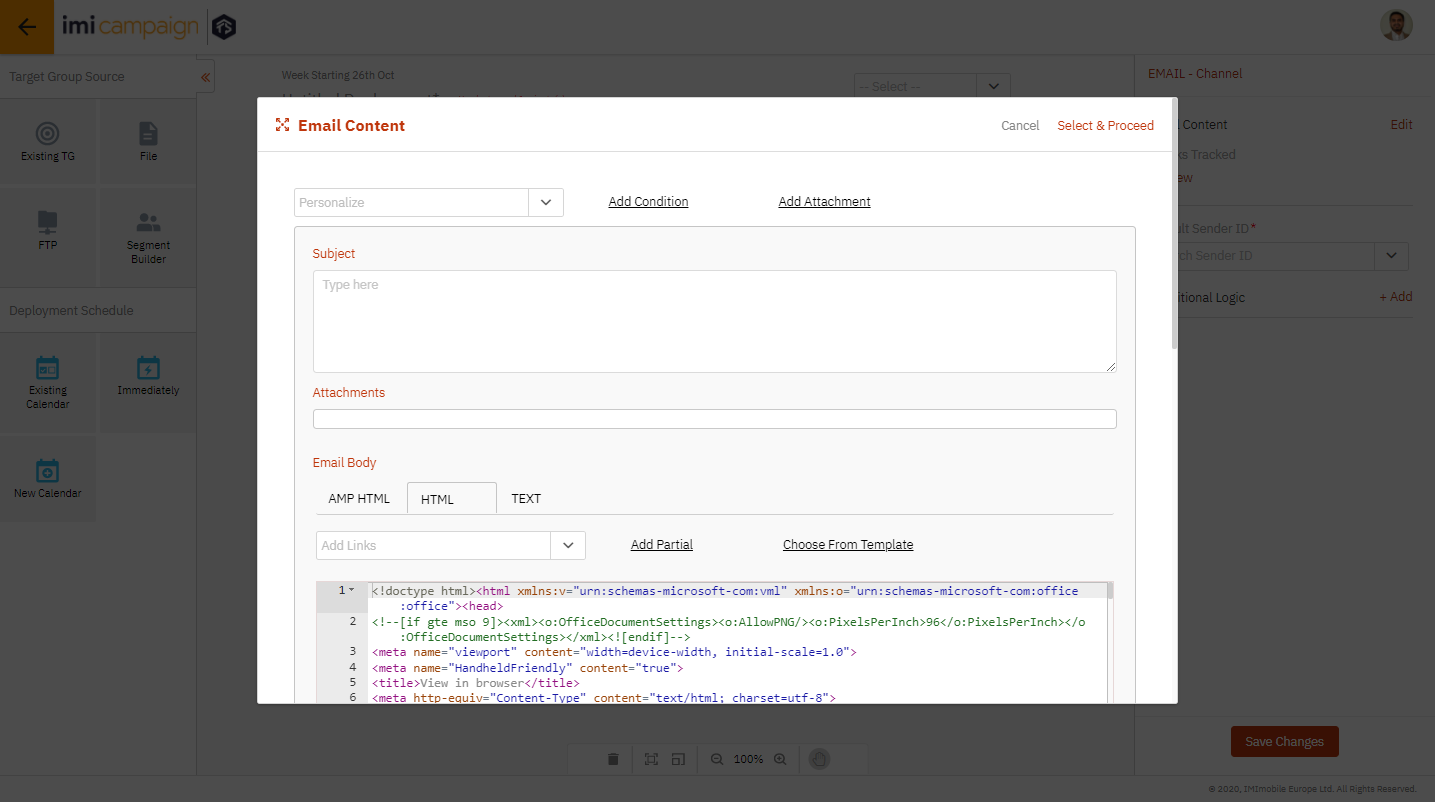
By selecting the ‘Email’ channel node, you will need to configure the Email content on the ‘Node Properties Panel’ on the right side.
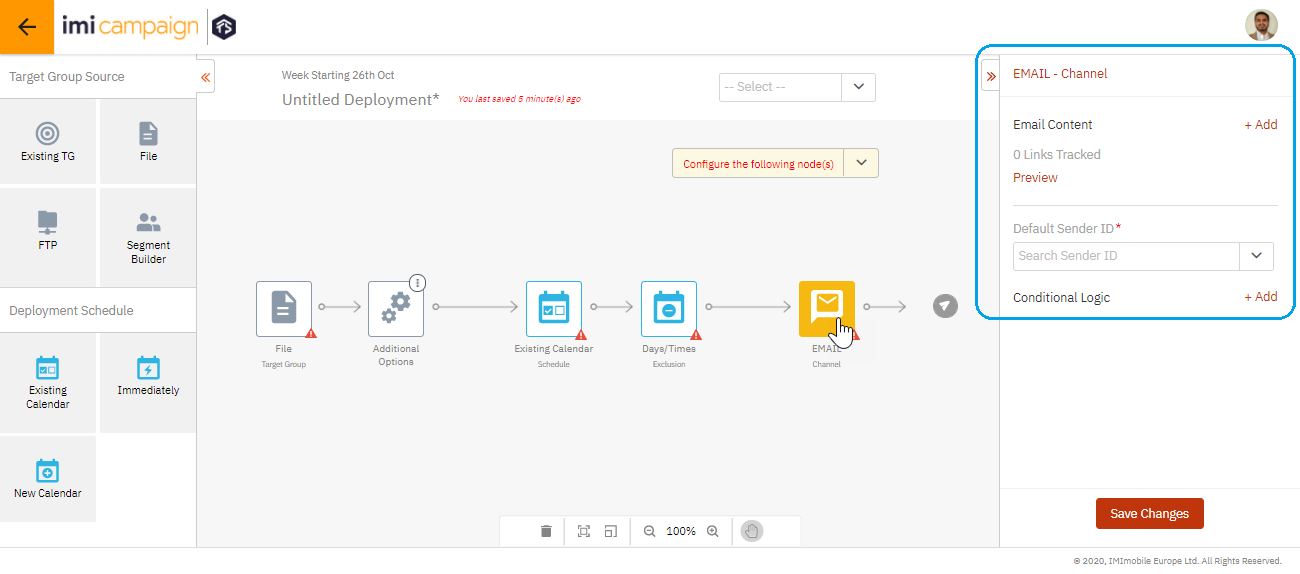
Here, you will be able to choose previously created Email Templates, Partials etc.
1.3.5 Save Deployment in ‘Draft’ status
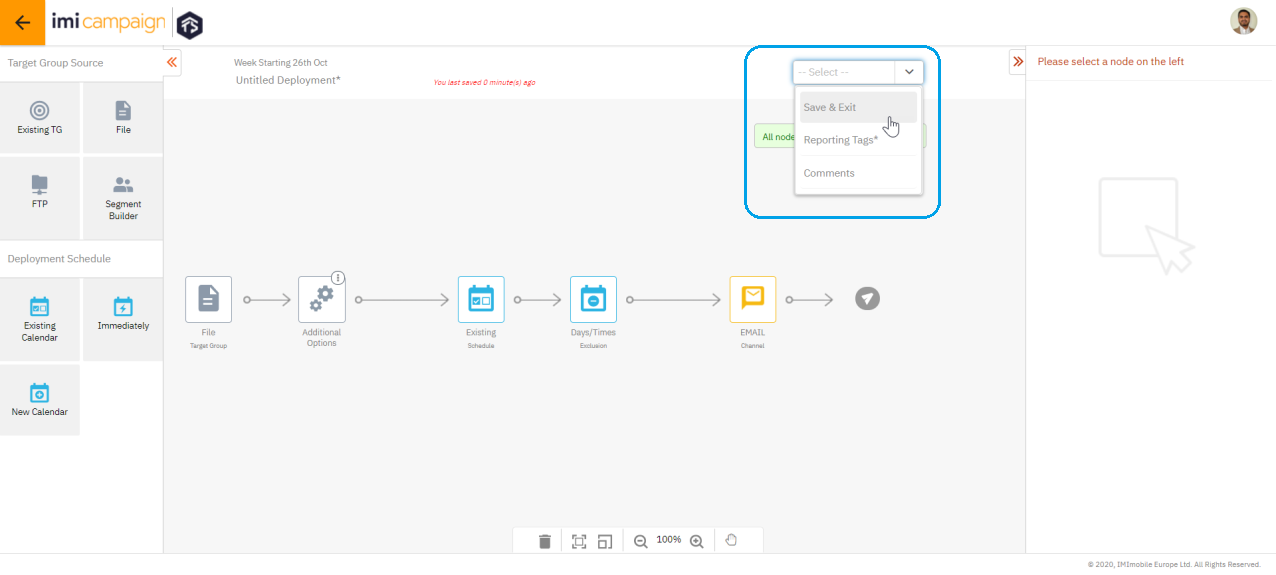
The drop-down within the ‘Deployment Canvas’ will keep track of which nodes are fully configured and which still need to be configured by the user.
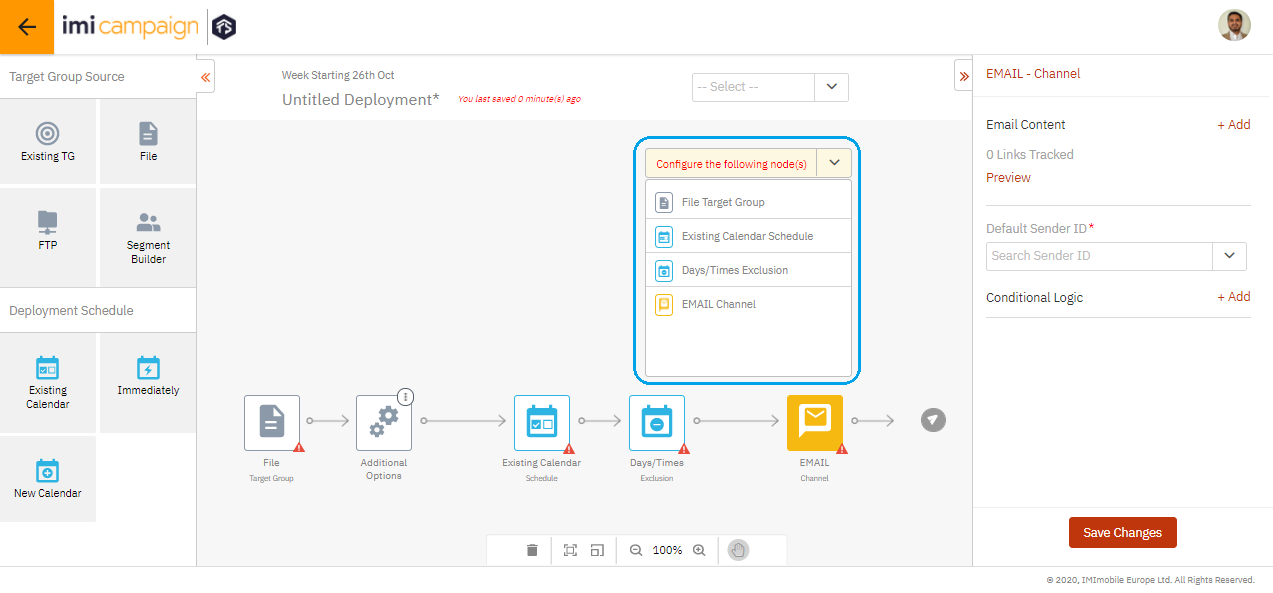
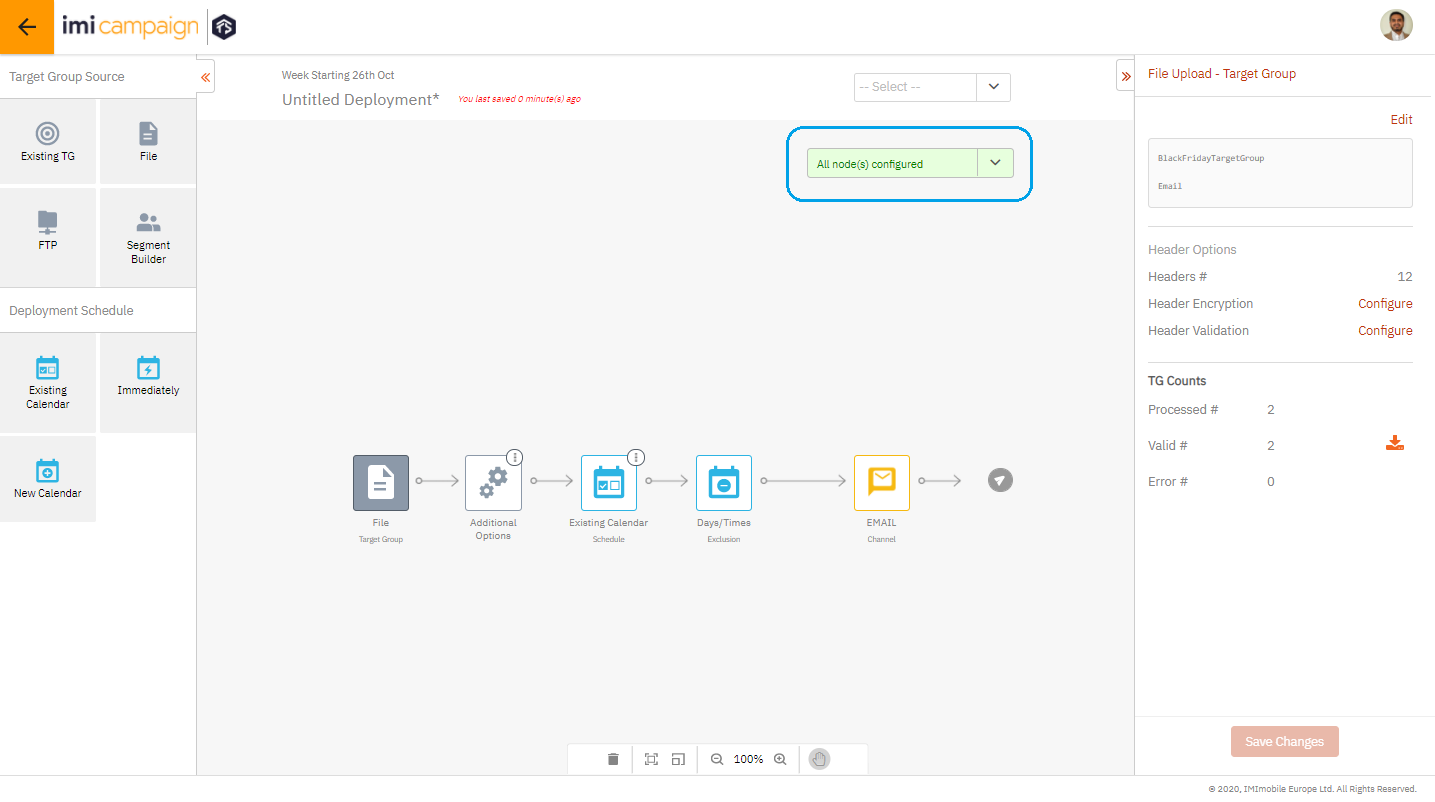
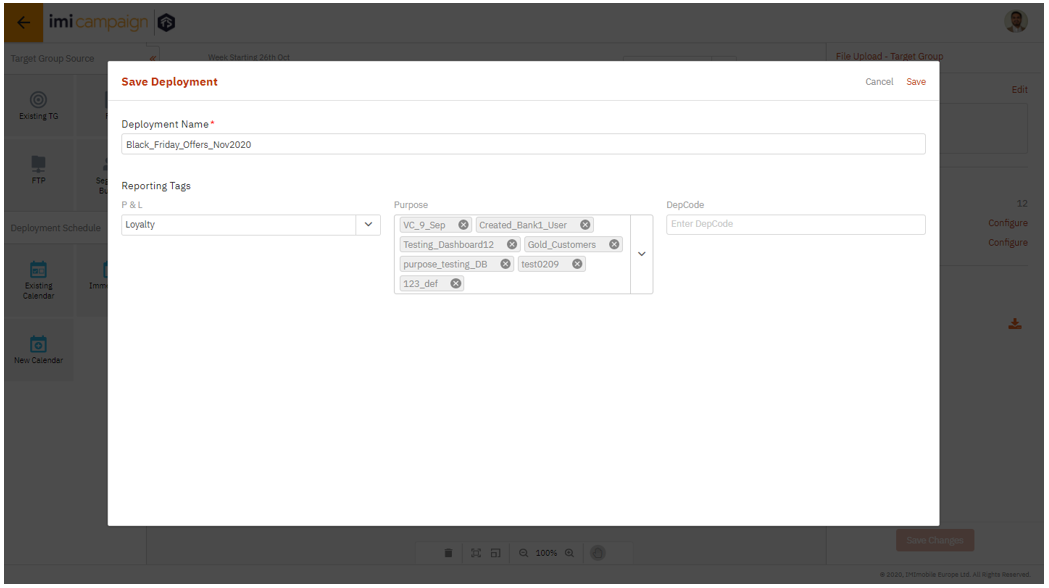
By using the drop-down at the top of the Canvas screen, you will then save this deployment as a ‘draft’. You can save a deployment in the ‘draft’ status without necessarily completing all the node configurations. (You may choose to come back and fill in the missing details later by editing this already drafted deployment).
1.3.6 Configure Additional Optional Target Group Nodes
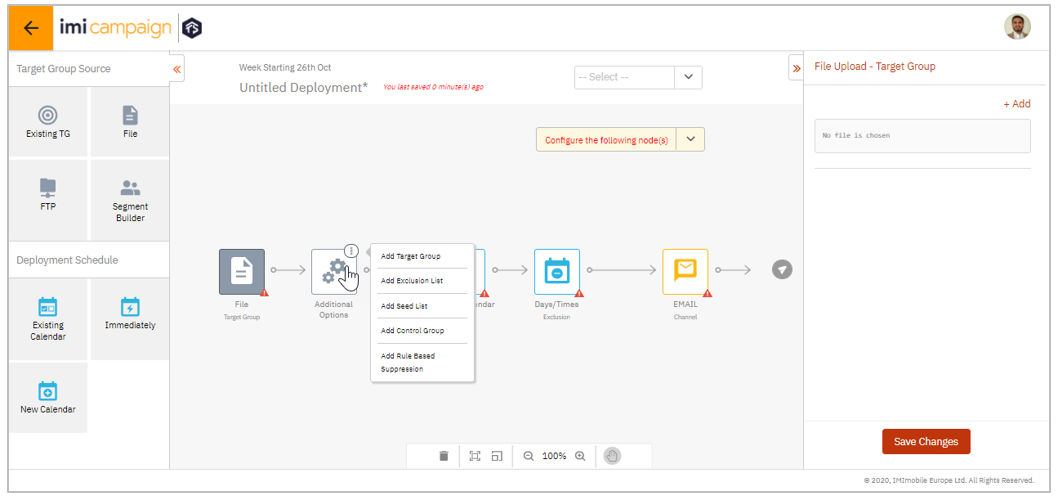
Depending on your requirements for a specific deployment, you will be able to add additional optional nodes related to the ‘Target Group’ definition e.g. Seed Lists, Control Group, Additional TGs, Exclusion List etc.
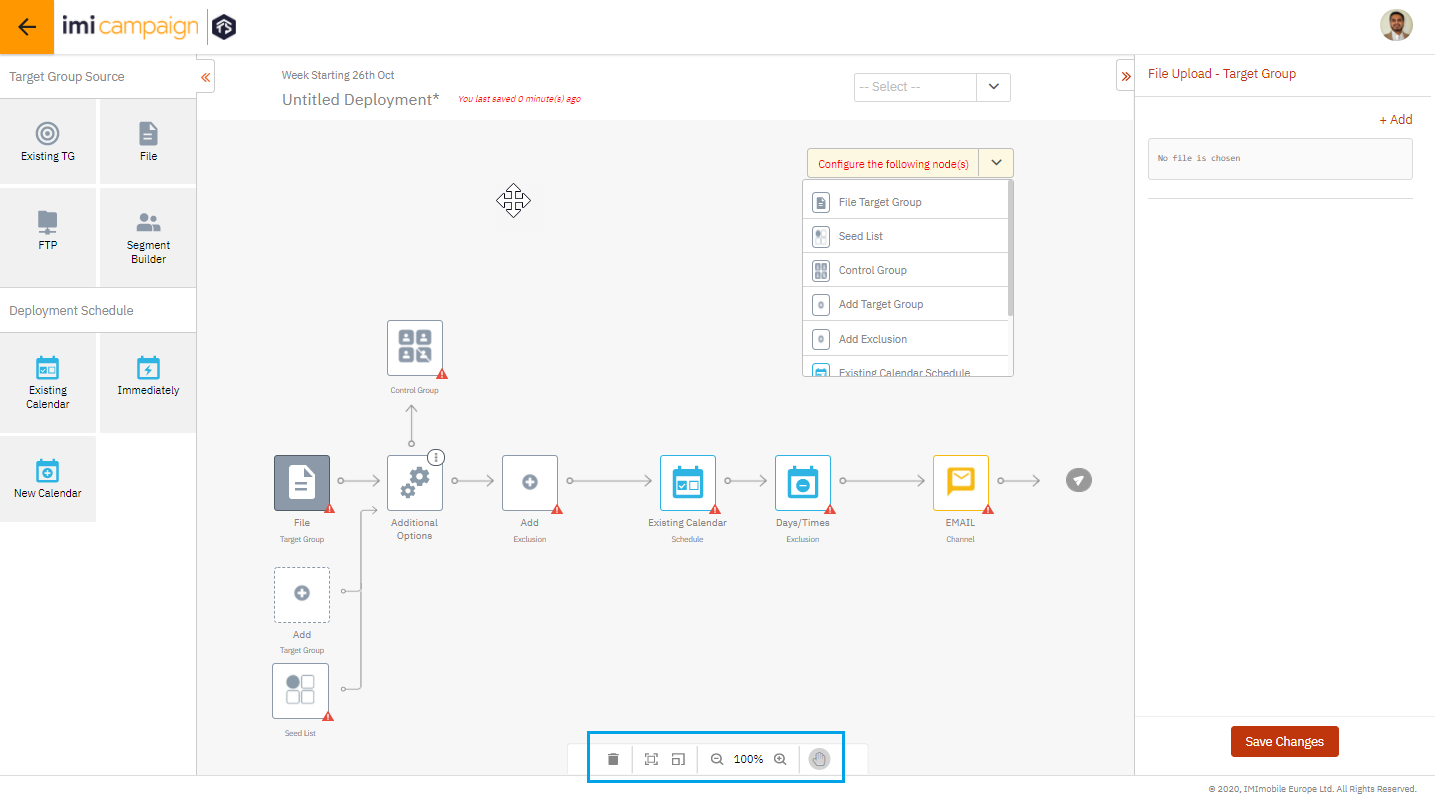
If you want to delete any of these optional nodes, then you can select the node and use the ‘Delete’ icon at the bottom of the Canvas. You can also use the ‘zoom’ and ‘pan’ options.
1.4 After drafting: Preview & Test, Edit, Activate, Save-as-Template, Prepare TG
After a deployment is drafted, it will appear on the ‘Campaign Details and Deployment listing’ screen (as shown in the previous section 1.2 ). When you click on a deployment in the ‘Draft’ status, the ‘Deployment Summary’ screen will open up.
Here, you can use the following features for this deployment :
- Preview & Test,
- Edit,
- Activate,
- Save As Template and
- Prepare TG (This is a new tenant-specific feature only available on the New UI)
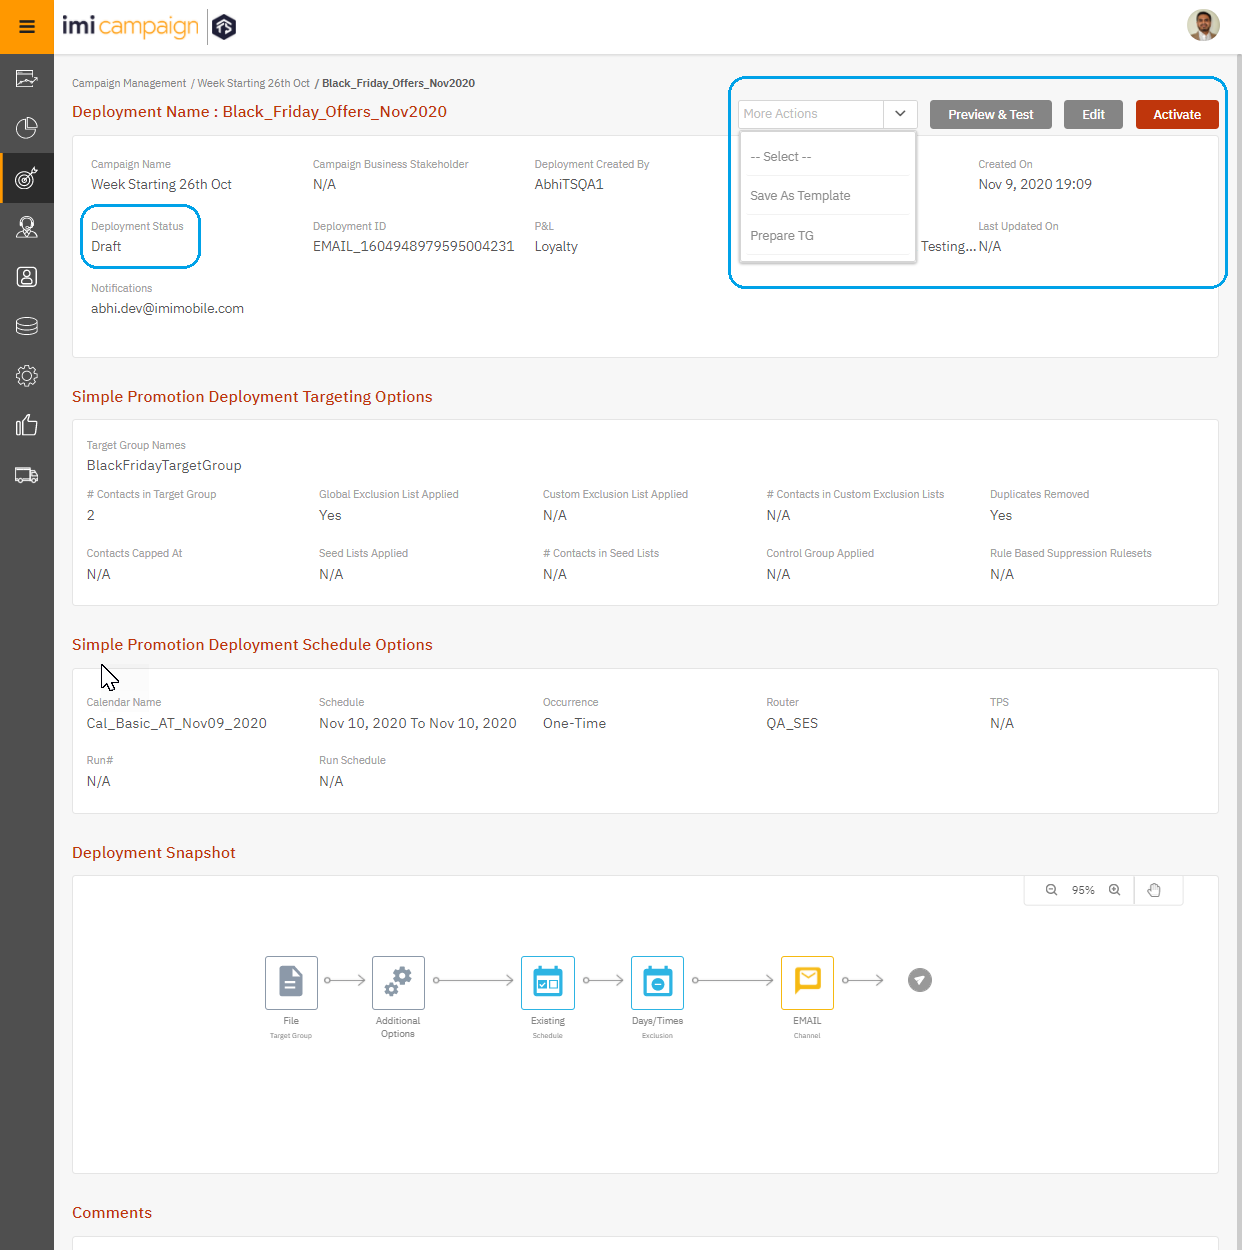
For a deployment in ‘Draft’ status, the ‘Deployment Summary’ screen will show the basic info, Targeting Options, Schedule Options, and the Deployment Snapshot.
1.5 View the Deployment Summary of a Completed / Activated Deployment
In case of a ‘Completed’ deployment, you will only have the option to ‘View’, rather than ‘Edit’ the deployment. For a deployment in ‘Completed’ status, the ‘Deployment Counts’ panel is also available.
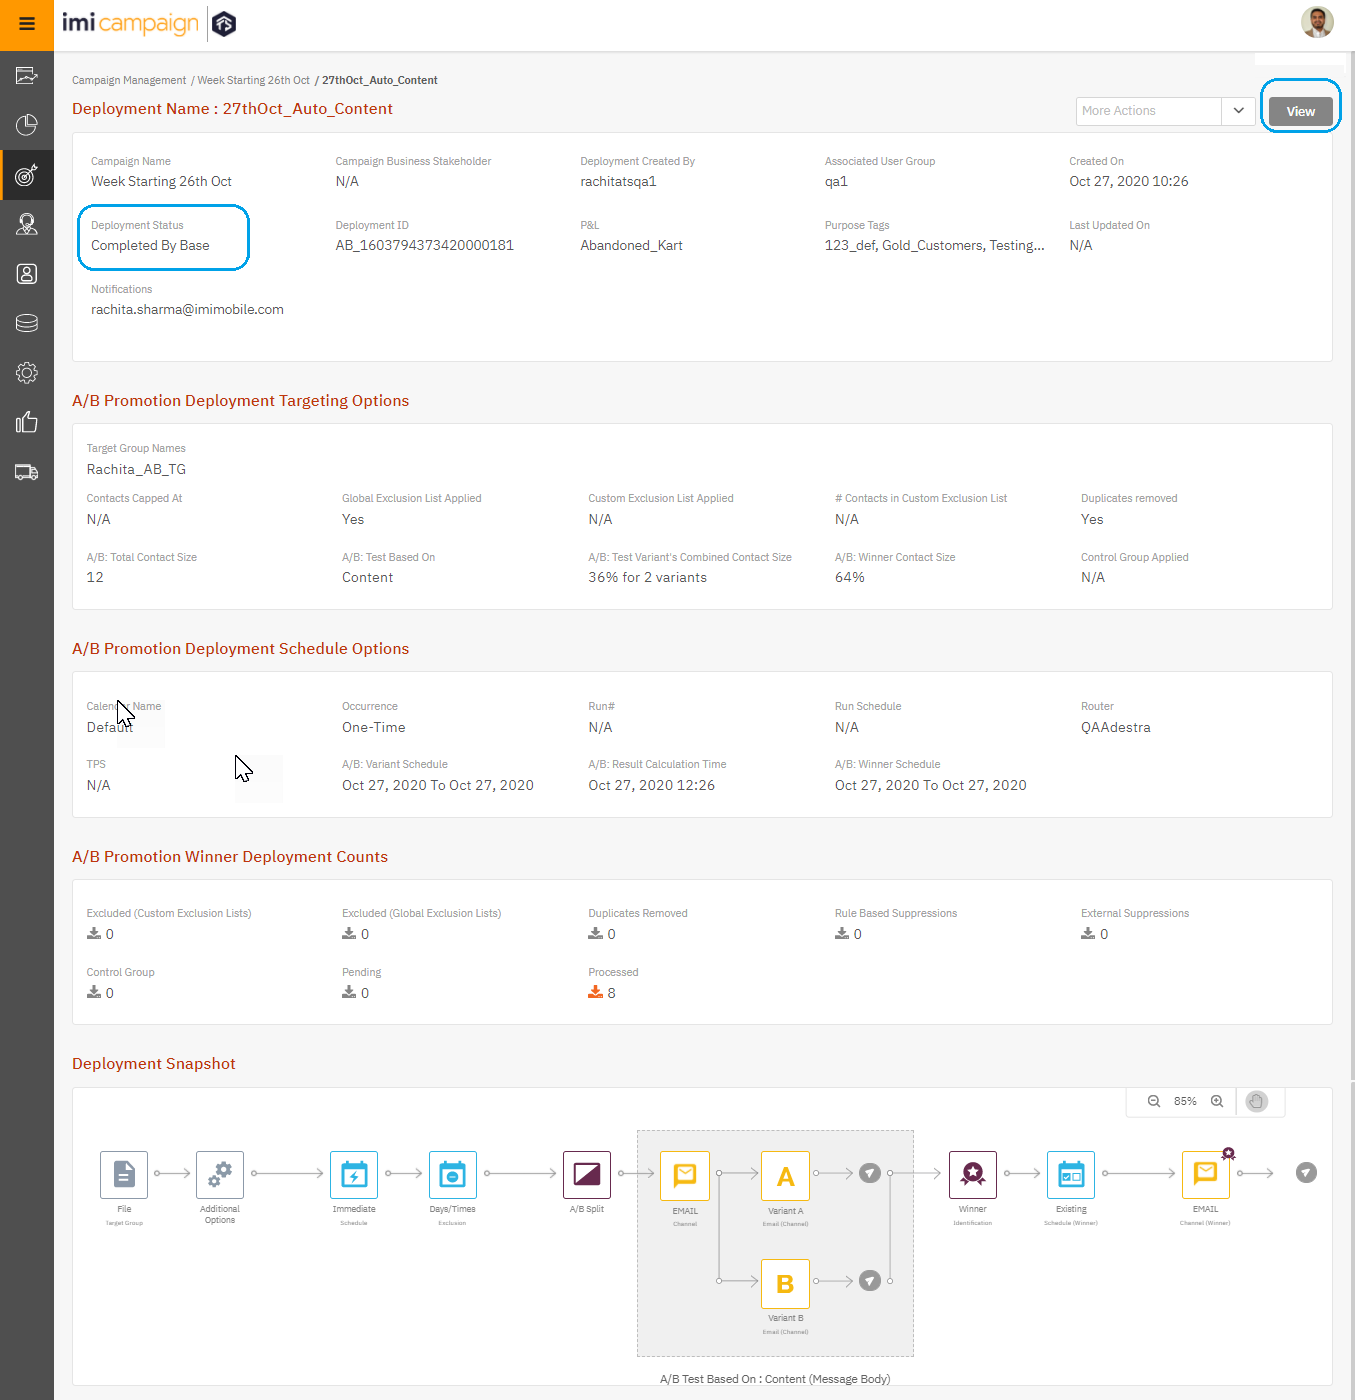
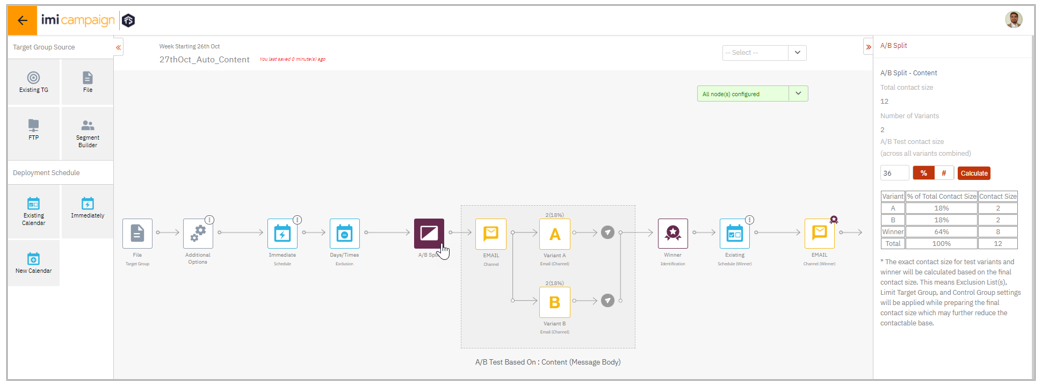
1.6 View a Completed Deployment using the ‘Deployment Canvas’
The ‘Deployment Canvas’ will open up when clicked on the ‘View’ button on the above screen.
1.7 Visualize all Deployments within a Campaign
From the Campaign Details / Deployment Listing screen, you can click on the ‘Visualize’ button to view the relationships between all the Deployments within a Campaign. This is especially useful in case of follow-up deployments.
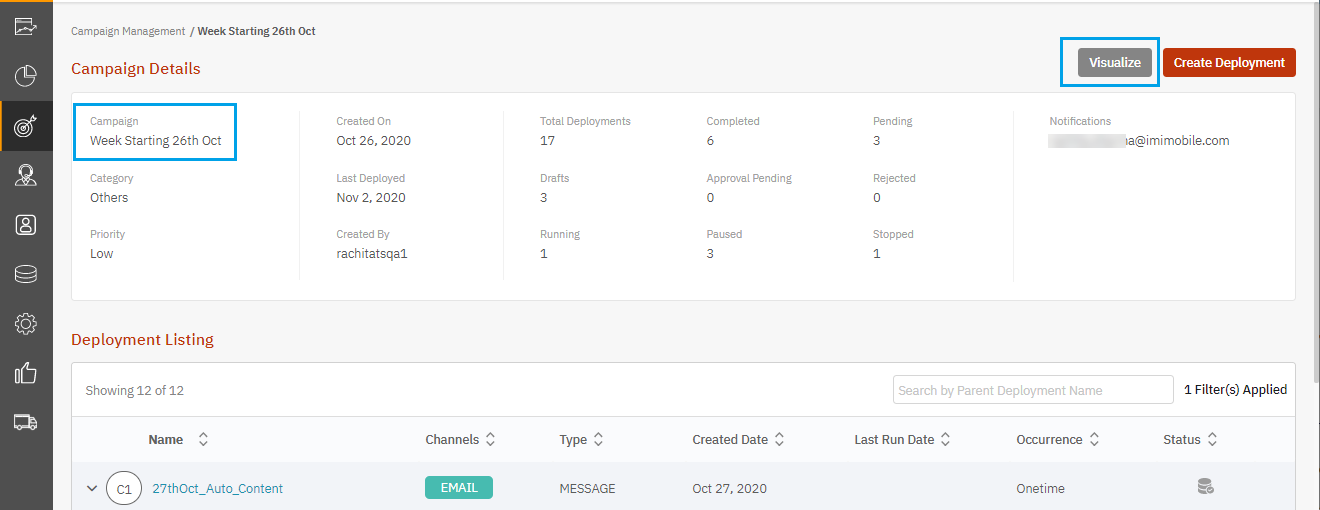
By selecting one of these deployments, you can see a few more details about it on the right-side panel.
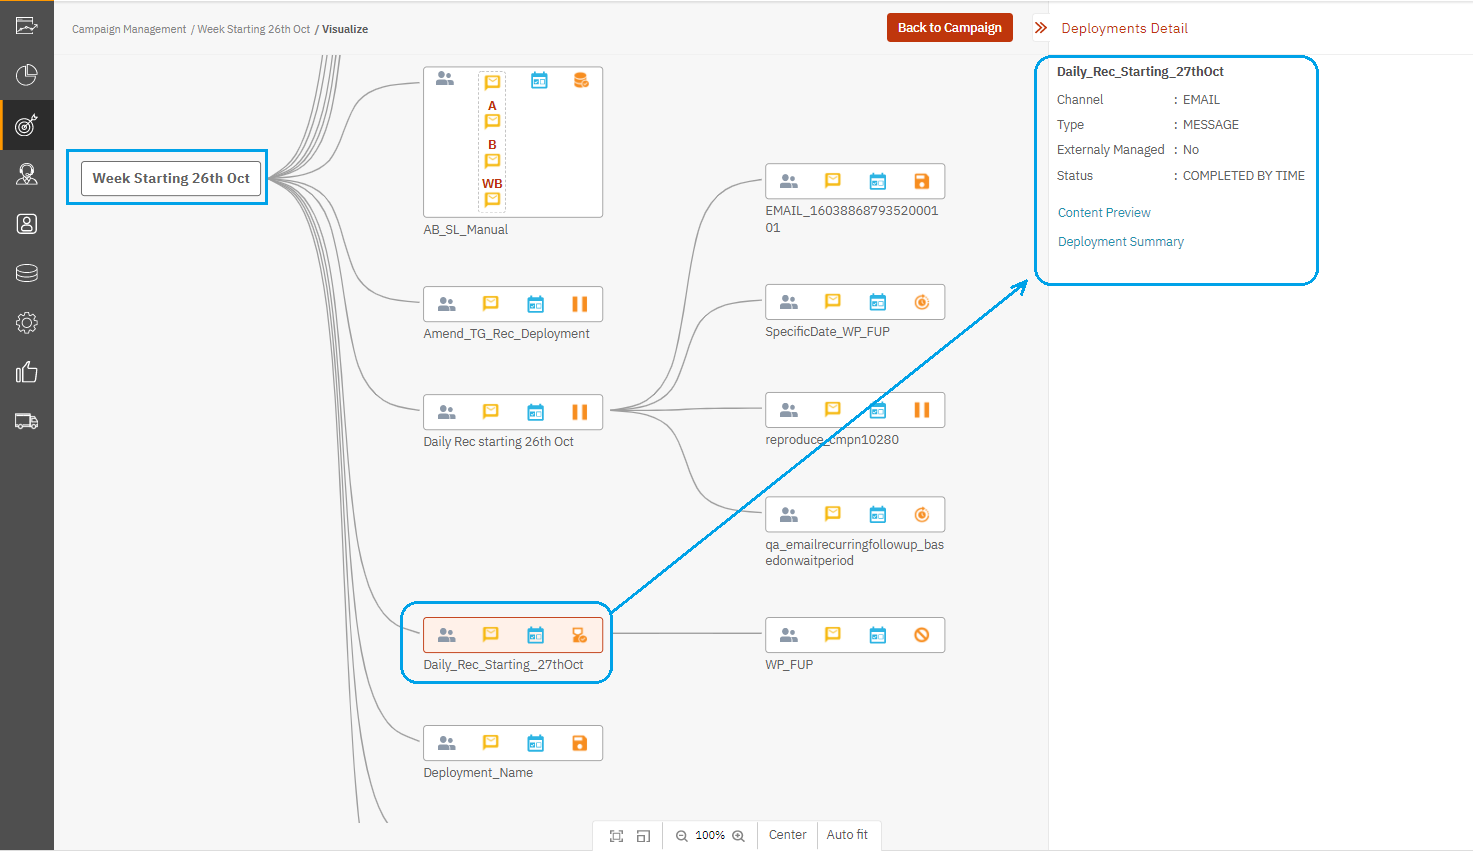
The grey icons convey the type of TG Source ( File / SFTP / Profile Segment) and how the blue icons convey the type of schedule (Onetime, Recurring, or Instant).
1.8 ‘Prepare TG’ for Onetime Parent & Follow-Up deployments
This tenant-specific feature is only available on the New UI. Please contact your imimobile account manager if you would like to access this feature.
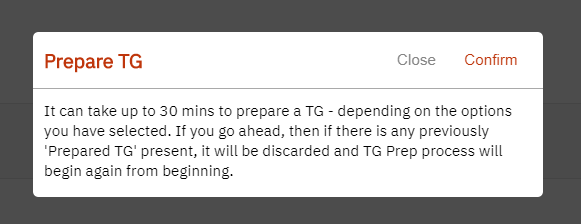
On the Deployment Summary screen, you will see a new option called ‘Prepare TG’ in case of Onetime Deployments. This option will ‘prepare the target group’ by processing options such as control groups, exclusion list, DND, etc.

If the ‘Prepare TG’ option is selected multiple times, then if there is any previously 'Prepared’ TG already present, it will be discarded, and the TG Prep process will start again for that deployment.
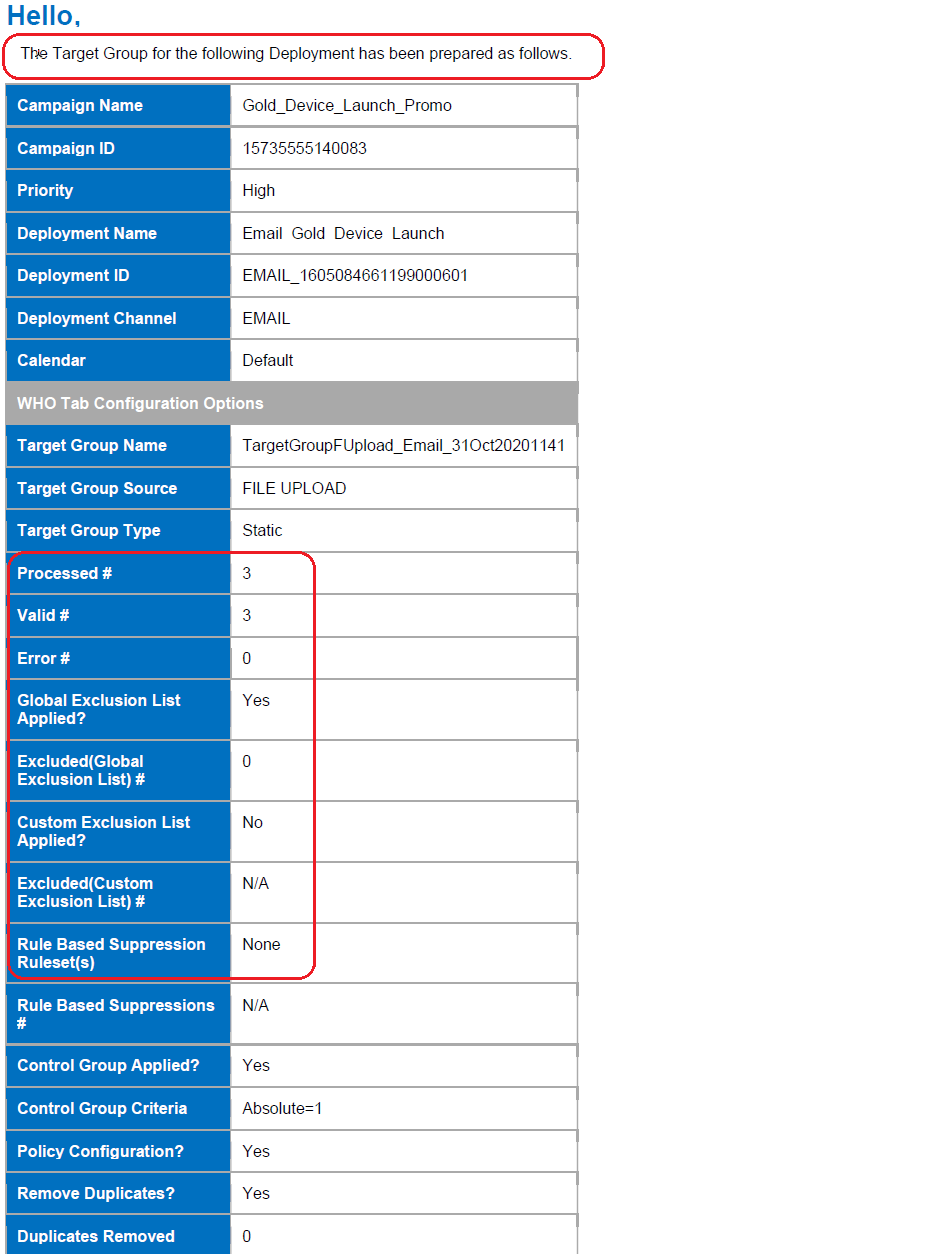
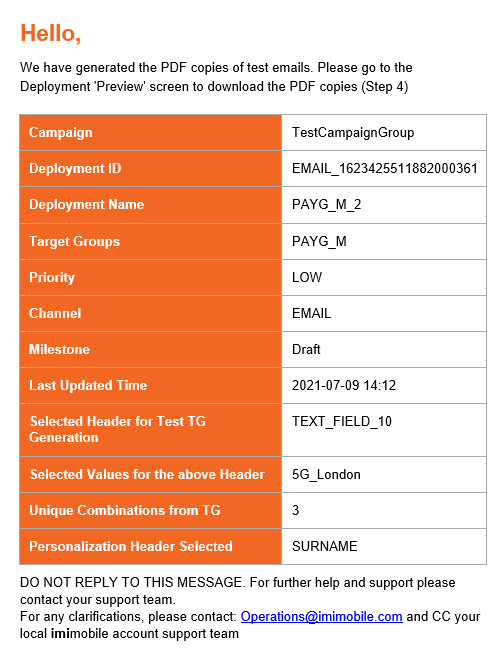
After the TG is prepared, the deployment creator will receive an email as shown below. This email will include all the relevant counts for the TG. This feature is especially useful to assess the count of customers eligible to receive a follow-up communication ahead of the follow-up being sent out.
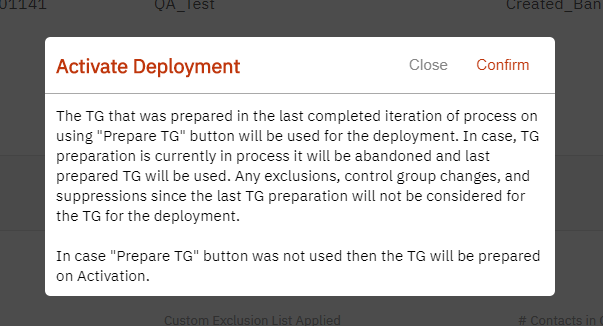
In case of Onetime Parent Promotions, if the ‘Prepare TG’ option has been used before activation, then the TG will not be prepared again at the time of activation – thus saving time.
This feature is useful in situations where you know the Target Group ahead of time but may want to make last-minute changes to the email content just before activation (especially when using the ‘Immediately’ schedule option). You can get the ‘Prepare TG’ step completed ahead of time; and thus, get the email communication out of the door more quickly after activation.
When you activate the deployment, you will be shown an alert informing you that the TG has already been prepared and the same already-prepared TG will be used. Of course, if you have made any changes to the Target Group since the TG was last prepared, you will be able to select the ‘Prepare TG’ option again before activation.
In case of Onetime Follow-Up deployments, even if the ‘Prepare TG’ option has been used one or more times before the activation, the TG will still be prepared again at the time of activating the deployment. This is essential to account for any potential updates to delivery and engagement metrics of the parent deployment ( e.g. Opens, Clicks) since the ‘Prepare TG’ option was last used for that Follow-up deployment.
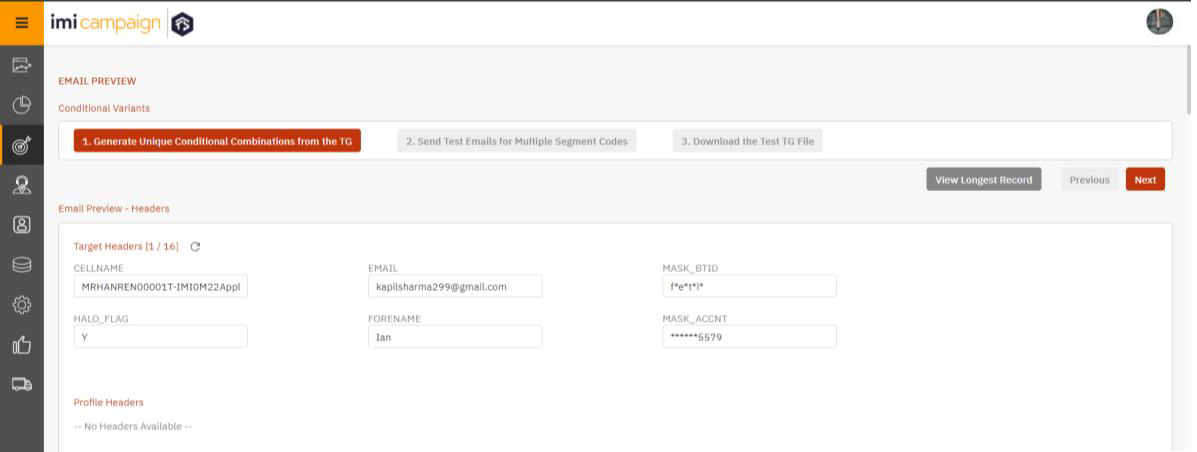
1.9 New UI: Auto-Generate Conditional Email Content Tests for Follow-Ups
This tenant-specific feature is only available on the New UI. Please contact your imimobile account manager if you would like to access this feature.
This feature was previously available only for Parent promotion deployments. After you use the above- mentioned ‘Prepare TG’ feature for a Follow-up deployment on the New UI, you can now also auto-generate the conditional content tests.
1.10 MMS Channel Deployments
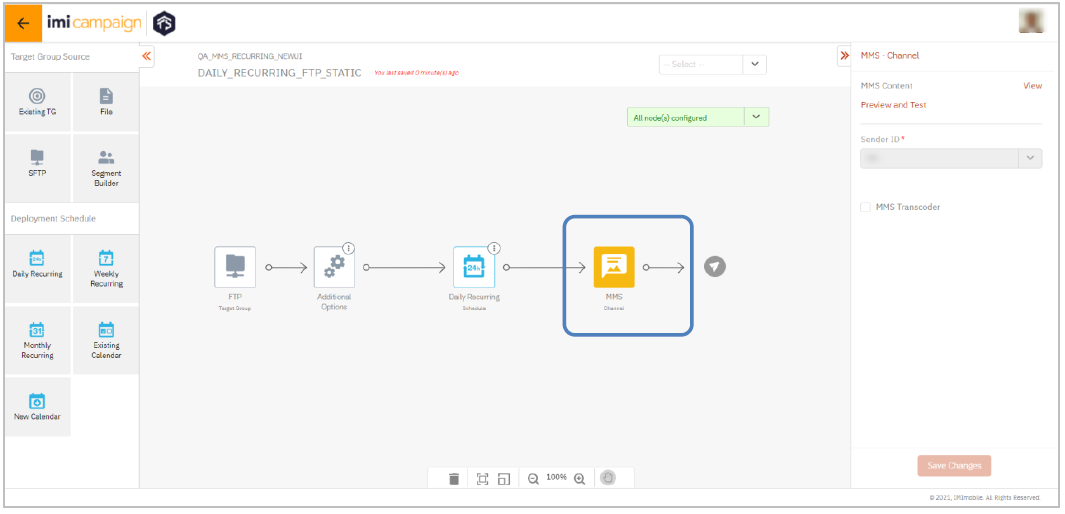
Now, in addition to Email & SMS channels, you can use the New UI to configure MMS channel campaign deployments.
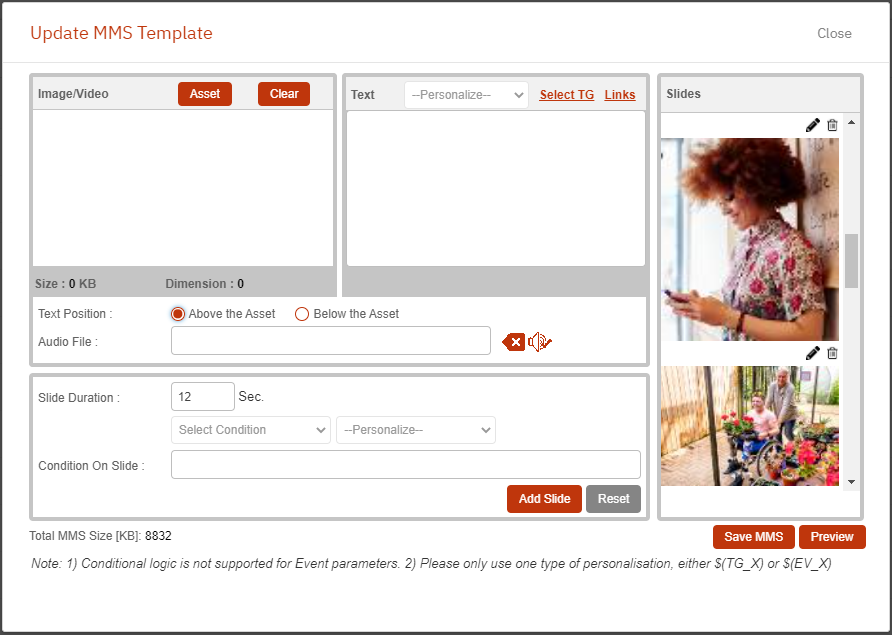
You will need to create an MMS Message Template prior to creating an MMS Deployment.
1.11 Customer Care screens
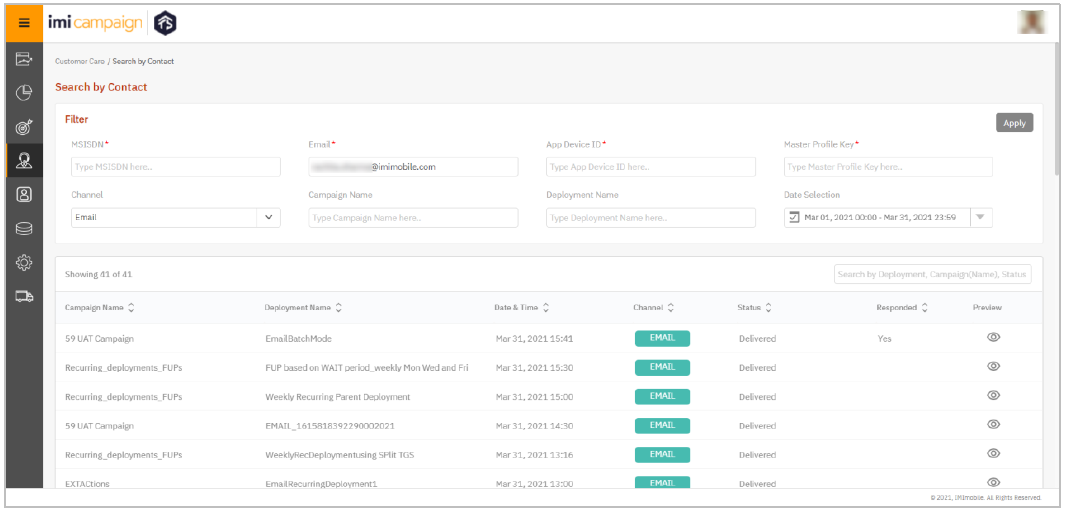
As of Release 5.9, the Customer Care screens are available on the New UI.
1.12 Recurring TG-Splitter & other improvements
In the previous release, the TG-Splitter feature only supported the ‘One-time’ option on the New UI. In this release, we have introduced the ‘Recurring’ option to the TG-Splitter feature. We have also introduced a few other UX improvements and changes to this feature.
- On the Old UI, this feature was also acting as a ‘File Splitter’ whereby you could upload a file to be split.
- On the New UI, the ‘TG Splitter’ will function as a ‘Target Group Splitter’ as its name suggests. This means that you will first need to create a Target Group from your file and then use this TG as a starting point to use the TG Splitter feature.
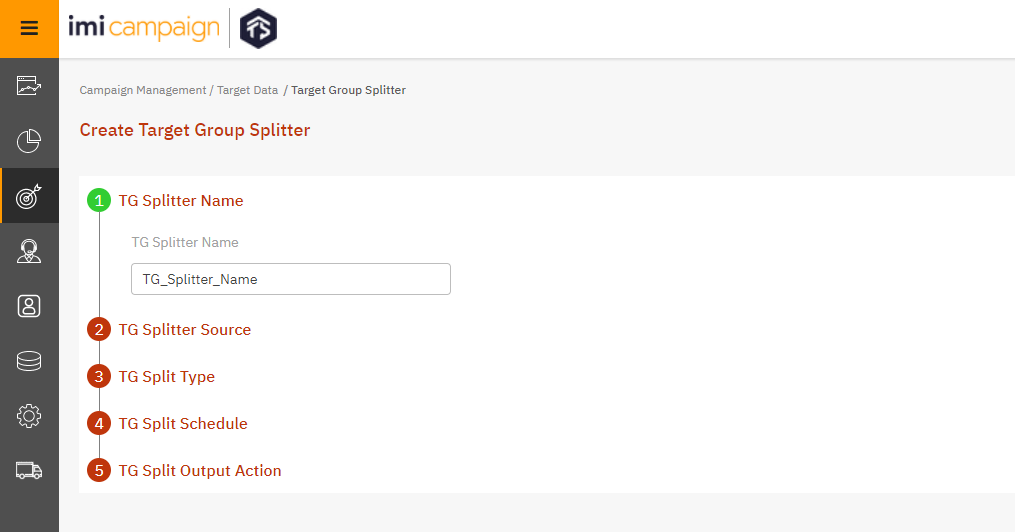
Here’s how the ‘TG Splitter’ feature works on the New UI :
- Step 1: Provide a name for your ‘TG Splitter’. On the Old UI, there was an option to ‘Use the existing file name’ in this step. That option has been removed from the New UI.
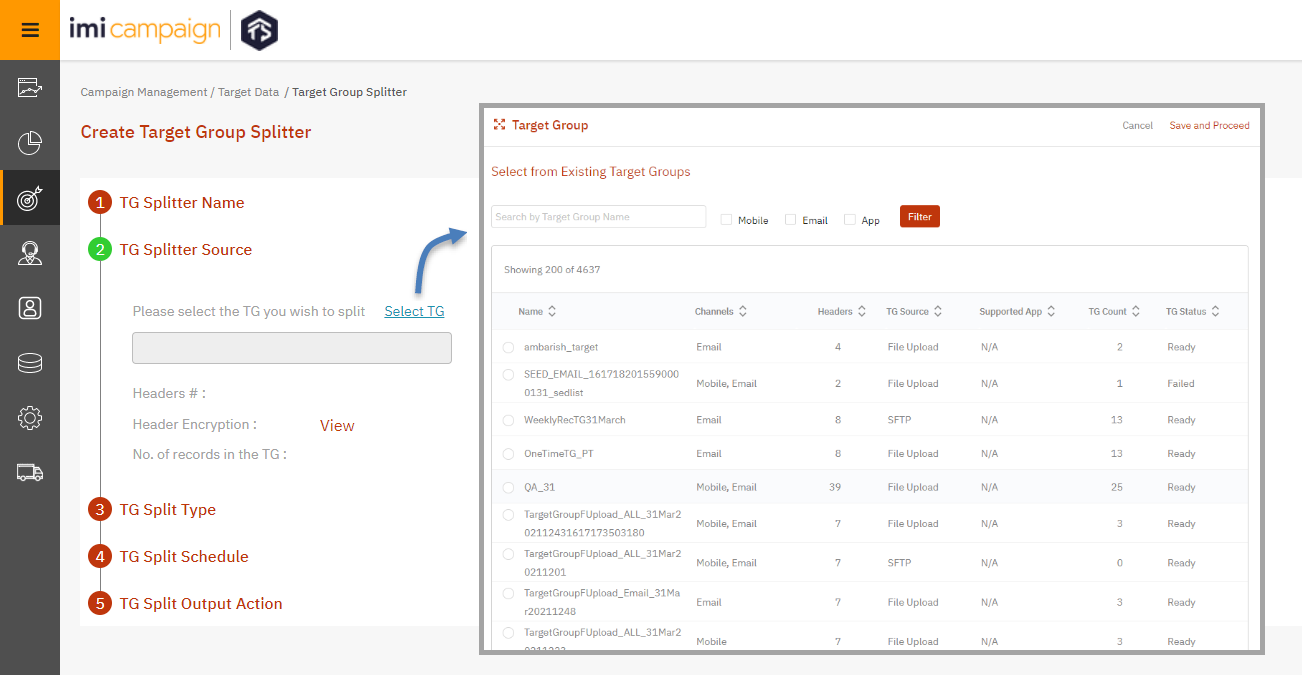
- Step 2: Select the TG you wish to split on the pop-up. The only supported TG-sources are ‘File Upload’ and ‘SFTP’.
To configure a Recurring TG-Splitter: Select a Dynamic TG
To configure a Onetime TG-Splitter: Select a Static TG
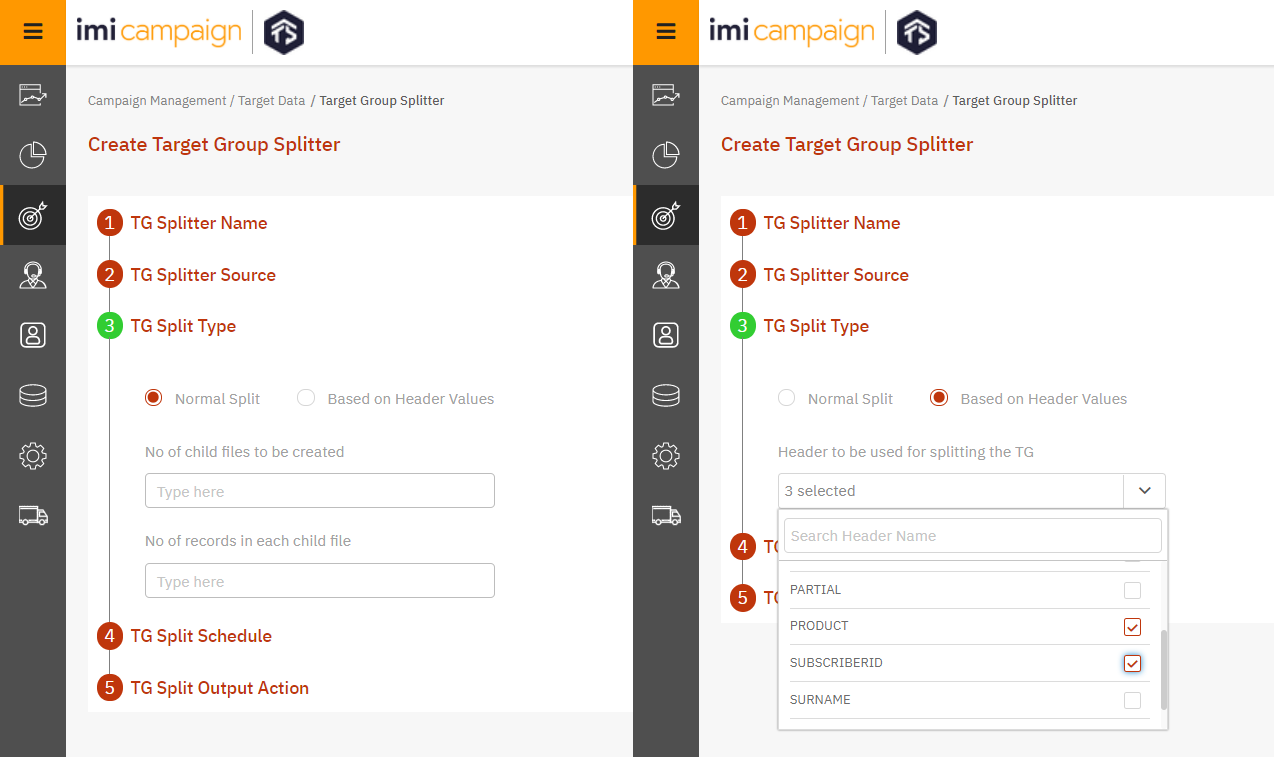
- Step 3: Choose whether the TG should be split randomly or based on the values of specific headers.
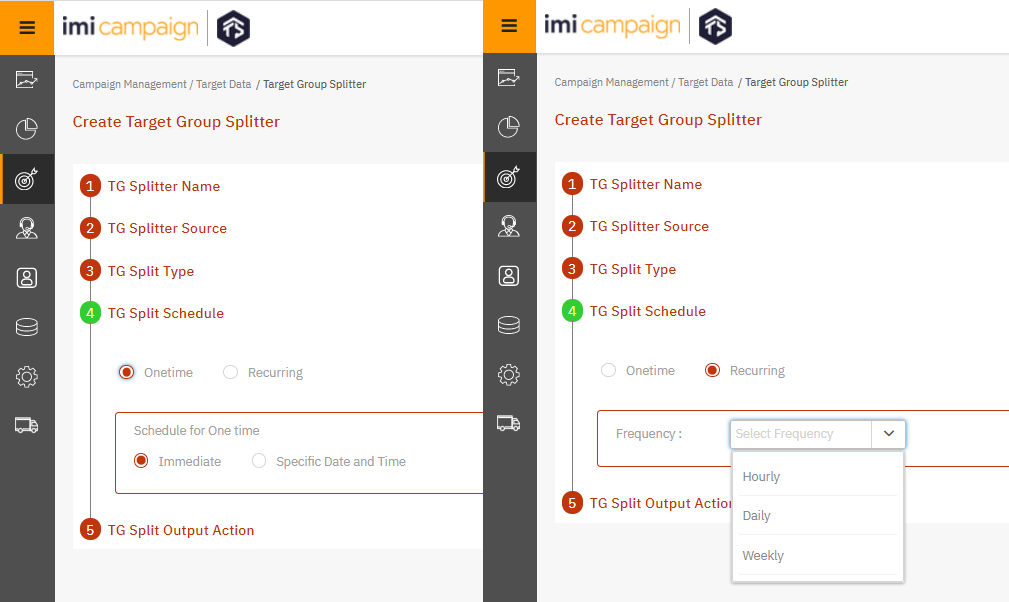
- Step 4: Choose whether the TG-Splitter should be run Onetime or on a Recurring-basis.
In case of Recurring TG-Splitter schedules, you would have selected a ‘Dynamic TG’ in Step 1. Typically, the source of such a Dynamic TG will be ‘Secure FTP’. The ‘TG Split Schedule’ that you specify in this Step 4 will be used by imicampaign to decide when to refresh the contents of the Dynamic TG that needs to be split (i.e., when to look for a new file in the specified Secure FTP location).
- Step 5: Specify what should be done with the split child TGs. The options available are different depending on whether you chose a Onetime or Recurring schedule for the TG-Splitter.
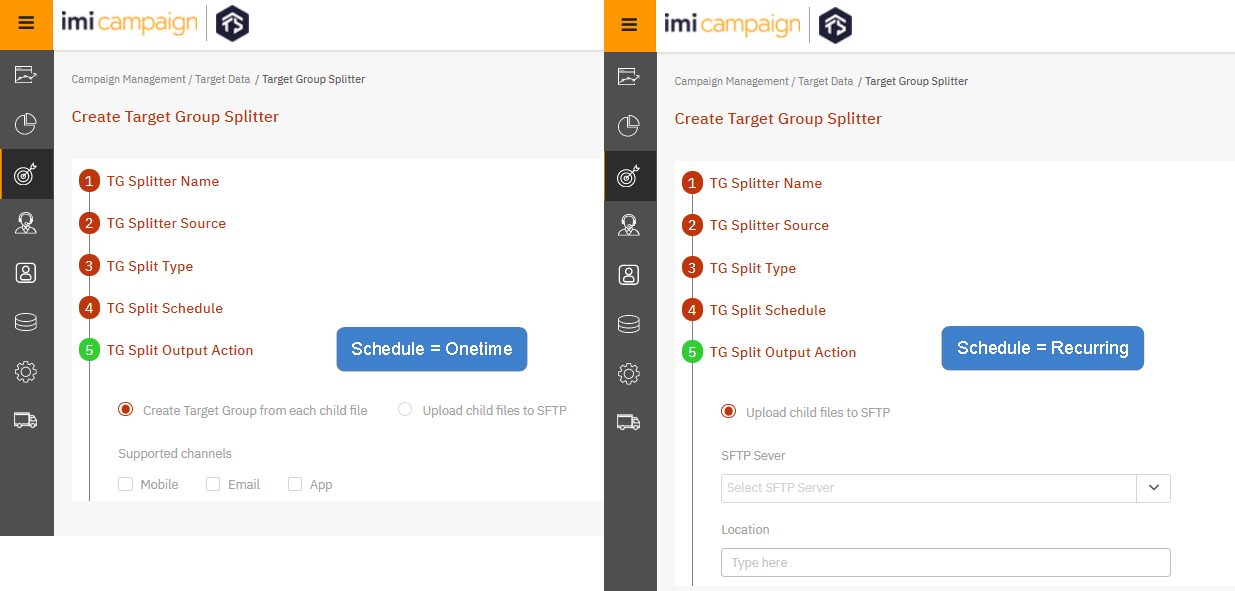
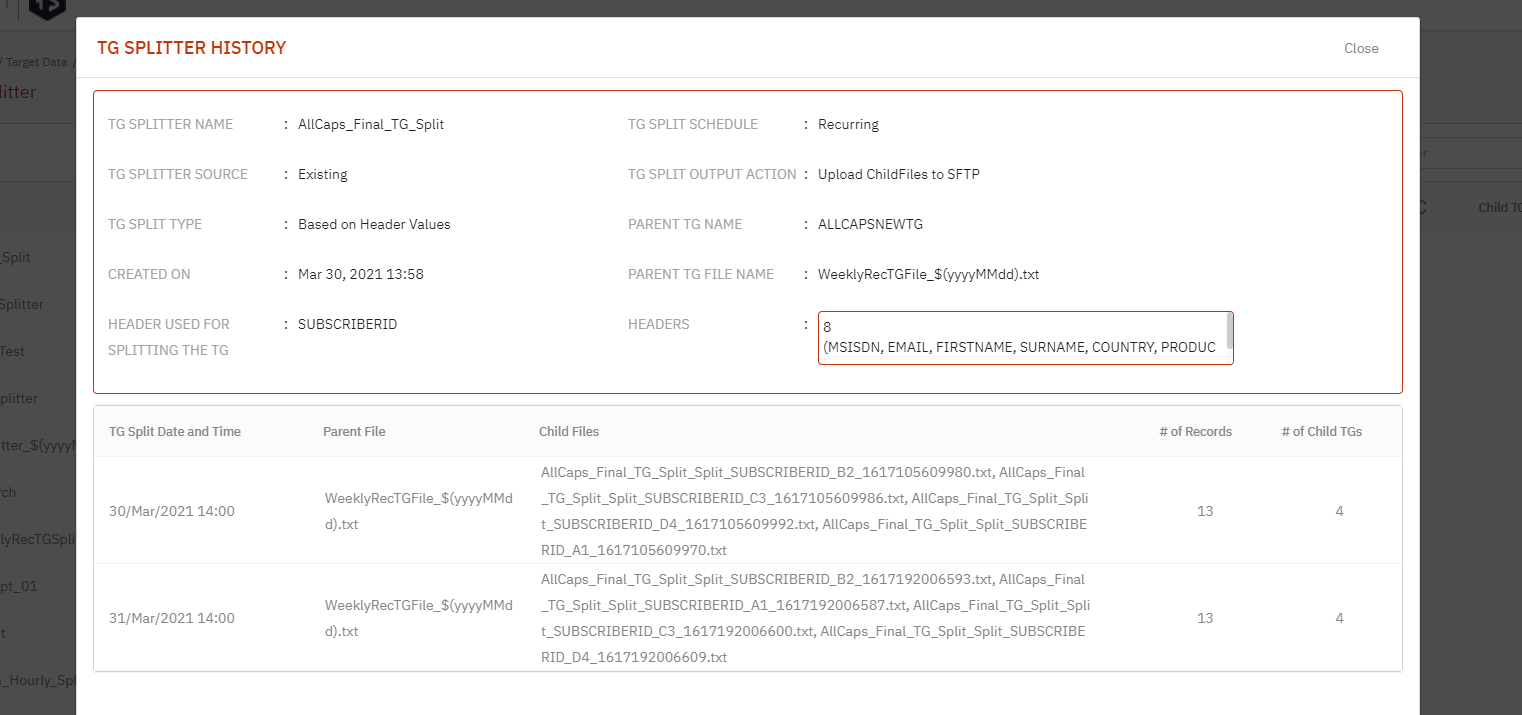
After a TG-Splitter task is configured, it can be viewed on the ‘Target Group Splitter’ screen.
- For Onetime TG Splitters, you can view the configured set up.
- For Recurring TG Splitters, you can view the history and stop the recurring schedule.

1.13 Email Channel – Improved Automatic Link Tracking
In Release 5.9, Email Automatic Link Tracking feature on the New UI has been improved as follows :
- The original HTML code created by the user will no longer be updated by imicampaign with its tracked-link URLs on the UI. The tracked-link format will be applied behind the scenes after the deployment is activated. This enhancement will save a lot of time for clients who go through multiple reviews and updates of their email content before a deployment is activated.
![]()
-
This enhancement is only applicable to the New UI. After you have pasted your email content on the New UI Email channel node, please do not open this deployment on the Old UI WHAT tab. This may cause problems in automatic link tracking.
-
On the Deployment Canvas within the Email content node, the Link Tracking section will now have checkboxes where you can indicate your choice whether a particular link should be tracked by imicampaign or not. On the Old UI, you will need to manually enter the keyword ‘notrack’ within the HTML code if you wanted a particular link to be not tracked by imicampaign.
![]()
- On the Email Preview screen, the links are now clickable so that you can easily verify before activation that links within your email will indeed redirect to the correct destination. From the Preview screen. please use the Ctrl + Click command to open the destination URL webpage for any link on a new browser tab.
![]()
1.14 Email Channel – Google Analytics UTM tags
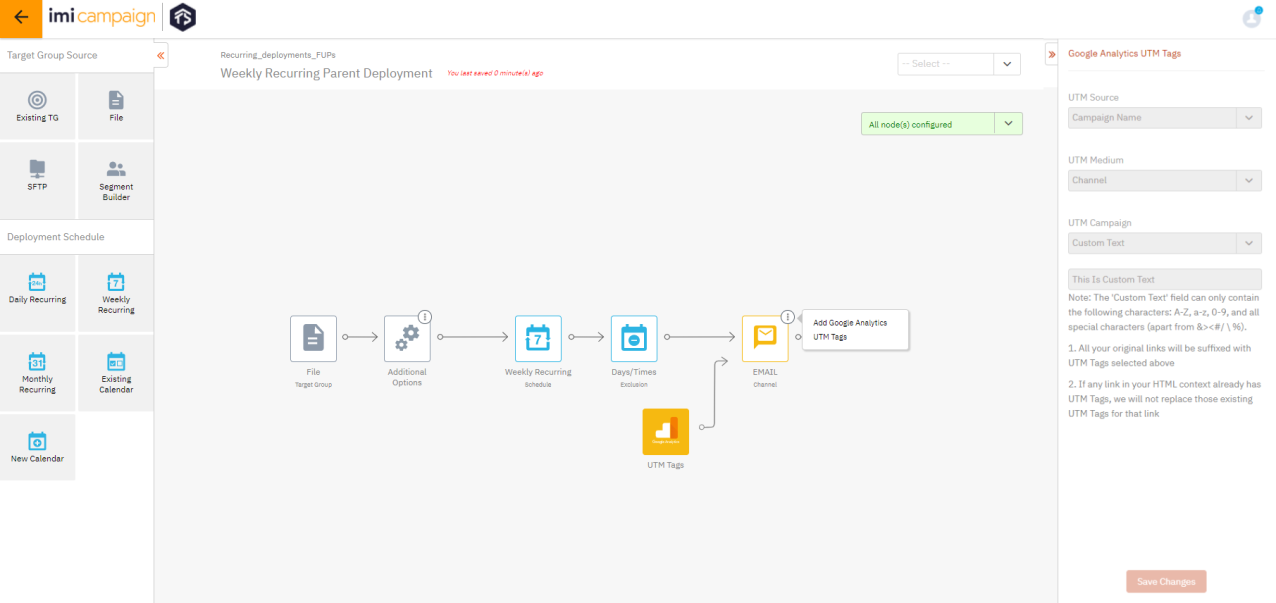
In Release 5.9, for Email channel deployments, we have introduced a new optional node for the Google Analytics UTM tags. This will allow you to (optionally) specify whether links within your email should be automatically suffixed with UTM tags and specify the format of the 3 most commonly used UTM tags, viz. UTM Source, UTM Medium & UTM Campaign.
1.15 Upload a file into a Datastore from your workstation
In Release 5.9, We have made it easier to upload a file from your local PC to populate a Datastore. Previously, you could only use SFTP, AWS S3, or Remote Databases to ingest data into a Datastore.
With this enhancement, you will be able to quickly create a Datastore and upload data into it if you have the data available on your local workstation (PC / Mac). You can then use that Datastore for building Customer Audience Segments without any need to configure SFTP locations or Remote Databases.
While adding a new Datastore, you will now see a new option to add “From File”.
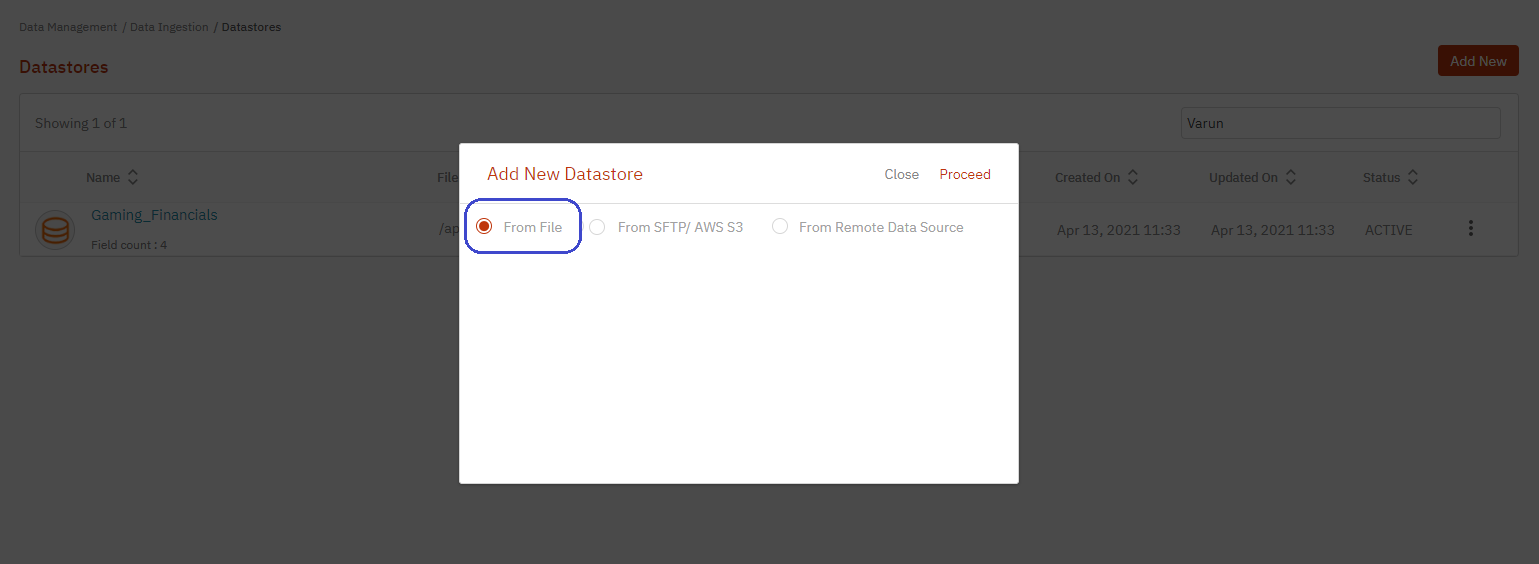
Here’s how this feature will work in short :
- You will need to load a sample file while adding a new Datastore. This sample file will be used to identify and define the Datastore columns and their datatypes. You can edit these imputed values and define further configurations such as Encryption for the Datastore columns, as needed.
- After adding the Datastore, you can use the “Import File” option from the 3-dot menu to upload data using the file, one or more times, into the Datastore.
- Optionally, you can click on the “View Report” option from the 3-dot menu. This will open the “Datastore Load Report” where you will be able to see the status of data loads into the specific Datastore. Only data for the last 7 days is shown by default in the Datastore Load Report.

1.16 App Push Channel Deployments
In Rel 6.0, we introduced the ability to configure App Push Channel deployments on the New UI.
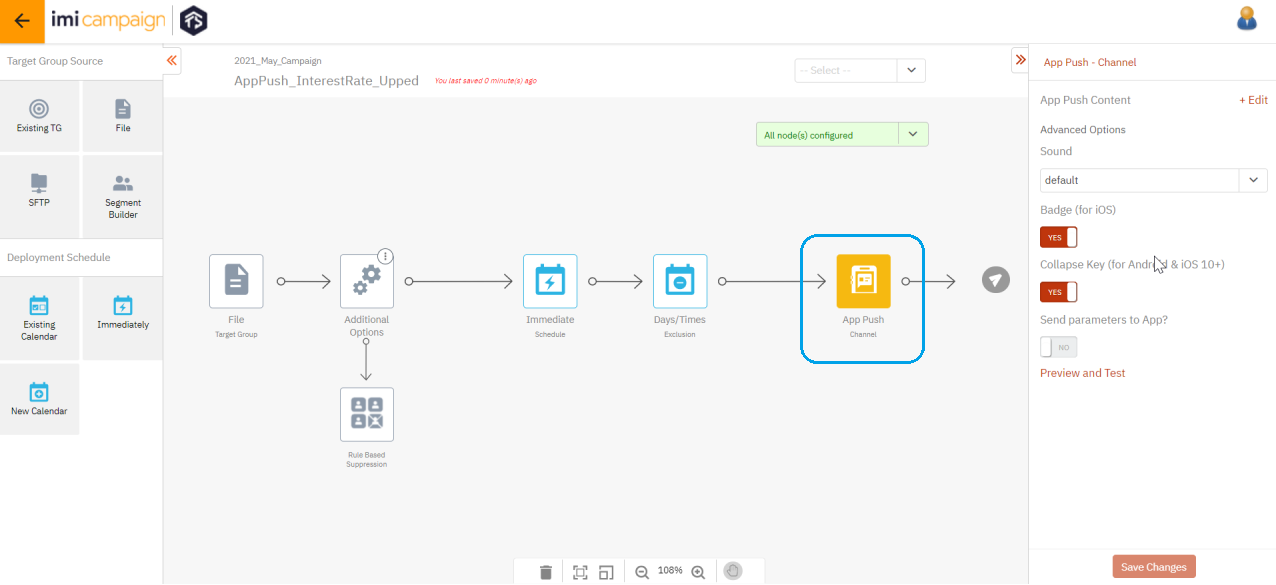
We also made improvements behind the scenes for the App Push channel whereby a separate ‘Service’ is no longer created in imiconnect corresponding to each App Push deployment within imicampaign.
1.17 External Action Channel Deployments
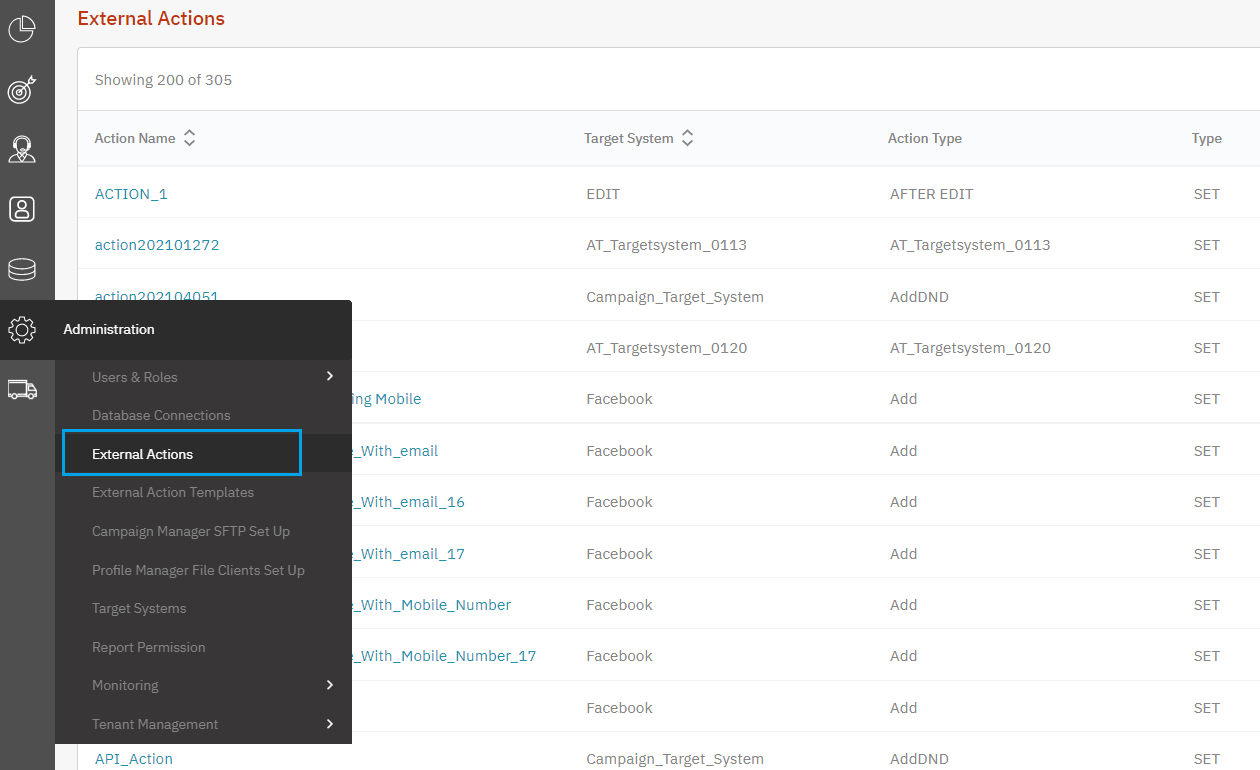
With this release, you can now configure External Action deployments on the New UI for MarTech Integration purposes.
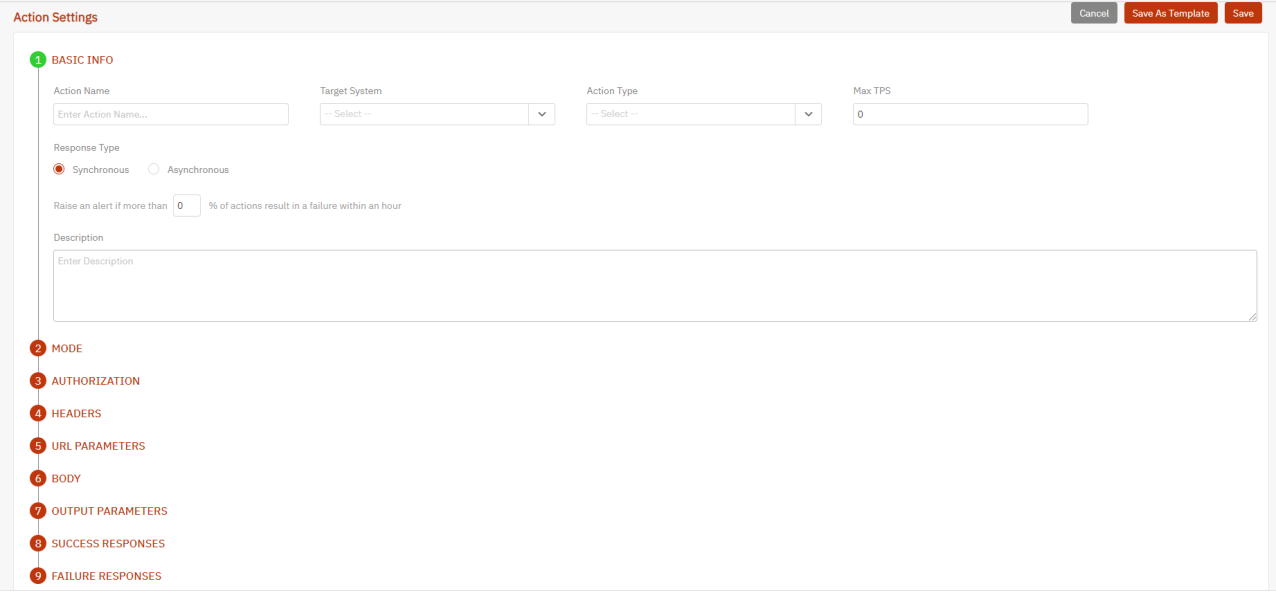
You can configure the Ext Action (API) endpoint and parameters here: Administration >> External Actions
And then configure the Action Settings:
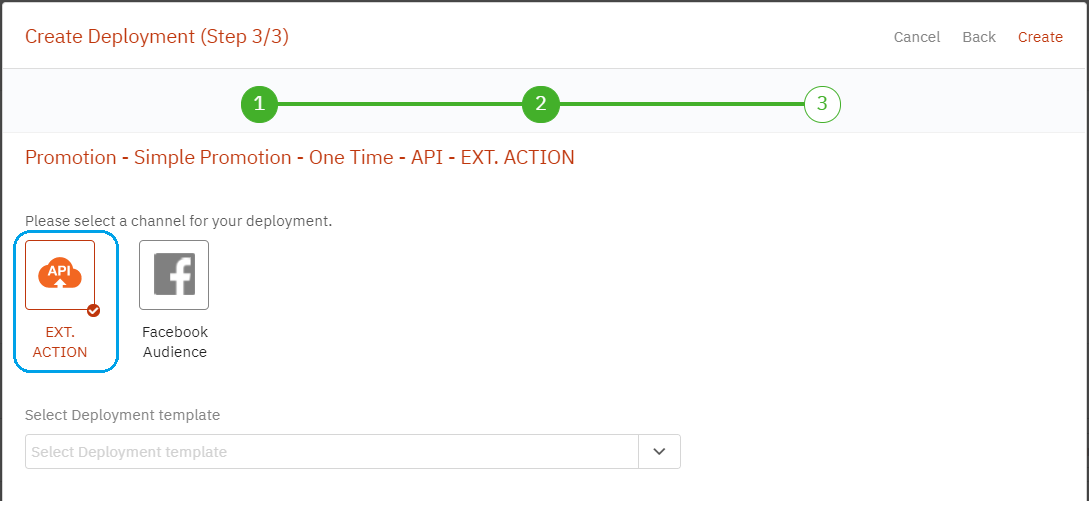
Ext. Action Deployment Creation:
a) Create a deployment and select ‘Content Type’ as API in Step 2
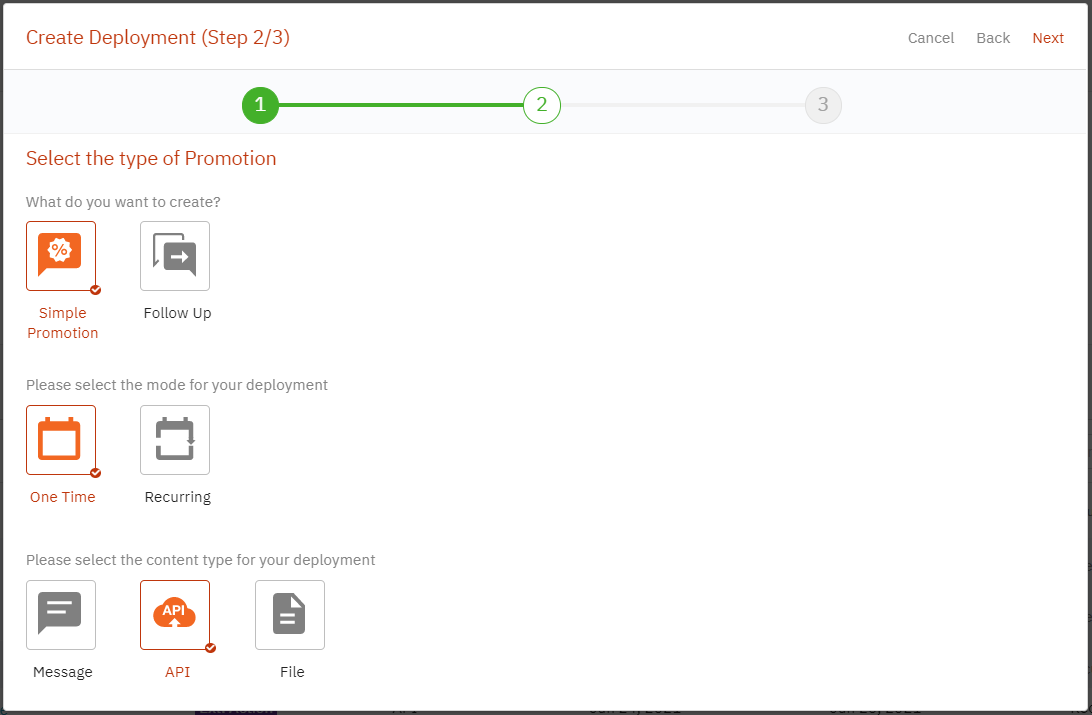
b) Select ‘Ext Action’ channel in Step 3.
c) On the Deployment Canvas screen, you will have the option to either choose an existing TG or use Segment Builder to create a Target Group.
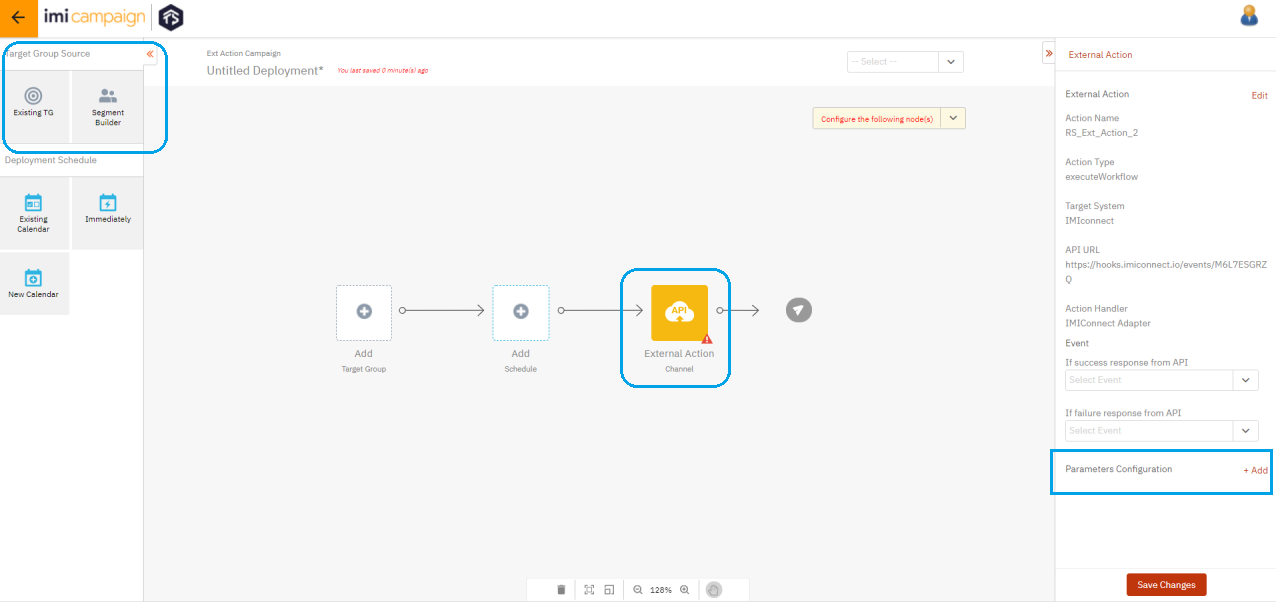
Click on the ‘+Add’ button for Parameters Configuration.

1.18 File Transfer Channel Deployments
In Release 6.0, we introduced the ability to configure File Transfer channel deployments on the New UI for MarTech Integration purposes.
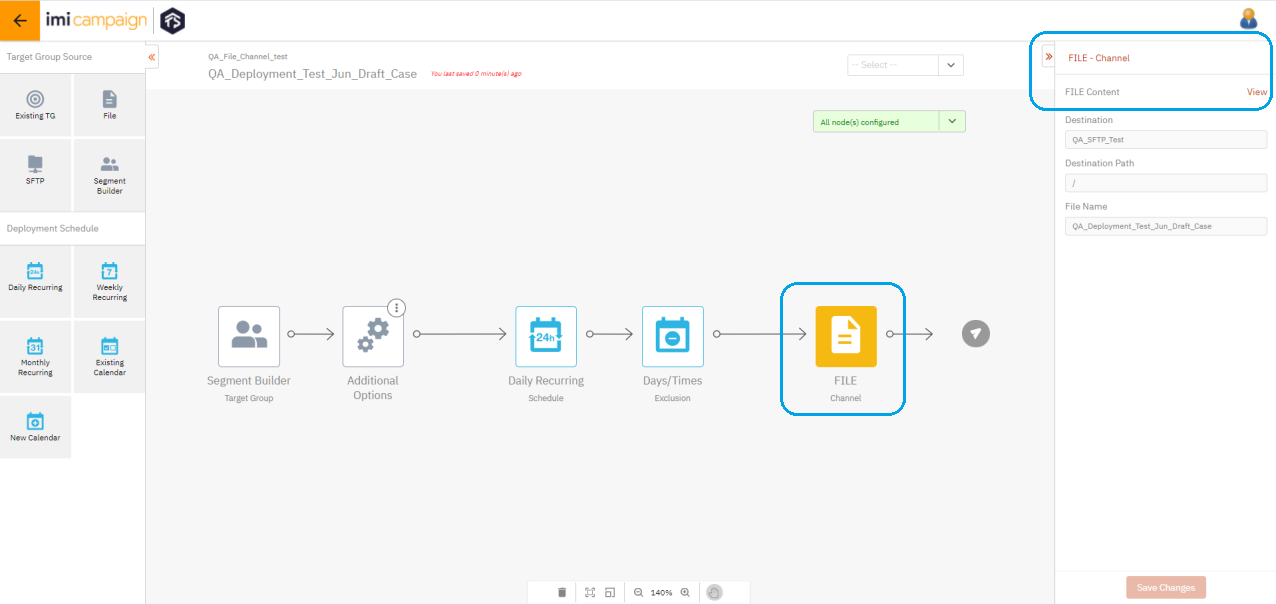
After selecting the File channel node, you can view / edit the list of headers within the file. This is where you also configure the File Name and the SFTP.
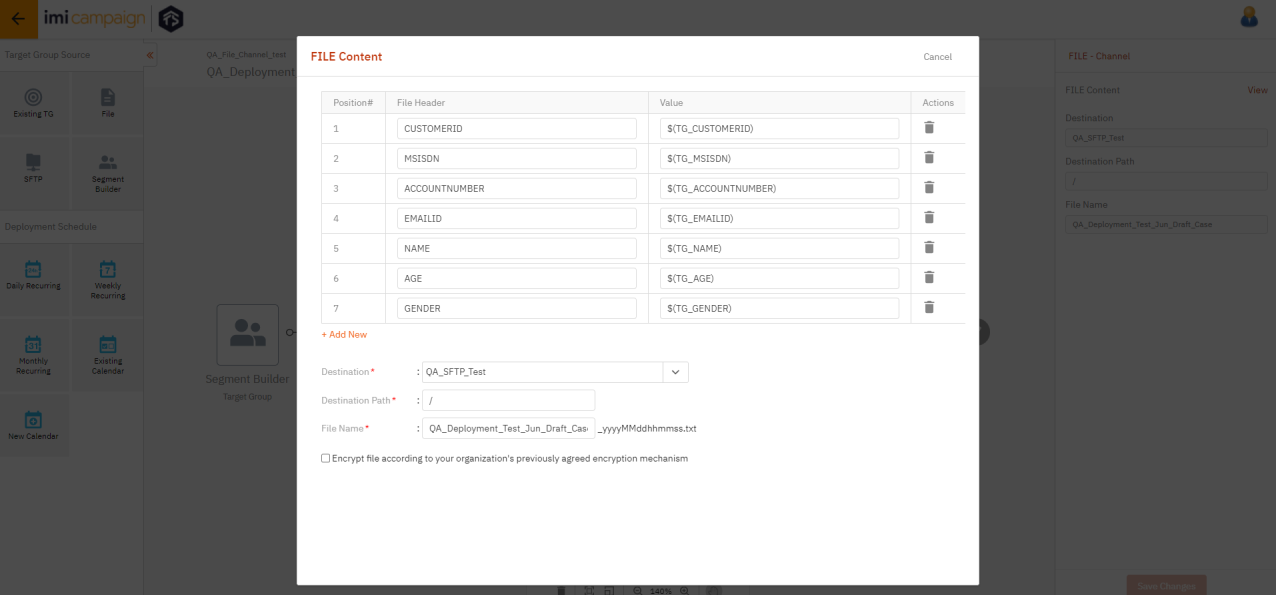
1.19 Facebook Custom Audiences Channel Deployments
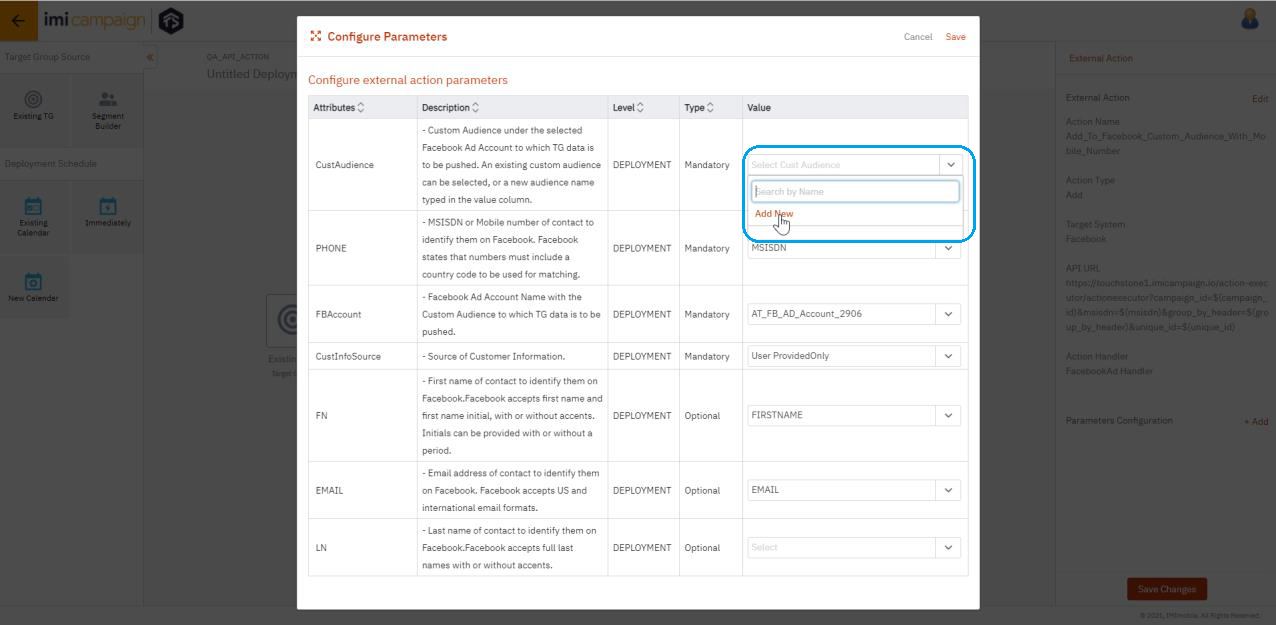
In Release 6.0, we introduced the ability to configure Facebook Custom Audiences channel deployments on the New UI for MarTech Integration purposes.
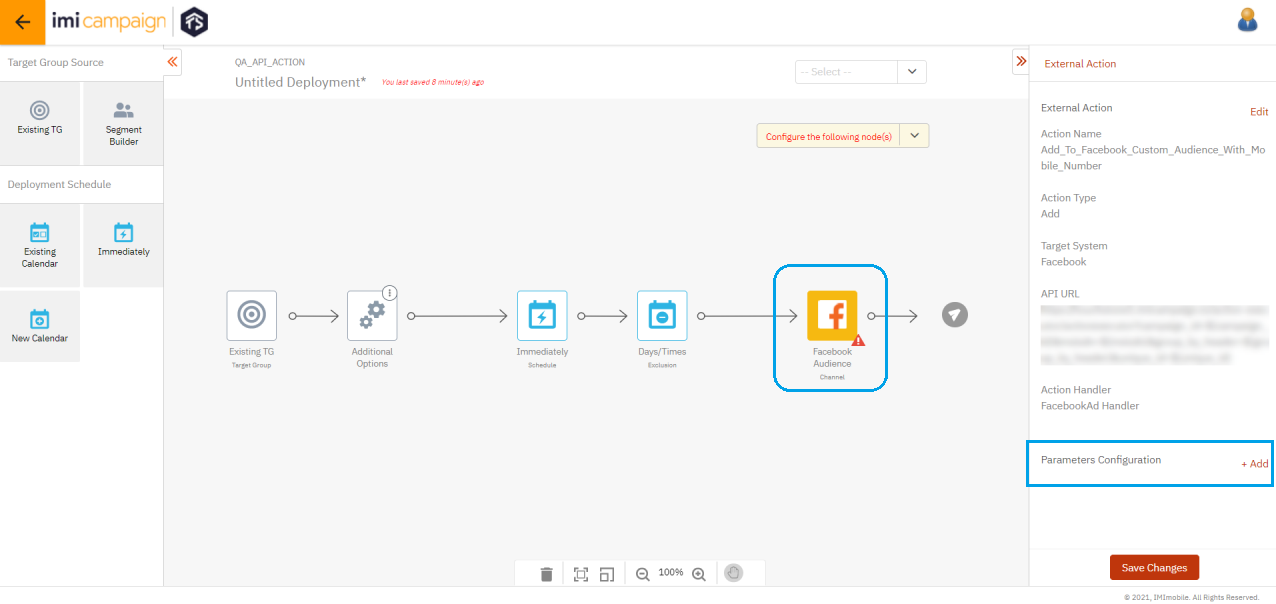
Click on the ‘+Add’ button for Parameters Configuration, where you can define a new Facebook Custom Audience or choose to upload the TG to an existing Custom Audience.
1.20 Deployment Approvals
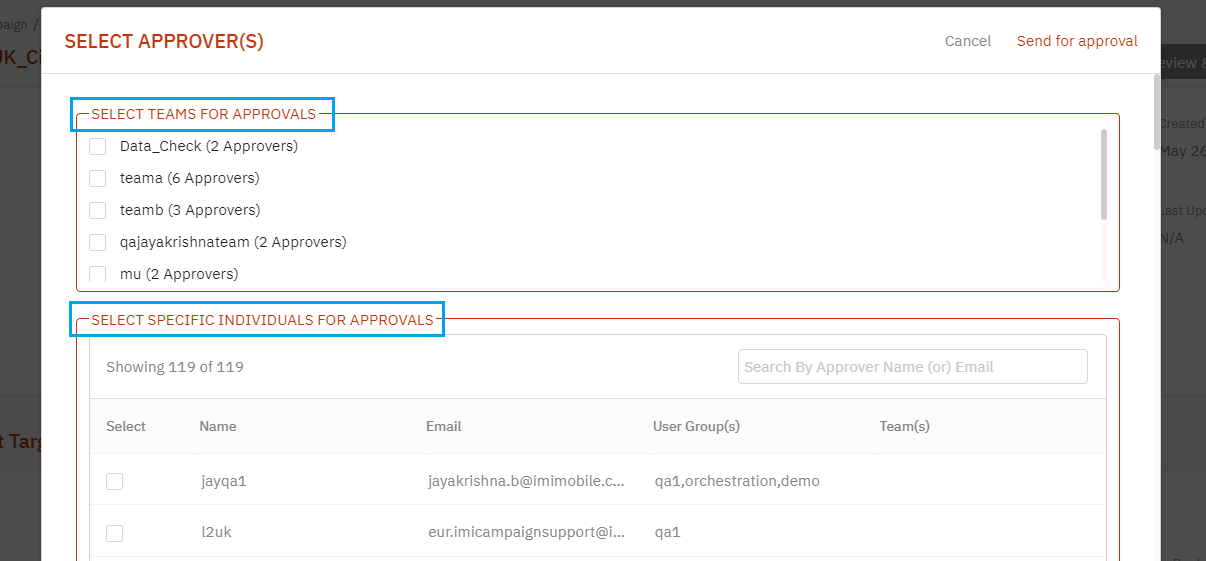
If a user does not have the permission to approve their own deployment, then they will see a ‘Send for Approval’ button (instead of the ‘Activate’ button).

The ‘Deployment Creator’ will then be able to designate ‘Individual Approvers’ or ‘Approval Teams’ for approving the deployment.
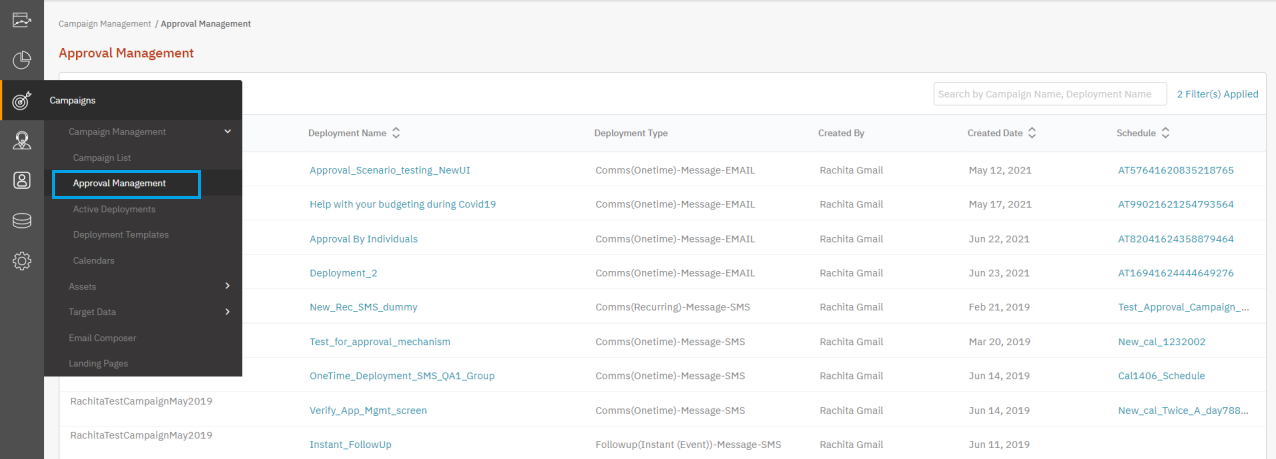
Once a deployment is sent for approval, the designated approvers will then be able to access it from the ‘Approval Management’ screen.
On clicking the deployment name, the approver will be taken to the deployment summary screen to review, where they can approve or reject the deployment as appropriate.

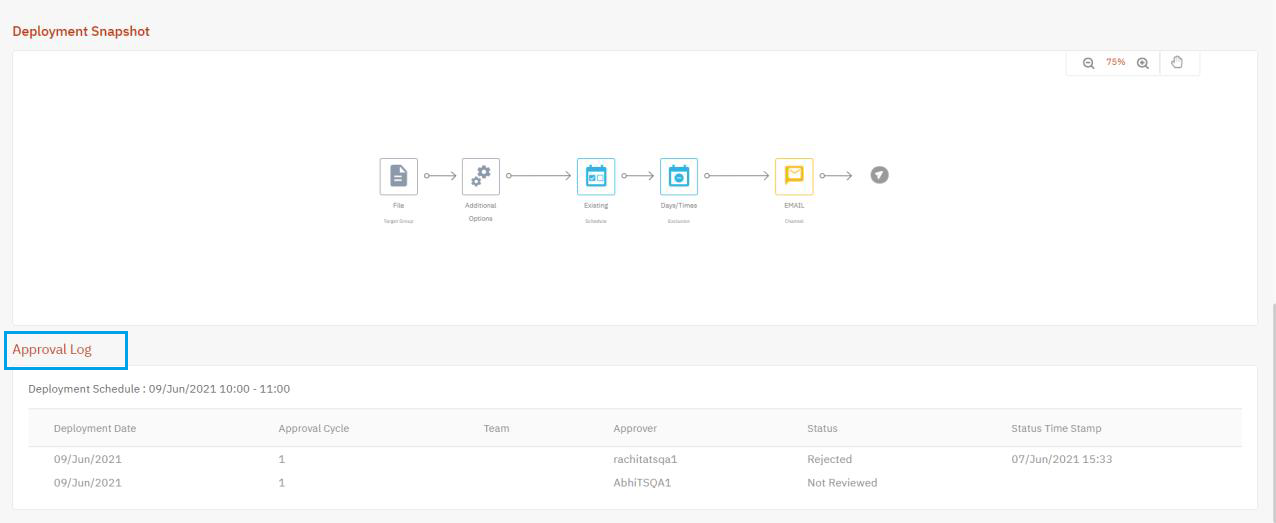
The ‘Approval Log’ will be available to view on the Deployment Summary screen.
1.21 Instant Deployment: 'Send Test Message' in Draft state
In Release 6.0, we introduced the ability to test the message copy for Event-triggered and MO-triggered Instant Deployments while they are in ‘Draft’ state.
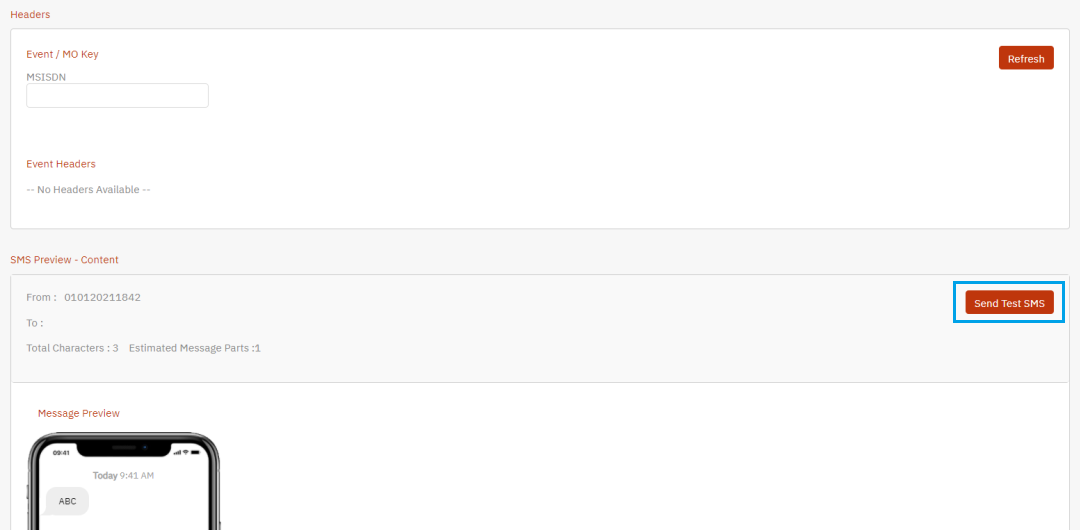
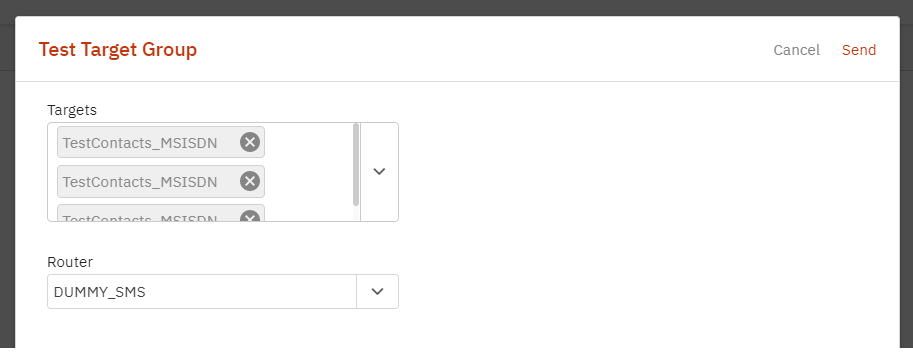
On clicking Send Test SMS button, you will be asked to select pre-existing test contacts and SMS router and be able to send the test SMS
1.22 Auto Generation of Email Tests: Generate PDF copies
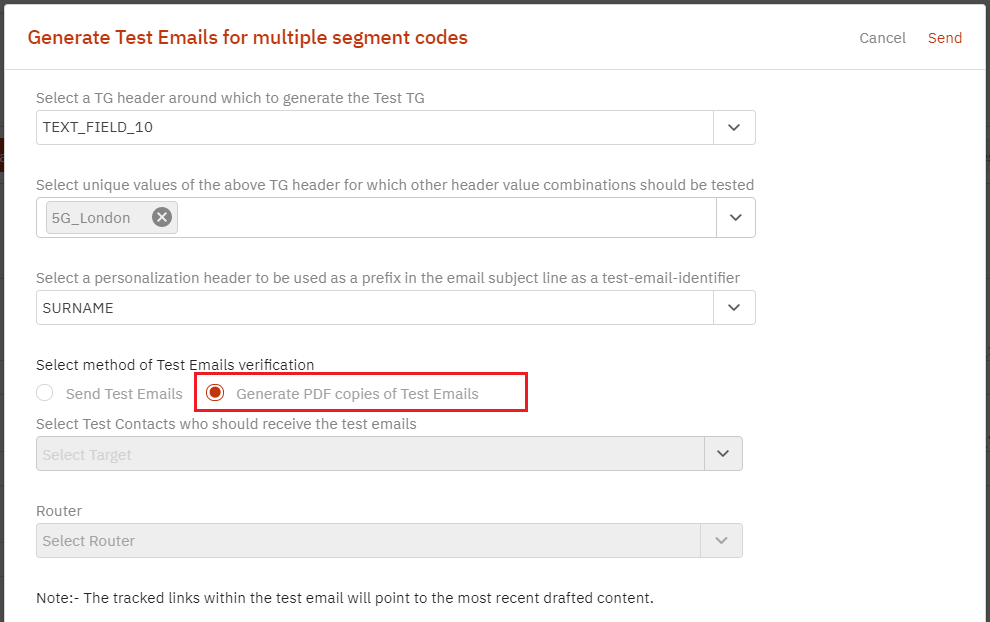
In Release 6.0, we introduced the option of generating PDF copies of your conditional test variants instead of sending test emails.
This is a tenant-specific feature.
In Step 2 of the process, if you choose ‘Generate PDF copies’ as the method of ‘Test Emails Verification’, the router and the test contacts dropdowns will be greyed out.
You will be sent an email notification when the backend process is completed, and the PDF copies are ready to be downloaded from the UI.
Button #4 ‘Download PDF Copies of Test Emails’ will be enabled on the Preview Screen.
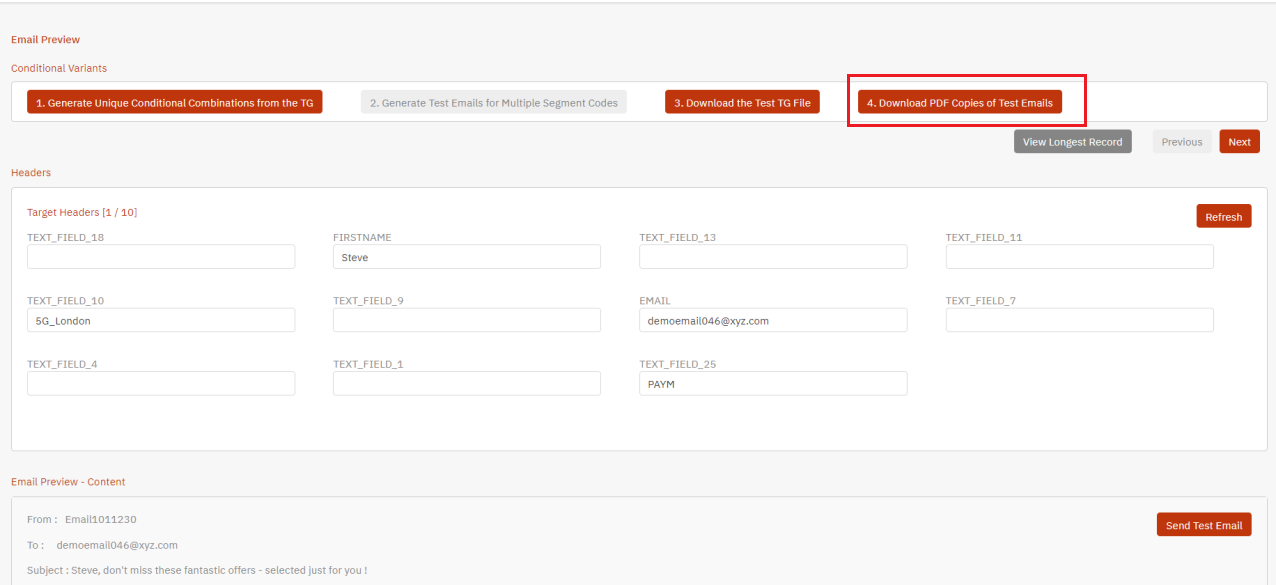
On clicking Button 4, PDF copies will be downloaded as a zipped folder with individual PDF files.
The PDF files will contain the Sender ID and Subject along with the personalized test variant content.
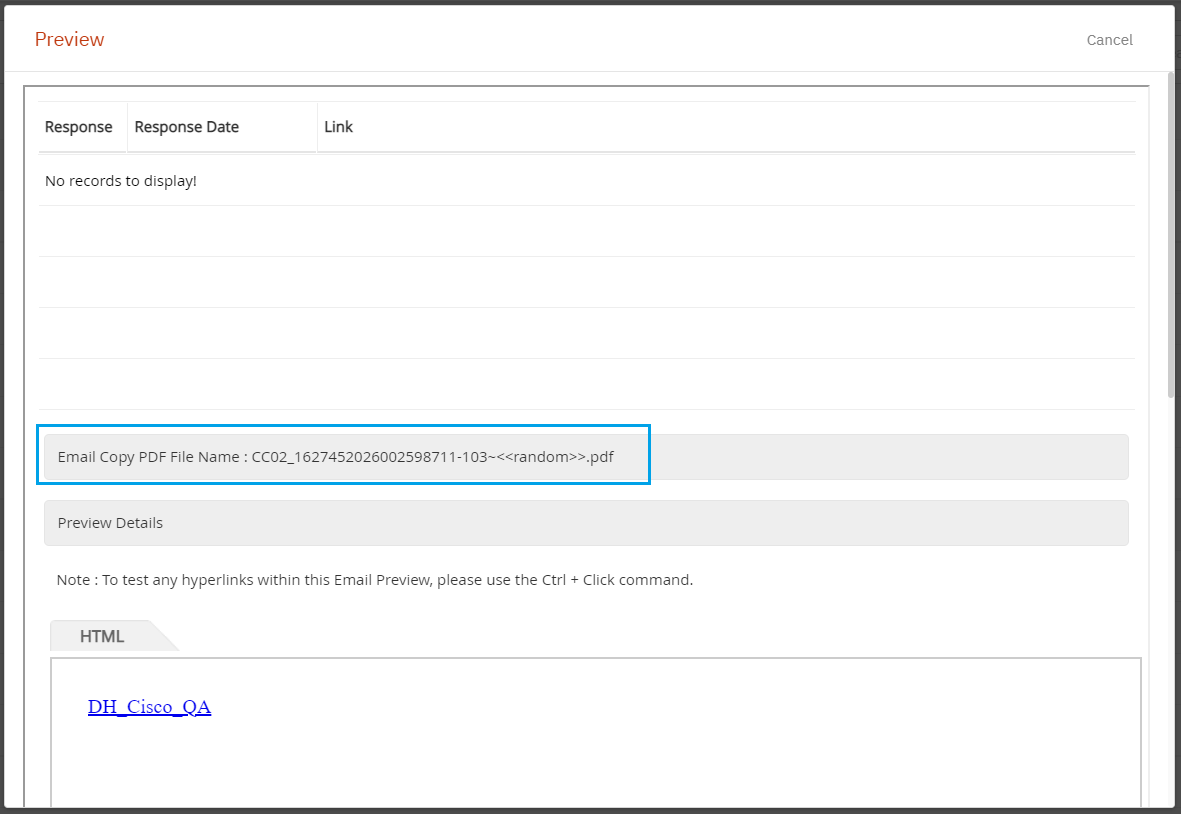
1.23 New in Rel 6.0.1: Auto Generation of Email Tests: Show PDF copy file name on Customer Care screen
This is a tenant-specific feature. If you have this feature enabled, then the name of the PDF filename (for a specific email recipient) will be displayed on the Customer Care screen. This will make it easier to locate that specific PDF file in case of a query about the email sent to a specific customer.
1.24 New in Rel 6.0.1: Auto Generation of Email Tests: Now possible in ‘Paused’ status
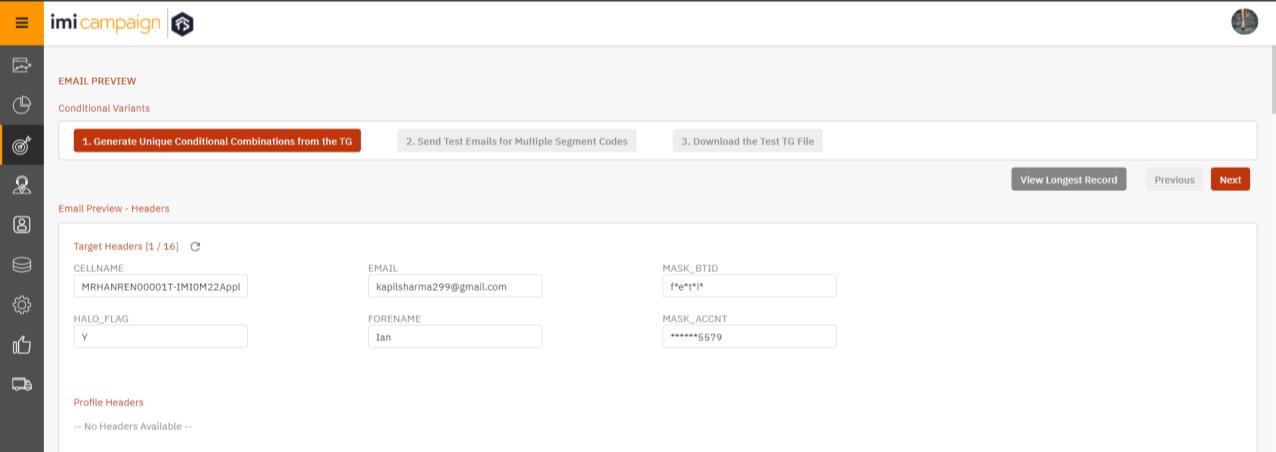
Auto-generation of test cases for email conditional content has now been extended to Onetime Promotions and Follow-up deployments in ‘Paused’ status. Previously, this was only available for ‘Draft’ Deployments. If you need to pause your conditional deployments and amend the content, you will now be able to generate conditional test variants and send the test emails to your chosen test contacts.
The Target Groups used for generating the unique combinations will be the original TGs used for Onetime and Follow Up deployments. It is not possible to update the Target Groups or use the 'Prepare TG' feature in case of paused deployments.
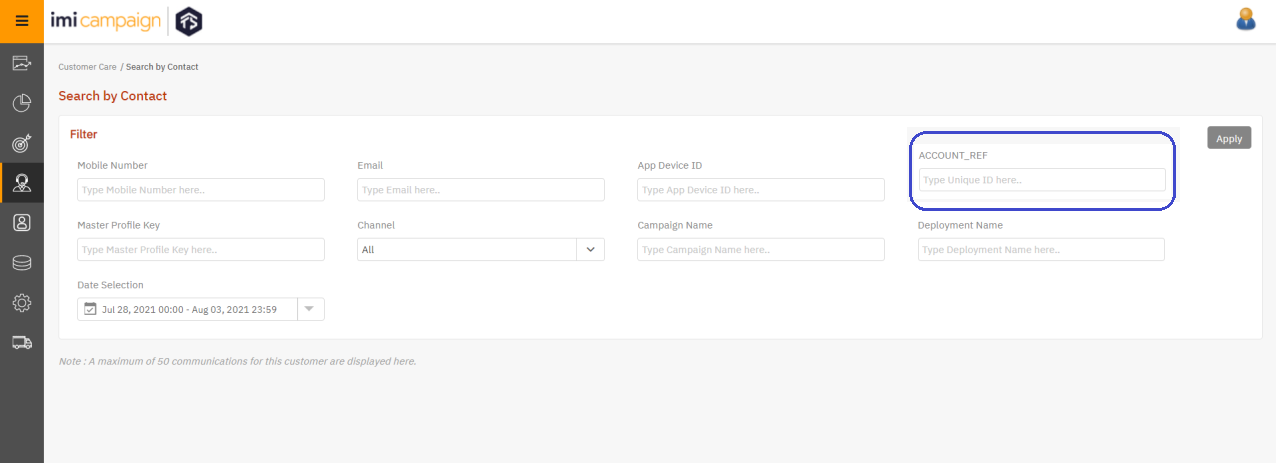
1.25 New in Rel 6.0.1: Customer Care screen: Search by Unique Customer ID
You will now be able to (optionally) designate a header to be the ‘Unique Customer ID’ for all target groups. This header will be available on ‘Customer Care’ screen. You will be able to search for the communications sent to a particular Customer ID without actually entering Emails or Mobile Nos. on the Customer Care screen.
Usage Notes :
- Please contact your local imimobile Client Success team if you would like to designate such a mandatory ‘Unique Customer ID’ header for all your Target Groups.
- Once you designate such a mandatory header for your TGs, then imicampaign will reject TG records which do not have this header.
In the below example screenshot, the client has designated ‘ACCOUNT_REF’ as the mandatory unique customer identifier which will be present in all their Target Groups.
1.26 New in Rel 6.0.1: Approval Management : Ability to filter by 'Approvers'
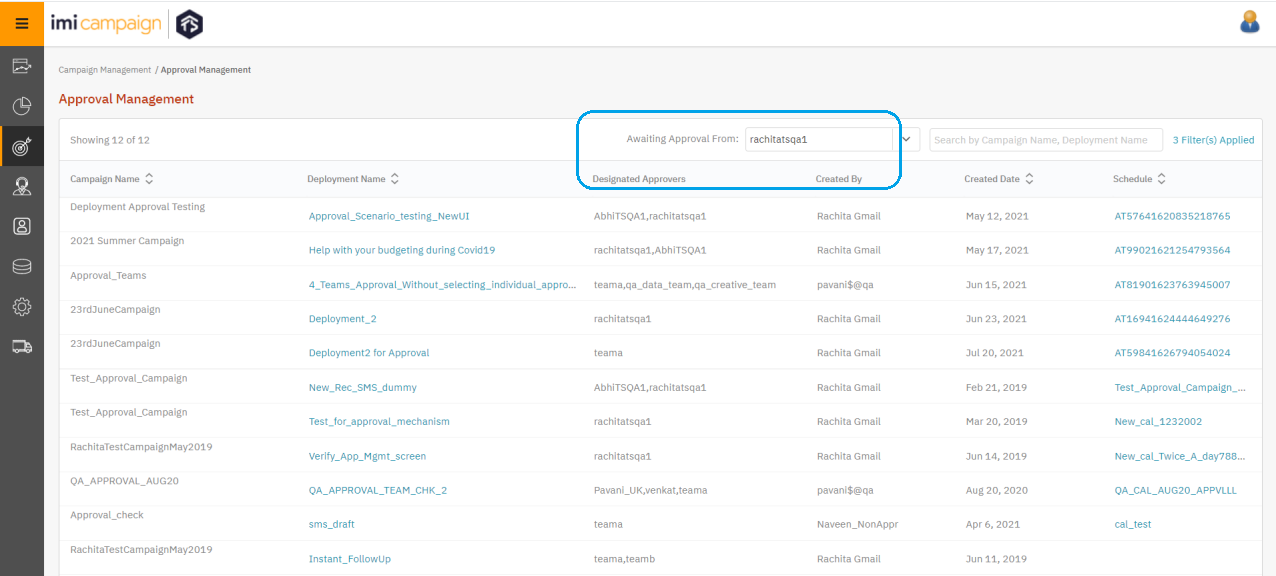
A new filter ‘Awaiting Approval From’ is now added on the ‘Approval Management’ screen. By default, the logged-in user will be selected. The list of deployments will include all deployments where the selected approver is either an ‘Individual Approver’ or a ‘Part of a team’.
1.27 New in Rel 6.0.1: Support for Microsoft Edge browser for the New UI
With this release, you will be able to use Microsoft Edge browser for the imicampaign New UI (in addition to the Google Chrome browser).
1.28 What’s not yet available on the New UI in this 6.0.1 release
With this Rel 6.0.1, nearly 99% of imicampaign features are now be available on the New UI. However, the following features used by a very small number of clients are not yet available on the New UI.
Campaign Manager module:
• Landing Pages: If you have ‘delegated your custom domain’ to imicampaign for the purpose of hosting your landing pages (which means your landing pages are hosted on a URL such as https://some-subdomain.client-xyz.com) , then you will need to continue to use the Old UI just for the task of configuring your landing pages. ( “Campaign Management >> Assets >> Landing Pages >> +Add New” ).
We are planning to introduce this feature on the New UI in the next release 6.1.
For all other tasks apart from the above, you can use the New UI.
If you have not ‘delegated your custom domain’ (which means your landing pages are hosted on a URL such as https://client-xyz.imicampaign.io/ ), then you can configure your landing pages on the New UI.
• Voice Channel Deployments: If you use imiconnect v5.x or legacy Da-Vinci Voice Platform tool to create your voice-flow menus, then these are not yet supported on imicampaign’s New UI. We are planning to introduce support for imiconnect v5.x voice-flows in release 6.1 or 6.2. So as of release 6.0.1, voice channel deployments are supported only with voice-flows created in imiconnect v4.x.
2.0 Profile Manager Module on the New UI
In Release 6.0, most of the features of the Profile Manager module were made available on the New UI. The following screenshots provide a glimpse of some of these Profile Manager features.
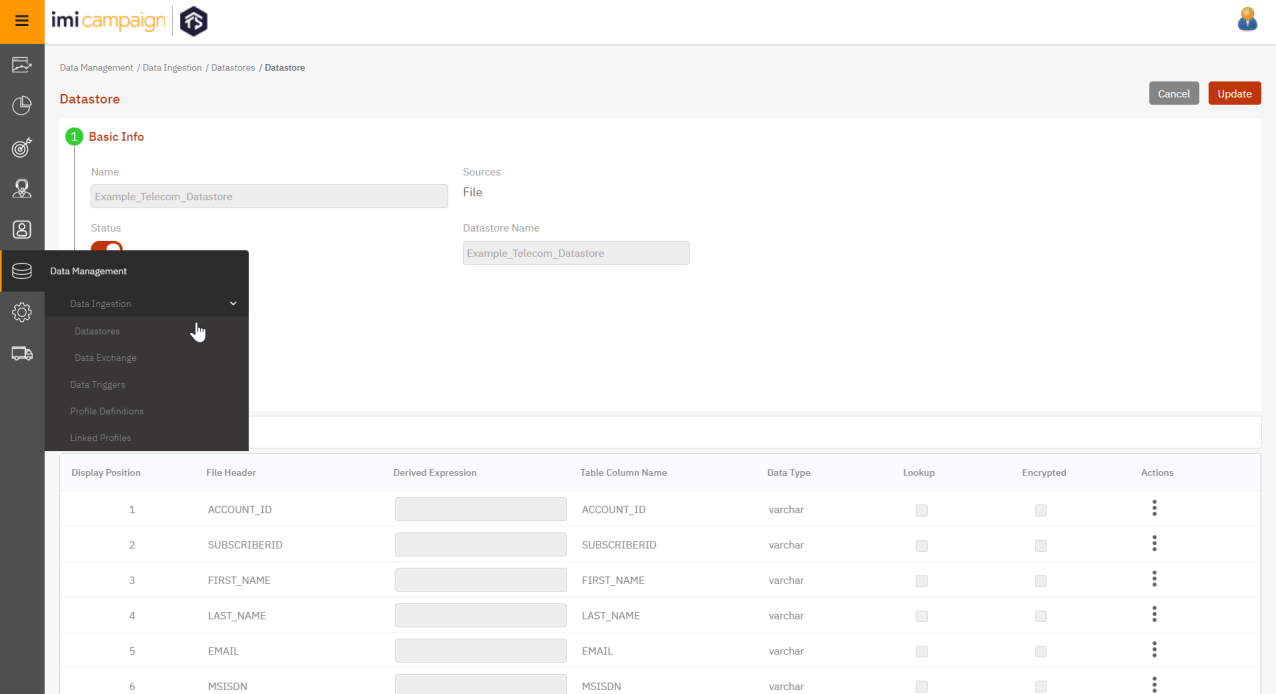
2.1 Data Ingestion, ETL, and DataStores
These features are available under the ‘Data Management’ menu.
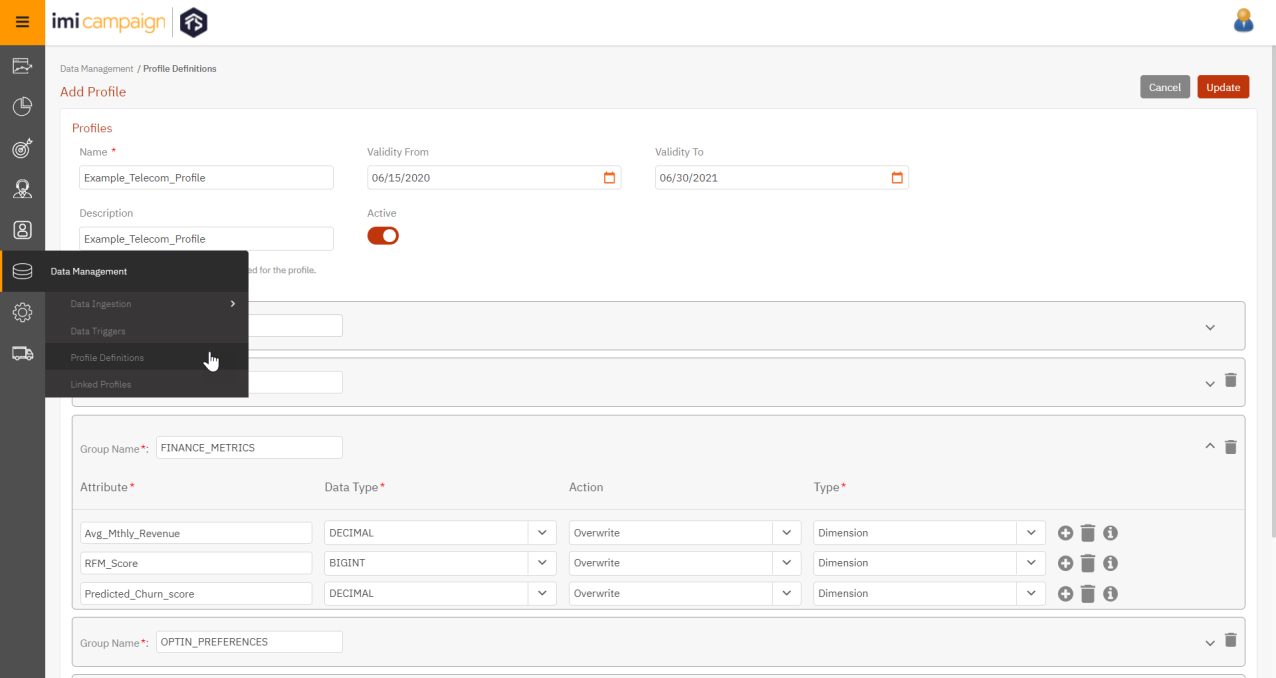
2.2 Profiles
The ‘Profile Definition’ feature is also available under the ‘Data Management’ menu.
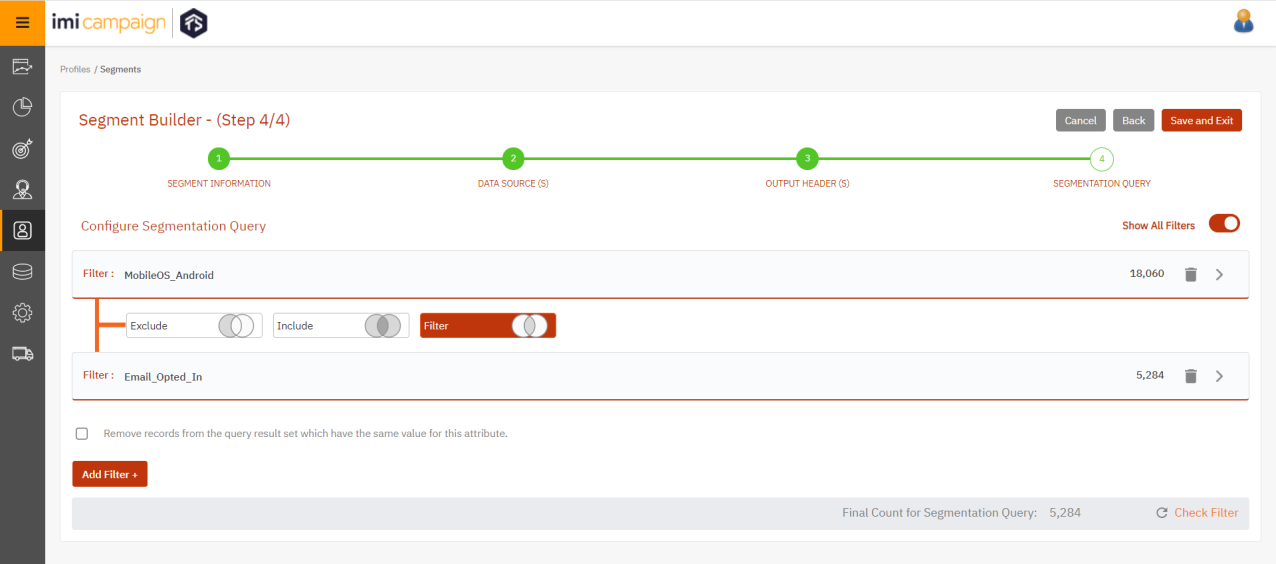
2.3 Segment Builder
This feature is available under the ‘Profiles >> Segments’ menu.
3.0 Dashboard & Reports enhancements
In this 6.0.1 mini-release, we have made a few small behind-the-scenes enhancements to the Dashboard & Reports modules to improve the performance and speed.
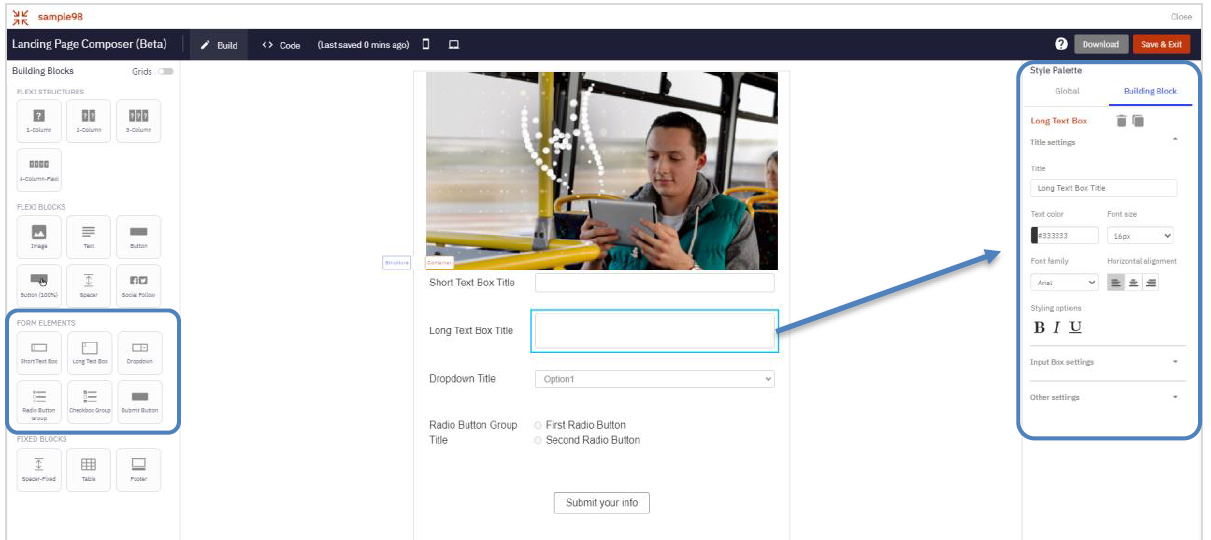
4.0 Drag-&-Drop Landing Page Composer (Beta)
In Release 6.0, we introduced the new Drag-&-Drop Landing Page Composer. In the current 6.0.1 mini-release, we have made a few minor improvements to this feature behind-the-scenes.
5.0 Drag-&-Drop Email Composer enhancements
In this 6.0.1 mini-release, we have made the following enhancements to the Email Composer module.
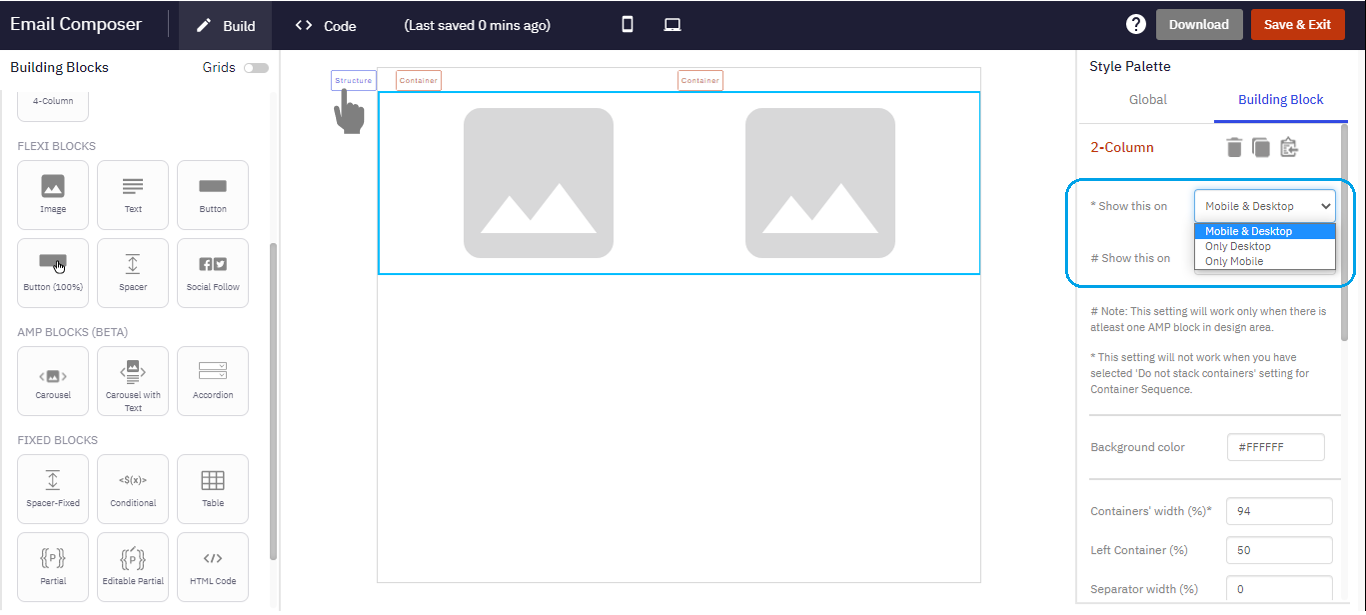
5.1 Hide 2-Column & 3-Column Structures on Mobile / Desktop
You will now be able to configure a setting for the 2-Column and 3-Column Structures which will allow to hide these Structures on Mobile or Desktop or both types of email clients. This same setting was introduced for the 1-Column Structure in the previous release 6.0.
This setting will be available in Style Palette when you click on Structure label for 2-Column and 3-Column Structures.
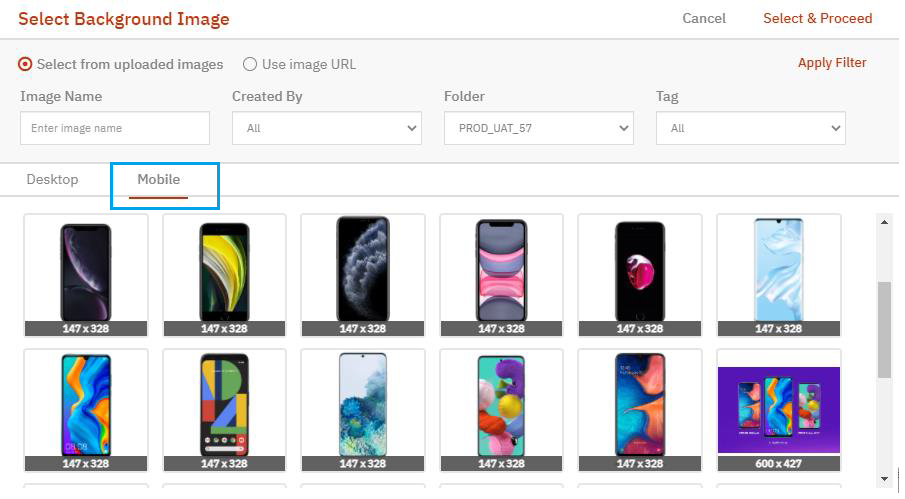
5.2 Add a different background image for mobile email clients
You can now configure a different ‘background image’ for mobile email clients and desktop email clients. This setting is available for 1-Column, 2-Column, and 3-Column Structures.
5.3 Buttons with curved edges in Outlook Desktop app
For the ‘Button’ and ‘Button (100%)’ building blocks, we have introduced a setting which will render curved edges in Outlook Desktop apps. Previously, buttons were always rendered with sharp right- angles in the Outlook Desktop app.
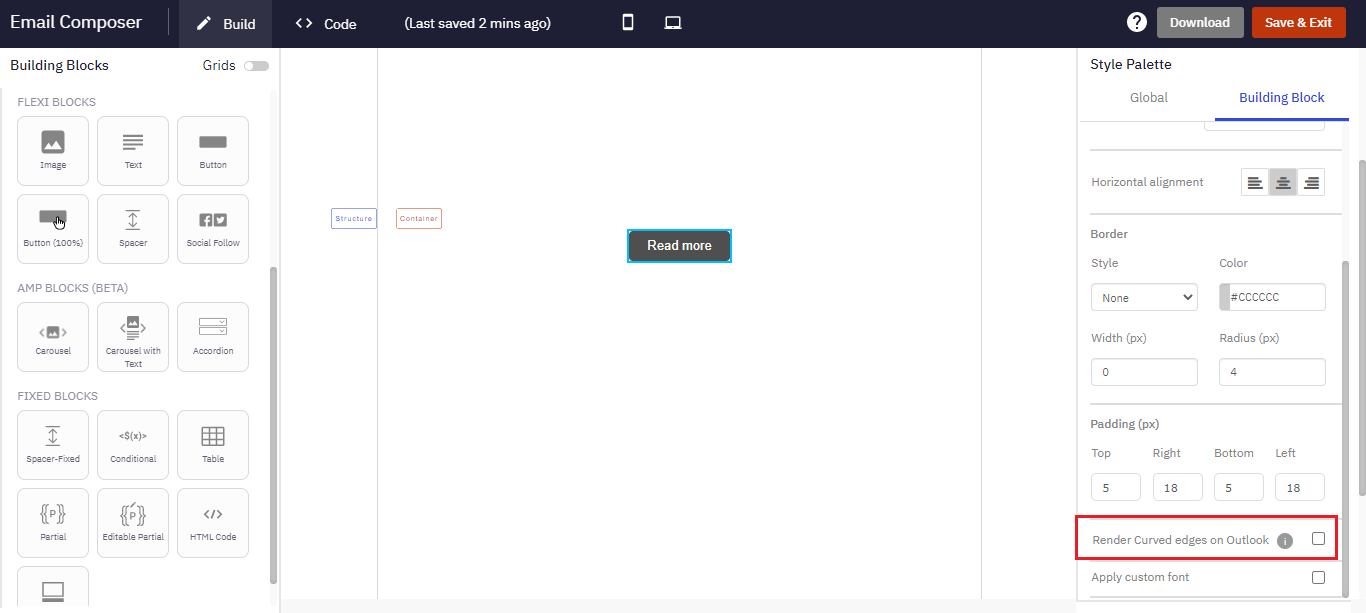
Usage Notes:
- If this setting is enabled, it will not be possible to track link clicks on this button which occurs on the Outlook Desktop app. This limitation is because we need to apply VML tags (instead of standard HTML tags) to render the curved edges of the button on the Outlook Desktop app.
- If you enable this setting for a ‘Button’ or ‘Button (100%)’, then please do not use a ‘Background Image’ for the Structure containing this button; otherwise there is a risk of the email being rendered in a distorted fashion.
5.4 Support for Dynamic Partials within the Email Composer
‘Dynamic Partials’ have been used by some of imicampaign clients for a long time to deliver a highly personalized ‘segment of one’ email experience to their customer base. However, until now this capability was available only if you developed your email HTML code outside of imicampaign and copy-pasted it within the HTML Editor.
With this Rel 6.0.1, you can also use this powerful feature within the Email Composer. We have introduced a new setting for the ‘Partial’ building block which will allow you to use ‘Dynamic Partials’. This setting is available in the ‘Select Partial’ pop-up.
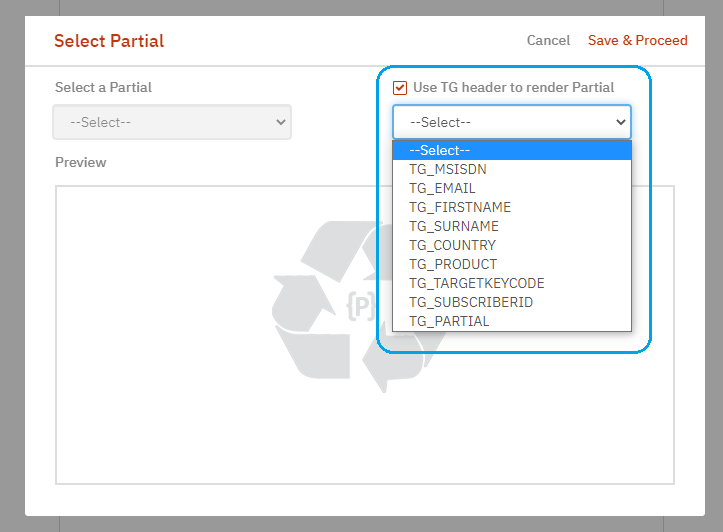
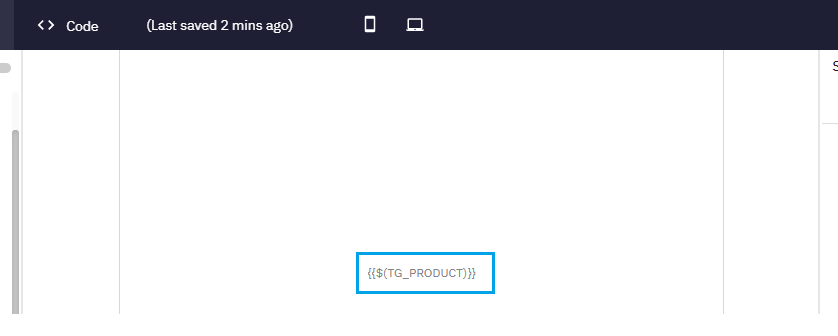
The ‘Dynamic Partial’ will show as {{TG_HEADER}} in the Design and Preview areas.
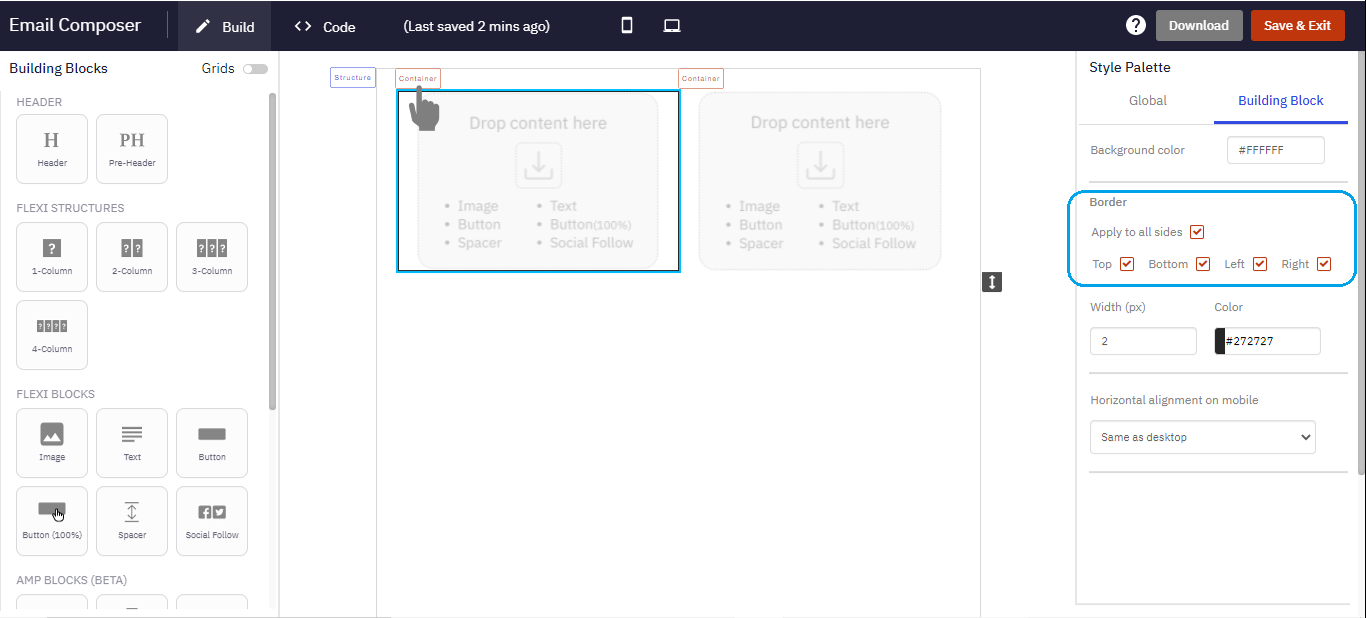
5.5 2-Column Structure: Ability to apply border to specific sides of a Container
We have introduced a new setting for the 2-Column Structure whereby you will be able to apply the border to specific sides of a Container. This setting will be visible in the Style Palette when you click on the ‘Container’ label of a 2-Column Structure.
6.0 Maintenance items in this release
As per the previously stated product transition strategy, most of these fixes and improvements are only applicable to the New UI. We are no longer applying routine fixes and improvements to the Old UI because it will be decommissioned soon after Release 6.1 around Nov / Dec 2021 timeframe.
| # | Module | Change Type | Description |
|---|---|---|---|
| 1 | Campaign Manager | Improved | [ User Groups ] : Improved the alert message if the user tries to create the same Sender-ID within different User Groups. The alert wording is : “You have already created this Sender ID in one of the User Groups. Please provide a different name to your Sender ID.”. [ PRB0045284 / INC10994060 / CMPN-12787 ] |
| 2 | Campaign Manager | Improved | [ TG Creation with GoAnywhere SFTP ] : Improved the SFTP feature such that now users will be able to create Static Target Groups with SFTP provided by the 3rd party vendor GoAnywhere. [ PRB0045677 / INC11311828 / CMPN-13060 ] |
| 3 | Campaign Manager | Fixed | [ File Channel ] : Fixed a bug whereby , under certain conditions, if the incoming file had only a single header of ‘EMAIL’, then the output file was not being prepared correctly. [ PRB0045503 / CMPN-12943 ] |
| 4 | Campaign Manager | Fixed | [ Password Reset ] : Fixed a bug whereby , under certain conditions, the password-reset feature was not working correctly [ PRB0045793 / INC11378206 / CMPN-13316 ] |
| 5 | Campaign Manager | Fixed | [ Dynamic TGs ] : Fixed a bug whereby , under certain conditions, ‘Remote Updates’ and ‘File processing’ options for dynamic Target Groups were not being displayed unless the option to ‘Skip the remaining file once the threshold is reached’ is selected. [ PRB0045791 / INC11381223 / CMPN-13310 ] |
| 6 | Campaign Manager | Fixed | [ User Creation ] : Fixed a bug whereby , under certain conditions, the User Creation screen was showing incorrect validations for the channel TPS fields. [ PRB0045794 / INC11380249 / CMPN-13311 ] |
| 7 | Campaign Manager | Fixed | [ User Audit Log ] : Fixed a bug whereby , under certain conditions, the Audit Log screen was incorrectly filtering data. [ PRB0045810 / INC11392063 / CMPN-13325 ] |
| 8 | Campaign Manager | Fixed | [ SMS Sender-ID Creation ] : Fixed a bug whereby , under certain conditions, non-alphanumeric characters were not being allowed in the ‘Invalid Request Message’ field due to an incorrect UI validation. [ PRB0045811 / INC11383981 / CMPN-13379 ] |
| 9 | Campaign Manager | Fixed | [MMS Pause / Resume ] : Fixed a bug whereby , under certain conditions, after an MMS deployment was resumed, the system validation was incorrectly asking the user to enter a subject line. [ PRB0045818 / INC11393569 / CMPN-13380 ] |
| 10 | Campaign Manager | Fixed | [ Scheduling issues for US-based clients hosted in AWS-Ireland ] : Fixed a bug whereby , under certain conditions, the deployment scheduling feature was not working correctly for some clients in the USA time-zone who are hosted in AWS-Ireland. [ PRB0045896 / INC11411095 / CMPN-12595 ] |
| 11 | Campaign Manager | Fixed | [ Approval Management ] : Fixed a bug whereby , under certain conditions, the ‘Approve/Reject’ buttons were not visible when the deployment was accessed from the Campaign Details screen. |
| 12 | Dashboard / Reports | Improved | The 'Promotion Transaction Report' has been renamed to 'Promotion Delivery Transaction Report'. Similarly, the 'Instant Deployment Transaction Report' has been renamed to 'Instant Deployment Delivery Transaction Report'. These reports have been renamed to make it clear that these reports do not contain ‘customer engagement’ data. We have on the product roadmap to introduce separate pre-configured Transaction Reports for Engagement’ data such as Opens and Clicks. |
| 13 | Dashboard / Reports | Improved | All Pre-configured reports will now have 'Report Creation Date' & 'Date-Range' in the format: 'YYYY/MMM/DD' |
| 14 | Dashboard / Reports | Fixed | Fixed a few minor bugs in the ‘Voice Deployment Details’ screen |
| 15 | Dashboard / Reports | Fixed | [ Scheduled Reports ] : Fixed a few minor bugs in the 'Edit Report Schedule’ functionality. [ PRB0045794 / INC11231946 / CMPN-12803 ] |
| 16 | Dashboard / Reports | Fixed | [ Unique Click Counts ] : Fixed a bug whereby , under certain conditions, the metric ‘Unique Click Counts’ was being incorrectly shown on the Dashboard and some pre-configured reports for some clients. [PRB0045774 / INC11314040 / CMPN-13305 ] |
| 17 | Dashboard / Reports | Fixed | [ Dynamic Headers Report ] : Fixed a bug whereby , under certain conditions, users were not able to open the ‘SMS/MMS Link Clicks Dynamic Headers Report’ Excel attachment. [ INC11375463 / INC11340269 / CMPN-13319 / CMPN-13343 / CMPN-13345 ] |
| 18 | Dashboard / Reports | Fixed | [Partial Composer]: Fixed a bug whereby, under certain conditions, the ‘Mobile specific padding’ for the ‘Text block’ was not working correctly [ PRB0045580 / INC11278765 / CMPN-12877 ] |
7.0 Need more information?
Please contact your Cisco/imimobile account manager if you have questions or would like access to a new feature.
Cisco Webex technical support team can be contacted at any time by phone or email:
- Europe / Middle East / Africa:
- Phone: +44 (0) 1494 750 600
- Email: [email protected]
- North America:
- Phone: +1-855-324-0970
- Email: [email protected]