Release 5.6 - 2020 August
Click on the above link to view the complete list of new features, enhancements, and defect fixes.
1.0 IMIcampaign Dashboard & Reports enhancements
1.1 Campaigns Listing: Added optional chart panel above the Campaigns List
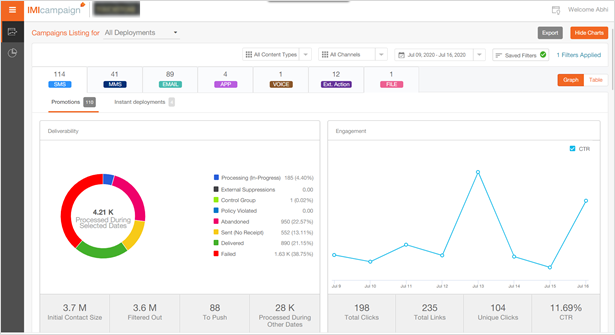
On the ‘Campaigns Listing’ page, when clicked on ‘Show Charts’ button near the top right corner, you will now be able to see ‘Deliverability’ and ‘Engagement’ charts showing aggregated metrics for all the Deployments within all the selected Campaigns. The metrics for each channel are shown on a separate tab. You can also switch between a ‘Graph’ and ‘Table’ view.

The list of Campaigns will continue to be displayed below the charts. By clicking on the ‘Hide Charts’ button, you can choose to hide the charts.
By default, the charts are always hidden every time the ‘Campaigns Listing’ page is rendered.
1.2 Campaign Listing: Show 200 campaigns before need to click ‘View More’
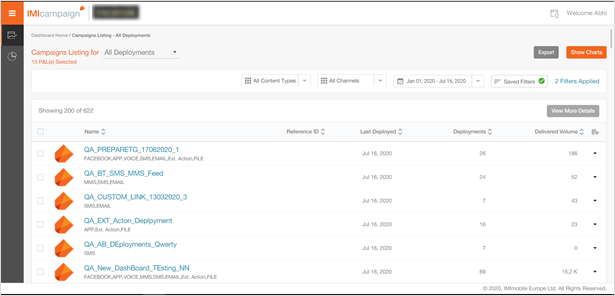
On the Campaign Listing page, you will now be able to view up to 200 campaigns before the need to click on the ‘View More’ link to show the next 200 campaigns.
1.3 Campaign Listing: Changes to some metrics and labels
On the Campaign Listing page, when you expand a specific Campaign to display the list of its constituent Deployments, now you will see the aggregated metric of ‘Processed During Selected Dates’. Previously, another metric called ‘Initial Size’ was being displayed here. This change has been done to ensure better consistency in the metric counts across various sections of the Dashboard considering the Date-filter applied by the user at the top of the screen. The ‘Initial Size’ metric is still available on the ‘Deployment Details’ screen.
1.4 AB Deployments: Label changed to ‘Processed During Selected Dates’
On the ‘Deployment Listing’ card, for AB Deployments, we have changed to column header label to ‘Processed During Selected Dates’. Previously, this was labelled as ‘Initial Size’.

1.5 Filter by ‘Occurrence’: One Time / Recurring / Instant Deployments
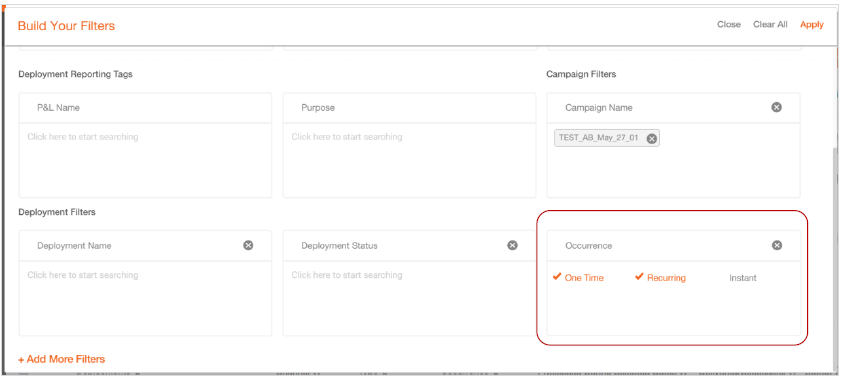
You can now apply a new ‘Occurrence’ filter under the ‘Deployment Filters’ category. This filter can be applied by clicking on the ‘+ Add More Filters’ link.
1.6 Deployment Listing: Better identification of Seed List deployments
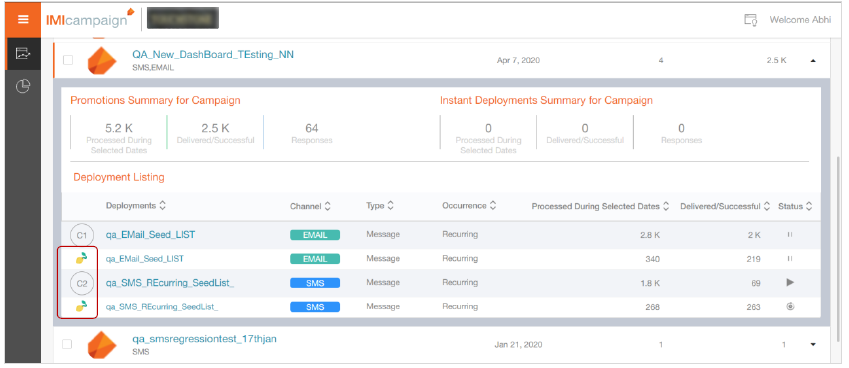
You can now more easily visually identify Seed List deployments as they will be indicated with a ‘seed’ icon on the Deployment Listing card.
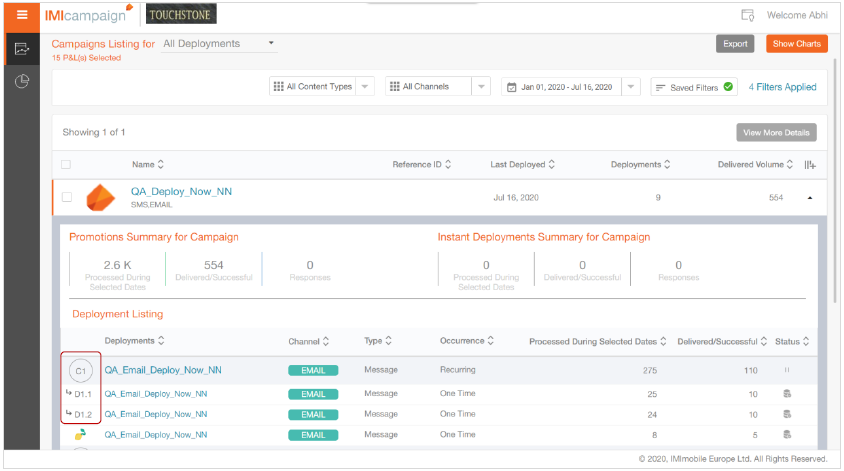
1.7 Deployment Listing: Better identification of ‘Deploy-Now’ deployments
You can now more easily visually identify ‘Deploy-Now’ deployments as they will be indicated with a number identifier beginning with the letter ‘D’.
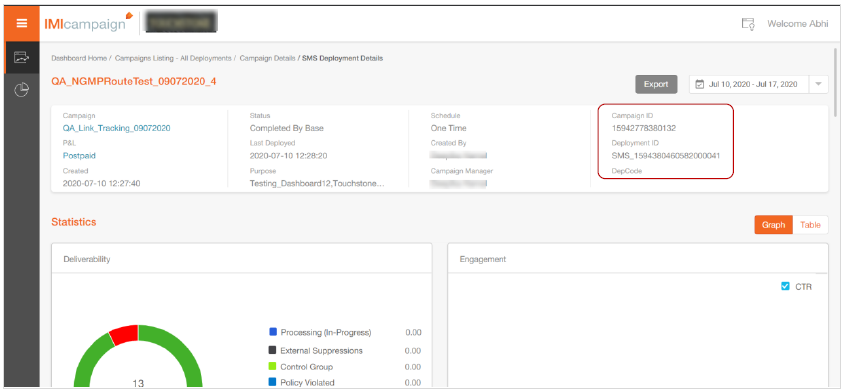
1.8 Deployment Details: Display Campaign ID and Deployment ID
On the Deployment Details page, you can now see the Campaign ID, Deployment ID and additional tenant-specific tag (e.g. DepCode in the screenshot below).
1.9 Email Deployment Details: 2 new charts introduced
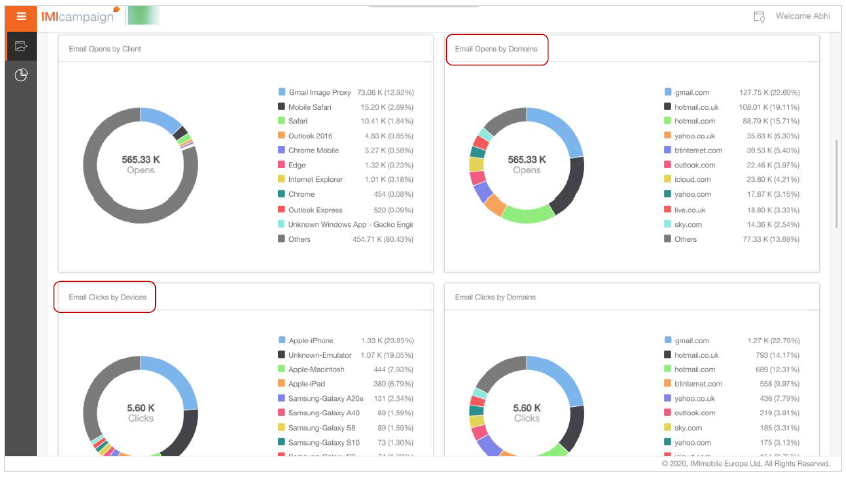
On the Deployment Details page for Email channel, we have introduced 2 new charts:
- Email Opens by Domain
- Email Clicks by Devices
1.10 Email Deployment Details: Email Heatmap Improvements
Several enhancements have been made to the Email Heatmap section for the Deployment Details page for the Email channel.
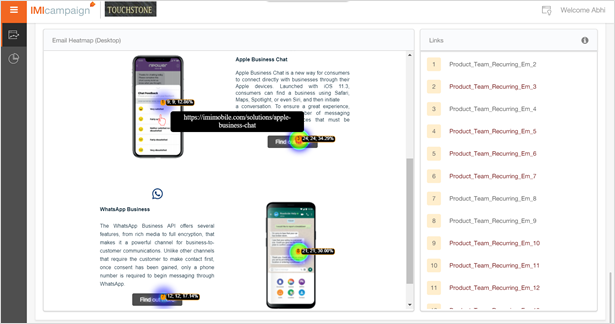
Actual link URLs are now displayed directly on top of the Email Heatmap itself when the mouse is hovered over the link
On the table of links to the right of the Email Heatmap picture, the following subset of links are shown in red colour.
o links that are hidden due to not being applicable for the desktop view of the email
o links that are not available due to conditions not being satisfied
o links that were present in previous runs of the email deployment, but are
not present in the latest run (in case of recurring deployments)
1.11 Ability to see scheduled reports created by all users within your User Group
Currently, you can only see scheduled reports that were created by yourself. From this upcoming release, you will also see scheduled reports created by your colleagues within your current User Group.
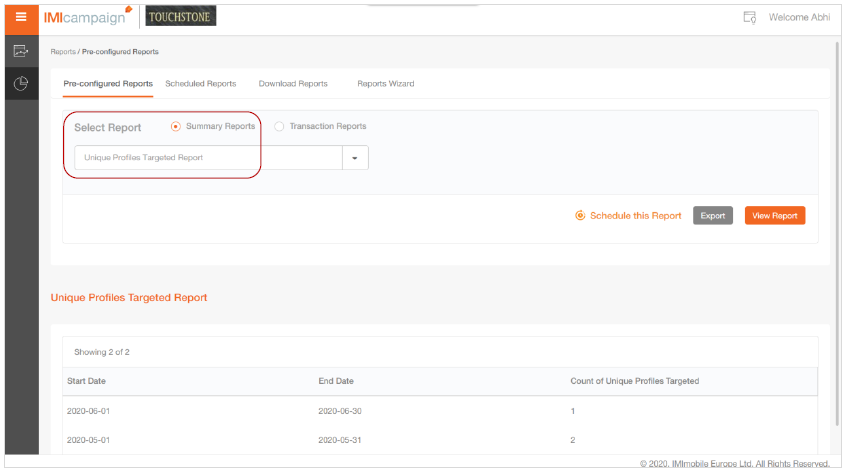
1.12 New Pre-Configured Report: Number of Unique Profiles Targeted by Month
This new report is useful for clients who license the IMIcampaign Profile Manager module.
Usage Notes:
The pre-requisite to be able to use this report is that the ‘Unique Profile Identifier Key’ must have been previously been made mandatory as an Output Header for every Segment and TG.
This report will show the count of Unique Profiles (represented by the Unique Profile Identifier Keys) that were targeted in any Campaign Deployments via any channel i.e. even if a Profile-ID was excluded due to exclusion criteria / rule-based suppression, that profile will still be counted.
This report will count Profiles targeted via :-
o Promotion Deployments (scheduled One-time and Recurring) and
o Instant Deployments (triggered by invoking Event API and SMS Inbound MOs)
This report will start counting the Targeted Profiles from the time this release 5.6 goes live. So, data prior to this release will not be available in this report.
If you are interested in getting this report enabled for you, please contact your IMImobile Customer Success Manager.
2.0 Campaign Manager module enhancements
2.1 Easier-to-use ‘Basic Calendars’ – useful for one-time deployments
You will now be able to create calendars for same-day deployments more easily in fewer clicks. When creating a ‘New Calendar’, you will be shown a pop-up with the ‘Basic’ option selected by default. The ‘Calendar Name’ will be pre-populated with a system-generated name. You can choose to update this value, although there’s no need to do so, especially for quick one-time deployment setups. The ‘Start Date’ and ‘End Date’ will be populated by default with ‘Today’s Date’.
For a One-time Promotion or Follow-up Deployments to be deployed on the same day, you will only be required to populate the ‘Start’ and ‘End’ time and create your calendar.
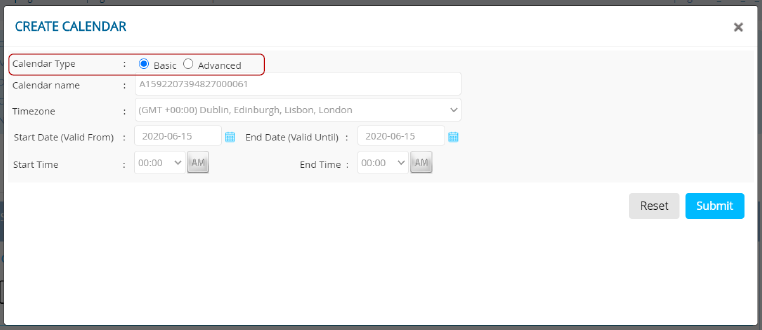
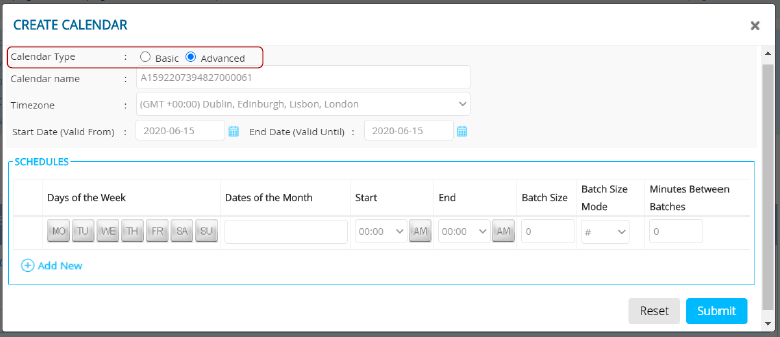
The existing functionality of creating calendars with ‘Batching’ and with ‘Multiple-schedules’ remains available within the ‘Advanced’ calendar type.
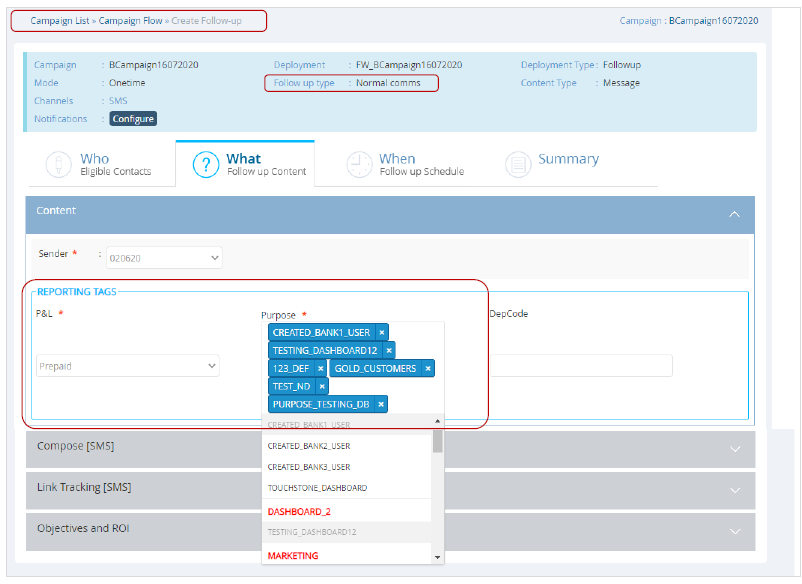
2.2 Follow-ups: Inherit ‘P&L’ and ‘Purpose’ tags from the Parent deployment
When you create certain types of Follow-up Deployments, they will inherit the mandatory reporting tags (‘P&L’ and ‘Purpose’ values). This can save you time, especially if you use multiple ‘Purpose’ tags organised within multiple ‘Purpose Groups’.
Usage Notes:
This feature is applicable to these Follow-up Deployments :
o Scheduled One-time Follow-ups
o Scheduled Recurring Follow-ups
o Instant Follow-ups to Existing Deployments (with inherited whitelists)
This feature is not applicable to these Follow-up Deployments
o Instant (Externally Managed ) Follow-ups
o Scheduled A/B Follow-ups
o Instant (Externally Managed ) A/B Follow-ups
The reporting tags will be inherited by the Follow-up deployment only in cases where there is a single Parent Deployment.
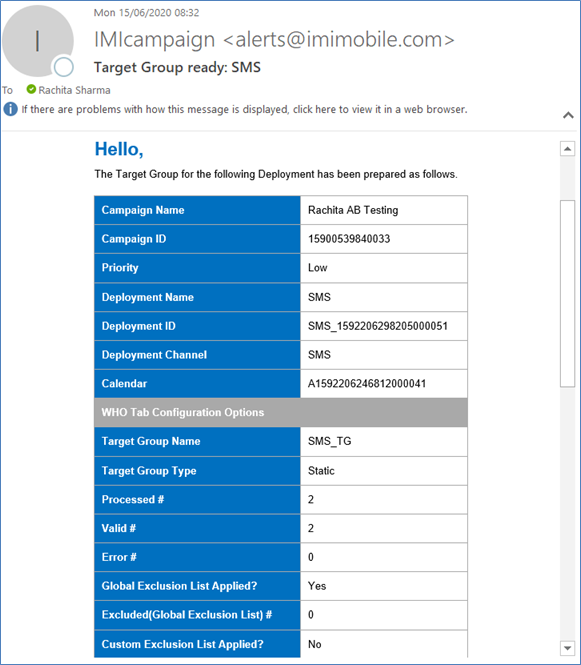
2.3 ‘Target Group ready’ Email Notifications for ‘File Upload’ TG Source
For all One-time and Recurring Promotions where TG source is ‘File Upload’, we have introduced a new email notification called ‘Target Group Ready’ notification.
The deployment-creator and any designated approvers will receive this notification after the Target Group preparation is completed.
2.4 Assets >> SMS Short Links: Configure location of the unique link-tracking-id within a customised SMS short link
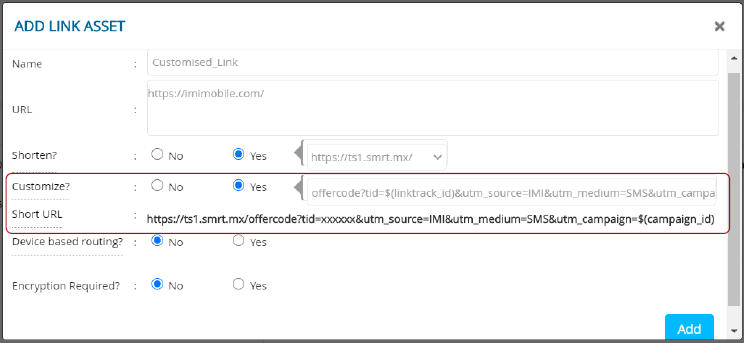
For tracking SMS link clicks, IMIcampaign by default appends a 6-character unique link-tracking-id at the end of the tracked URL. With this new feature in this release, you will be able to configure the position of this link-tracking-id within your URL string.
This feature is useful where the URL needs to be appended by other parameter values at the end (e.g. to represent content-ids within your digital content management system such as "Offers/?tid=$(linktrack_id)?offercode=579364r2839432p9").
Another example (shown in the screenshot below) might be to append web analytics tags such as Google Analytics UTM tags at the end of your URL.
Usage Notes:
- On the ‘Add Link Asset’ screen, in the 'Customise' field, manually add the custom URL path value, followed by the URL query-string parameters in the order in which they are required.
- Use the parameter ‘$(linktrack_id)’ where you want the IMIcampaign unique-link-tracking-id to be inserted within the URL.
- If you do not use the parameter ‘$(linktrack_id)’ in your URL, it will be added at the end of the URL by default (this is the existing system behaviour by default).
- There is no change in the behaviour of existing tracked links
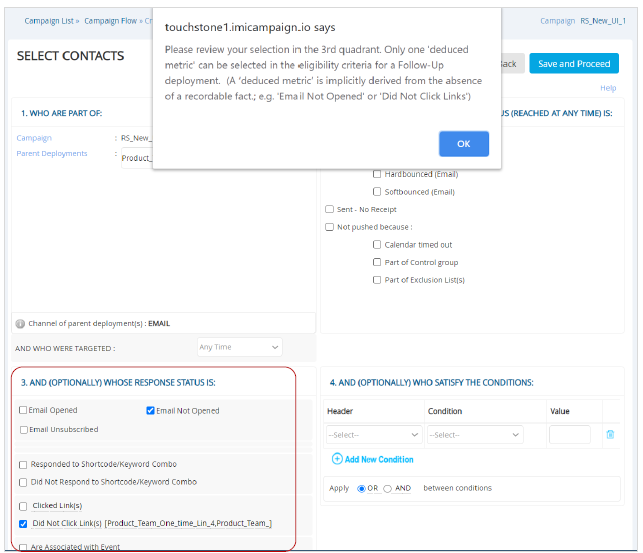
2.5 Follow-Up Deployments: Additional Validation of 3rd quadrant Conditions
An additional validation check has been added on the Follow-up Eligibility Definition screen as shown in the below screenshot.
For your follow-up deployment, you will be able to select only one of the following deduced metrics:
- Email not opened
- Did not respond to shortcode /keyword combo
- Did not click links
- Not associated with an Event
2.6 Deployment Status ‘Last Updated On’ Timestamp
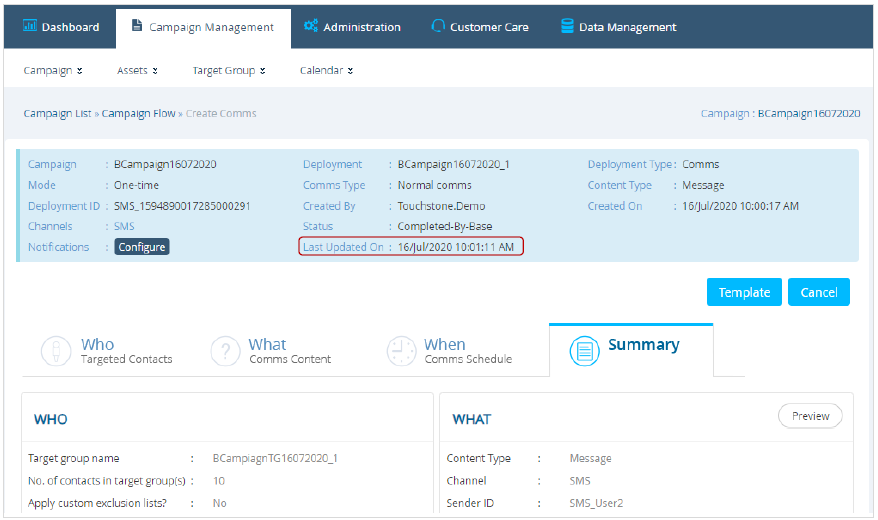
Now you will be able to see the last time the ‘Status’ of the deployment was updated – after its initial ‘activation’. This is especially useful to know in cases where a deployment might have been ‘paused’ and then ‘resumed’.
Note that if a deployment is updated multiple times while still in ‘Draft’ status, those timestamps are not captured by this new field – because the deployment’s ‘Status’ value will remain unchanged while it’s being updated in ‘Draft’ status.
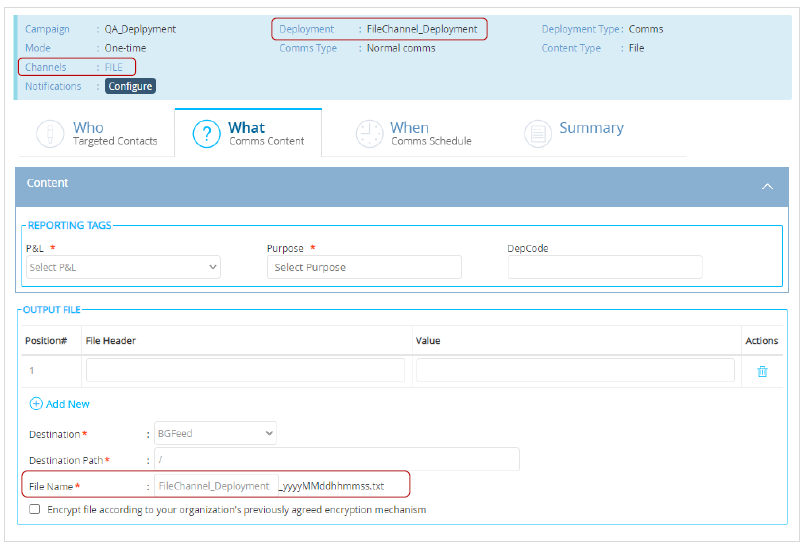
2.7 ‘File’ Channel >> What Tab: Assign a default filename
On the ‘WHAT’ tab for ‘File’ channel deployments, the system will automatically assign a file name which will be of the format “Deployment name” suffixed by the ‘Timestamp’. You will be able to override the ‘Deployment name’ portion of the filename with another text value if you prefer.
2.8 WHEN tab >> Email / SMS / MMS Routers : Segregated by User Group
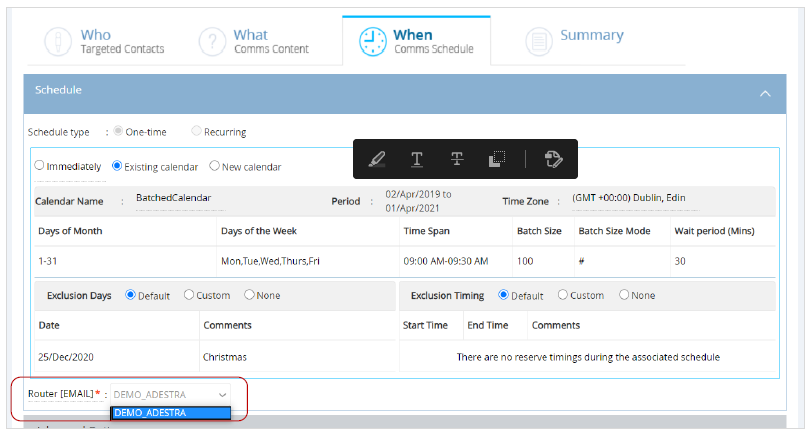
On the WHEN tab, now you will see only those Email / SMS / MMS Routers that have the same User Group associated as the User Group that you are currently in.
The actual association of the Routers to specific User Groups is a backend administration activity for which a request can be submitted to the Operations team.
This feature is useful for clients who may have the same campaign deployment team supporting multiple brands.
3.0 Drag-&-Drop Email Composer enhancements
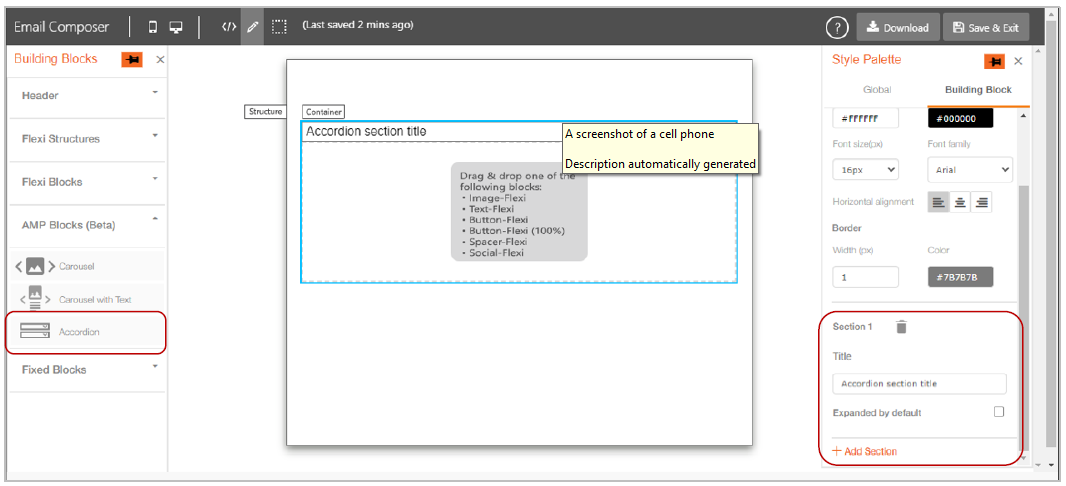
3.1 New AMP Interactive Block: Accordion (Beta)
In this release, we are introducing a new AMP interactive block: Accordion. This will be available in the Building Blocks Palette under ‘AMP Blocks (Beta)’ section. You can add up to 5 sections in the Accordion from ‘Style Palette >> Building Block’ tab.
A video mini-tutorial on the usage of the Accordion AMP block can be viewed here:
AMP ‘Accordion’ Block Style Palette Settings:
You can configure the AMP Accordion using the following settings and controls within the Style Palette :
- Title Settings: You can apply styles (Background color, Border etc.) to the Title of the Accordion.
- Delete section: You can delete a section by clicking on the delete icon. After a section is deleted, the next section will replace this section, e.g. if section #3 is deleted then section #4 will become new section #3 within the Accordion.
- Title: You can add text to the title of Accordion.
- Expanded by default: You can show the section of Accordion expanded by default by clicking on this checkbox.
- Add Section: You can add up to 5 sections in the Accordion. You must add a Flexi block in each of the already existing section before you can add a new section.
3.2 New AMP Interactive Block: Carousel-With-Text (Beta)
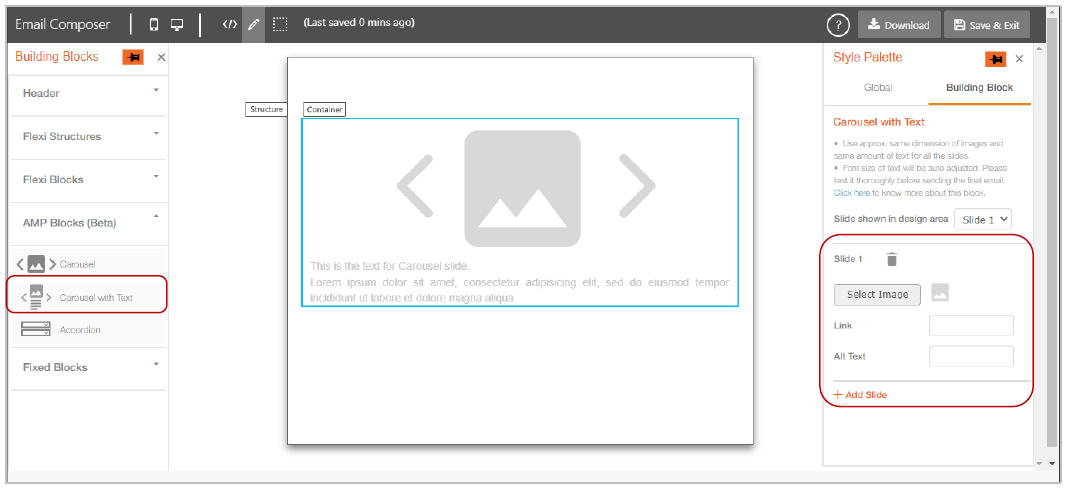
We are introducing another new AMP interactive block: Carousel with Text. This will be available in the Building Blocks Palette under ‘AMP Blocks (Beta)’ section. You can add up to 5 slides in the ‘Carousel-with-Text’ block from the ‘Style Palette >> Building Block’ tab.
A video mini-tutorial on the usage of the Accordion AMP block can be viewed here:
AMP ‘Carousel-with-Text’ Style Palette Settings:
You can configure the AMP ‘Carousel with Text’ using the following settings and controls within the Style Palette :
- Select Image: You can select an image which is already uploaded in ‘Assets >> Media’ section. After you select an image, a thumbnail preview will also be available.
- Delete slide: You can delete a slide by clicking on the delete icon. After a slide is deleted, the next slide will replace this slide, e.g. if slide #3 is deleted then slide #4 will become new slide #3 within the Carousel.
- Link: You can add a link URL for the image in the slide.
- Alt Text: You can also add alternate text for the image in the slide.
- Add Slide: You can add up to 5 slides in the Carousel with Text. You must associate an image with each of the already existing slides before you can add a new slide.
- Slide shown in design area: You can select the slide which you want to update in the design area. Once a slide is added, it will be shown in the drop-down.
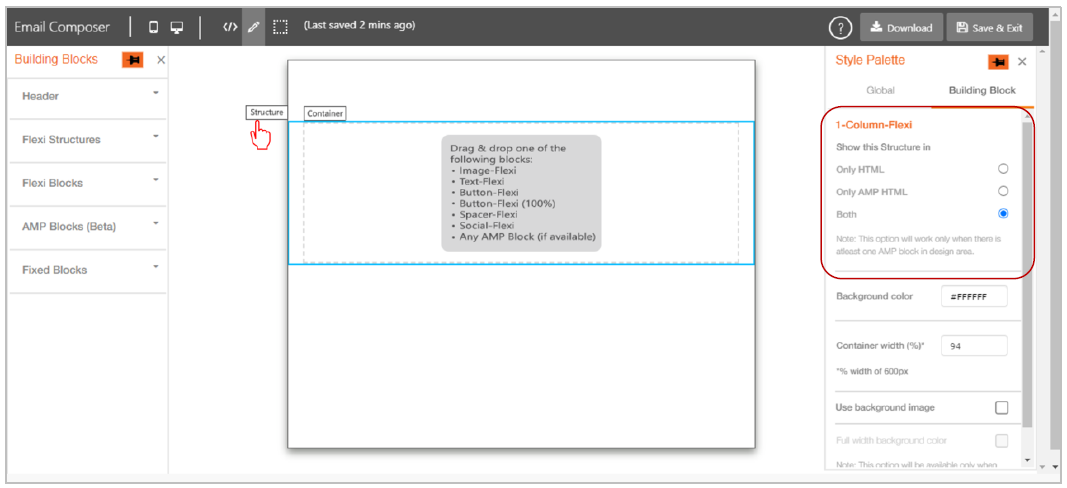
3.3 Render 1-Column-Flexi Structure only in AMP or HTML-fallback or Both
You can now design a fallback HTML block which will be displayed (as an alternative for an AMP interactive block) on devices who do not support AMP block yet.
We have introduced a setting called ‘Show this Structure in’, having the following three options:
- Only HTML
- Only AMP HTML
- Both
This setting will be available for ‘1-Column-Flexi’ Structure under ‘Style Palette -> Building Block’ when you click on ‘Structure’ label on the design area.
Note that AMP Interactive block will be removed from the fallback HTML even if you select Both option for this setting.
3.4 Text-Flexi Block: Superscript, Subscript and Strikethrough options
We are introducing the following 3 additional ‘style effects’ in the black text-editing-toolbar :
- Superscript
- Subscript
- Strikethrough
These style effects work similarly to how you might use them in Microsoft Word; e.g. they will be applied on top of other style options like Font-colour and Font-size.

These ‘style effects’ will be available for the following Building Blocks :
- Text-Flexi
- Header
- Footer
- Table (Textual)
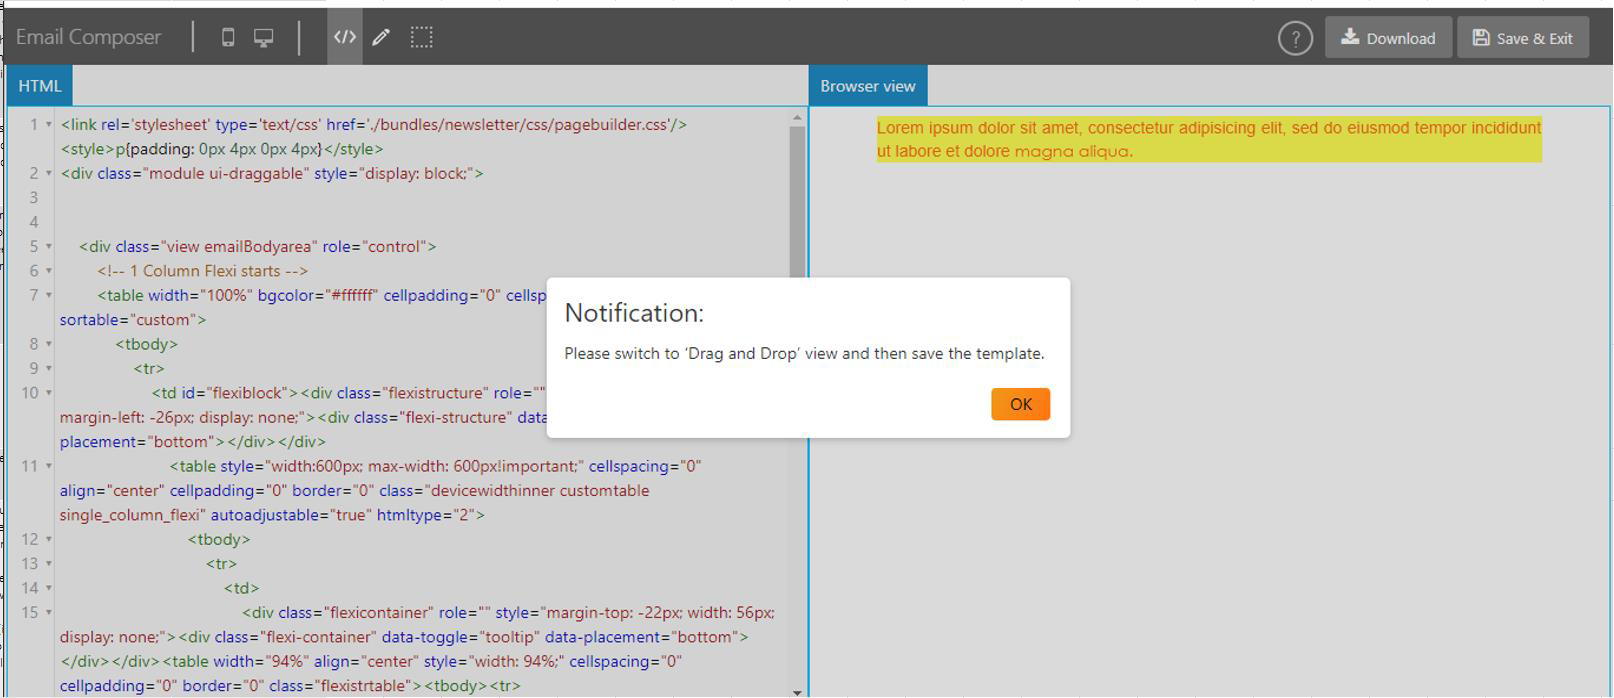
3.5 Stop the user from saving the template whilst in HTML Source mode
This enhancement is related to the following ServiceNow incidents / problem tickets : INC10381397 / INC10376358 / PRB0044220 / IMI-PRB0044225
3.6 Button-Flexi (100%) block: Specify a different width on mobile devices
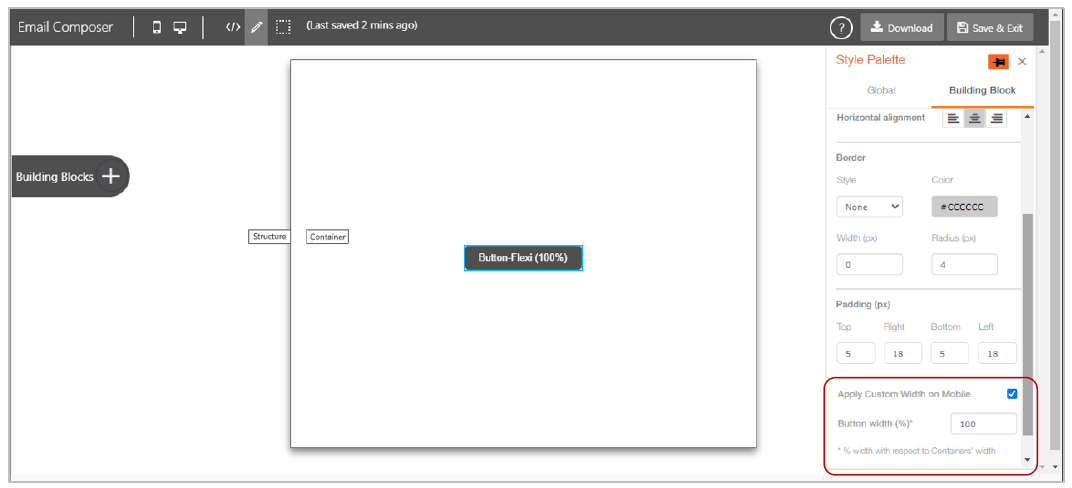
In the last release, we had introduced the ‘Full width on mobile’ setting for the ‘Button-Flexi (100%)’ block. This setting allowed you to render buttons in full width on mobile devices.
In this release, we are giving you more control over how this feature works on mobile devices. You can now specify the % of the button-width that should be used to render on mobile devices. This is the % width with respect to the Containers’ width. This setting is now called ‘Apply Custom Width on Mobile’.
3.7 Image-Flexi block: Apply same dimensions on mobile & desktop devices
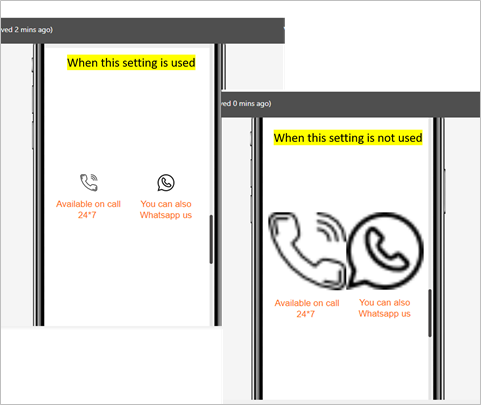
This is another enhancement that will give you more control over how the email renders on mobile devices.
We have introduced a setting called ‘Do not expand on mobile devices’ for the ‘Image-Flexi’ block. This setting will be available in the right-side Style Palette after you select an image.
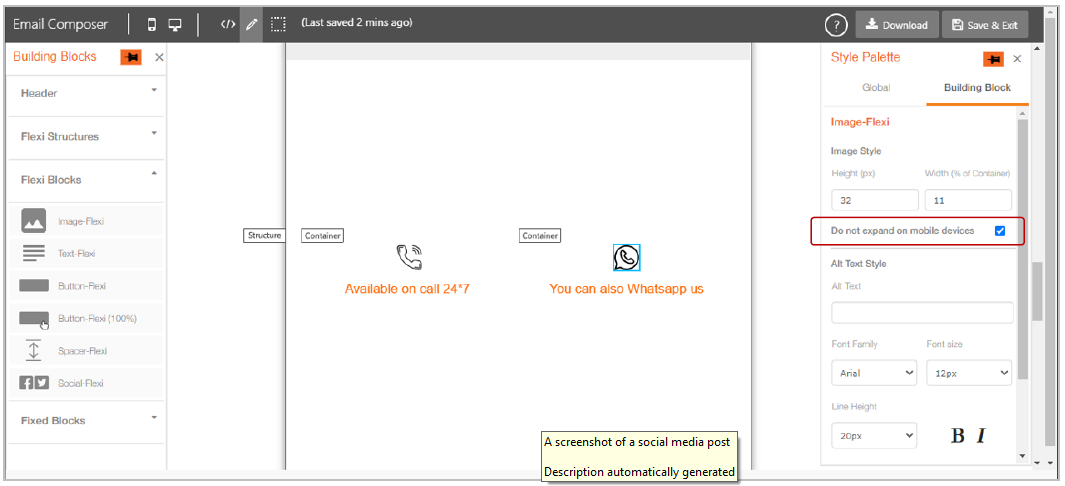
This setting will be useful when you want to use the same small-dimension images on both Desktop and Mobile devices. Currently, the image expands itself on mobile devices to occupy full container width.
3.8 Mobile Preview: UX improvements
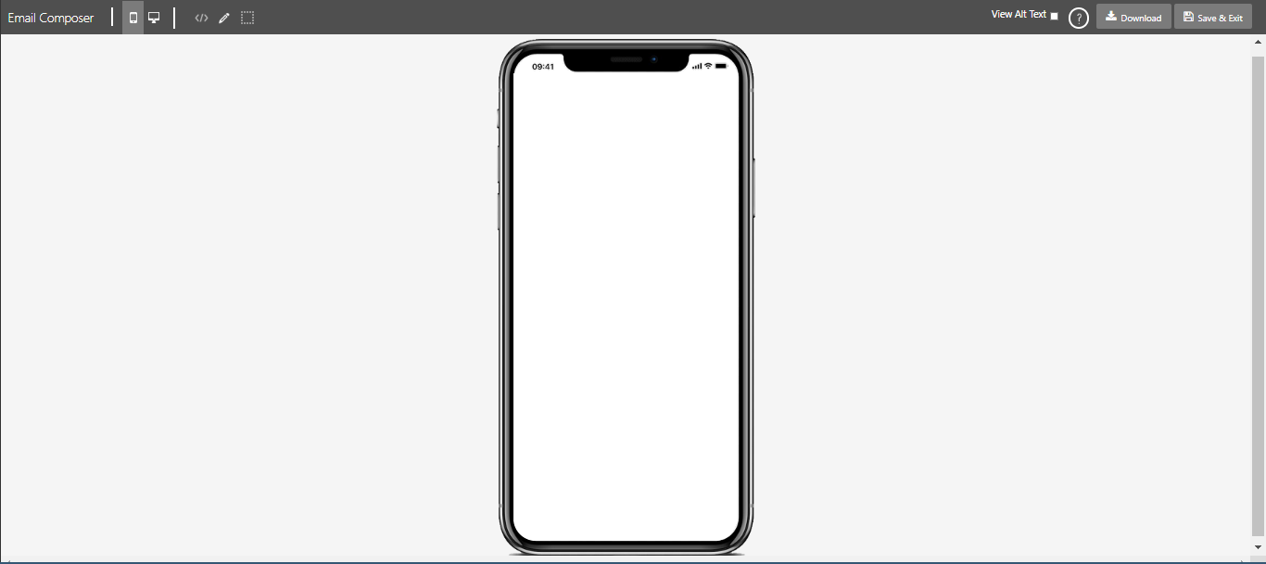
The Mobile Preview screen has been refreshed to reflect more recent mobile devices’ designs and dimensions.
3.9 Reduced size of auto-generated HTML code by removing indentation
The indentation of the HTML tags has been removed in the responsive HTML auto-generated by Email Composer. This will reduce the size of the final HTML code which is sent to email recipients.

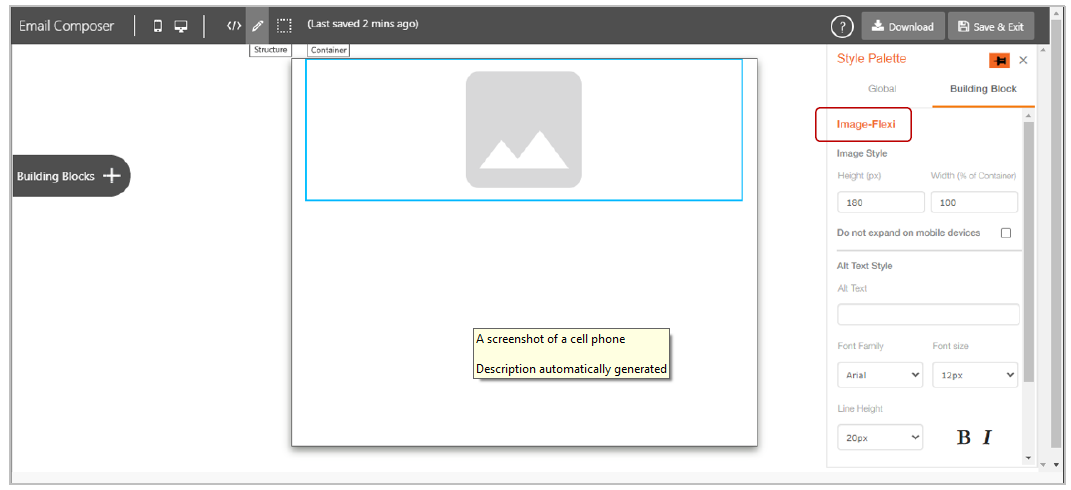
3.10 Display the selected block’s name in the right-side Style Palette
You will now be able to see the selected Building Block’s name in the right-side Style Palette under Building Block tab.
4.0 Profile Manager module enhancements
4.1 Display only those Segments associated with the user’s current User Group
With this release, every Segment will be associated with the segment creator’s User Group (i.e. the specific User Group that the segment-creator was using at that time).
While viewing the list of Segments (Data Management >> Segmentation >> View Segments), the user will be shown only those Segments which have the same associated User Group as that of the user’s current User Group.
This feature is especially useful if your campaign deployment team is responsible to deliver campaigns for multiple brands.
4.2 Display only those Datastores associated with the user’s current User Group
With this release, every Datastore will be associated with the datastore creator’s User Group (i.e. the specific User Group that the datastore-creator was using at that time).
While viewing the list of Datastores (Data Management >> Data Ingestion >> Datastores), the user will be shown only that Datastore which have the same associated User Group as that of the user’s current User Group.
This feature is especially useful if your campaign deployment team is responsible to deliver campaigns for multiple brands.
4.3 Display only those Datastores associated with the user’s current User Group in the Datasource selection option list while creating Segments
Under the Data Management >> Segmentation menu, while creating or editing a Segment, within the ‘Select Data Source(s)’ accordion in the ‘Selected Sources’ dropdown list, only those Datastores will be displayed whose associated User Group matches with the user’s current User Group.
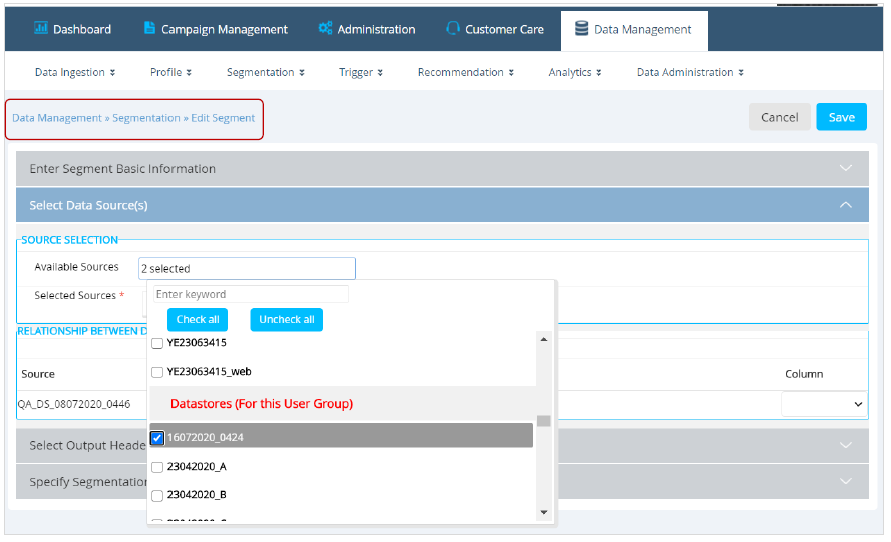
This feature is especially useful if your campaign deployment team is responsible to deliver campaigns for multiple brands.
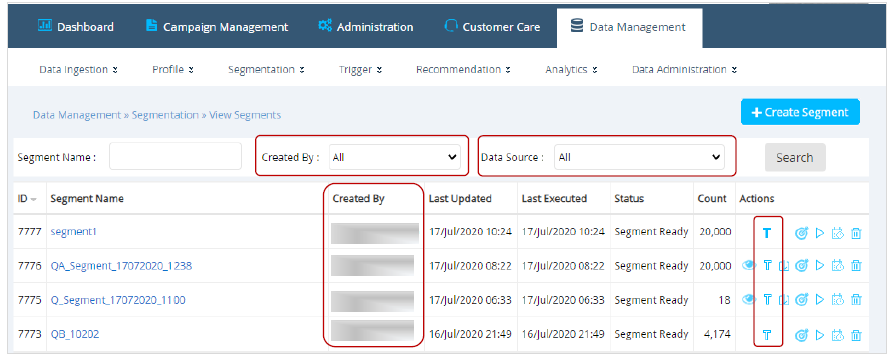
4.4 Segment Builder: ‘Create / View Segments’ - UX improvements
We have made the following UX improvements on the ‘Create Segments’ and ‘View Segments screen.
- Ability to filter Segments based on the segment-creator
- Ability to filter by the Data Source used within Segments
- A new column has been added showing the segment ‘Created By’
- Ability to mark a Segment as a ‘Segment-Template’ (more on this in the next section )
4.5 Segment Builder: Save a Segment as a Reusable ‘Segment Template’
You can now designate a Segment as a reusable ‘Segment Template’ by clicking on the ‘T’ icon under the ‘Actions’ column. A segment that has already been templated is identified by the ‘solid T’ icon.
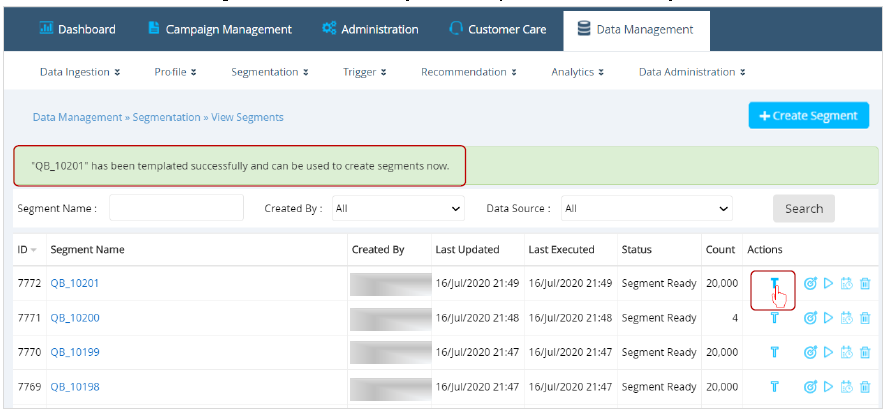
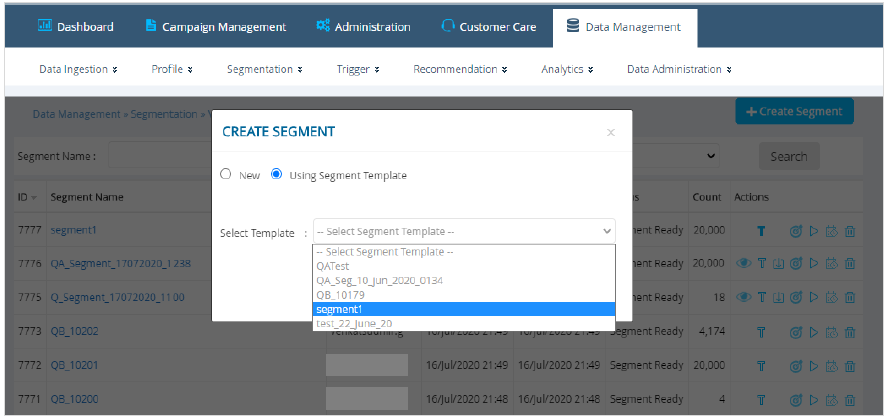
After a Segment is templated, that Segment-Template can be used to derive a new Segment from.
This feature can save you quite a bit of time, especially if you have to create a new Segment with a lot of Filters and /or a lot of Output Headers, which are only slightly different from another Segment that’s already available.
4.6 Data Ingestion >> Datastores: UX improvements
This screen and its corresponding menu have been renamed from ‘Feed (ETL)’ to ‘Datastores’.
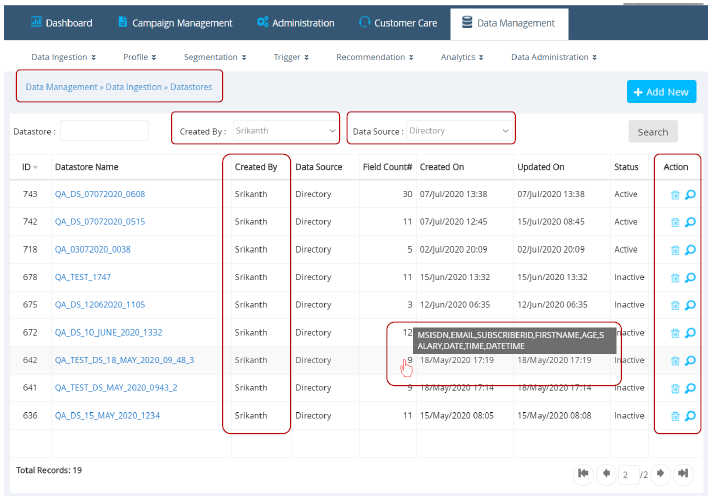
We have made the following UX improvements on this screen:
- Ability to filter Datastores based on the datastore-creator
- Ability to filter by the Data Source – whether it’s the ‘(local) Directory’ or ‘Remote Database’
- A new column has been added showing the Datastore ‘Created By’
- Ability to view the Datastore columns when the mouse is hovered on the Field Count value
- Under the Actions column: A new button to Delete a Datastore – so that you can easily delete Datastores that may have been created for loading ad-hoc files and are no longer needed
- Under the Actions column: A new button to Check Datastore Load Status. When clicked, you will be taken to the ‘Datastore Load Report’ screen – so that you can quickly see the data-load status for that Datastore during the last 7 days (more on this in the next section)
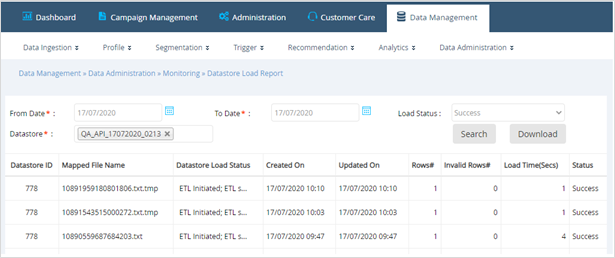
4.7 ETL: Data Administration: Datastore Load Report - UX improvements
This report available under the menu ‘Data Administration >> Monitoring’ has been renamed from ‘Feed Load Report’ to ‘Datastore Load Report’.
We have made the following UX improvements on this screen:
- Removed less useful columns from the table
- Removed a less useful filter called ‘Datastore Maps’
- Under the ‘Mapped File Name’ column, display just the file name (rather than the file location path as used to be displayed previously)
- Ability to search for the Datastore name within the ‘Datastore’ dropdown list
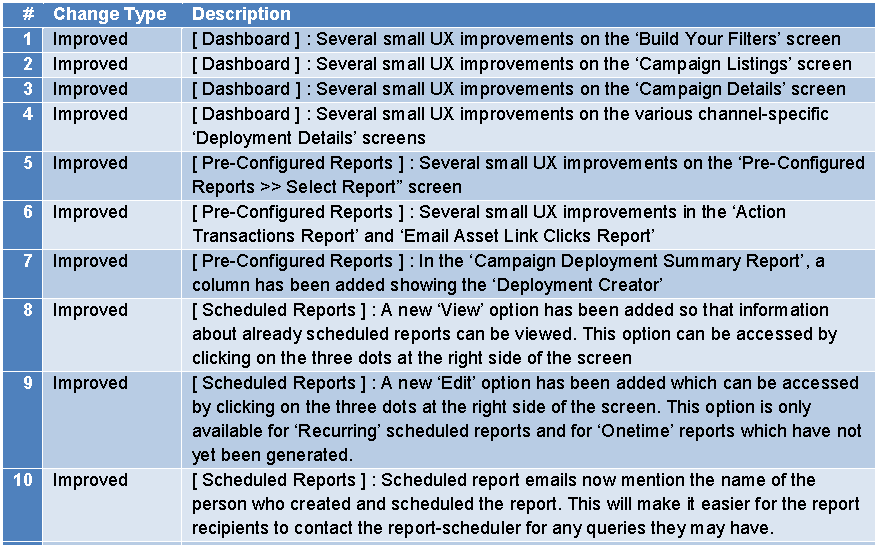
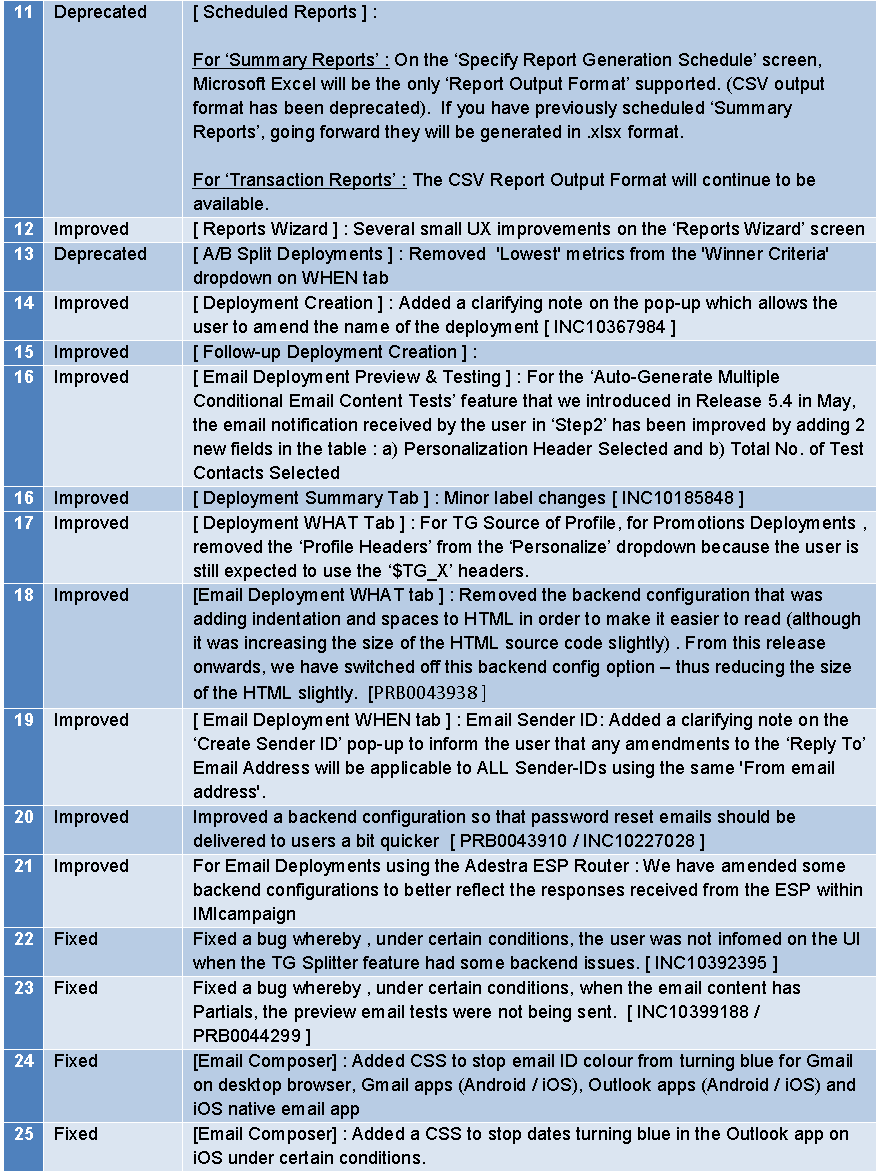
5.0. Maintenance items in this release
6.0 Need more information or help before or during the update?
Please contact your IMImobile account manager if you have questions or would like access to a new feature.