Release 5.4 - 2020 May
Click on the above link to view the complete list of new features, enhancements, and defect fixes.
1.0 New Dashboard: Graduating from 'Beta' to 'GA'
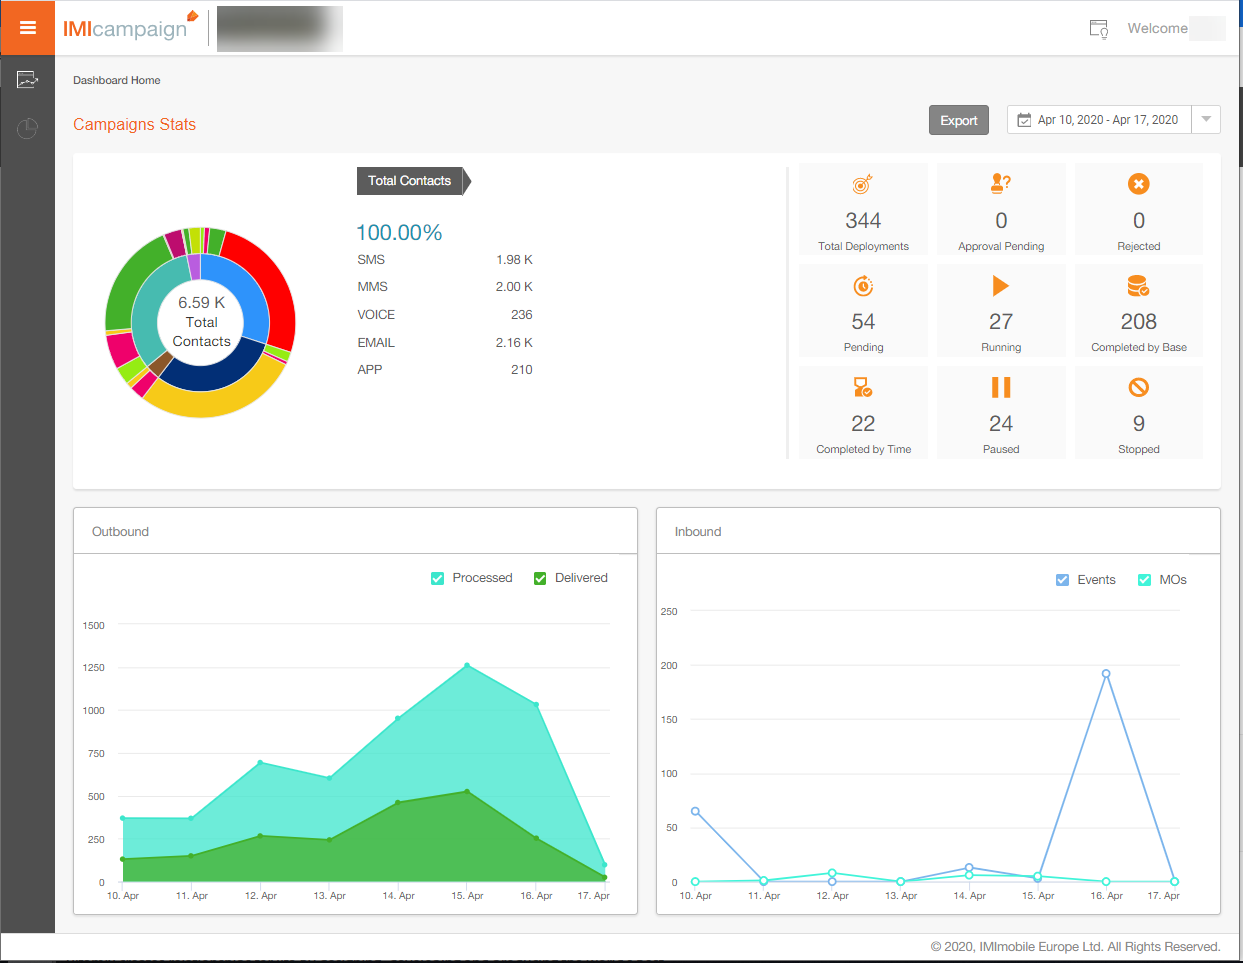
You may remember that we introduced our new-look dashboard (as ‘Beta’) as part of our Release 5.1 in August 2019.
With this Release 5.4, we will decommission the old dashboard pages and the new-look dashboard will graduate out of the ‘Beta’ to ‘Generally Available (GA)’ status.
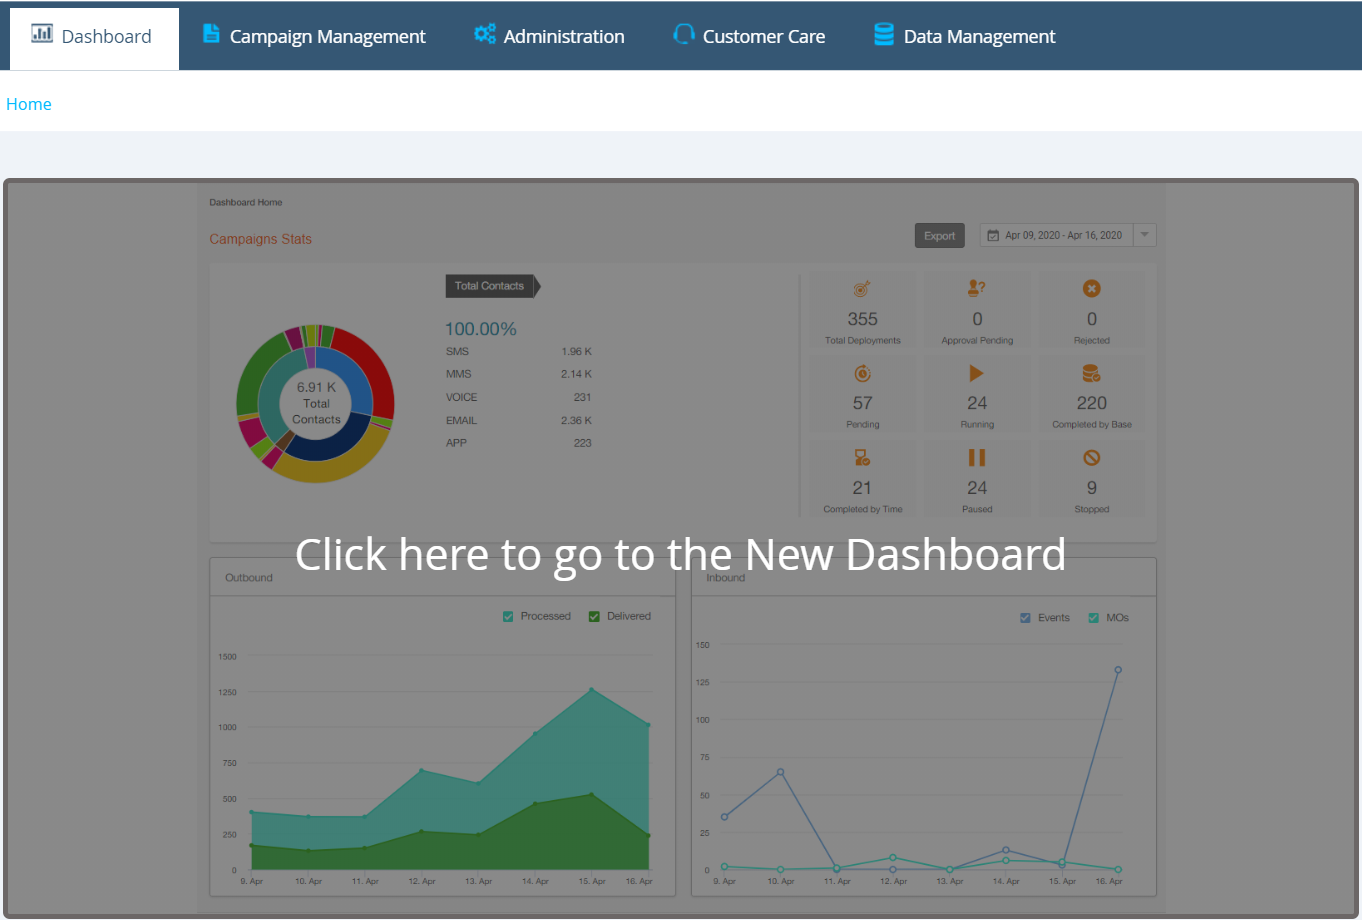
From the existing ‘Dashboard Home’ tab, when you click on the link named ‘Click here to go to the New Dashboard’, the new-look dashboard will be launched in a separate browser tab.
1.1 New Dashboard Pages
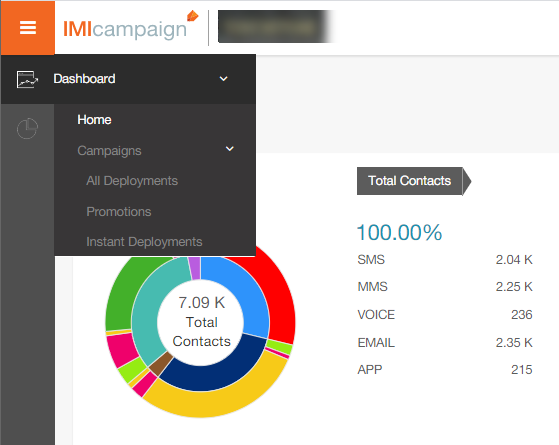
The following screenshot shows the top-level navigation menu of the New Dashboard section.
1.2 New Reports Pages
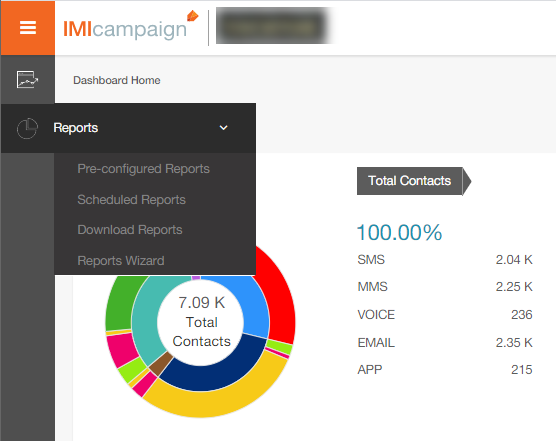
The following screenshot shows the top-level navigation menu of the New Reports section.
More info is available online https://help.imicampaign.io/en/collections/2246277-reports
1.3 List of Pre-Configured Reports
More information about the full list of Pre-Configured Reports can be found on IMIcampaign Online Help Documentation here:
https://help.imicampaign.io/en/articles/2706810-pre-configured-reports
1.4 New Channel: ‘Facebook Custom Audiences’
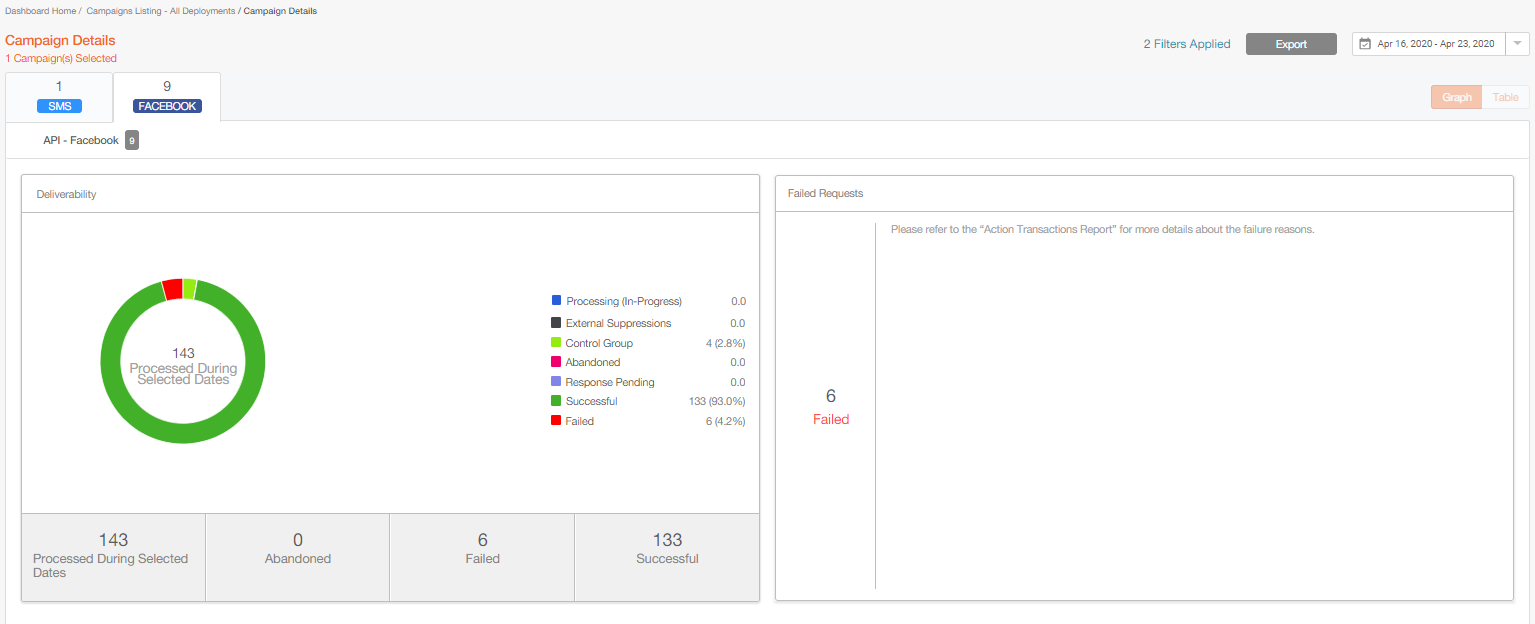
In this release, we are re-launching the ‘Facebook Custom Audiences Integration’ feature as a standard channel – which means you will now be able to schedule One-Time and Recurring campaign deployments for this channel. Accordingly, you can now monitor the progress and status of Facebook Custom Audience sync on the Dashboard.
Please also refer to section 2.12 New Channel: Facebook Custom Audiences.
1.5 Data on the New Dashboard – Additional Notes
The Dashboard will have aggregated campaign metrics data going back to 18 months.
The Dashboard uses a purpose-built back-end data infrastructure – which is separate from the data infrastructure used for the Campaign Management section of IMIcampaign. This mechanism will improve the performance & responsiveness of the Campaign Management features. As a result, there is a few minutes delay when the campaign send data begins to appear on the Dashboard after a campaign is activated.
2.0 Campaign Manager module enhancements
2.1 Email Channel: Interactive Capability with ‘AMP Email’
We are very excited to introduce the ‘AMP Email’ technology with this release. AMP email seeks to enhance and modernize the email experience through added support for dynamic content and interactivity. Recipients of AMP emails can view and interact with the AMP interactive components directly within the email itself, without them having to be redirected to an external landing page or an application outside of the email.
AMP is an open-source HTML framework project managed by the AMP Open Source Project, although it was originally developed by Google. Technically, AMP is a set of HTML tags backed by JavaScript to create interactive elements for email. More information about the AMP Email technology can be found here: https://amp.dev/about/email/
AMP Email format is currently supported by the following email clients:
- Gmail on Desktop Browser
- Gmail Mobile Apps (iOS and Android)
- Mail.ru
Other email clients like Yahoo, Outlook.com are expected to support it in the near future. The fallback HTML version is rendered by email clients which do not yet support the AMP format.
How AMP Email will be implemented in the product:
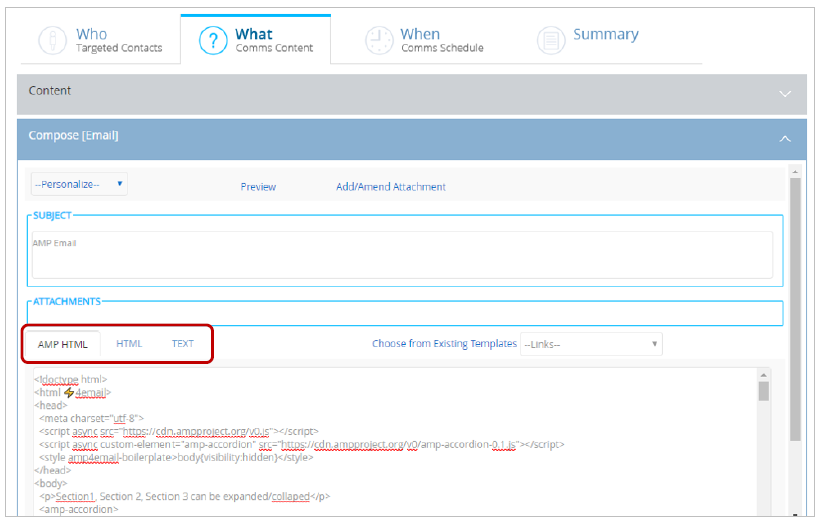
You can now see a new tab ‘AMP HTML’ within the WHAT tab (in addition to the existing HTML and Text tabs). You can directly paste your own AMP-HTML code in this new tab.
You need to also provide the corresponding fallback HTML version in the HTML tab as it will be displayed for email clients which do not support AMP emails yet.
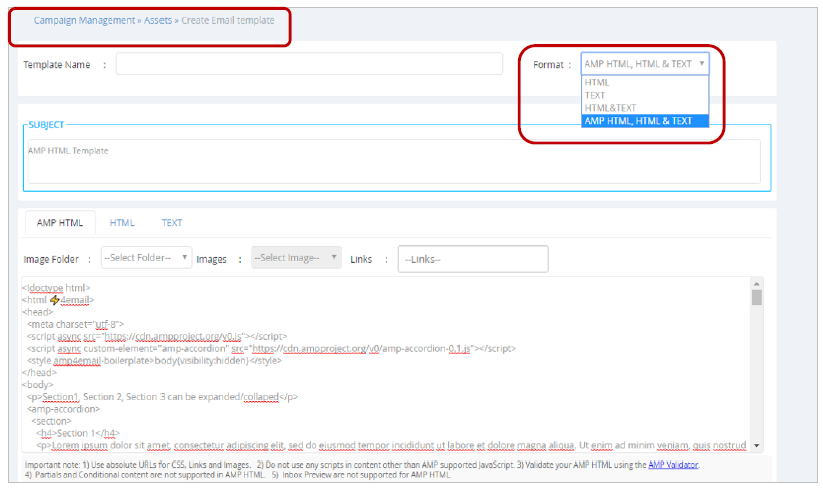
AMP HTML Email Message templates can also be created using ‘HTML editor’ and ‘Drag & Drop Composer’. (More information about the ‘AMP Carousel’ block within the Drag-&-Drop Email Composer can be found in section 4.1 later in this Release Note)
Pre-requisite: Registration with Google & Microsoft as an ‘authorized sender of dynamic email’
You will need to register your Sender Email address with Google & Microsoft as an ‘authorized sender of dynamic emails’. This is a pre-requisite for Gmail and Outlook.com to render your AMP Emails in those inboxes. Without this registration, they will only render the fallback HTML versions of your email.
More information about this registration process can be found here: https://developers.google.com/gmail/ampemail/register
https://docs.microsoft.com/en-us/outlook/amphtml/register-outlook
Please contact your IMImobile Account Manager if you need help and advice about this registration process.
Usage Notes:
- The AMP Email capability is a tenant-specific feature. Please contact your IMImobile Account Manager if you would like this feature enabled for you.
- The AMP Email capability is only available via email routers using the AWS SES ESP (Email Service Provider).
- It is mandatory to provide the fallback HTML code for email clients which do not yet support AMP Email; otherwise, you will not be able to activate an AMP Email Deployment.
- Email Partials are not currently supported in the AMP-HTML as the double-curly-brackets notation used for Partials is also used as one of the tags within AMP-HTML syntax.
- Conditional Content (using IF ELSE logic) is not currently supported in AMP-HTML.
- If an email recipient clicks on the ‘View in browser’ link from an AMP Email, then the fallback HTML version will be displayed within a separate browser tab.
2.2 Email channel: Support for ‘Blank’ Dynamic Email Partials
When using dynamic email partials by referencing them within a TG file, you can now use the reserved partial name ‘BLANK’ when a ‘content panel’ is not applicable for a segment of customers.
For example, consider the scenario where an email deployment has placeholders for 4 content panels (offers); however, a segment of customers may be eligible for only 2 offers.
Previously, it was only possible to use dynamic partials if all the customers were eligible to receive all the 4 offers. With this release enhancement, that constraint will be removed.
Benefit: Hyper-Personalized ‘Segment-of-one’ Email Campaigns with Dynamic Partials
Usage Notes:
- Use ‘dynamic’ email partials where the partial names are referenced within the Target Group file, where a specific header value in the TG file contains the partial names to be used to populate a particular ‘content panel’ within the email.
- For those customers who are not eligible to receive offers in a specific content panel, the partial name in the target group file should be ‘BLANK’.
- As usual, the dynamic partials within the email content should be referenced with the ‘double-curly-braces’ syntax, e.g. {{$(TG_OFFERPANEL03)}}. The values for the ‘OFFERPANEL03’ header for different customers will be different partial names.
- IMIcampaign will disregard the ‘BLANK’ value and render the remaining content.
2.3 Email channel: Auto-Generate Multiple Conditional Email Content Tests
You will now be able to generate with a few clicks, all the unique variations of an email containing conditional content and send them as tests to your selected test contacts.
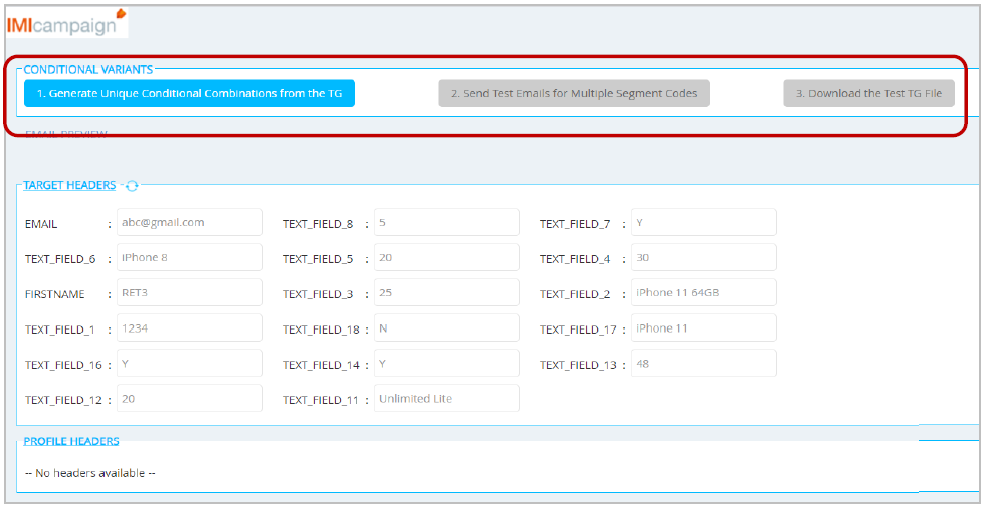
If your email has conditional content logic, you will see the new ‘Conditional Variants’ section on the Preview screen when the deployment is in ‘Draft’ state.
Benefit: Accelerate testing and approvals for emails containing conditional content
Usage Notes:
This feature is currently only applicable for deployments which have :
- Target Group Type = Static and
- TG Sources = File Upload or FTP
For a Recurring Deployment with a Dynamic Target Group, you can use a sample TG file to Draft a test version of the OneTime deployment and generate the test variants.
Step 1:
On clicking the 1st button ‘Generate Unique Conditional Combinations from the TG’, IMIcampaign will parse through the email conditional logic as well as the entire TG and generate unique combinations at the backend. This process is expected to take 15-20 mins. Once completed, IMIcampaign will send the following email notification to inform the deployment creator that the Step1 is completed.
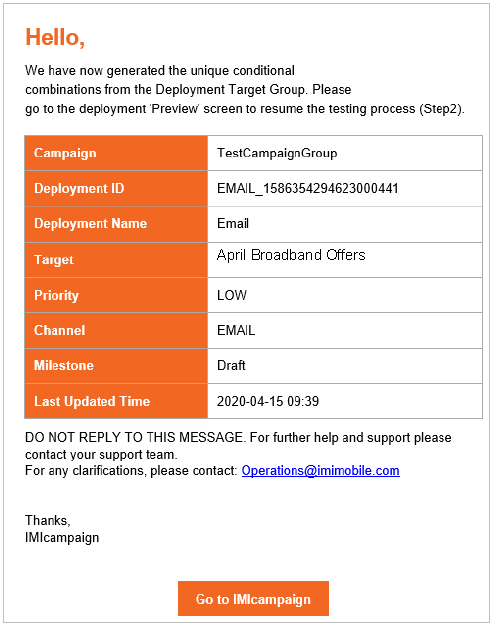
At this point, you can refresh the Preview screen and Step2 button will be enabled.

Step 2:
On clicking the 2nd button ‘Send Test Emails for Multiple Segment Codes’, a pop-up will appear.
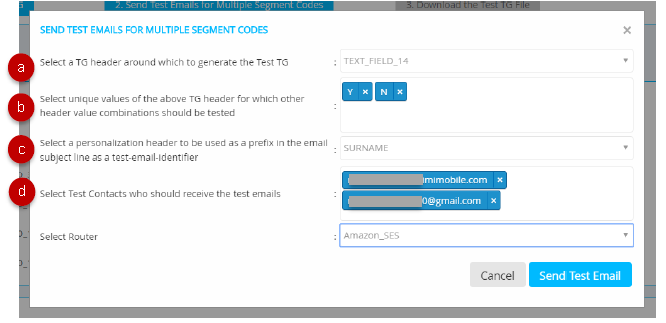
a) You can now select the TG header around which you wish to generate your conditional variants. This dropdown will only display TG headers which are:
- Used within the IF / ELSE conditional logic statements
- Designated as ‘Dynamic Reporting Headers’ for your specific tenant configuration
- Not encrypted for your tenant configuration (e.g. email address itself is always encrypted, so it will not be shown. If you have additionally other headers encrypted like first-name, physical address, etc, then those will not be available in this dropdown)
b) In the next field, you can select all the values of the selected header for which you would like to generate the tests. If your selected header has blank values for some of the contacts in the TG, you will see an option to select ‘BLANK_VALUE’. This will select all unique combinations for which the selected header has blank values.
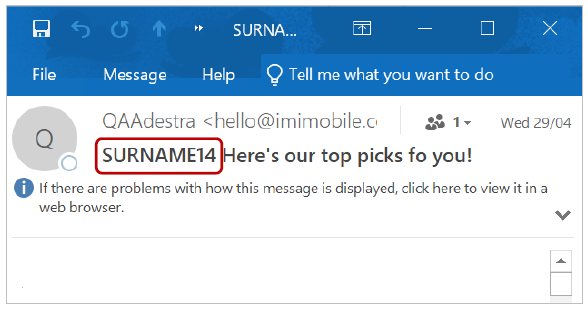
c) You will also be asked to select a ‘personalization header’. This header value will be replaced in the test TG file for all contacts - with a combination of this selected ‘personalization header’ name and a sequence number, e.g. if you select SURNAME as your personalization header, then in the auto-generated test TG file, all SURNAME values will be replaced with SURNAME1, SURNAME2,... SURNAME17 etc. This replaced value will also be added as a prefix in the email subject line of the test emails received by the test contacts (as shown in the screenshot below). This will help you identify which test email matches with which row in the test TG file.
d) You will then be asked to select your Test Contacts to whom the test emails should be sent. All the Test Contacts will receive all the unique combinations, e.g. if you select 2 Test Contacts and there are 9 unique combinations, then a total of 18 emails will be sent.
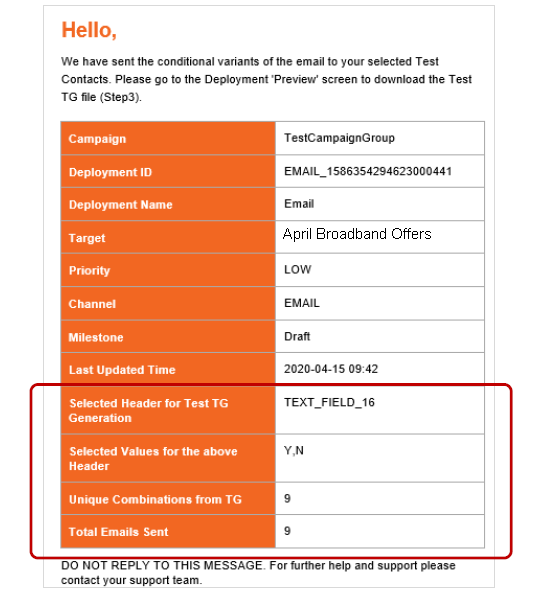
After all the test emails have been sent, you will receive an email notification from IMIcampaign stating that Step2 is completed. The email will also show the total count of unique combinations selected in the Test TG as well as the Total count of test emails sent.
At this point, the Step3 button will be enabled on the Preview screen.
Step 3:
On clicking the 3rd button (‘Download the Test TG file’), you will be able to download the test TG and manually send it to all the selected test recipients – so that the test contacts will then be able to compare the actual test emails received by them against the header values in the test TG file.
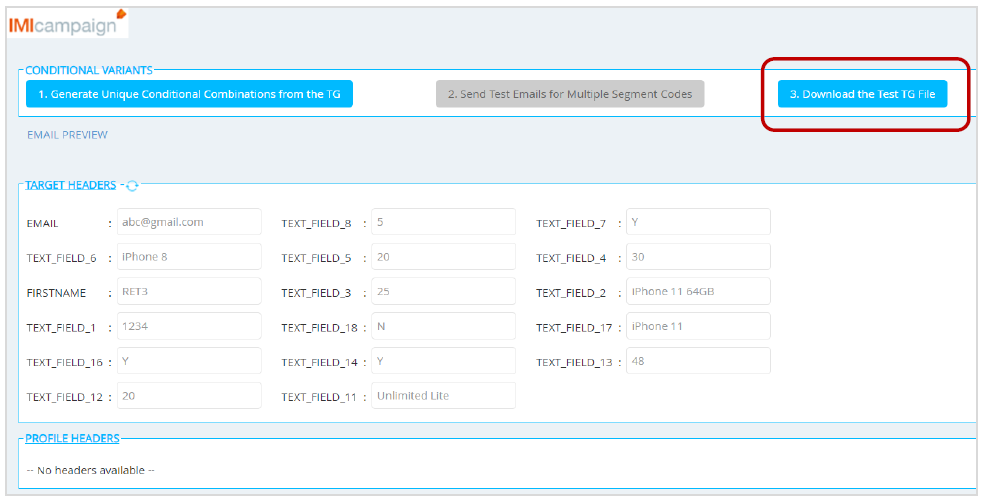
This test TG file is a subset of the actual TG file and will contain all the unique combinations identified by IMIcampaign from the actual TG, e.g. if the test TG file contains 17 unique combinations (17 rows of data), that means each test recipient will have received 17 test emails.
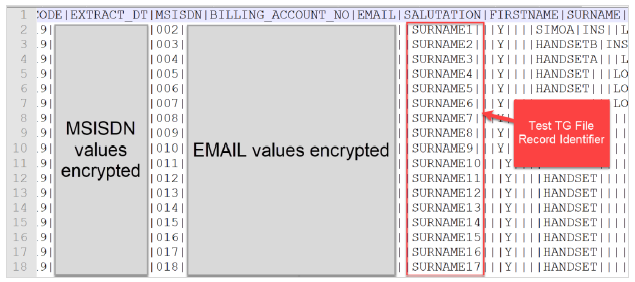
- In this test TG, any header values which have been designated as ‘to be encrypted’ for that TG (e.g. MSISN, EMAIL ) will be encrypted as per privacy and regulatory requirements. This downloaded file is expected to be sent across to test recipients who may be external stakeholders such as 3rd party creative agencies etc. That’s why in order to improve PII data protection, we have decided not to make the encrypted headers available in decrypted format in this file – even if the user has permissions to view the encrypted data as clear text in other contexts within IMIcampaign.
- This test TG file will also have the personalization header replaced with a unique sequential value (SURNAME1, SURNAME2, …, SURNAME14 etc).
- This personalization header value will be used as a prefix in the subject lines of the emails received by test recipients, e.g. as shown in the screenshot below, the test contact has received this email with a subject line beginning with SURNAME14. So, this test email will have conditional content which matches with data row with SURNAME14 value in the downloaded Test TG file.
Currently, there is a limitation whereby this feature works only if there is a valid value present in the last header for every contact record within the Target Group file. We will be removing this limitation over the next few weeks in the next minor product release update 5.4.1.
2.4 Email Channel: Custom 'Reply-To' Addresses
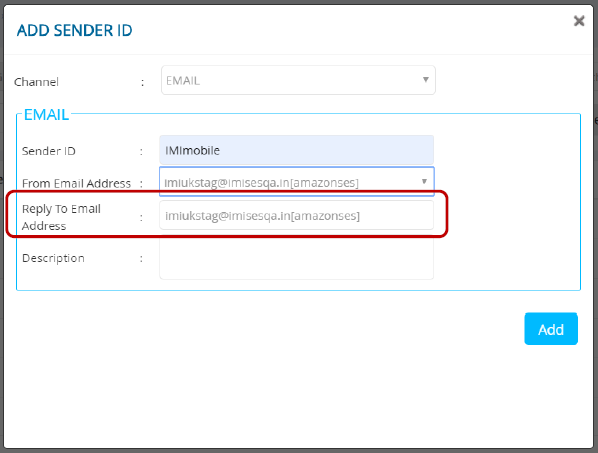
You will now have the option of configuring a ‘Reply-To Email Address’ for all the Email Sender IDs. By default, the ‘From Email Address’ will be selected as the ‘Reply-To Email Address’. However, this field is editable, and you can choose to enter any other valid email address.
2.5 Email Channel: Allow Duplicate Emails Within a TG File
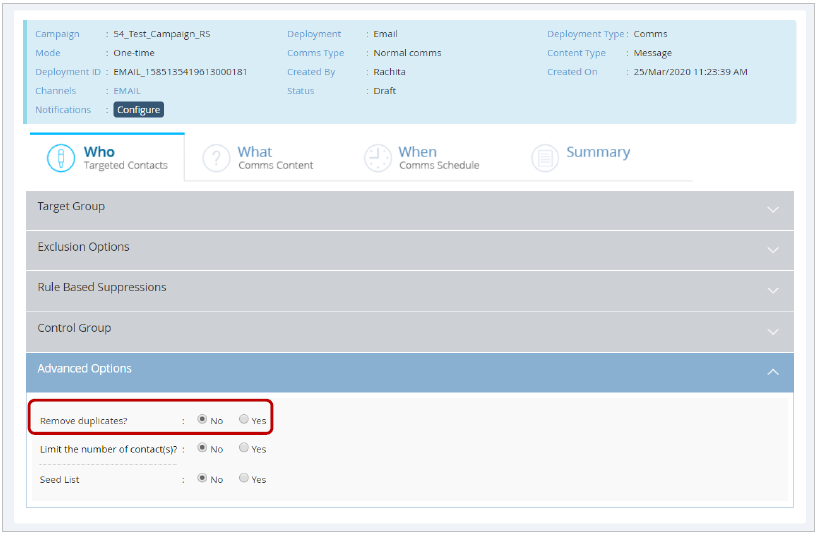
You will now be able to have duplicates in your target groups for Email Deployments when using Amazon SES router. The ‘Remove Duplicates?’ option can be found within the ‘Advanced Options’ accordion on the WHO tab. By default, the ‘Remove Duplicates?’ value will be set to ‘Yes’.
This enhancement is related to the ServiceNow ticket IMI-PRB0041239.
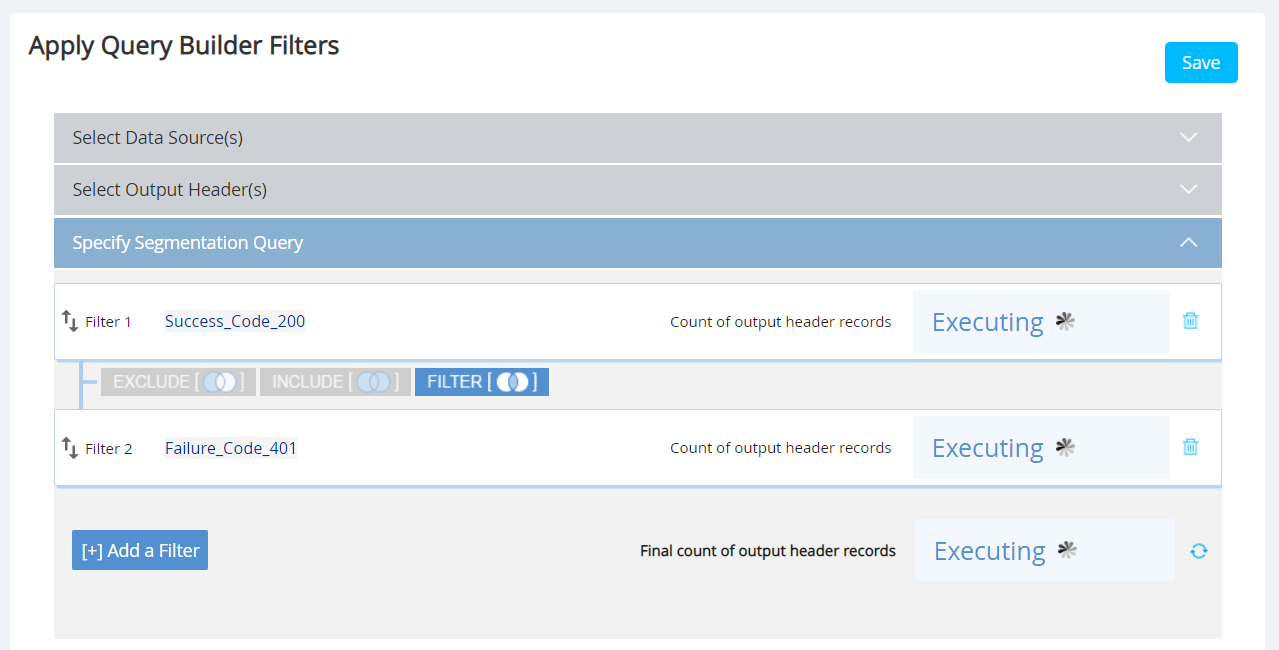
2.6 Ext Action Channel: Follow-Ups on Specific Success / Failure Responses
You will now be able to create follow-ups to External Action (API) parent deployments based on specific success and failure response codes returned by the 3rd party API.
How to use this feature:
- Select your Parent ‘Ext. Action’ Deployment and click on ‘Apply Segment Query Filters’.
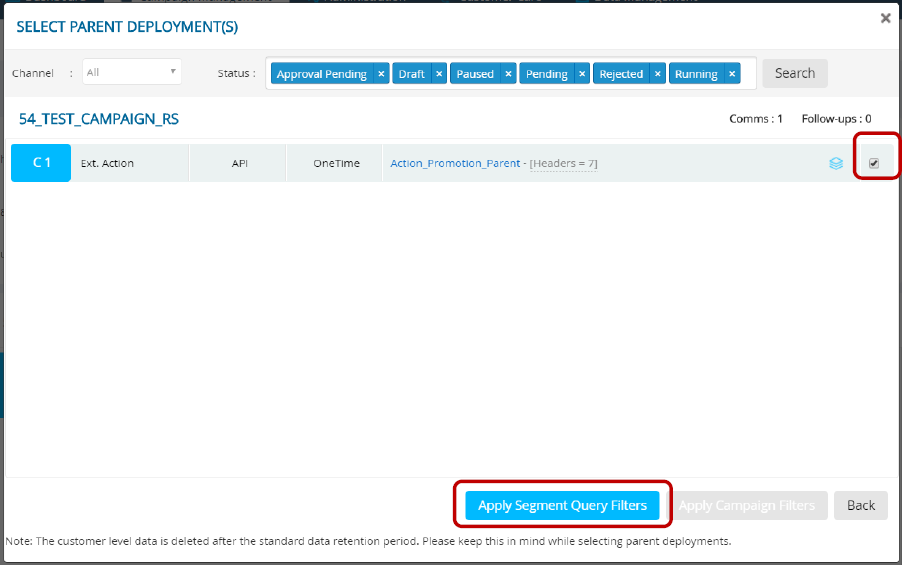
- When defining filter conditions, select parent campaign and deployment(s).
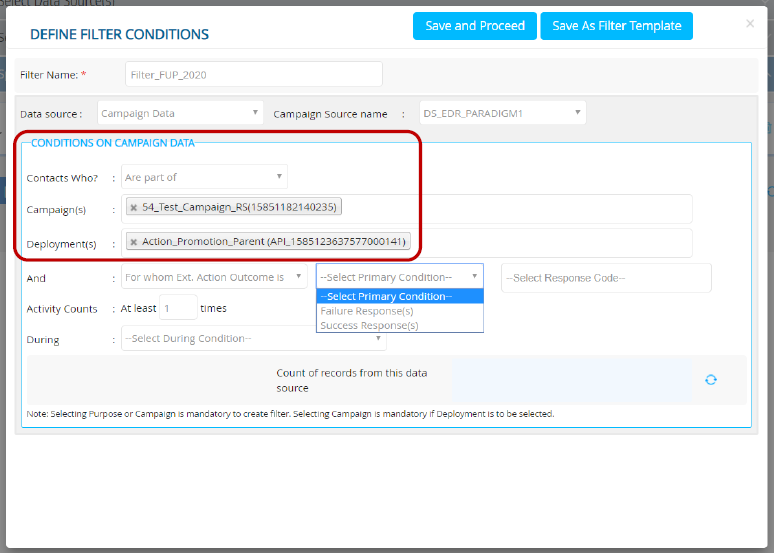
- Select Ext. Action outcome either Success or Failure response(s).
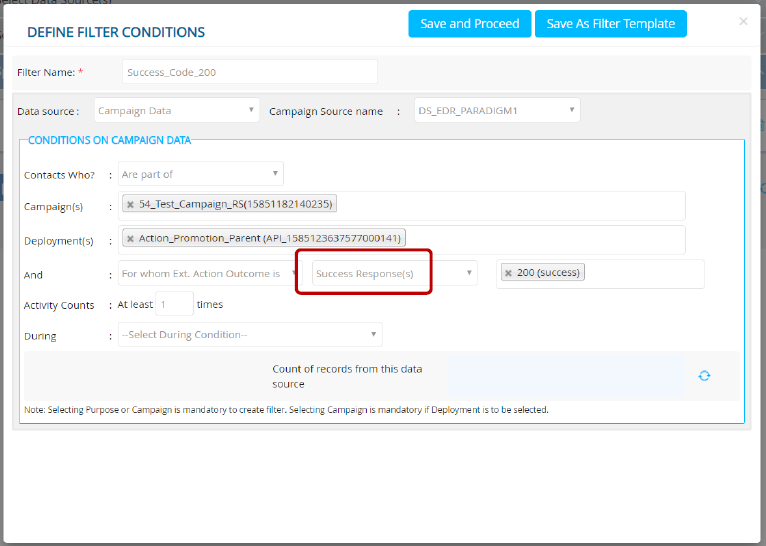
- In the multi-select field select the response code(s).
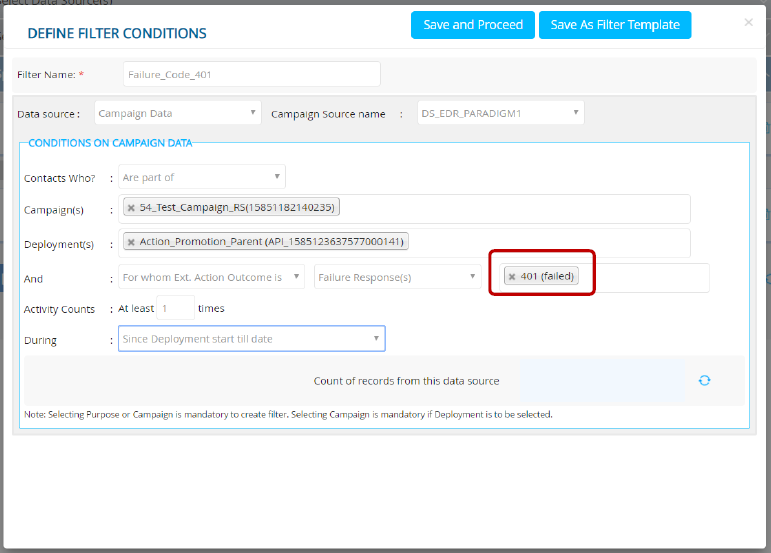
- If you would like to combine filter criteria for success and failure response codes within a single deployment, then you will need to define a second filter to select failure codes.
2.7 Mobile App Push Channel: Rule Based Suppressions
The Rule-Based Suppressions feature which was already available for Email, MMS, and SMS channels are being extended to Mobile App Push Channel in this release.
This feature could make it easier for clients to enforce adherence to their customers’ opt-out preferences. It is especially useful for clients who have many IMIcampaign users setting up a large number of Campaign Deployments. A challenge for these clients is how to reduce the possibility that their team of deployment-creators might forget to include some important contact-suppression criteria as part of Target Group definitions.
This feature will also be useful to suppress communications to customers with specific criteria other than their communication opt-out preferences e.g. as shown in the below screenshot, you might want to exclude customers within a specific city for a certain subset of your campaign deployments.
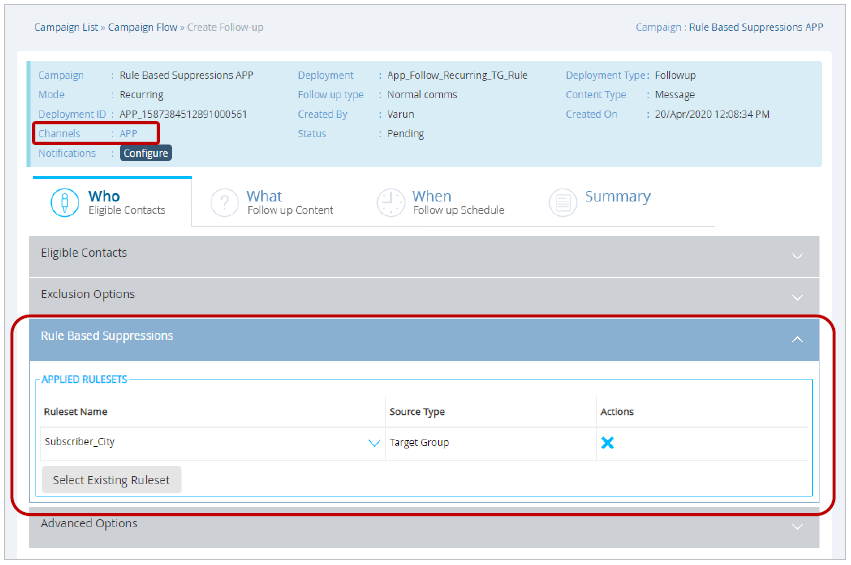
Rule-Based Suppressions will be available for the following types of Campaign Deployments :
- One-Time Comms
- Recurring Comms)
- One-Time Follow-Ups
- Recurring Follow-Ups
- Instant Deployments (Event-triggered): more on this in the next sub-section
For the App Push Notifications channel, the Rule Based Suppressions feature is only available when App ‘Input Data Key = CUSTOMERID’, i.e. it is not available for ‘Input Data Key = APPDEVICEID’
(App Input Data Key is selected on the Deployment >> Who Tab under Target Group accordion).
You will be able to see the contact counts from the TG who have been excluded because of a Suppression Ruleset in two places within IMIcampaign :
- On the Deployment Summary >> Counts quadrant in the bottom right part of the screen and
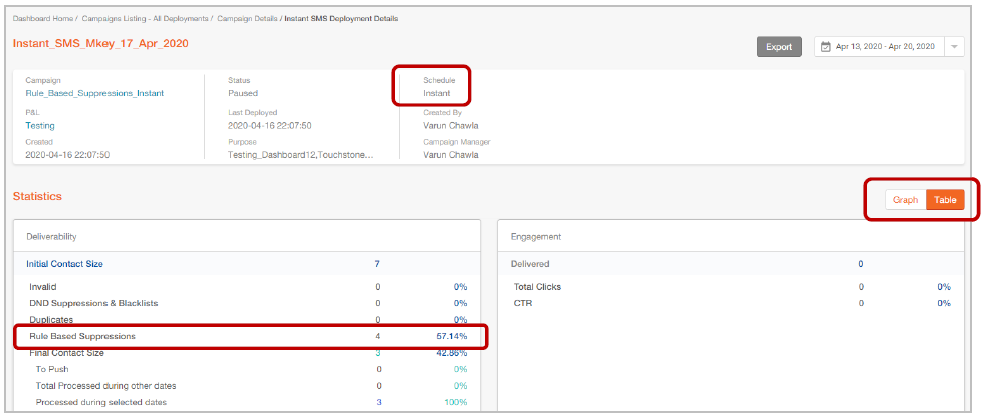
- On the Dashboard at both Campaign and Deployment Level (in Table View only).

How to configure Rule-Based Suppressions:
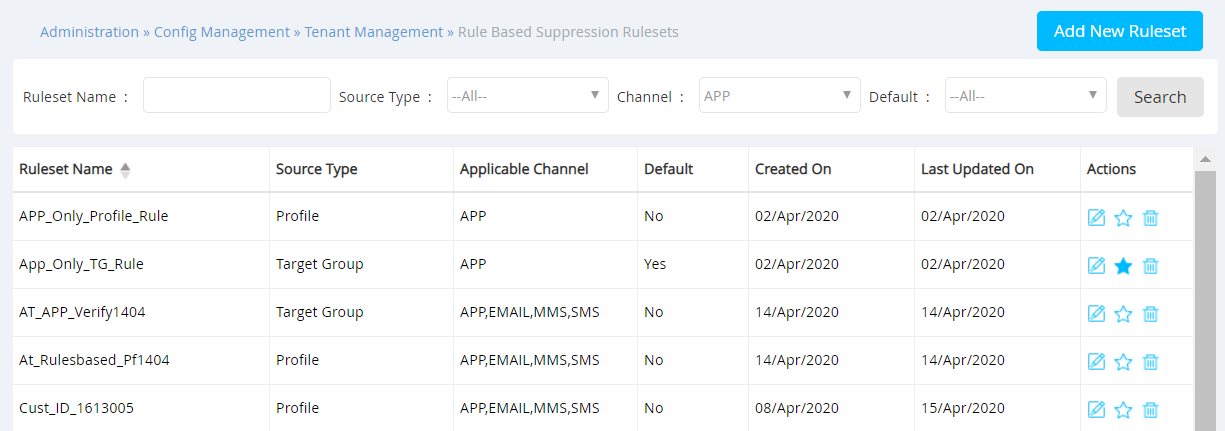
- The user who has the appropriate role/permissions can configure Rule Based Suppression Rulesets under the Administration tab (Administration >> Config Management >> Tenant Management >> Rule Based Suppression Rulesets).
- A Ruleset is applicable to one of the two Source Types: ‘Target Group’ or ‘Profile’.
- A Ruleset can be configured to be applicable for one or more of the 4 supported channels. (App, Email / MMS / SMS).
- A Ruleset can be designated as a ‘Default Ruleset’ by clicking on the ‘star’ icon.
- If some Ruleset(s) are made 'Default' for a channel, then these Ruleset(s) will be auto-selected on the Rule Based Suppression accordion under Who tab while creating a deployment. The deployment creator can choose to remove these “Default” Rulesets.
- If at least one rule-based suppression is mandated for a channel, then deployment creators will not be able to activate any deployment for that channel unless at least one Suppression Ruleset is applied to the deployment.
- If you want to enable this setting (“Enforce at least one Rule Based Suppression Ruleset” ) for one or more of the 4 supported channels, then please contact your IMImobile Account Manager.
2.8 Rule Based Suppressions for Instant Deployments (for 4 channels)
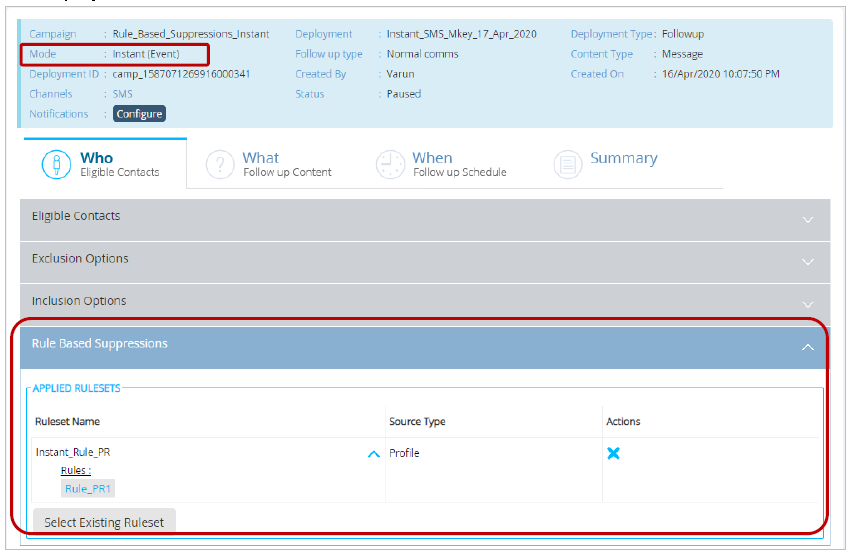
With this release, we are extending the Rule Based Suppressions feature to Instant Deployments for all 4 applicable channels (App, Email, MMS, and SMS).
Previously, this feature was available only for OneTime and Recurring Promotion Deployments (i.e. Comms and Follow-Up Deployments).
Rule Based Suppressions will be available for the following types of Instant Campaign Deployments:
-
Instant Follow-Ups to External Comms; i.e. those without any ‘parent deployments’
o Event-triggered Deployments initiated by 3rd party systems by calling the
Event API -
Instant Follow-Ups to Existing Comms / Follow-Ups; i.e. those with ‘parent deployment(s)’
o Event-triggered Deployments initiated by 3rd party systems by calling the
Event API
In addition, the following restrictions exist for Rule Based Suppressions for Instant Deployments: -
Other Instant Deployment Triggers (e.g. SMS MOs) are not supported for Rule Based Suppressions.
-
The selected Event must have the ‘Event Key Type’ as ‘Master Profile Key’ to be able to use this feature (other Event Key Types are not covered).
-
Only Rulesets with Profile Source will be available for Rule Based Suppressions in case of Instant Deployments.
You will be able to see the count of contacts who have been excluded because of a Suppression Ruleset on the Dashboard at both Campaign and Deployment Level (in Table View only).
2.9 User’s Current User Group Now Visible on All Screens
The current User Group you are currently working in will now be shown under your ‘Display Name’ in the near the menu in the top-right corner. This will help you to keep track of your current User Group as you navigate across the product screens.

2.10 Rename a Deployment while in Draft status
You will now be able to change the name of your deployment while the deployment is in ‘Draft’ status. On the Summary screen, the Deployment name was previously just a textual label; with this release, this has now been converted to a clickable link.
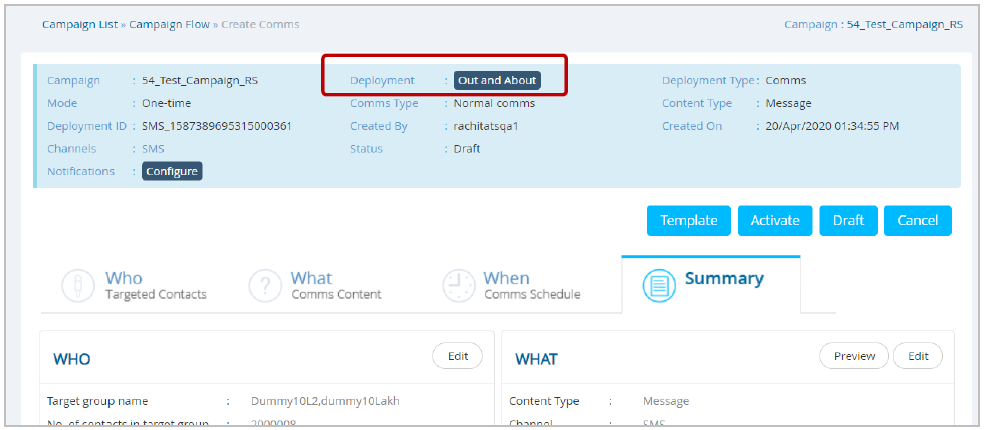
On clicking the Deployment name, you will be asked to enter a new name for the Deployment.
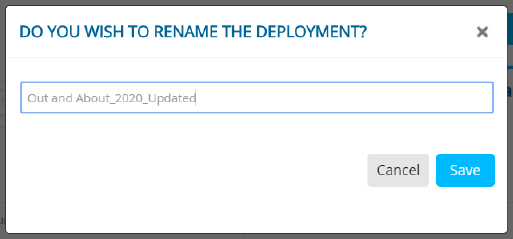
After clicking ‘Save’ on this pop-up, the deployment should be ‘Drafted’ again for the new Deployment name to take effect.
2.11 Campaign Flow: Default filter values for ‘Deployment Status’
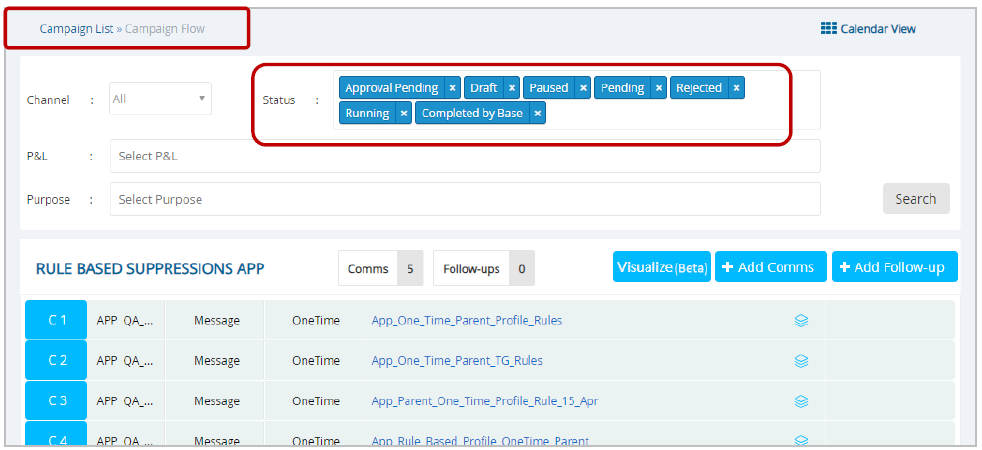
Now when you navigate to the ‘Campaign Flow’ screen to view the deployments under a Campaign, only the deployments with the following status values will be shown by default :
- Approval Pending
- Draft
- Paused
- Pending
- Rejected
- Running
- Completed by Base
Deployments with status values ‘Completed by Time’ and ‘Stopped’ will not be shown by default.
This small enhancement has been implemented based on user feedback to limit the number of deployments a user sees on this page and thus provide a more focused view.
You can easily change the selected statuses (e.g. to include the “Stopped” status or to remove one of the default selected statuses) and click ‘Search’ to view the deployments with your desired statuses.
2.12 New Channel: Facebook Custom Audiences
In this release, we are re-launching the ‘Facebook Custom Audiences Integration’ feature as a new ‘standard’ channel. Now you can schedule One-Time and Recurring Deployments for this channel.
This channel will enable you to push your TG data from IMIcampaign to Facebook Custom Audiences, which in turn can be used to target adverts to contacts across the Facebook ecosystem.
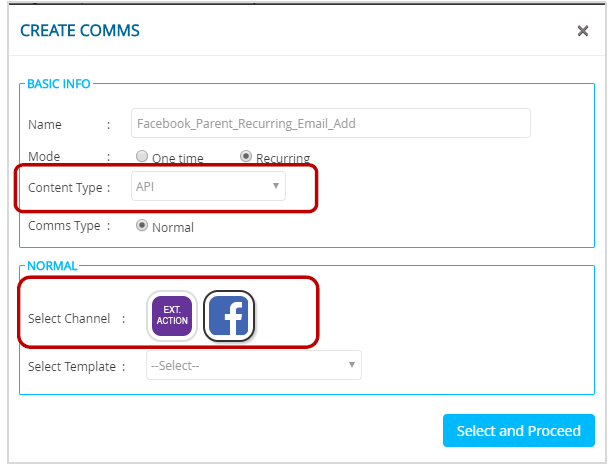
- You can create One-Time and Recurring Comms Deployments for this channel by selecting ‘Content Type = API’ and clicking the ‘Facebook’ channel icon on the ‘Create Comms’ pop-up.
- Similarly, you can create Follow-Ups for this channel using the ‘Create Follow-Up’ pop-up.
o For a Follow-Up Deployment, you will be able to select only one Facebook Deployment as its
Parent.
o While creating Follow-Ups, only the ‘Segment Query Filters’ option is available (‘Apply
Campaign Filters’ option is not supported).
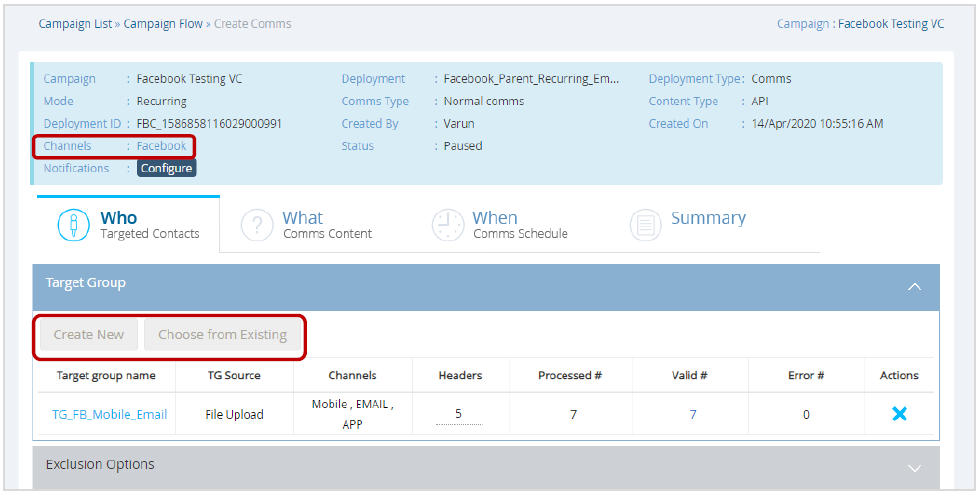
While creating a Deployment for the Facebook channel, on ‘Who’ tab:
- For the ‘Create New’ option: you will be able to only use TG Source =Profile Data.
- For the ‘Choose from Existing’ option: you will be able to select already existing TGs with any source (e.g. Profile Data, File, FTP etc).
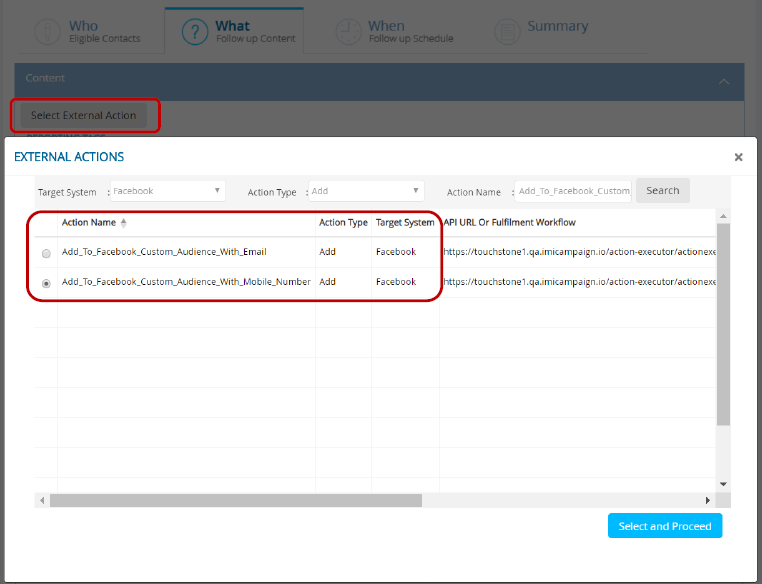
While creating a Deployment for the Facebook channel, on ‘What’ tab:
- You will need to select one of the pre-configured API External Actions on the Deployment. Currently, the following two API External Actions will be pre-configured:
o Add_To_Facebook_Custom_Audience_With_Email
o Add_To_Facebook_Custom_Audience_With_Mobile_Number
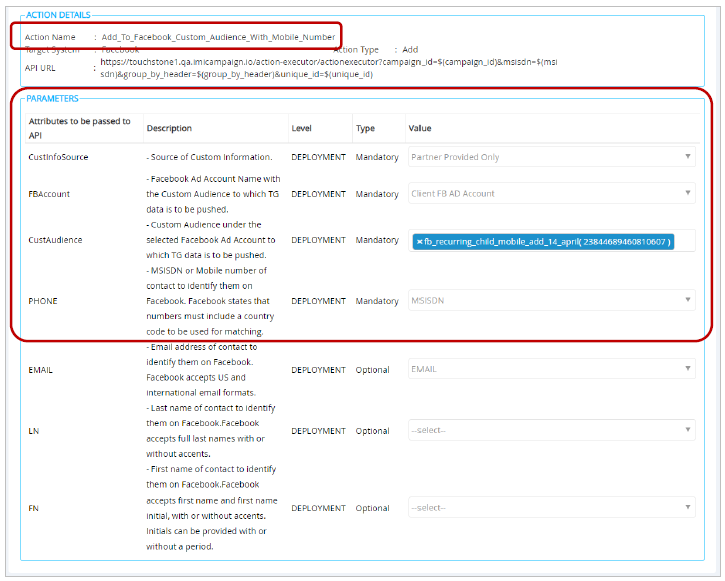
-
You will also need to provide values for the following mandatory parameters:
o FBAccount: You can select from the drop-down list of Facebook Ad Account
IDs that you would have previously configured on the following screen: Data
Management >> Integrations >> Facebook >> Facebook Ad Accounts.o CustAudience: You can choose an existing “Custom Audience” from the drop-down list (visible after you select the FBAccount) or you can enter the name of a new Custom Audience to be created and populated as part of this Deployment execution. o CustInfoSource: You will need to select one of 3 possible values as allowed by Facebook. o Email or Phone: One of the 2 keys that will be used by Facebook to match your customers’ identity with their respective Facebook accounts. Depending on which of the two Ext Action APIs you selected previously, one of these is mandatory and the other is optional.
If you have the 'Facebook channel' enabled for your tenant, then the Facebook-related Ext Actions are available to all users across all User Groups. These cannot be restricted to specific User Groups.
Please do not edit, update, or delete these pre-configured Ext Actions in your tenant; doing so will adversely impact your ability to execute Facebook Custom Audience Deployments.
After the Deployment is activated, you will be able to see the relevant counts in two places:
- On the Deployment Summary >> Counts quadrant in the bottom right part of the screen and
- On the Dashboard at both Campaign and Deployment Level.
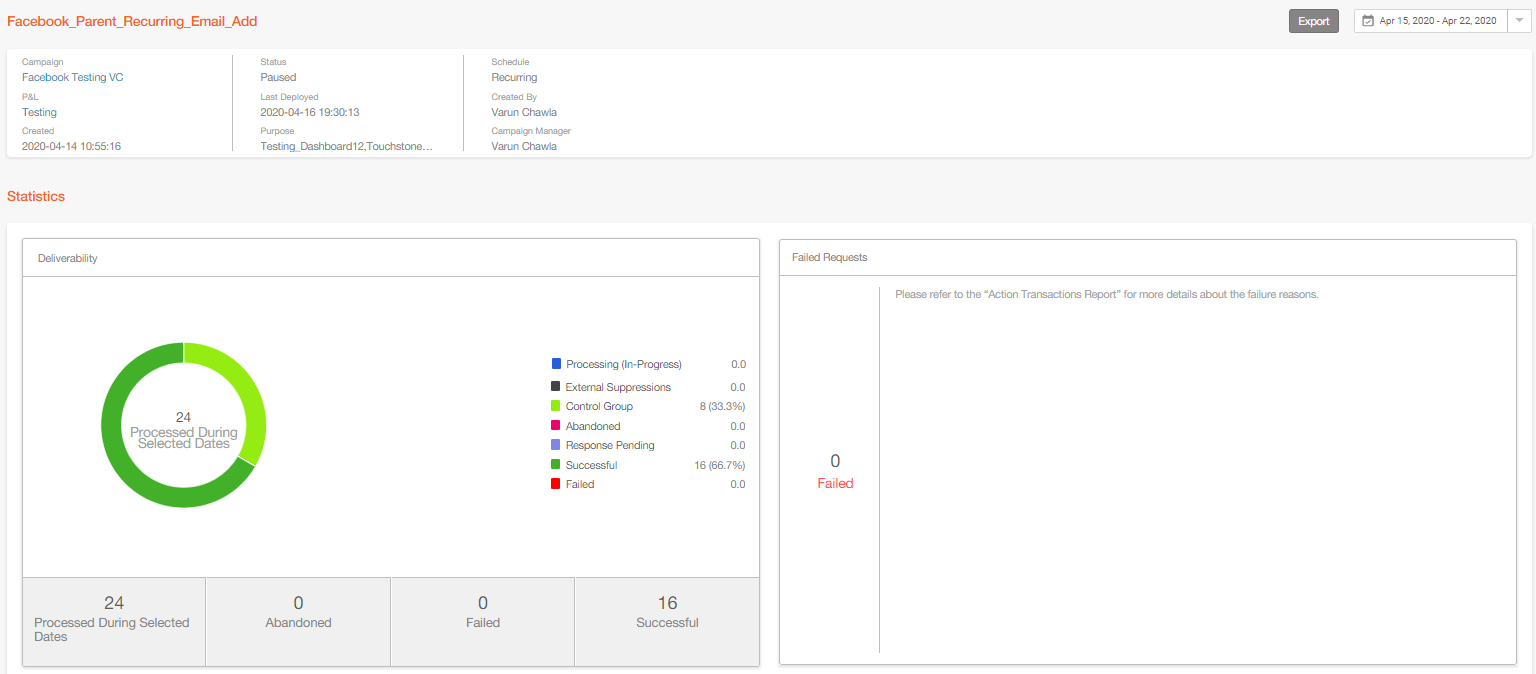
You can also use the pre-configured ‘Action Transactions Report’ to view the status of each Successful / Failed request and the specific Failure reasons.
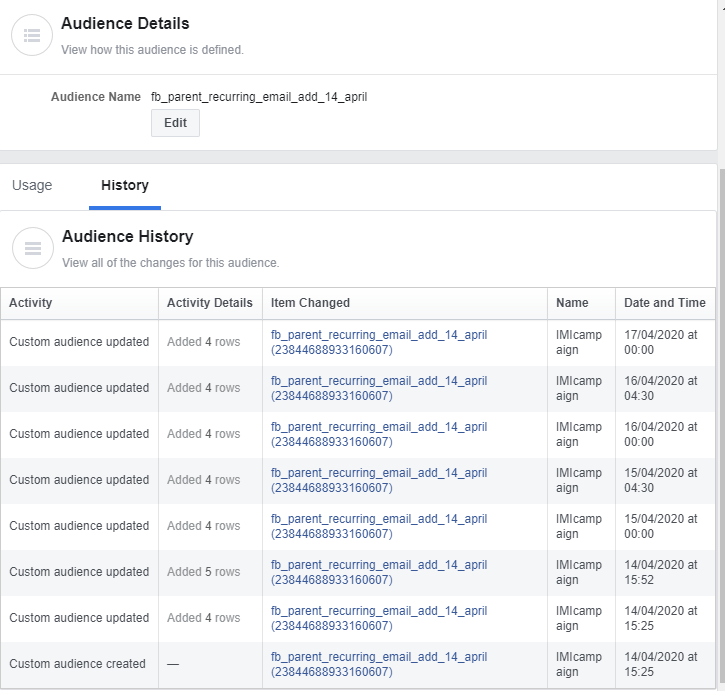
On your Facebook Business Account UI, you will be able to monitor the sync activity for your Facebook Custom Audiences ( Facebook Business Account >> Assets >> Audiences ) e.g. the sync history as shown in the screenshot below. These ‘Custom Audiences’ can be used to target Ads across the Facebook advertising platform (Facebook, Instagram, Facebook Audience Network, Facebook Stories, Messenger etc.)
3.0 Data Integration Capability Enhancements
3.1 Ability to query Amazon Redshift Remote Data Stores
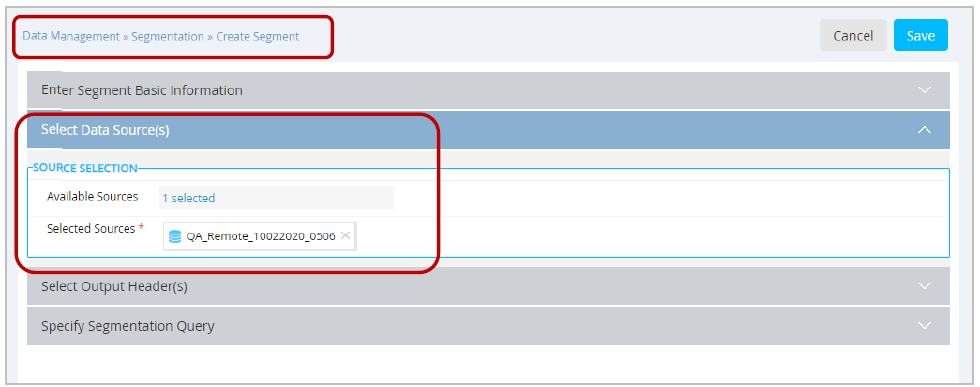
You will now be able to select Amazon Redshift Tables and Views as Data Sources while building segmentation queries under the Data Management menu. (Data Management >> Segmentation >> Create Segment).
Usage Notes:
- Only Remote Datastores for which “Import Data” setting is “ON” will be available to be selected while creating segments.
- You can add or update Datastores under Data Management > Data Ingestion > Feed (ETL).

3.2 Improved Data Ingestion (Feed ETL) from Remote Datastores
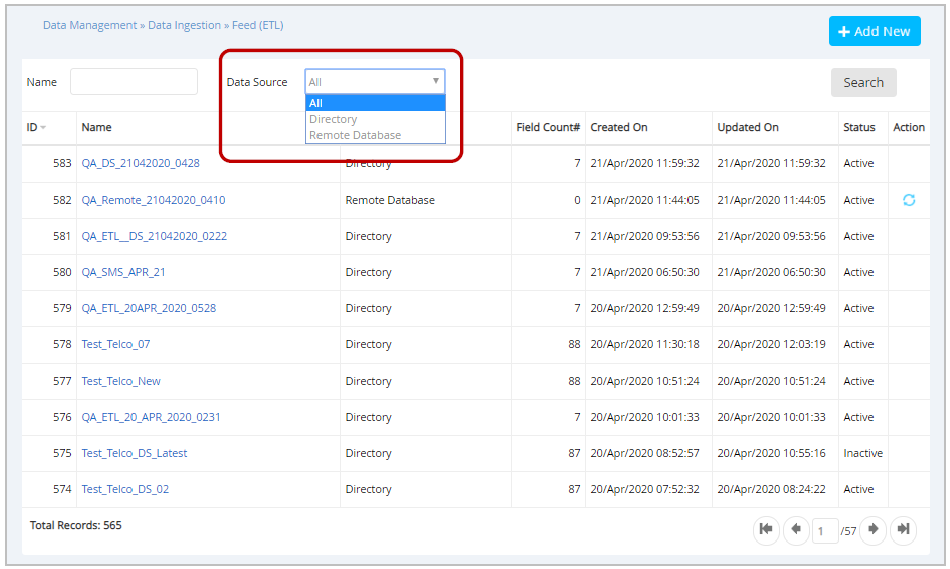
We have made the following UI improvements and removed some columns on the Feed (ETL) view screen (Data Management >> Data Ingestion >> Feed (ETL)) to provide a simplified experience.
- Added a new grid column labelled ‘Data Source’ and corresponding search field to filter the displayed list to show feeds with ‘All’, ‘Remote Database’, or ‘Directory’ data source. ‘All’ is the default selection for the search field.
- The columns "Map Count", "Day Filter", "Ignore Lines", and "Pre Process" have been removed from the grid. This information can be viewed by opening the feed by clicking on the feed name.
In addition, while adding a feed with ‘Remote Database’ source:
- The ‘Schedule’ field under Basic Info accordion will only be enabled if the ‘Import Data’ option is set to ‘ON’.
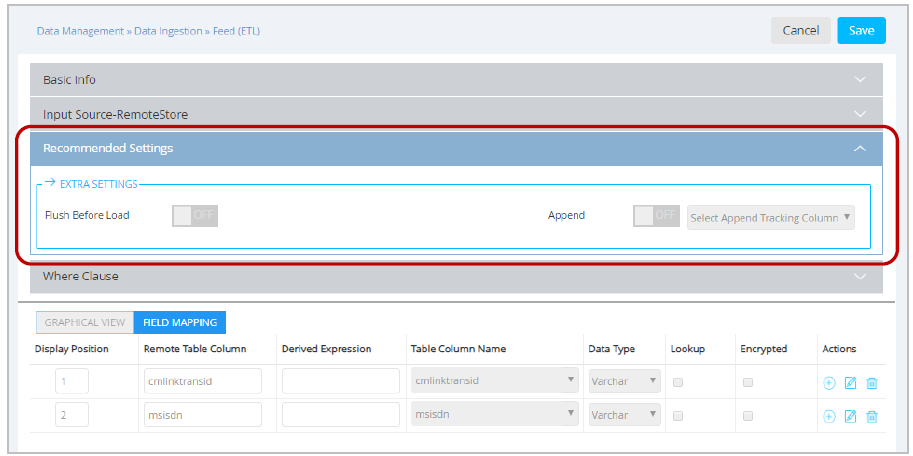
- Under the ‘Recommended Settings’ accordion, only the ‘Flush Before Load’ and ‘Append’ options will be shown. The other options which are shown under this accordion for ‘Directory’ data source do not apply in the case of ‘Remote Database’ source.
4.0 Drag-&-Drop Email Composer enhancements
4.1 Introducing Our First AMP Interactive Email Block: ‘Carousel’
We are very excited to introduce our first AMP Block: Carousel.
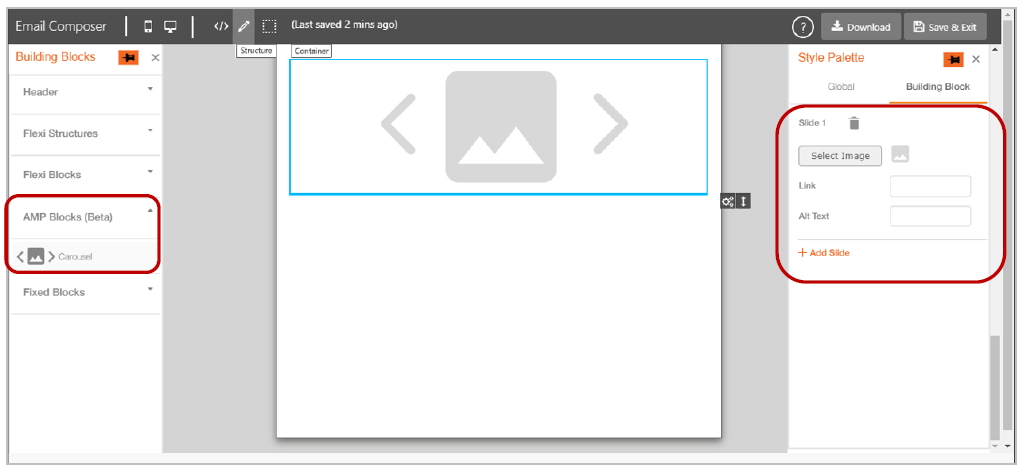
- You will find the ‘Carousel’ block under ‘Building Blocks’ Palette >> ‘AMP Blocks (Beta)’ section.
- You can add up to 5 slides in the Carousel from the ‘Style Palette >> Building Block’ tab.
- For email clients that do not support AMP Email capability, the first image of the Carousel will be used within the fallback HTML.
- The Carousel AMP Block (and other AMP Blocks that we will introduce in the future) will be available within the Email Composer only if the AMP Email option is enabled at the tenant level as mentioned in section 2.1 earlier.
You can see a video mini-tutorial showing how to use this AMP Carousel block here:
https://help.imicampaign.io/en/articles/3526764-interactive-email-with-amp-beta
Over the next few months, we will be introducing our next 2 AMP Interactive Email blocks:
- Accordion, and
- Carousel with Image & Text
AMP Block Style Palette Settings:
You can configure the AMP Carousel using the following settings and controls within the Style Palette:
- Select Image: You can select an image which is already uploaded in the ‘Assets >> Media’ section. After you select an image, a thumbnail preview will also be available.
- Delete slide: You can delete a slide by clicking on the delete icon. After a slide is deleted, the next slide will replace this slide, e.g. if slide #3 is deleted then slide #4 will become new slide #3 within the carousel.
- Link: You can add a link URL for the image in the slide.
- Alt Text: You can also add alternate text for the image in the slide.
- Add Slide: You can add up to 5 slides in the Carousel. You must associate an image with each of the already existing slides before you can add a new slide.
Preview of AMP Content:
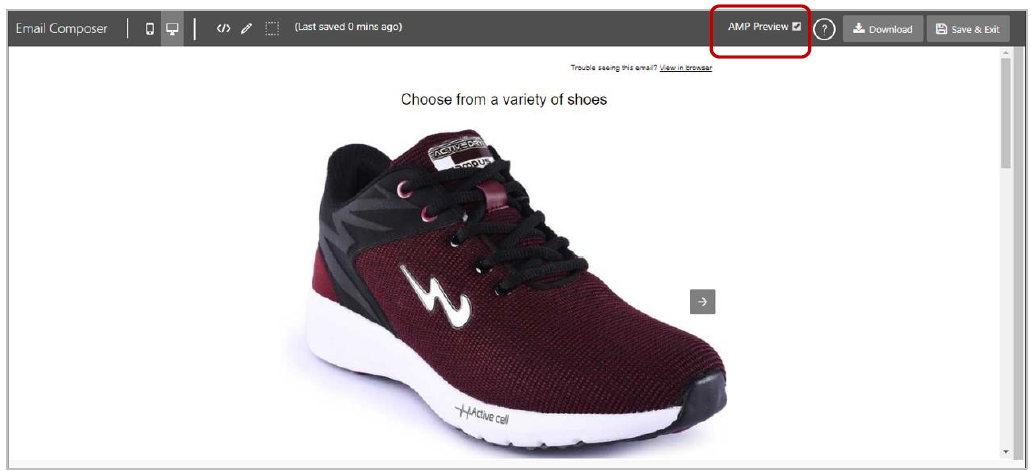
- If you added any AMP Email Block on the design canvas, then you will see the ‘AMP Preview’ checkbox on the black menu bar at the top.
- This checkbox will be selected by default and the preview of the AMP interactive content will be shown.
- To see the fallback HTML preview you can unselect this checkbox.
AMP Carousel Block - Usage notes, constraints, and caveats:
- When an AMP Block is used in an Email Template, the Email Composer will auto-generate two source code files: AMP HTML and HTML. Both these source code files are available by clicking the ‘Download’ button.
- An AMP block should be used in a new email template. Adding an AMP block to an already existing non-AMP email template is not supported.
- AMP email templates only support ‘secure links’ (i.e. those beginning with HTTPS). If you use any HTTP links within an AMP email template, then only the fallback HTML content will be rendered.
- The overall height of an AMP Carousel will be equal to the maximum height of the images added in its Slides, e.g. if a Carousel has 3 Slides with the respective image heights of 300px (Slide #1), 500px (Slide #2) and 400px (Slide#3), then the Carousel’s height will be 500px. A gap will be visible below the images on Slide#1 and Slide#3.
- The rendered height of the Carousel in mobile devices will be the same as that on desktop devices.
- How the width of the images within a Carousel impacts the rendering on different device form factors:
-
Image width less than 317px width:
o On Desktop devices: Image is rendered with its original width
o On Mobile devices: Image is rendered with its original width -
Image width more than 317px width:
o On Desktop devices: Image is stretched to occupy the full width of Container
o On Mobile devices: Image is stretched to occupy the full width of Container
-
The Email Heat Map is not available for AMP HTML.
-
The following Blocks are not supported within an AMP email template
- Partial
- Conditional Content
- HTML Source Code
- Product Compare
-
Although the ‘Partial’ block is not supported within an AMP template, you can still leverage already created HTML Partials by using the ‘Editable Partial’ block.
-
Within the 1-Column Flexi and 2-Column-Flexi Structures :
- ‘Full width background color’ setting is not supported for AMP email blocks
- Within the 1-Column Flexi, 2-Column-Flexi, and 3-Column-Flexi Structures:
- ‘Background Image’ feature is not supported for AMP email blocks
- ‘Horizontal alignment on mobile’ setting is not supported for AMP email blocks
- Within the ‘Text-Flexi’ Block:
- ‘Different font size on mobile devices’ setting is not supported within an AMP email template.
- ‘Apply Custom Font’ setting is not supported within an AMP email template.
- Follow the below link to view some of the common reasons that dynamic emails fail to render and instead fall back to the basic text or HTML.
https://developers.google.com/gmail/ampemail/debugging-dynamic-email
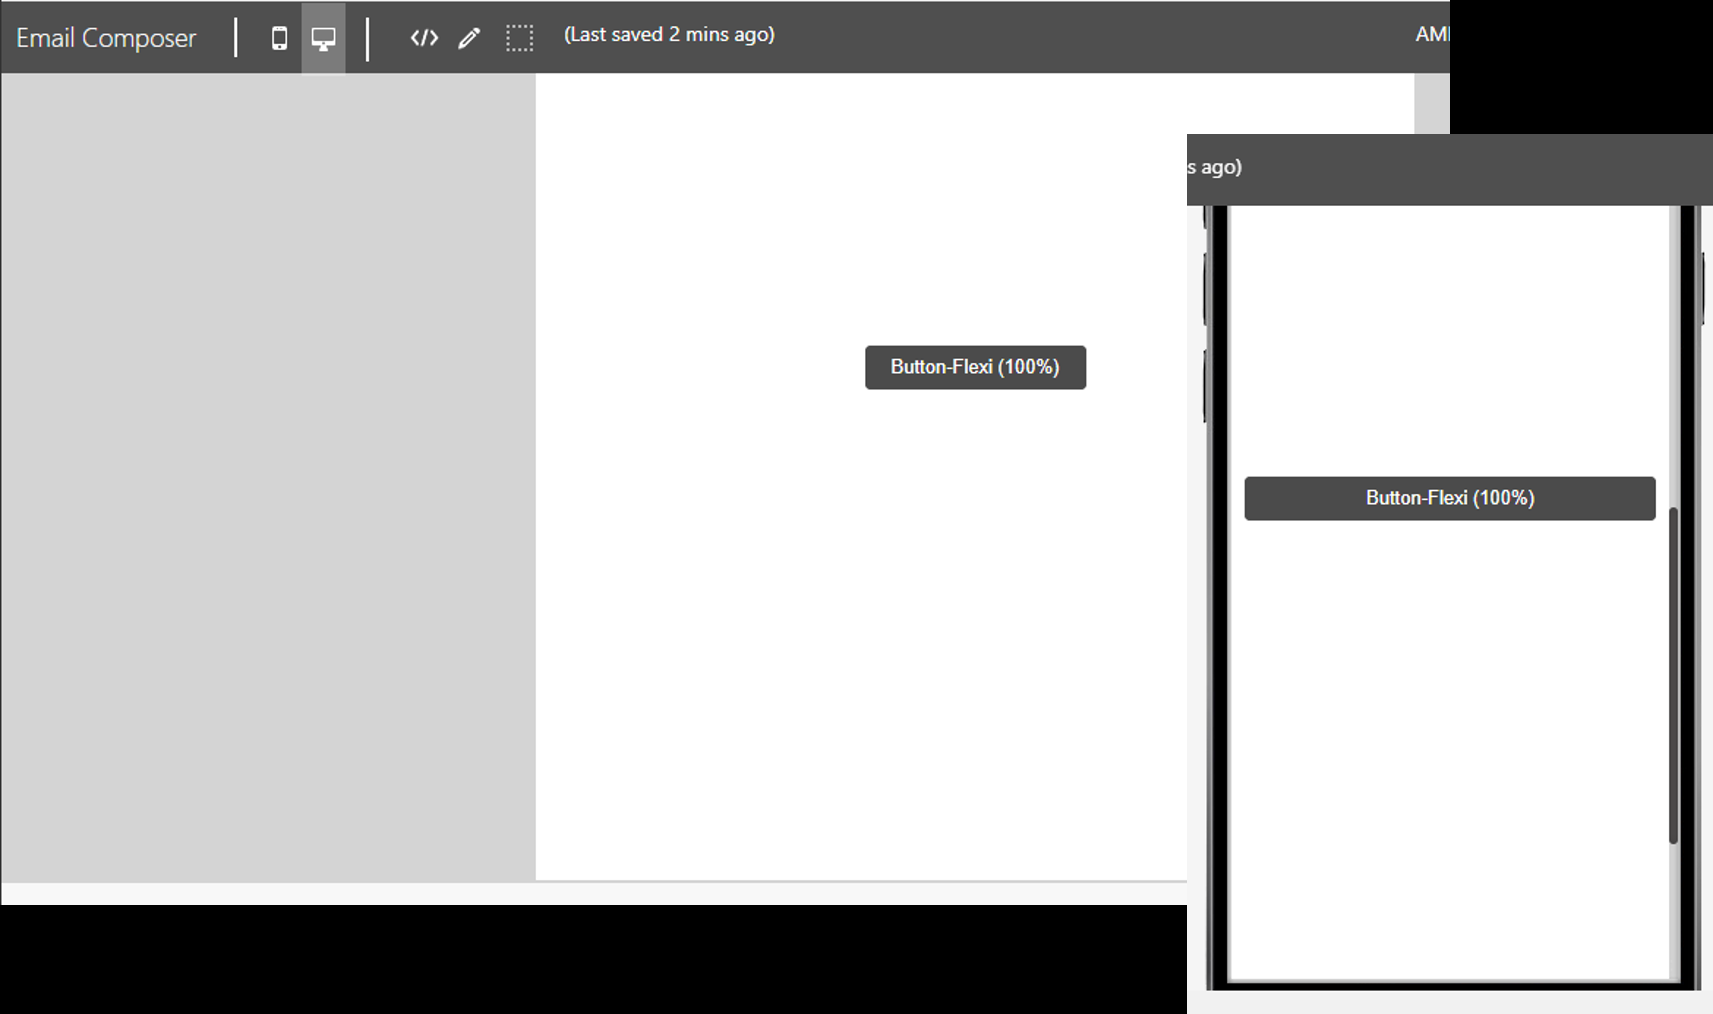
4.2 ‘Button-Flexi (100%)’ Block: Render Button in Full-width for Mobile Devices
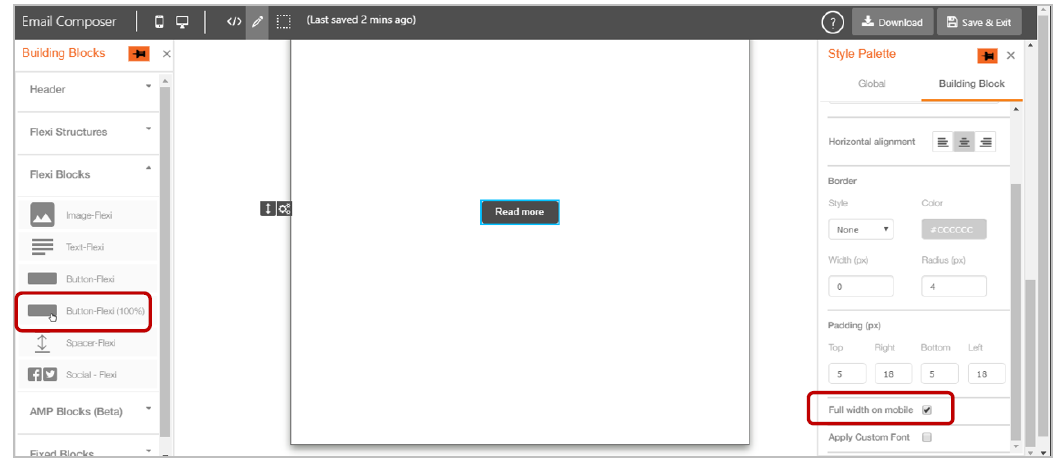
We have added a new setting for the ‘Button-Flexi (100%)’ Block called: ‘Full width on mobile’. When you select this setting, the button will occupy full width on mobile devices which should improve the user experience for CTA Buttons. This setting will be visible within Style Palette when you click inside the ‘Button-Flexi (100%)’ block.
Desktop & Mobile Preview:
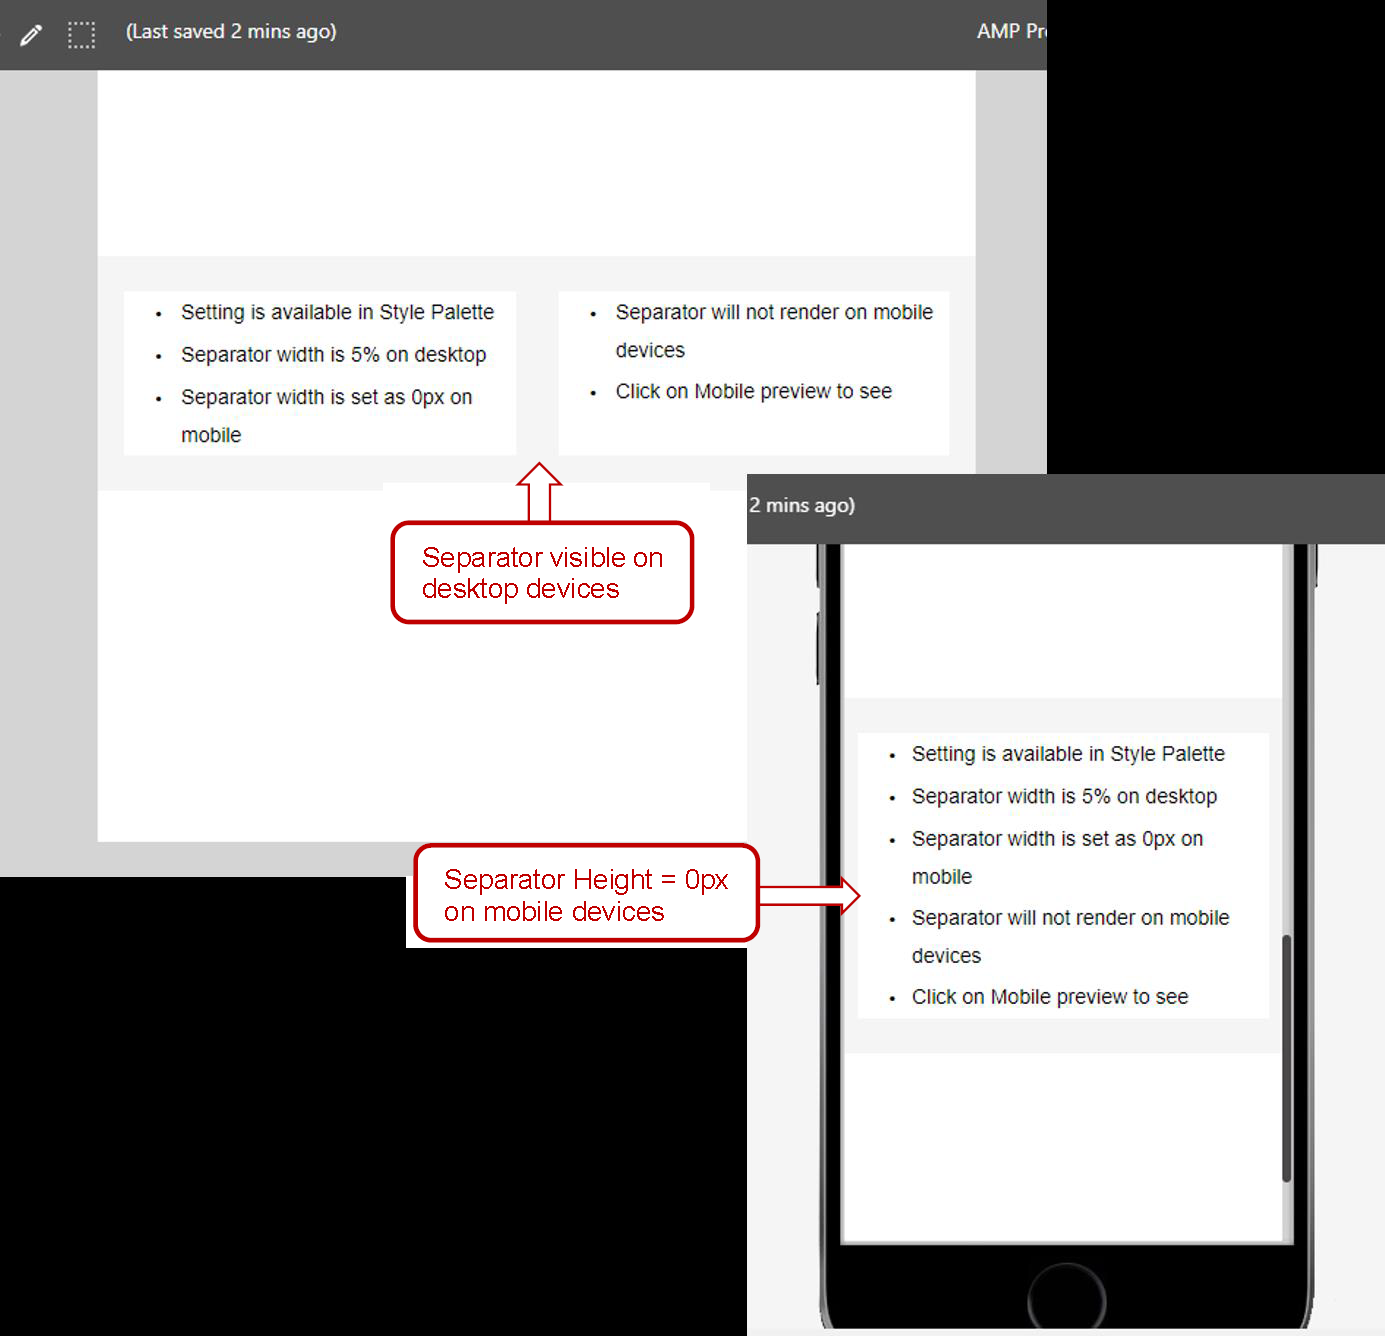
4.3 ‘2-Column-Flexi’ Structure: Different Height of Separator on Mobile Devices
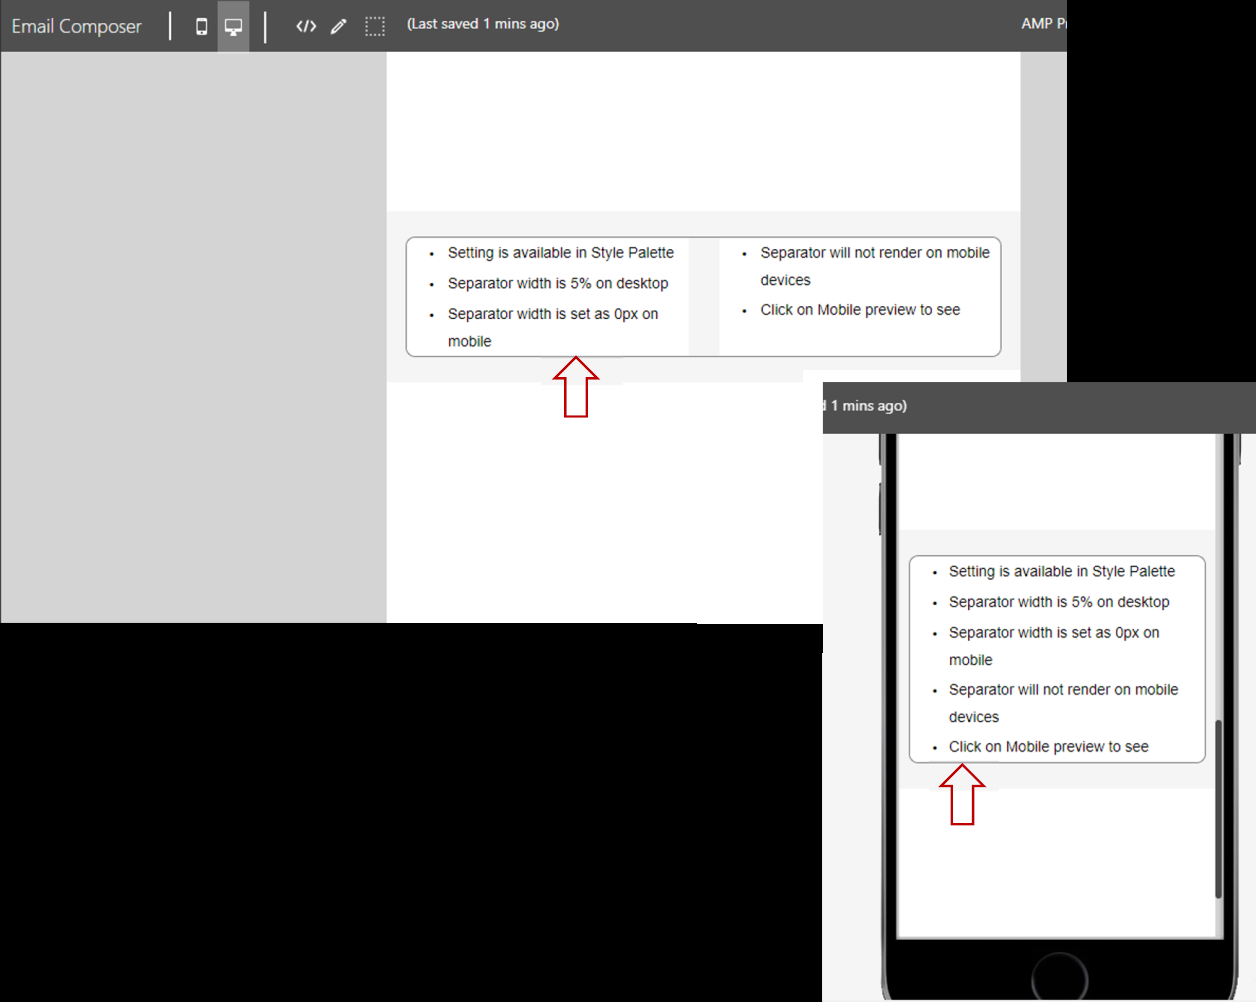
We have added a new setting for the ‘2-Column-Flexi’ Structure called: ‘Apply custom separator height’ (‘While Rendering on Mobile’). This will allow you to specify a different height on mobile devices for the separator between the 2 Containers within a 2-Column Flexi Structure. Previously, the width of separator on desktop devices was used as the height of the separator on mobile devices. This setting will be visible within the Style Palette when you click on the ‘Structure’ label for ‘2 Column Flexi’ Structure.
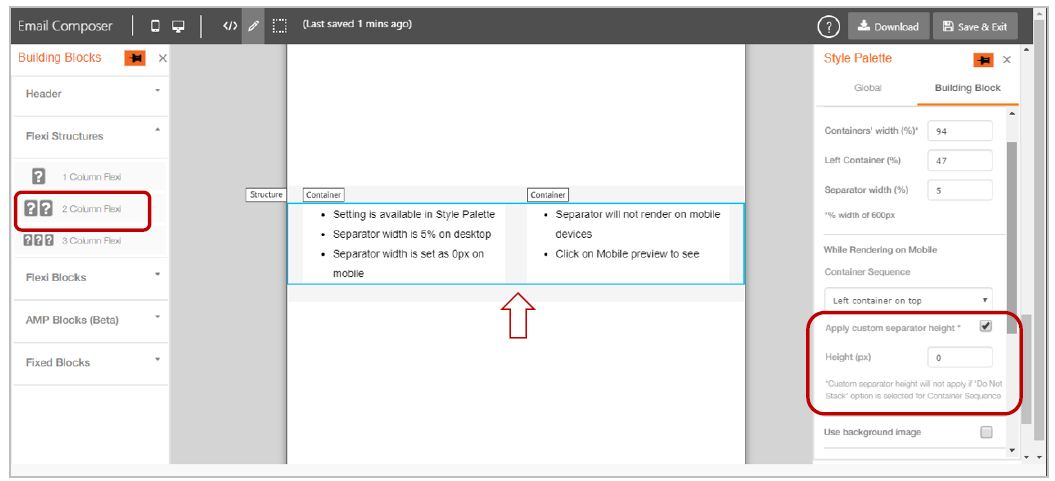
Desktop & Mobile Preview:
4.4 ‘2-Column-Flexi’ Structure: Configure Containers' Outer Border
We have added a new setting for the ‘2-Column-Flexi Structure’ called: ‘Containers’ outer border (Beta)’. This will allow you to add a common outside border to the 2 Containers within the ‘2-Column Flexi’ Structure. This setting will be visible within the Style Palette when you click on the ‘Container’ label within a ‘2 Column Flexi’ Structure.
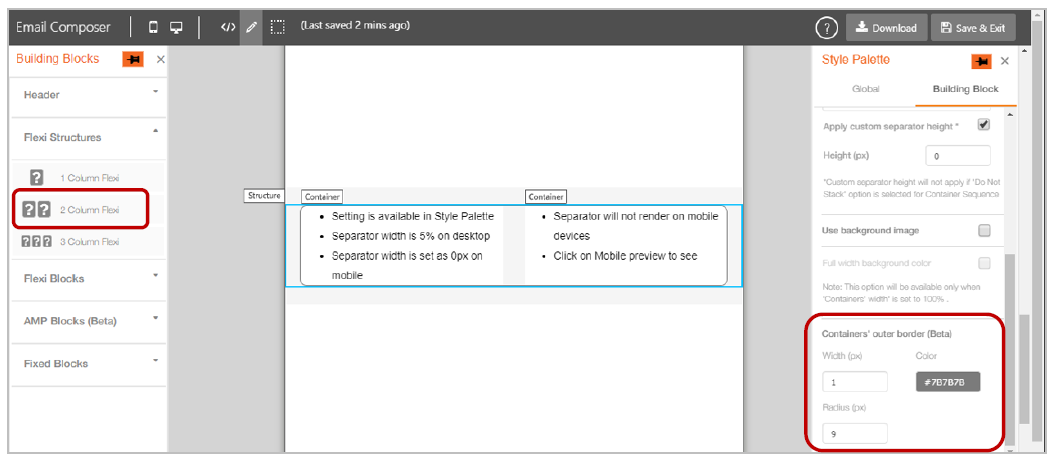
Desktop & Mobile Preview:
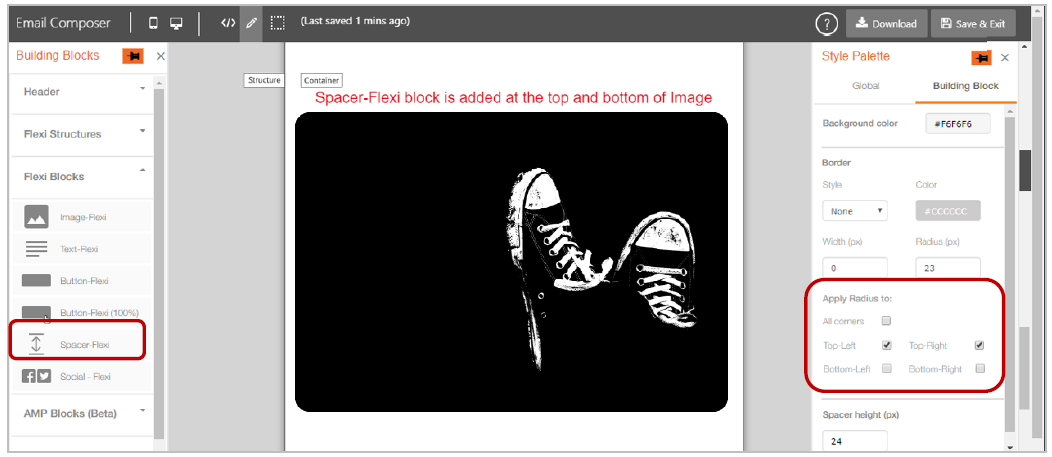
4.5 Spacer-Flexi’ Block: Border Radius option at corner level
You can now specify a radius to apply a curve to individual corners of the ‘Spacer-Flexi’ block. This setting will be visible within Style Palette when you click inside ‘Spacer-Flexi’ block.
You will be able to design a rounded corner look for your images using this feature by adding spacers immediately above and below images with the same background colours.
This enhancement is related to the ServiceNow ticket IMI-PRB0043797.
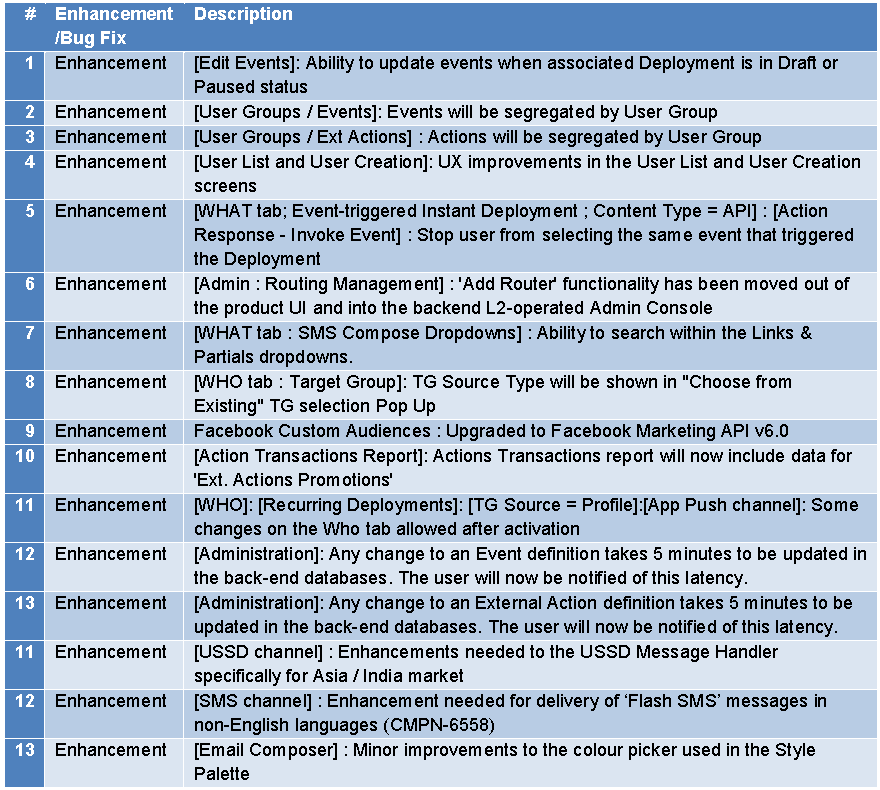
5.0 Maintenance items in this release
6.0 Need more information or help before or during the update?
Please contact your IMImobile account manager if you have questions or would like access to a new feature.