Release 5.2 - 2019 September
Click on the above link to view the complete list of new features, enhancements, and defect fixes.
1.0 New Dashboard
We introduced the New Dashboard in the previous release 5.1. In this release, we have added a few new features and enhancements. We have also been working behind the scenes to make the Dashboard Charts and Tables to load faster.
1.1 Deployment Timeline by Day of the Month
This card shows the variation of deployment metrics over a period. It is available for all types of deployments; however, it’s most useful for recurring deployments and instant deployments running over a number of days/weeks/months.
In the previous release (5.1), the X-axis could only show ‘months of the year’. In this release, we have enhanced this card to cover a few more scenarios.
When the selected date filter value is ‘Today’, ‘Yesterday’ or a ‘Specific Date’:
In this case, on the X-axis, the appropriate number of days for the month will be displayed; however, the data will be populated only for the selected value in the Date Filter at the top right corner of the page.

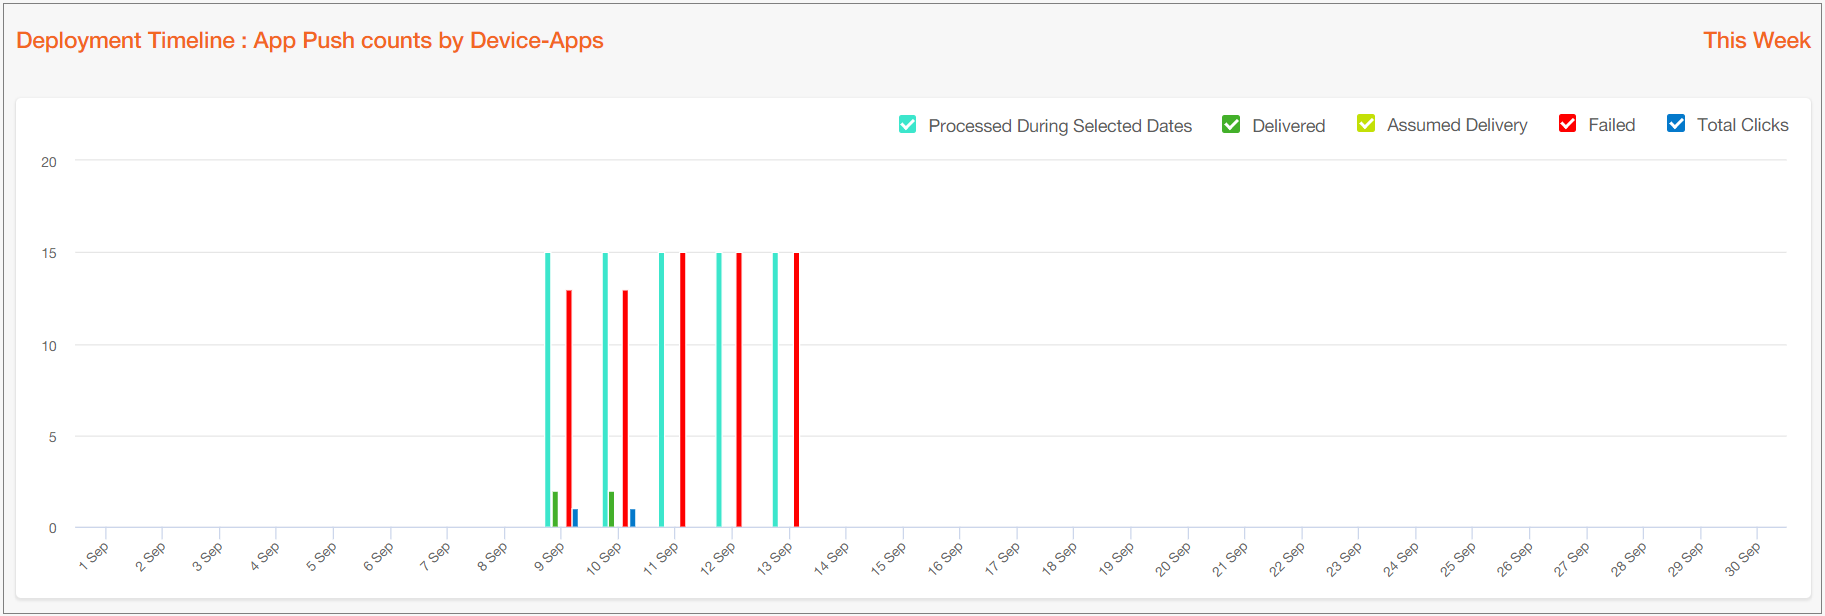
When the selected date filter value is ‘This Week’ or ‘Last 7 Days’:
In this case, on the X-axis, the appropriate number of days for the month will be displayed; however, the data will be populated only for the 7 days as per the selected value in the Date Filter at the top right corner of the page.
When the selected date filter value is ‘Previous Month’ or ‘Month-to-Date’ :
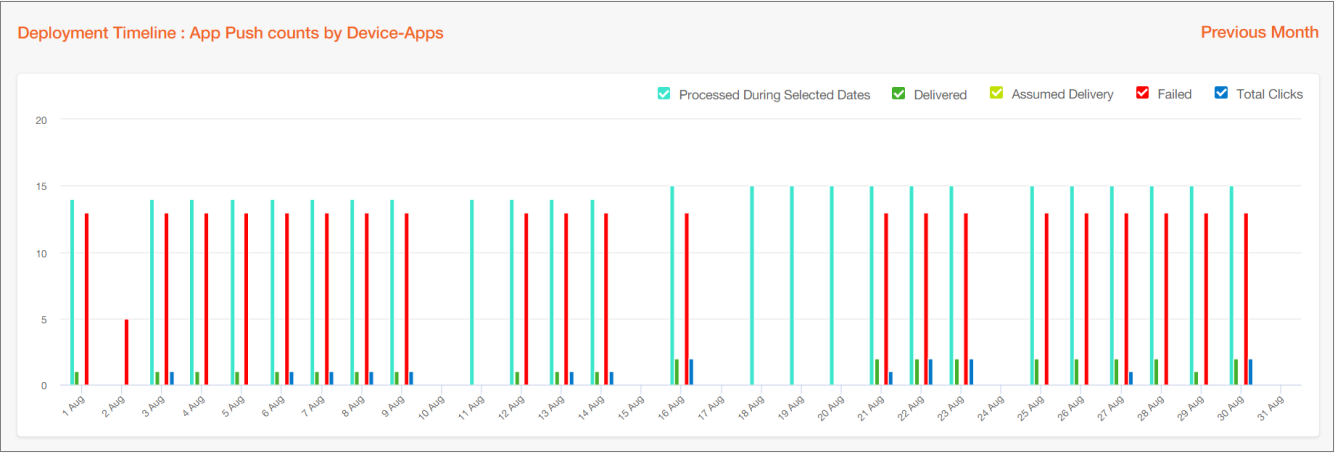
When the selected date filter value is ‘Date Range’ and the period span is less than 31 days:
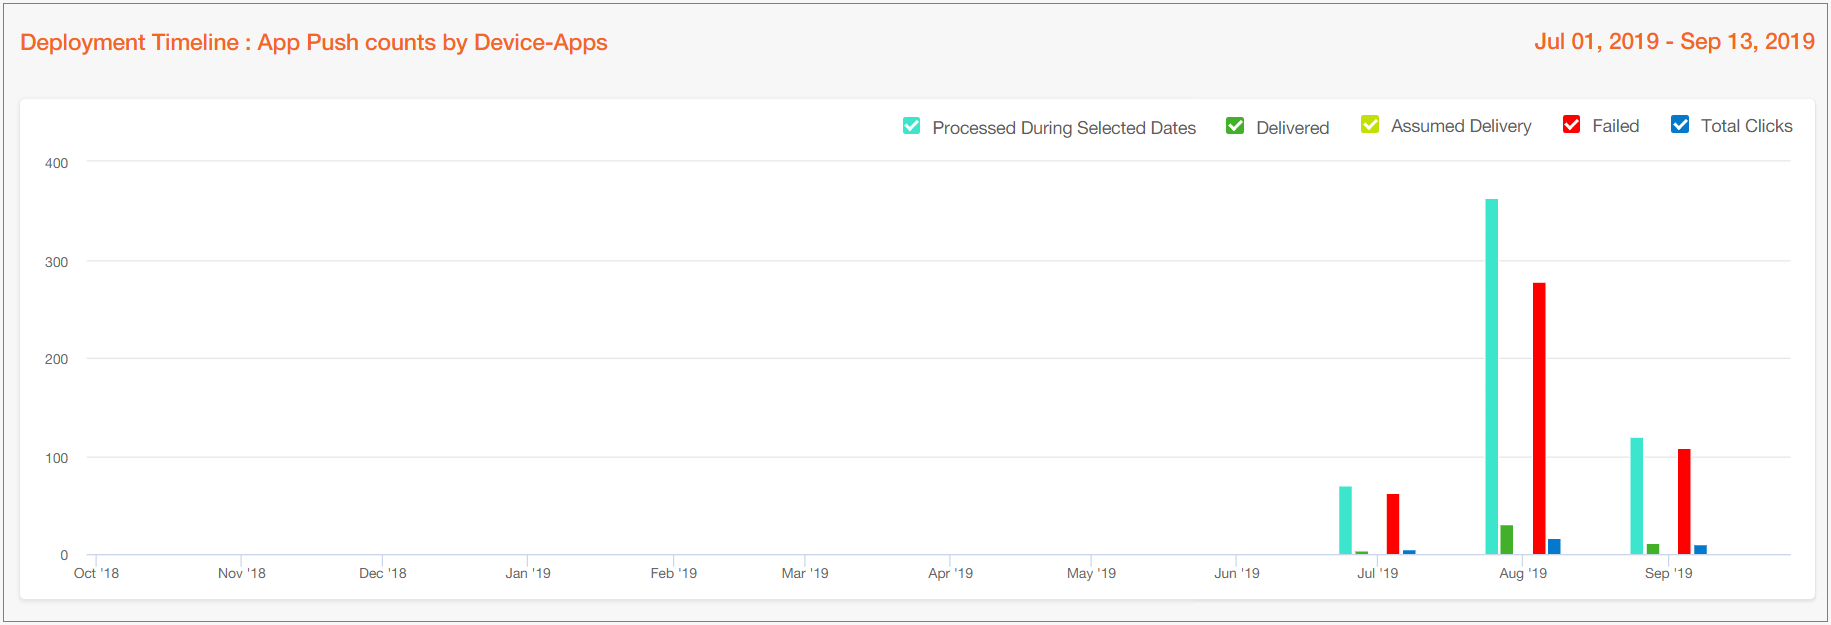
When the selected date filter value is ‘Date Range’ and the period span is more than 31 days:
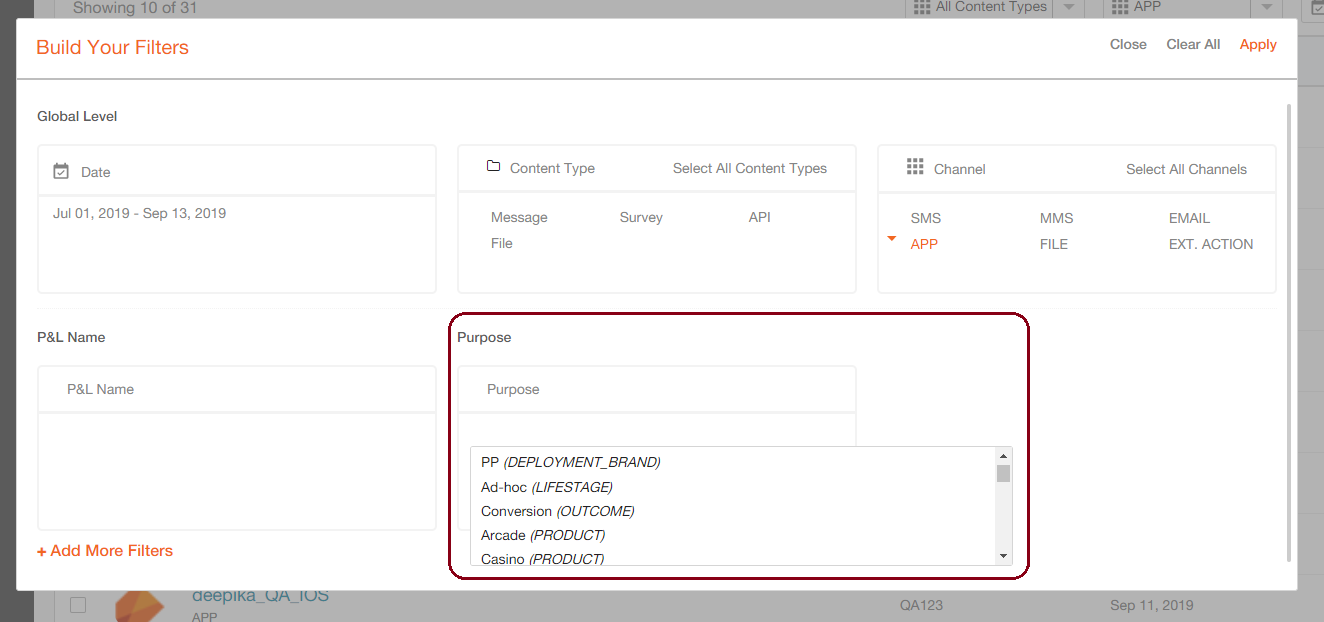
1.2 Additional Custom Filter for ‘Purpose’ fields
When building your own filters, now you can use the ‘Purpose’ fields. The ‘Purpose Group’ will be shown within parentheses following the selected ‘Purpose’ value.
1.3 Email Deployment Details: New charts for Email Clients & Email Inbox Domains
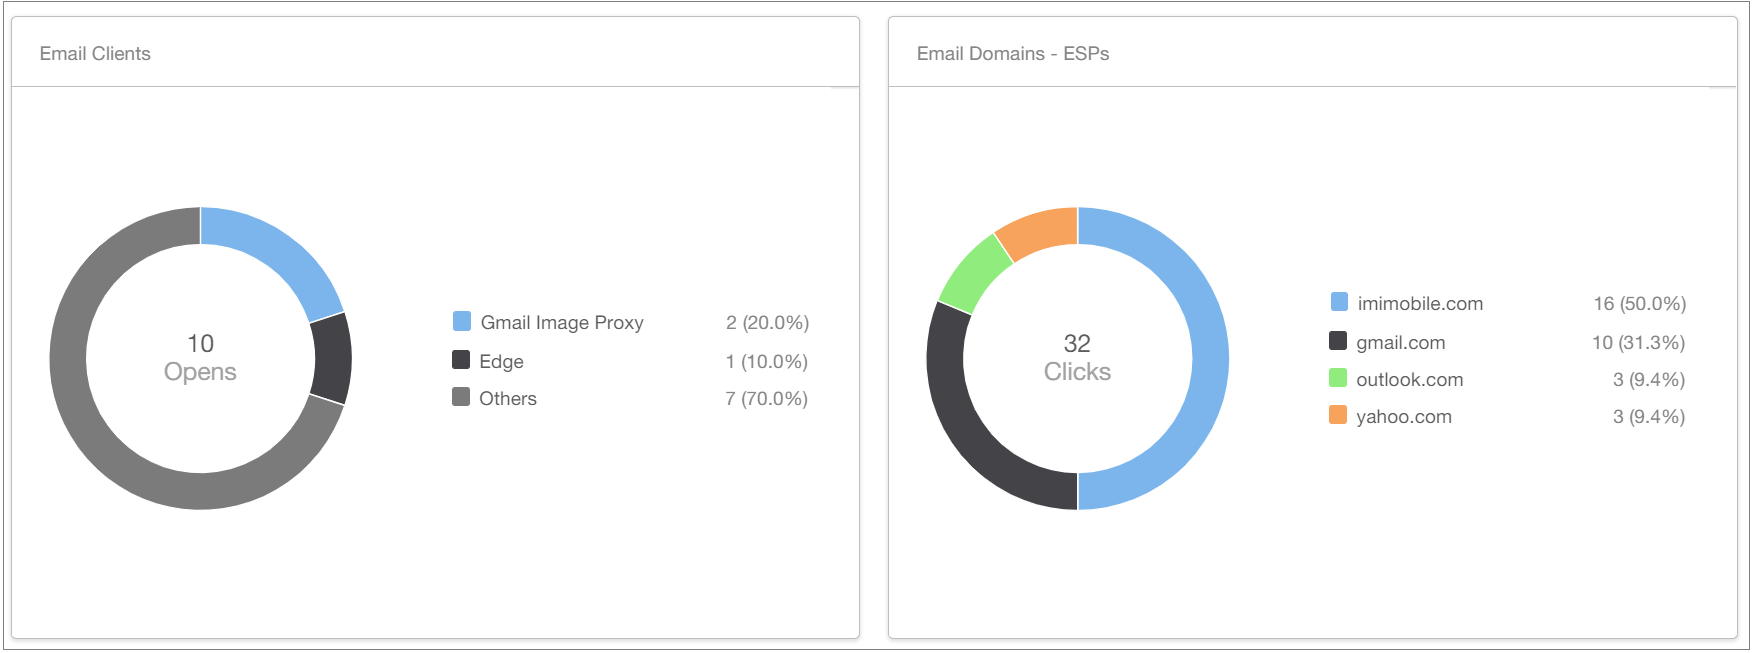
We have introduced 2 new charts under the Email Deployment Details page :
Email Clients chart: This uses Email Opens as the underlying metric
Email Inbox Domains chart: This uses Email Clicks as the underlying metric
The data used to populate these charts is available from Sept 2019 onwards. So, for deployments running prior to Sept 2019, the data in these charts will use some default values for Email Clients and for Email Inbox Domains.
2.0 Campaign Manager module enhancements
2.1 Wait Period for Onetime & Recurring Follow-Ups
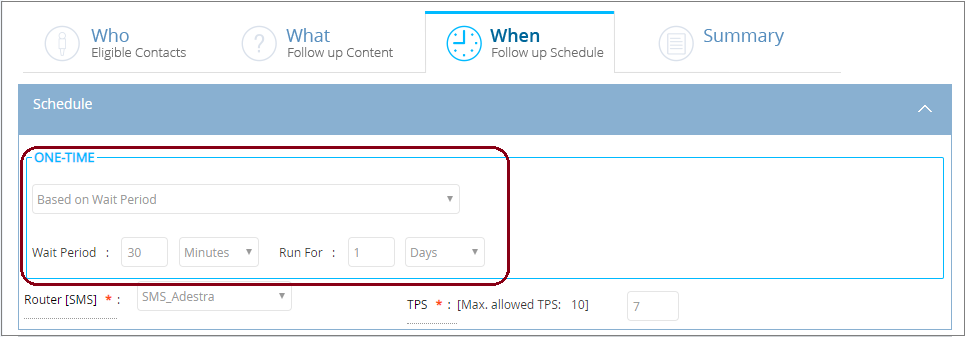
You will now have the option to schedule follow-ups by specifying a ‘Wait Period’ after the completion of the Parent Deployment.
- The ‘wait period’ value can be configured to be between 30 mins to 31 days.
- The ‘wait period’ will commence when the parent deployment’s status reaches ‘Completed by Time’, ‘Completed by Base’ or ‘Stopped’.
- For a One-Time follow-up, you can specify a duration in days/hrs until which the follow-up should run.
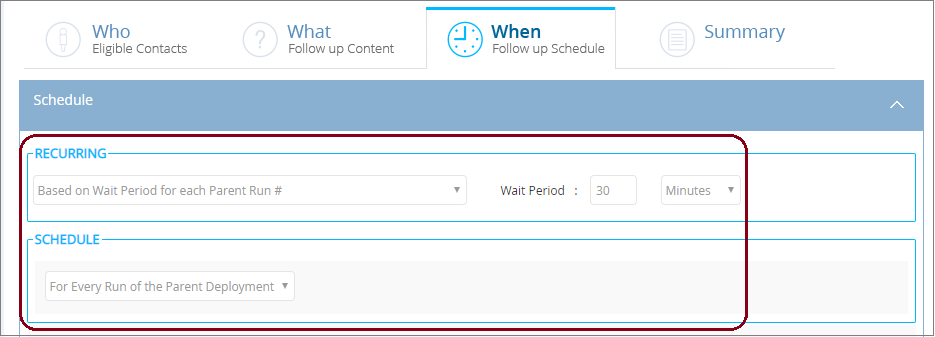
- For a Recurring follow-up, you can schedule it to execute after every ‘Run Instance’ of the parent deployment.
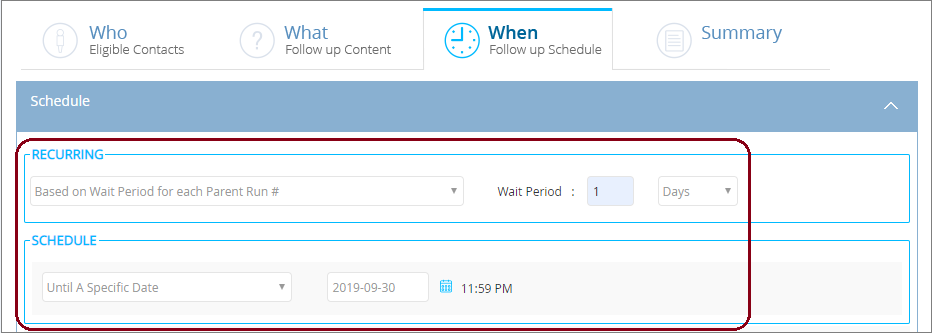
- Alternatively, you can schedule the Recurring follow-up to execute until a specific date. In this case, the follow-up will run for all the ‘Run Instances’ of the parent deployment until 11:59 PM on the date specified.
2.2 Recurring Deployments: Replace the Target Group in between Run Instances
You will now be able to replace Dynamic Target Groups in-between Run Instances for Recurring Deployments.
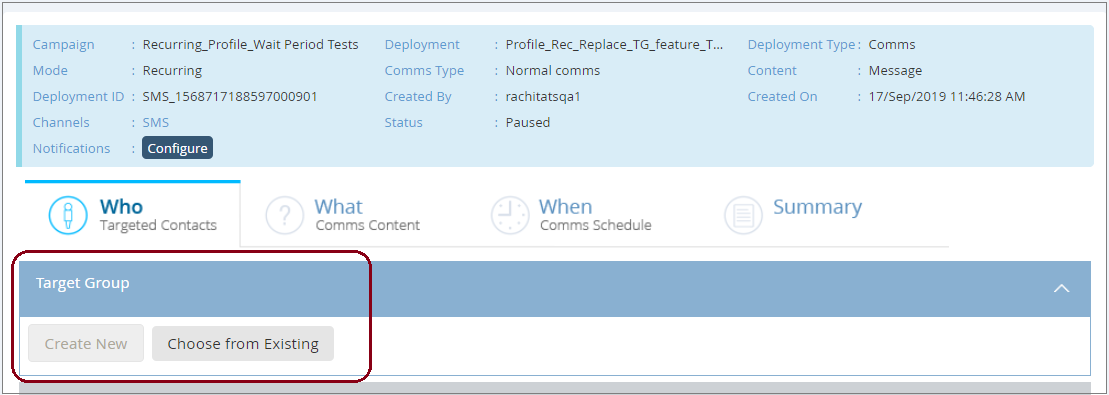
Whilst a Recurring Deployment has completed a Run Instance and is awaiting Target Group (TG) preparation for the next Run Instance, you will now be able to remove the TG on the WHO tab (after pausing the deployment) and select another TG by clicking on the ‘Choose From Existing’ button.
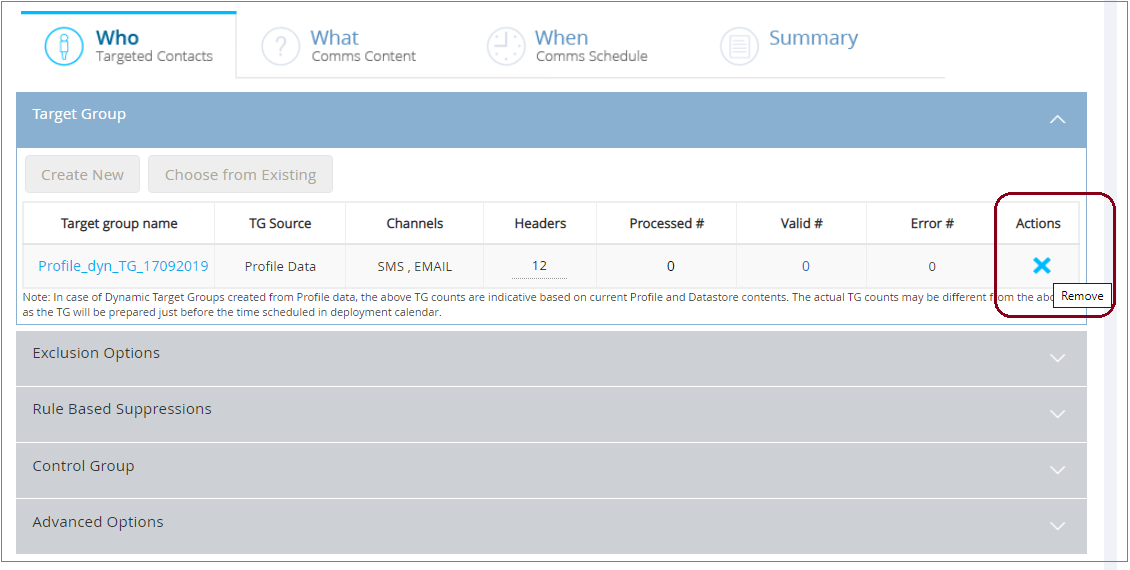
As of release 5.2, this capability will be available only for the following types of Recurring Deployments:
- TG-Source = ‘Profile Data’ (i.e. this will be currently available only to clients who have licensed IMIcampaign’s ‘Profile Manager’ module).
- TG-Type = ‘Dynamic’
- Applicable to the following channels: SMS, MMS and EMAIL (Note: We plan to introduce this feature for the App Push channel in a future release)
Usage Notes:
- The ‘Create New TG’ button on the WHO tab will remain disabled; so, you will only be able to replace the old TG with an already created TG from the ‘Target Group List’ page (Campaign Management >> Target Group >> Target Group List )
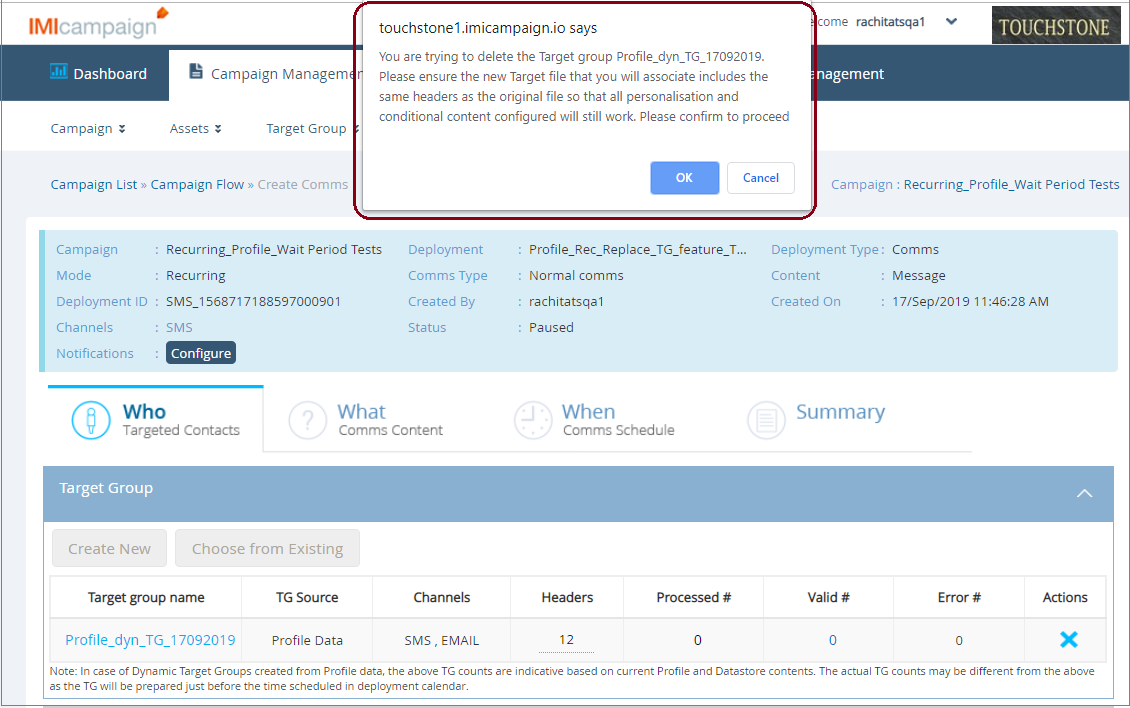
- You will need to ensure that the headers of the new TG exactly match with those of the original TG. When you click on the ‘Choose From Existing’ button, you will only be displayed a list of already created TGs whose headers match exactly with the headers of the old TG.
2.3 Recurring Deployments: Amend some WHO tab options after activation
You will now be able to edit certain sections of the WHO tab after activating Recurring Deployments. Previously, the WHO tab was not editable at all after a deployment was activated.
More specifically, this new capability is applicable under the following scenarios:
- When the Status of a Recurring Deployment changes from ‘Pending’ to ‘Paused’
- When the Status of a Recurring Deployment changes from ‘Pending Approval’ to ‘Rejected’
As of release 5.2, this capability will be available only for the following types of Recurring Deployments:
- TG-Source = ‘Profile Data’ (i.e. this will be currently available only to clients who have licensed IMIcampaign’s ‘Profile Manager’ module).
- Applicable to the following channels: SMS, MMS and EMAIL
(Note: We plan to introduce this feature for the App Push channel in a future release)
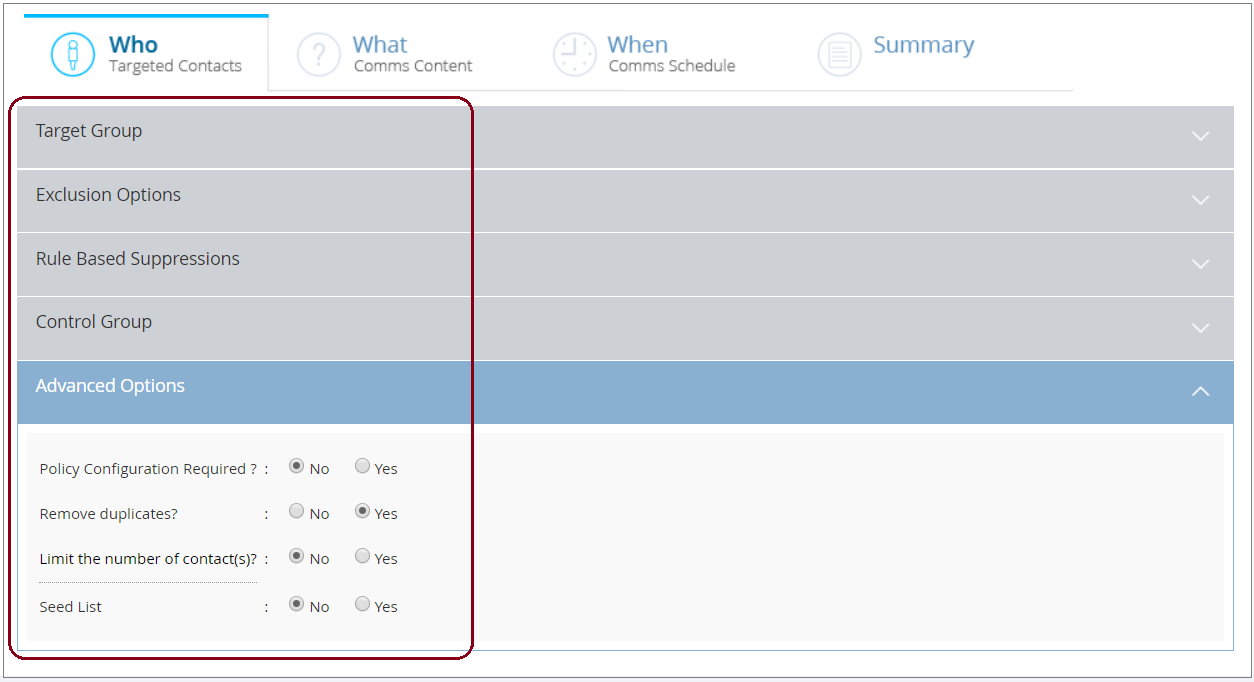
The following table summarises what changes you will be able to make on the WHO tab after a Recurring Deployment is activated.
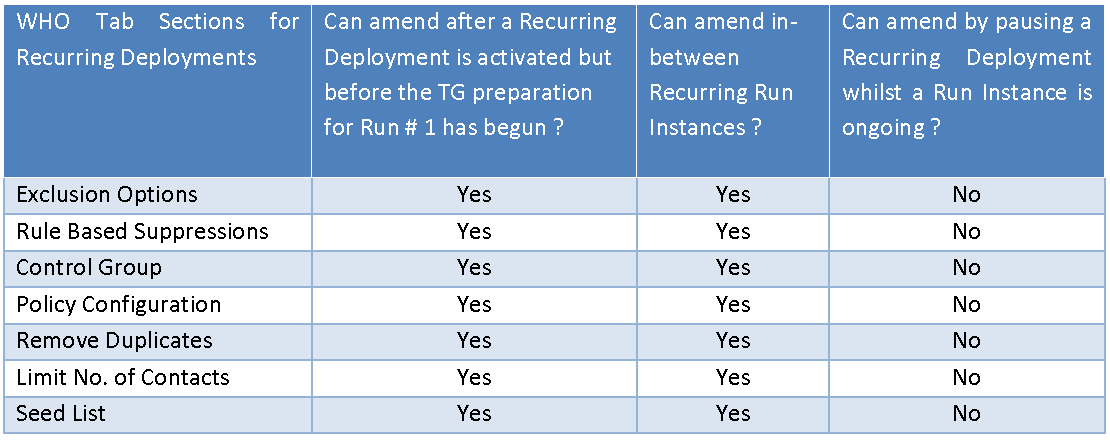
After the Target Group (TG) is prepared for a particular Run Instance, then any of the above amendments made to a Recurring Deployment will be applicable for the next Run Instance, e.g. If the TG is already prepared for Run Instance # 5, and the user now pauses and amends one of the above WHO tab options, then those changes will be applicable from Run Instance # 6 onwards.
2.4 Recurring Deployments: Allow a ‘delayed start’ for Run # 1
This Enhancement is best explained by using the following example scenario.
Let’s say you want to set up a Recurring Deployment with the schedule of [9 am-to-5 pm for Mon-to-Fri]. However, you forgot to set it up before Monday 9 am and remembered about this task at 10 am on Monday.
Prior to this Release 5.2, you would have to set up the Recurring Deployment schedule as [10:15 am-to-5 pm for Mon-to-Fri]. After the Run Instance # 1 is completed, the Deployment Status will change from ‘Running’ to ‘Pending’. At this point, you would have to pause the Deployment, amend the schedule to [9 am-to-5 pm] and then resume the Deployment.
With this enhancement in the current Release 5.2, you will now be able to configure Recurring Deployments starting on the same day and select a start time earlier than the time when the deployment is being set up. This will reduce the effort and hassle of pausing, modifying the start time and then resuming the deployment after the Run Instance # 1.
In the above example, when setting up the deployment at 10 am on the Monday, you will be able to configure the desired schedule of [9 am-to-5 pm for Mon-to-Fri]. As soon as you activate the deployment, the TG preparation for Run Instance #1 will begin. Assuming this TG preparation takes 45 mins, the messages will begin to be sent out to the TG contacts at around 10:45 am.
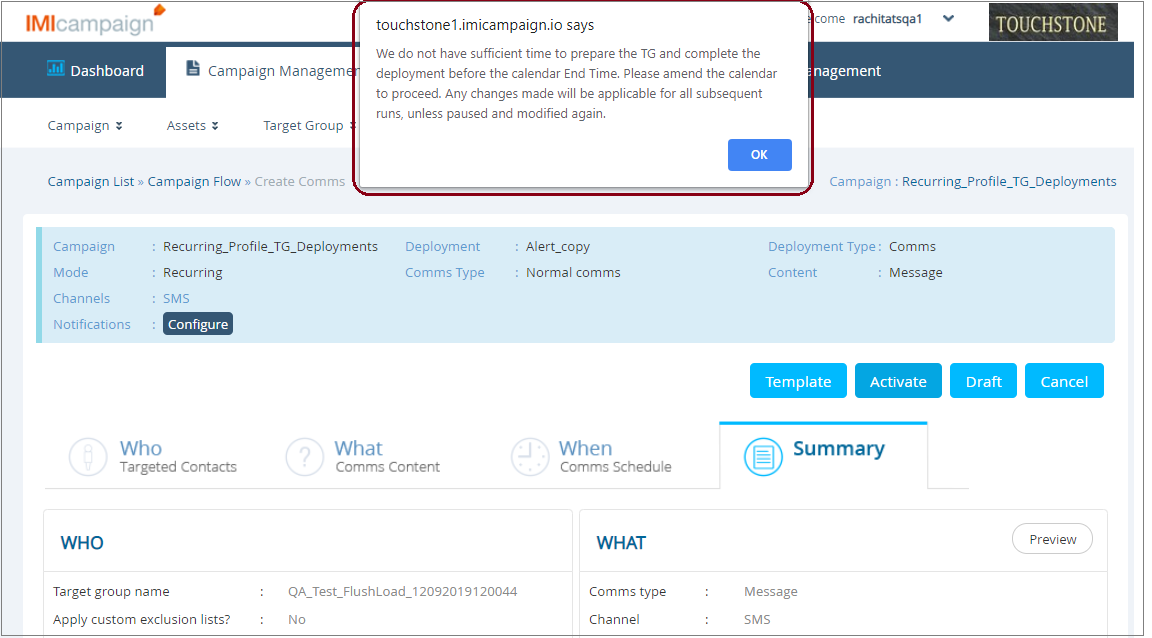
Let’s now consider a slightly different scenario where you remembered to set up this Recurring Deployment at 4:15 pm on the Monday (within 60 mins of the schedule end time for that day).
In this case, IMIcampaign does not have sufficient time before 5 pm to prepare the Target group and complete the Run Instance #1. So, if you still want the Run Instance#1 to be sent out on the Monday, then you will need to set up a different schedule to accommodate the TG preparation for the Run instance #1, say 9 am-to-6 pm for Mon-to-Fri. After the Run Instance#1 is completed, you will need to pause the deployment and modify the schedule back to your desired schedule of 9 am-to-5 pm for Mon-to-Fri.
2.5 Customer Care: Filter by Date / Time Duration
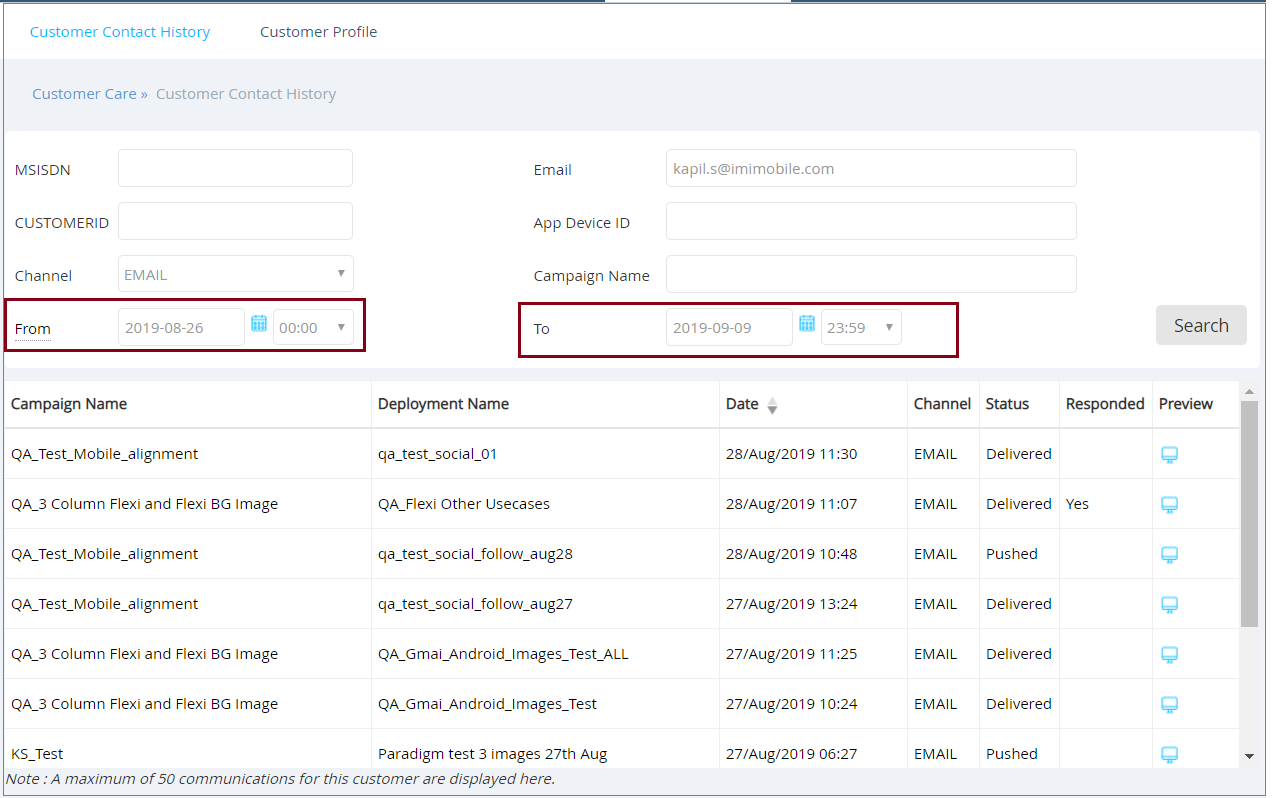
You will now be able to apply filters for ‘From’ and ‘To’ timestamps on the Customer Care screen.
The Customer Care screen will show up to 50 records for the selected contact considering the timeframe filter. This is useful in case a contact has received a large number of communications and you just want to focus on the subset of communications sent during a specific timeframe.
2.6 Deployment Templates: Specify a name for the Deployment Template
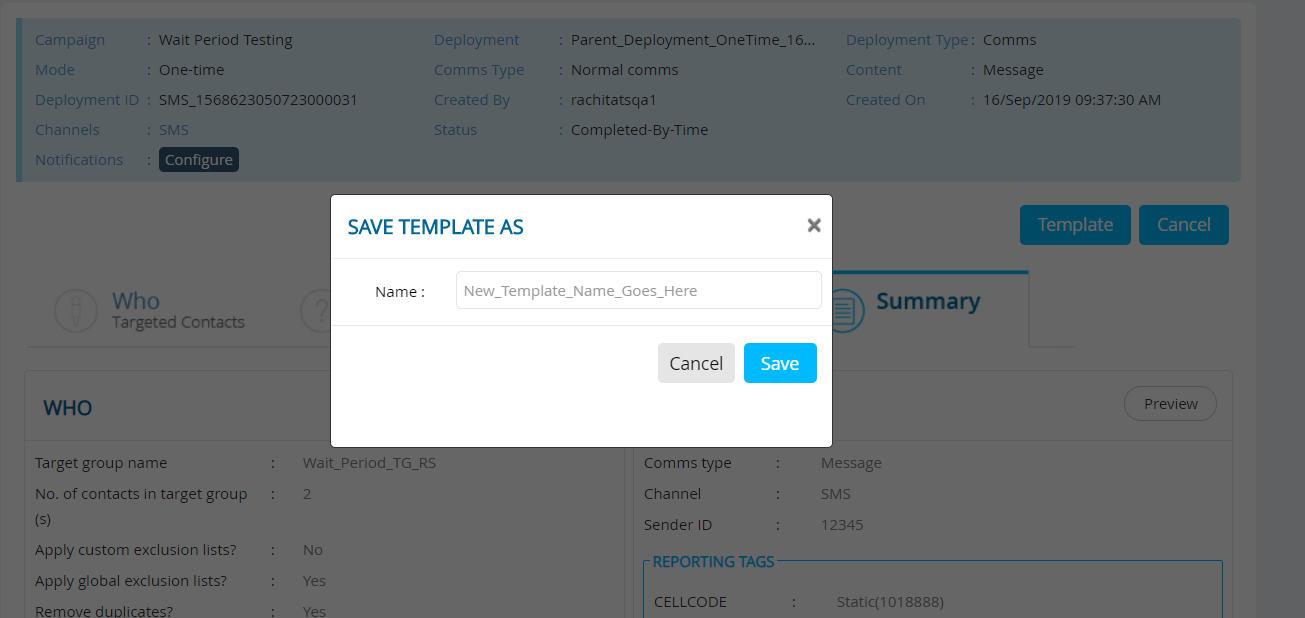
When you click on the ‘Template’ button, you will now be able to specify a name for the Deployment Template. Prior to this Release 5.2, the Deployment Template always inherited the name of the Deployment.
All the naming convention rules for ‘Deployment’ names will also apply for ‘Deployment Template’ names.
2.7 Deployment Templates List: Filter by ‘Schedule Type’
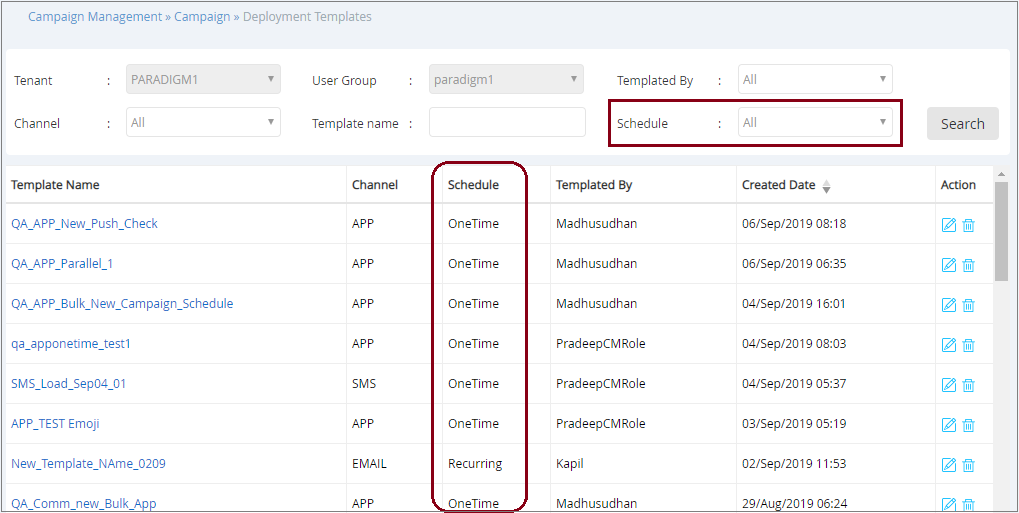
The ‘Deployment Templates’ screen will now display the ‘Schedule type’. The schedule column will indicate whether the templated deployment was ‘OneTime’, ‘Recurring’ or ‘Instant’. There are also two additional filters ‘Channel’ and ‘Templated By’ to look for the subset of deployment templates that you need to work with.
2.8 Email channel: Choose Email Sender ID based on conditional rules
You will now be able to select ‘Sender IDs’ for your Email recipients based on data attributes in the target group.
A new link called ‘Add Conditional Logic’ has been introduced on the WHAT tab.
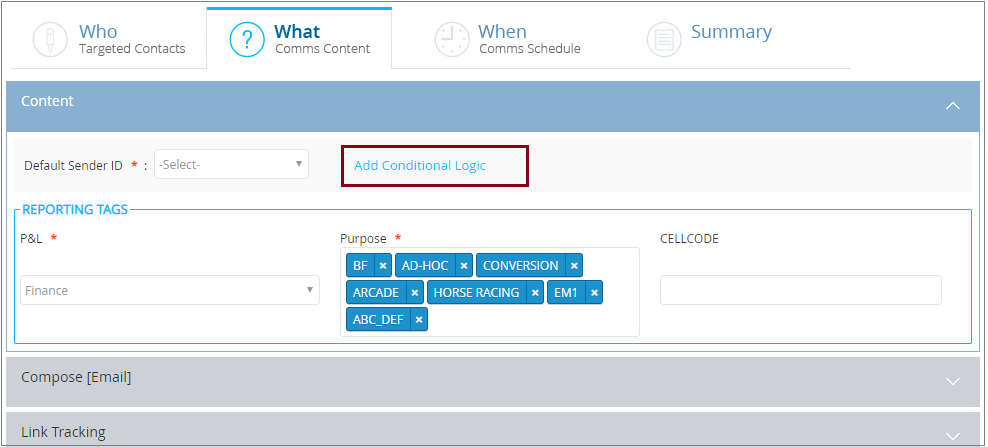
Clicking on this link will open a pop-up for you to define the conditional logic for associating a different Email Sender ID for each recipient (This syntax is similar to how you use conditional logic for email subject lines).
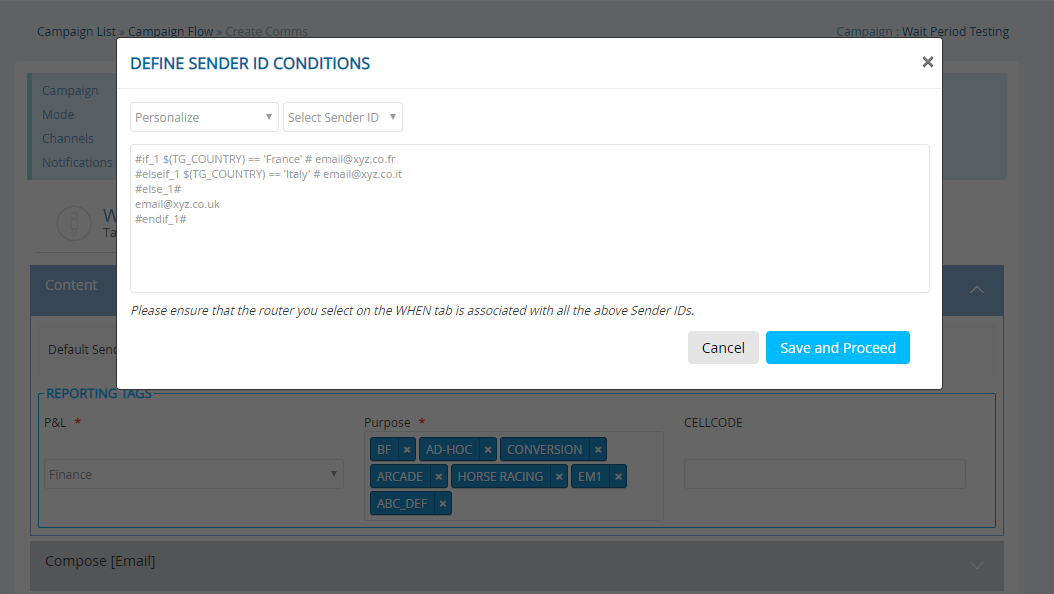
All the Email Sender IDs used in the conditional logic should be associated with the same router which will be selected on the WHEN tab.
2.9 Email channel: Override Automatic Link Tracking using 'notrack' (PRB0042882)
Prior to this release 5.2, you were required to uncheck the checkboxes on the ‘Link Tracking’ accordion to indicate that you did not want a specific link to be tracked by IMIcampaign. This mechanism was somewhat confusing and error-prone.
So, in this release, we are introducing a simpler way to configure ‘non-tracking’ of a link. You now just need to add the keyword ‘notrack’ within the a element outside the ‘href’ attribute in the HTML content. In the below example screenshot, the first link (bbc.co.uk) will be automatically tracked by default.
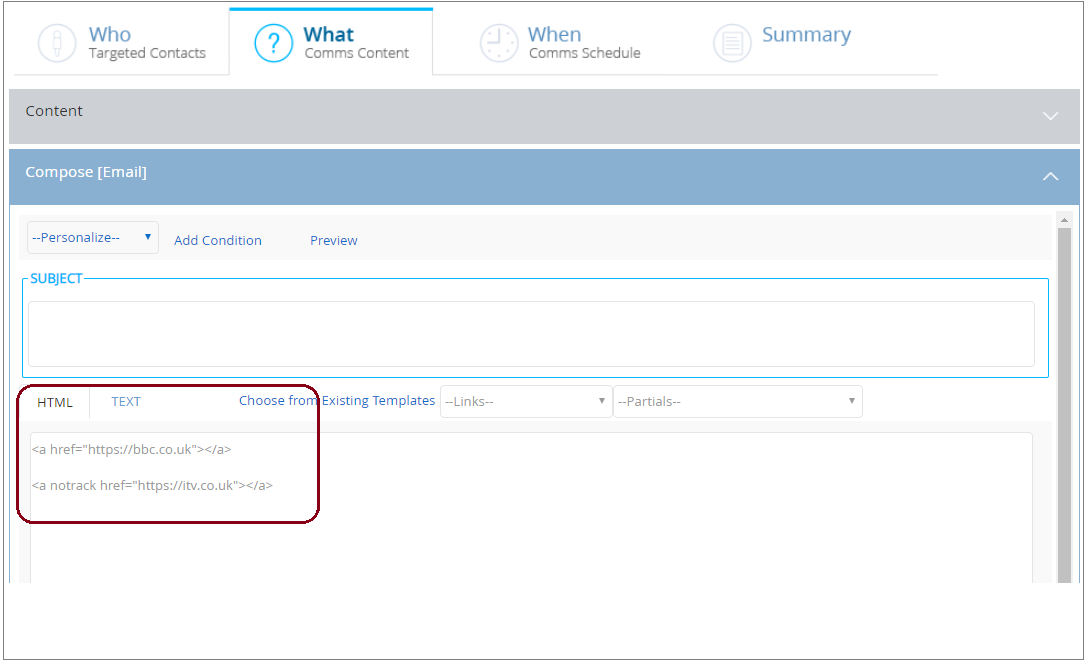
The second link (itv.co.uk) has the ‘notrack’ parameter associated with it. Therefore, the second link will not be tracked.
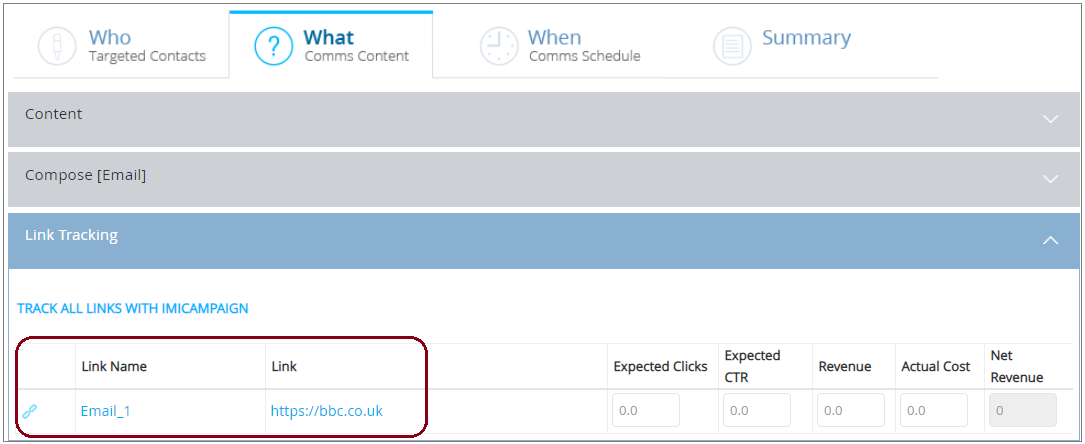
If you have existing running deployments which require links not to be tracked, you will need to pause those deployments; update the HTML content by inserting the ‘notrack’ parameter within the URLs and then resume the deployments.
2.10 Mobile App Push channel: Use Emojis in title and notification body
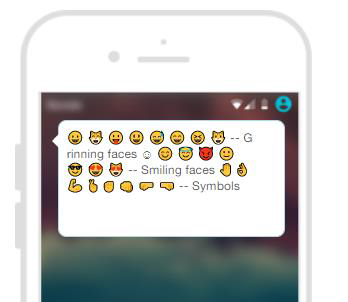
You will now be able to use emojis within Mobile App Push Notification deployments 😊.
2.11 ‘SMS Link Clicks By MSISDN’ Report: added date range filter (PRB0042824)
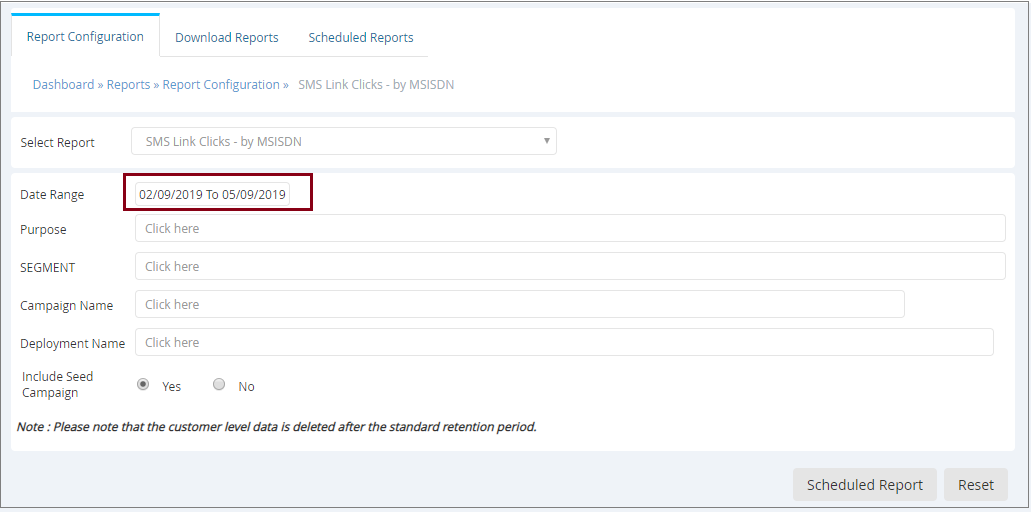
You will now be able to select a ‘date range’ for the ‘SMS Link Clicks By MSISDN’ transactional report.
2.12 Old Dashboard: Changes due to introduction of Rule Based Suppressions
We introduced the ‘Rule Based Suppressions’ feature in Release 5.1. As a result of this, a number of metrics within the Dashboard have been renamed or amended within the following 3 sections of the Old Dashboard:
- ‘Dashboard > Campaigns > Outbound’ tab: Message Delivery (charts, table and excel export)
- ‘Dashboard > Campaigns > App Push’ tab: App Push Counts by Customer (charts, table and excel export)
- ‘Dashboard > Statistics’: Channel Status (charts, table and excel export):
The following changes have been made on the above 3 sections of the Old Dashboard.
a) The "Suppressions (static)" category has been renamed to "DND Suppressions & Blacklists" to reflect the data being presented
b) The "Suppressions (run time)" category has been renamed to "External Suppressions" so as to better capture the underlying data being shown, as these suppressions rely on external client designated APIs for contact suppression
c) "Advanced Filters (run time)" category has been removed as this functionality has been retired from the product to simplify the user experience
d) "Advanced Filters (static)" category has been renamed to "Rule Based Suppressions" as this category will now include data from Deployment > Who Tab > Rule Based Suppressions (which will supersede Who> Advanced Options> Additional Filters functionality which is being retired)
3.0 Profile Manager module enhancements
3.1 Ingest data from Amazon Redshift into campaign Datastores
On the ‘Data Management>Data Ingestion>Feed (ETL)’ screen, you can now select a Remote Database as a source while creating a new feed. For now, this can be only used to ingest schema or data from Amazon Redshift Tables and Views. You need to enable the “Import Data” option to pull data from the database. You will have the option to flush existing data in the datastore or/and to append new data.
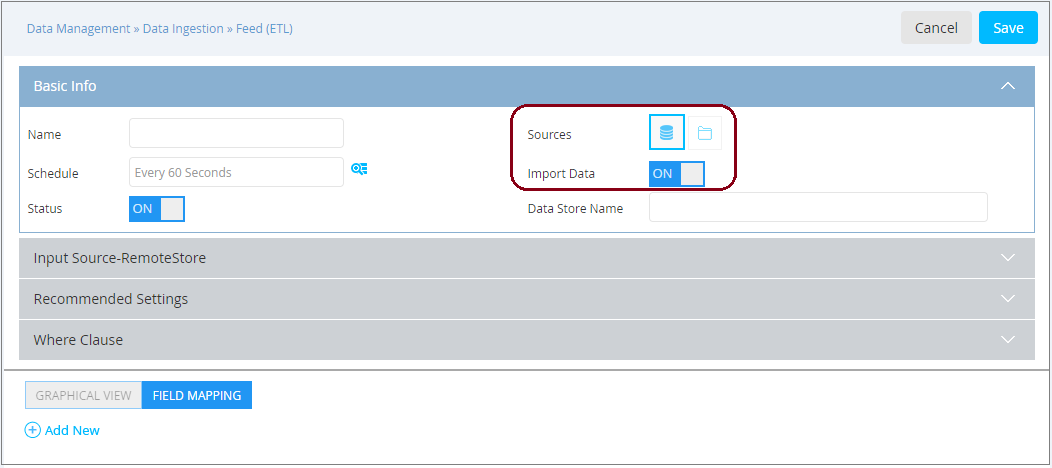
Additionally, for active feeds with Remote Database as a source, it will be possible to import data on-demand using “Import Now” action from the Feed list.

4.0 API & Integration capability enhancements
4.1 Facebook Custom Audiences: Use a Target Group as the source of data
Using IMIcampaign’s Facebook Integration, you will now be able to push data from Static Target Groups in IMIcampaign to Facebook Custom Audiences in your Facebook Ad account. The source of the Static TGs could be File, FTP or Customer Profile.
To use this feature, please work with your IMImobile account team to set up the below one-time configuration.
-
On your Facebook Ad Account, please provide 'Standard Access' (permissions to view performance and manage campaigns) to IMIcampaign’s Facebook Ad Account.
-
Then add your Facebook Ad account to IMIcampaign under ‘Data Management > Integrations > Facebook > Facebook Ad Accounts’.
After the above one-time setup, every time you need to create a new Facebook Custom Audience, you will need to follow these steps : -
Map the headers for the Static Target Group to the appropriate Facebook Field. (This is the Static TG that you want to push to create a Facebook Custom Audience)
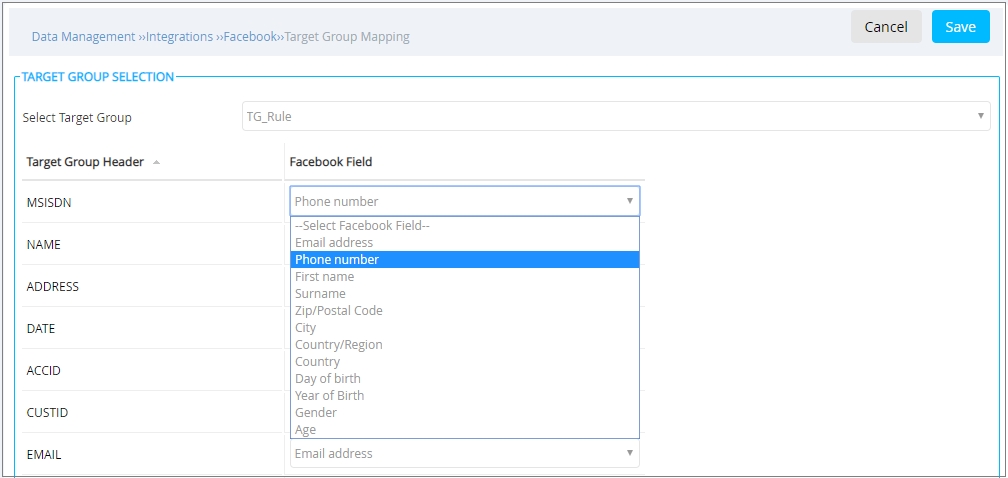
- You can then add a new custom audience to which you wish to push the TG Data. This can be done under ‘Data Management > Integrations > Facebook > Custom Audiences’.

- On clicking 'Save and Sync', the specified Custom Audience will be created in your Facebook Ad Account (using Facebook’s Marketing APIs) and IMIcampaign will push the TG data to this Custom Audience.
- You will be able to see the status of the Custom Audience Sync requests under ‘Data Management > Integrations > Facebook > Sync Execution Report’.
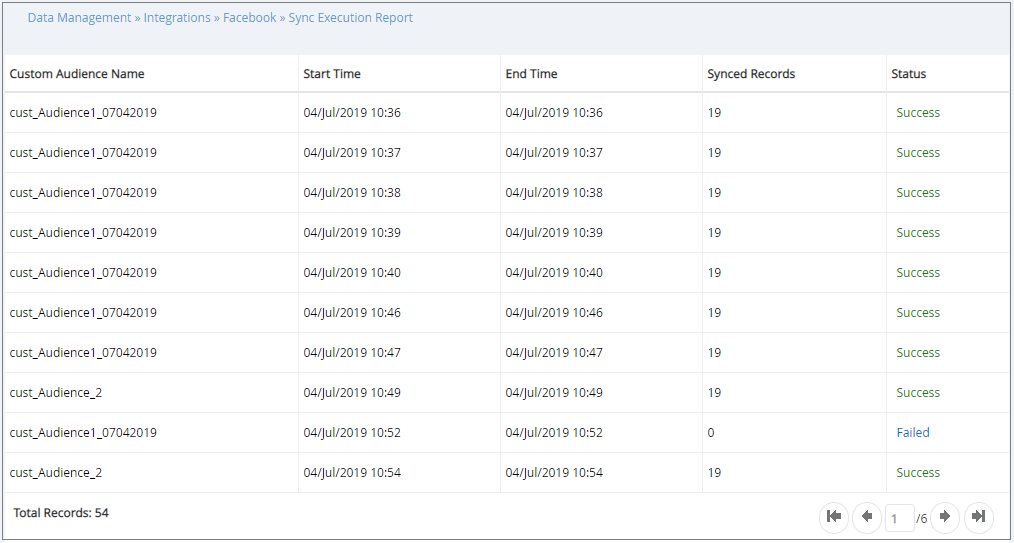
Please note the following points before using this feature :
- You will no longer be able to directly push Profiles to a Facebook Custom Audience. To push Profile Data, please create a Static TG with the ‘TG Source = Profile Data’.
- This feature is currently limited to Static Target Groups because Facebook does not currently support flushing data from a Custom Audience using APIs. Therefore, using Dynamic Target Groups may lead to data-inconsistencies within your Facebook Custom Audience.
4.2 ‘Get Access Token’ API: New token will be issued every time the API is invoked
From this 5.2 release, requests to IMIcampaign’s ‘Get Access Token API’ will return a new token on every request. This new token will have a lifetime of 60 mins (3600 seconds) and can be used to authorise requests to other IMIcampaign APIs during this duration.
What was the behaviour of this API prior to this release 5.2?
If the client had a valid authorization token with a lifetime of 60 minutes, (let’s label this valid token as ‘XYZ’ for example) and made another request to the ‘Get Access Token API’ then the API would again return ‘XYZ’ as the token. ‘XYZ’ would continue to be returned as the token on all requests to the ‘Get Access Token’ API until ‘XYZ’ expired in 60 minutes after it was first issued.
4.3 Introducing API-specific Users (separate from UI Users)
From this 5.2 release, we are introducing a feature to create “API-specific Users”.
Users of IMIcampaign will be categorised into 2 types as follows:
- UI Users: These users are created by the tenant admin or a user who has permissions to create other users. These users can perform actions on the UI as per their assigned ‘User Roles’ and Permissions associated with those User Roles.
- API Users: These users are created by the tenant admin or a user who has permissions to create API users. They can only access APIs. They cannot access the IMIcampaign UI.
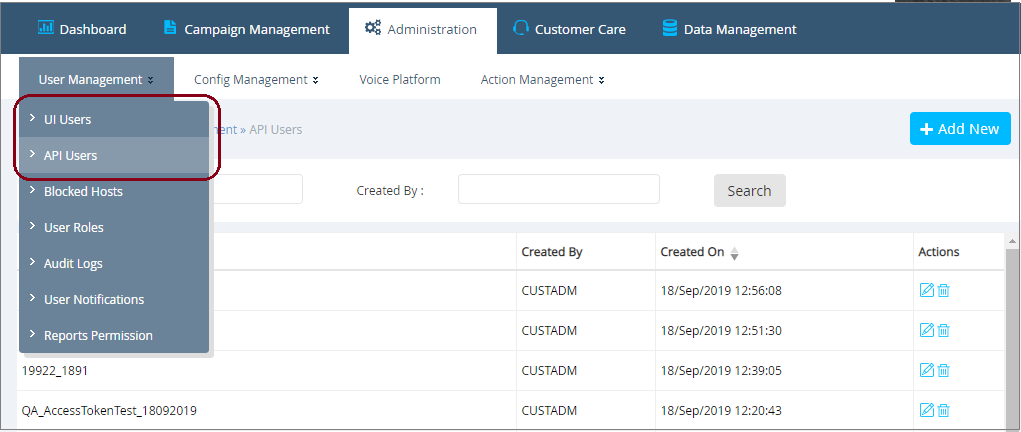
Your tenant admin will be able to create “API Users” for you.
These “API Users” will have a system-generated API Key ID and Secret Keys to access APIs. These non-expiring credentials will be different from the credentials used for logging into the IMIcampaign UI as a UI user. This will provide enhanced security by ensuring a user does not have to use their UI credentials in an application which is used to accesses IMIcampaign APIs. Further, API Users can be authorized to access only the required set of IMIcampaign APIs (Prior to this release, a user with valid credentials was able to access all IMIcampaign APIs.)
An API user’s Access Key ID and Secret Key 1 or Secret Key 2 can be used as an authorization to invoke the permitted IMIcampaign APIs. IMIcampaign will not expire the Secret Keys on its own. Depending on the client’s IT policy, an existing Key can be deleted and a new Key can be generated from the UI to be used as required on a periodic basis (say every 3 to 6 months or after a developer has left the organisation). An API User can have a valid Key 1 and Key 2 at same time. This will provide the client organization time to rotate Keys by making code changes in their application when it is decided that an existing Key needs to be replaced.
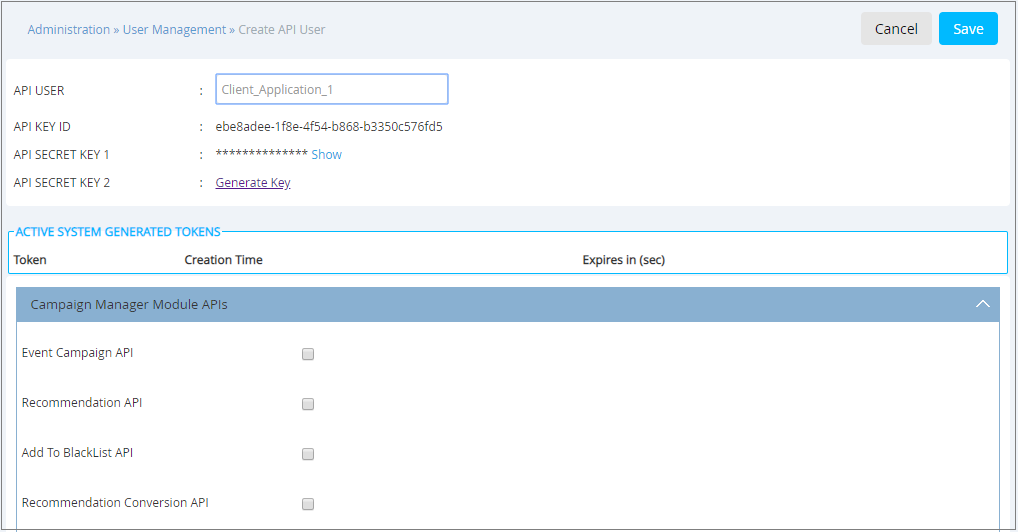
For clients who are already using the ‘Get Access Token API’, their existing UI Users will be replicated to create corresponding API users (with the same credentials as corresponding UI user). They can continue to use these credentials to call ‘Get Access Token API’. These tokens (expiry period 3600 seconds) received in the API response are labelled as System Generated Tokens in the UI. All Active System Generated Tokens (tokens which have not expired) will be listed on the requesting user’s API User page. Therefore, there is no specific action needed by these clients; their existing applications will continue to work unaffected.
For clients who are already using the ‘Golden Authkey’ method to access other IMIcampaign APIs (e.g. Event API), their existing ‘Golden Authkey’ will be replicated as ‘API Secret Key1’. Again, these clients will not need to take any action to update their code. Their existing applications will continue to work unaffected.
Going forward, the recommended approach to access IMIcampaign APIs is to use non-expiring Secret Keys rather than 60-min-expiring Tokens.
4.4 New API: Add Contact(s) to DataStore
The newly introduced “Add Contact(s) Datastore API” will enable adding records to a DataStore by specifying the DataStore ID and the Feed ID (which is auto-generated at time of Feed creation in IMIcampaign UI). Up to 100 records can be inserted in a DataStore in a single API request.
4.5 Single-Sign-On SAML-based Authentication with Microsoft Azure AD
In addition to IMIcampaign’s standard login, you can now request to enable SAML based authentication with Microsoft Azure Active Directory for your IMIcampaign tenant login process. If this feature is enabled for you, your organization’s users will be redirected to an Azure page (maintained by your IT team) on entering your tenant-specific IMIcampaign URL in the browser. Validated users will be directed by Azure to their specific IMIcampaign Welcome pages.
On clicking ‘Logout’ within IMIcampaign, your users will be redirected back to your Azure page.
Please contact your IMImobile Account Manager if you are interested in getting this feature enabled for your tenant.
5.0 Drag-&-Drop Email Composer enhancements
We have added a number of enhancements and new features for the IMIcampaign Drag-&-Drop Email Composer in this release.
5.1 Introducing a new ‘Flexible’ Building Block: ‘3 Column Flexi’ (beta)
This new ‘Flexible’ Building Block is available under the “Flexi’ section of the left palette.
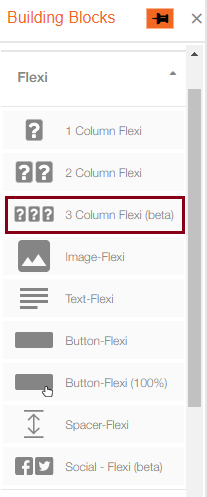
You can drag and drop the following ‘Flexi’ building blocks inside this block:
• Image-Flexi
• Text-Flexi
• Button-Flexi
• Spacer-Flexi
• Button-Flexi (100%)
This building block is not yet available for Drag-&-Drop Partial Composer. We plan to make it available in the Partial Composer in an upcoming release.
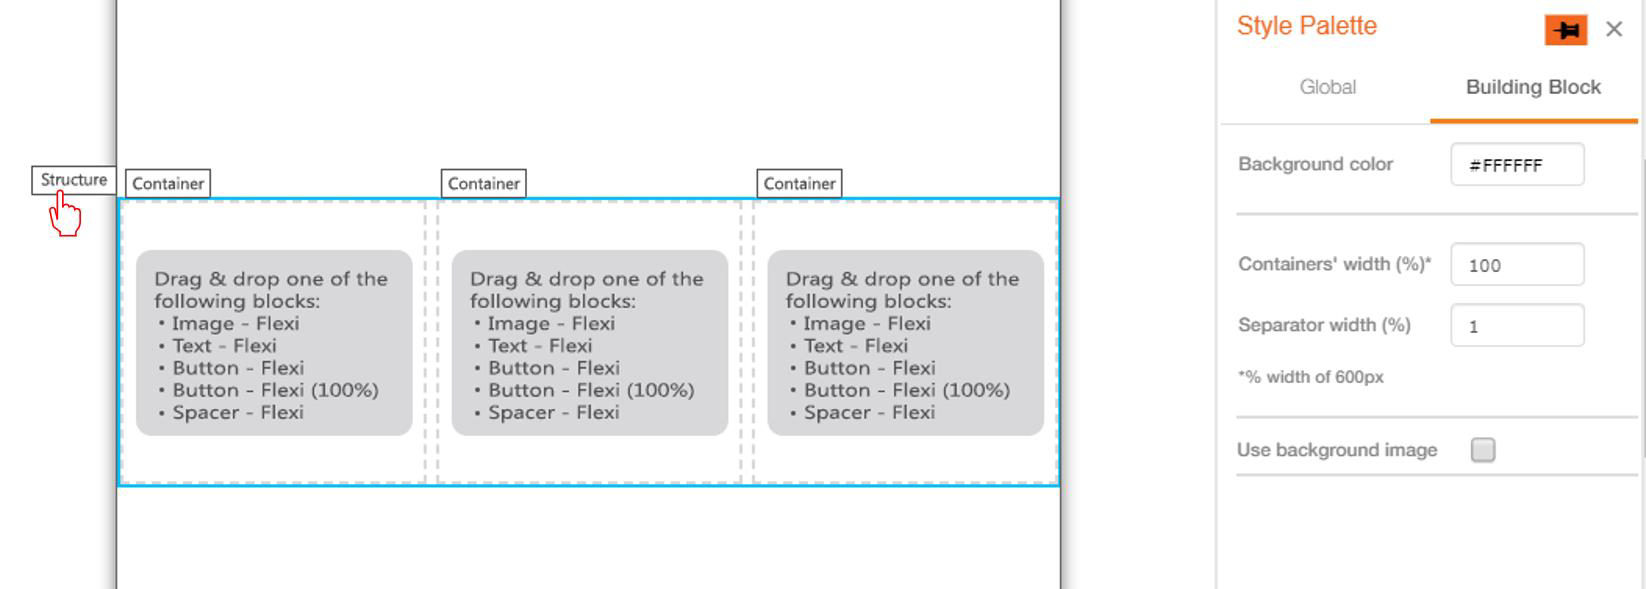
Following options are available at Structure level for this block. These options will be visible in Style palette when you click on ‘Structure’ label:
Background colour: This background colour will be applied to Containers and Separators as well.
Containers’ width: This width will be equally divided among the three containers.
o The minimum allowed value is 90.
o The maximum allowed value is 100.
Separator width (%) - The input value for this option will be applied to both the Separators.
o The minimum allowed value is 0.
o The maximum allowed value is 5.
Use background-image :
o You can add a background image to ‘3 Column Flexi’ block. More details can be found later in this release note.
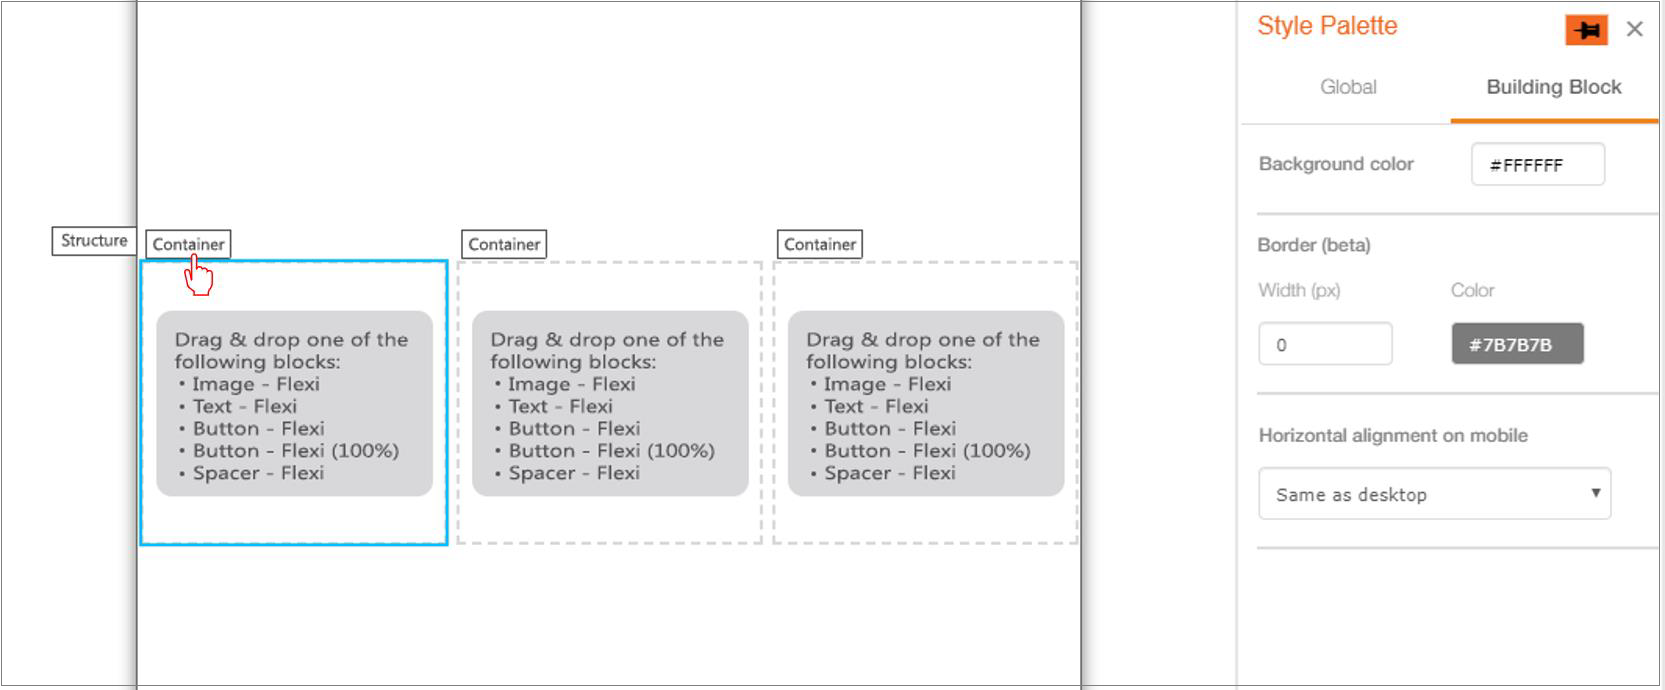
Following options are available at Container level for this block. These options will be visible in Style palette when you click on the ‘Container’ label :
- Background colour: This will override the Background colour applied at the Structure level.
- Border: You can add a border to the Container using this option. This option will be explained in detail in the later part of the Release Note.
- Horizontal alignment on mobile: You can add different alignment for mobile devices. More details can be found later in this release note.
o ‘Same as desktop’, ‘Left’ and ‘Right’ are the three options available for this drop-down.
Usage Notes for 3-Column-Flexi block:
- This feature is currently in ‘beta’ as we expect to introduce some minor enhancements in the next release.
- Default Containers’ width has been set to 100.
- Default width of Separators has been set to 1.
- Value entered in ‘Container width (%)’ option would be applicable to mobile devices as well.
- Please drag and drop at least one block inside the Container before saving the template.
- You can drop multiple blocks inside the Container.
- The blocks must be dragged from the left side palette into the ‘3 Column Flexi’ Structure. i.e. You should not move a block designed outside the ‘3 Column Flexi’ Structure into its Container.
- You can drag and drop a ‘3 Column Flexi' block inside a Conditional block.
- Background colour for the structure will be applied to Separator by default. There is no separate option for the background colour of Separator.
- The Containers will always be stacked on mobile devices i.e. Left Container on top followed by middle Container and then right Container at the bottom.
In upcoming releases, after consultation with clients, we are planning to remove the older building blocks if the same designs and results can now be achieved with the newer ‘Flexi’ building blocks.

The ‘3 Column Flexi’ block is not yet available in Drag-&-Drop Partial Composer. We plan to make it available in the Partial Composer in an upcoming release.
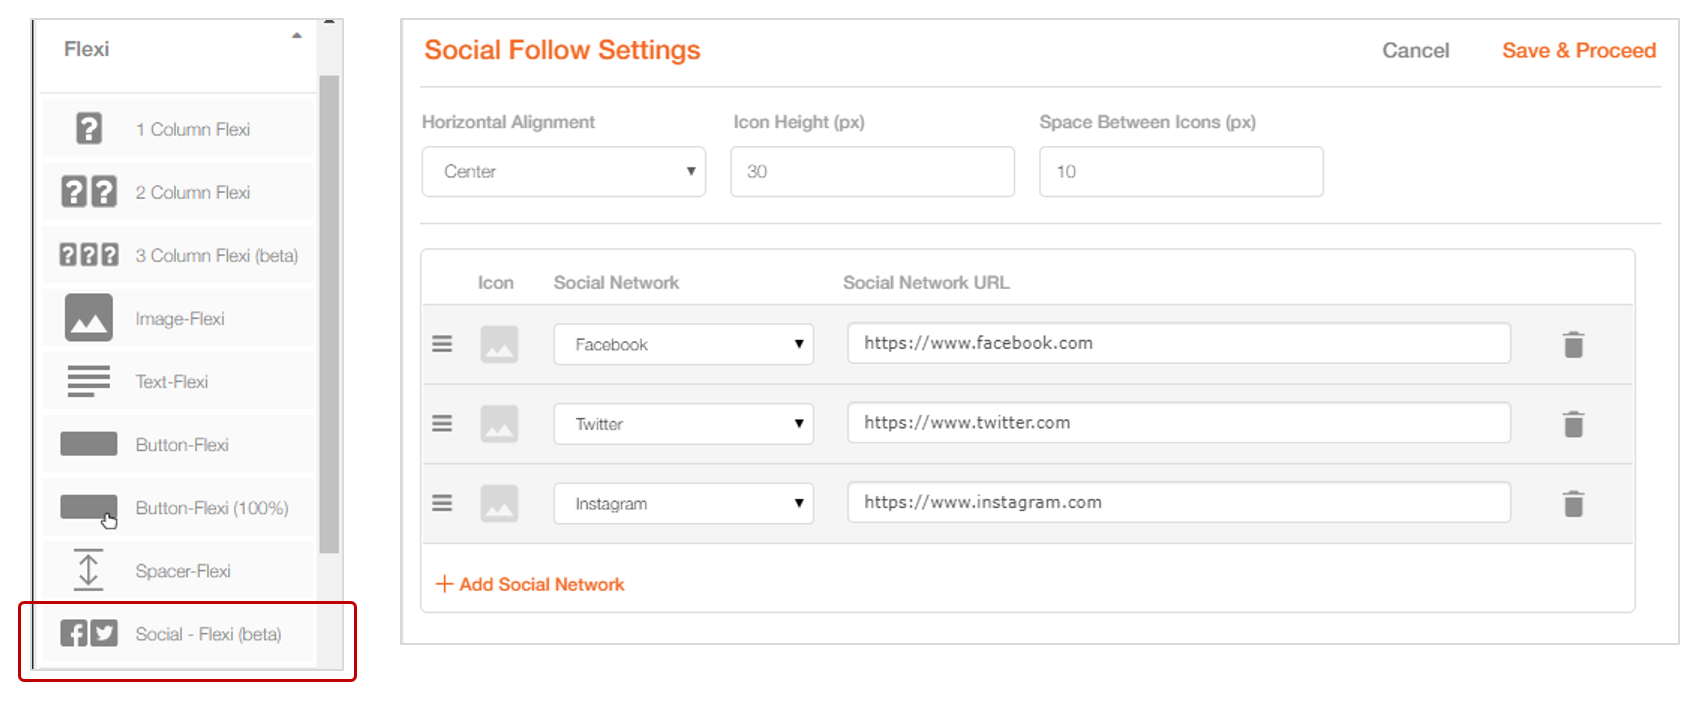
5.2 Introducing a new ‘Flexible’ Building Block: ‘Social-Flexi’ (beta)
This block is similar to the existing ‘Social Follow’ block, but it can also be used only inside ‘1 Column Flexi’ and ‘2 Column Flexi’ blocks.
When you click on the ‘Edit’ icon, a pop-up will appear where you can add/edit the settings for this block.
The options in this pop-up are the same as in the existing ‘Social-follow’ block.
Usage Notes:
- This feature is currently in ‘beta’ as we expect to introduce some minor enhancements in upcoming releases.
- Social network icons should be in a single line in desktop preview and mobile preview, otherwise, icons may render unevenly spaced in the final HTML.
- Icons used should have similar dimensions.
o Minimum value of ‘Icon Height’ has been increased from 1px to 15px.
o Maximum value of ‘Space between icons’ has been increased from 10px to 60px. - The placeholder social follow icons only appear in design view but will not render in Desktop/Mobile preview or final HTML.
5.3 Introducing a new ‘Flexible’ Building Block: ‘Button-Flexi (100%)’
This block is similar to the existing ‘Button-Flexi’ block; the only difference is that for this new block, the whole Button area will be clickable. In contrast, for the already existing ‘Button’ and ‘Button-Flexi’ blocks, only the text area is clickable (where the URL link is applied).
This block can be dropped inside the ‘1 Column Flexi’, ‘2 Column Flexi’ and ‘3 Column Flexi’ blocks.

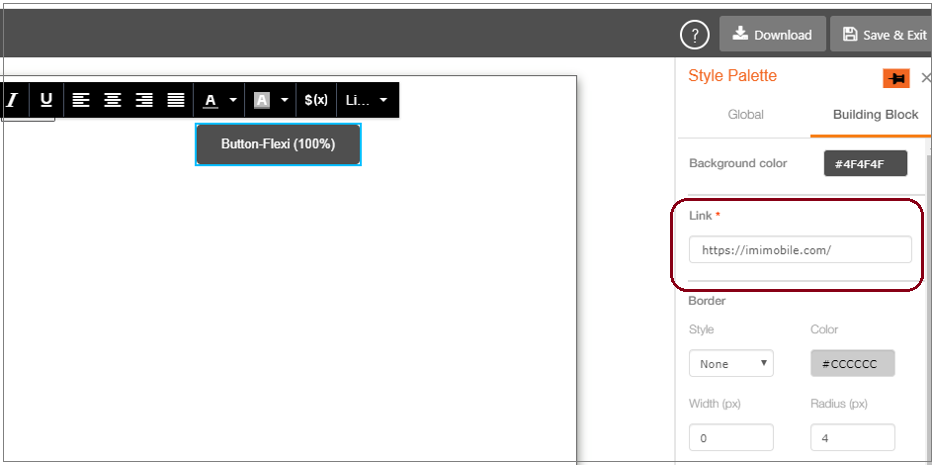
You can add the link to the ‘Button-Flexi (100%)’ block from the Style palette. By default, the URL ‘https://imimobile.com/' link will be added to this button; please make sure you change it before saving the email message template.
Usage Notes:
- While rendering in the Outlook Desktop client, if top or bottom padding is not applied then right and left padding will not render. If top/bottom is applied then Outlook will adjust right and left padding automatically.
- This block is also available in Drag-&-Drop Partial Composer.
5.4 Mobile-responsive rendering on the Gmail app (Android and iOS)
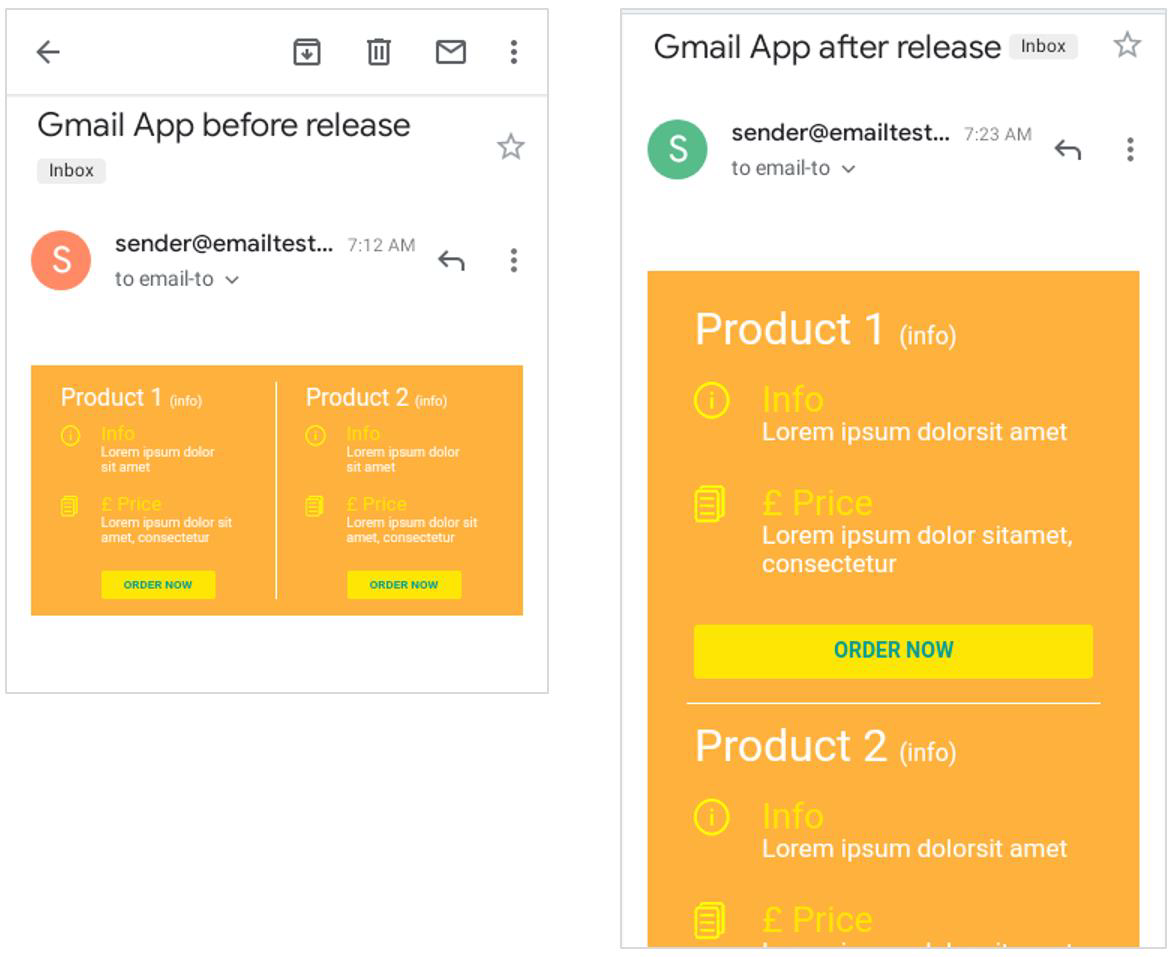
From this release onwards, a mobile-responsive email will be rendered on the iOS and Android Gmail apps.
Prior to this release, the Desktop version of the email used to be rendered on the iOS and Android Gmail app clients.
Usage Notes:
- This enhancement will not have any impact on existing deployments.
- To apply this change for an existing email template, you will need to open it and save it again. You can then re-select this saved template in the WHAT tab of your existing deployment (after pausing the deployment).
- If you derive a new template from an existing ‘Master Template’, then the derived template will exhibit the mobile responsive rendering on Gmail Apps.
- One side-effect of introducing this feature for Gmail Apps is that the Yahoo Android app will now render the Desktop version. However, we have deemed this as an acceptable trade-off because the Yahoo Android app has a very small market share of email clients.
5.5 Mobile-specific Font Size for the ‘Text-Flexi’ block
You can now configure a different font size for the text when rendering on Mobile devices. This option will be visible in the Style Palette when the user clicks anywhere inside ‘Text-Flexi’ block.
Below is an example where we have used 50px as Font size for desktop devices and 10px as Font size for mobile devices:

Usage Notes:
- This option is currently only available for the ‘Text-Flexi’ block.
- This option is not yet available for drag-&-drop Partial Composer. We plan to introduce it there in upcoming releases.
- This option will be unchecked by default.
- Font sizes up to 30px are available in the drop-down for this option.
- The default selected font size for this option is 16px.
- Line height will be 1.5 x the font size on mobile devices if this option is selected; e.g. if the font size for mobile devices is set to 20px, then a line-height of 30px will be applied on mobile devices.
- Note that the Font size and the Line-height on Desktop devices will be applied as selected in the black floating toolbar.
5.6 Mobile-specific Horizontal Alignment
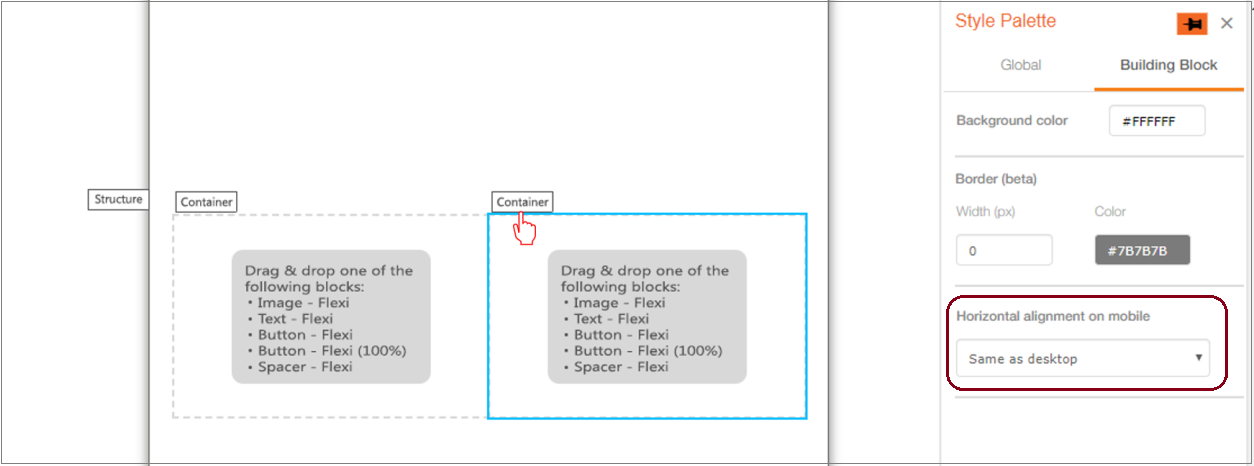
You will now be able to configure the horizontal alignment of blocks with a different setting on mobile devices (compared that on Desktop email clients). This setting will be visible within the Style palette when you click on the ‘Container’ label for ‘1 Column Flexi’, ‘2 Column Flexi’ and ‘3 Column Flexi’ blocks.
Usage Notes:
- This setting will be applied to all the blocks inside a Container.
- This setting will not work for Containers in a ‘2 Column Flexi’ block in case the ‘Do not stack containers’ option is selected for the ‘On Mobile’ setting within the Style Palette.
- Following 3 options are available in the drop-down :
o Same as Desktop: Horizontal alignment of blocks on mobile email clients will be the same as that on the desktop.
o Left: Blocks inside the container will be left-aligned on mobile devices.
o Right: Blocks inside the container will be right-aligned on mobile devices. - This setting has also been introduced for the Drag-&-Drop Partial Composer.
In the below example, we have used a ‘2 Column Flexi’ block and the ‘Horizontal alignment on mobile’ setting is selected as ‘Left’ for a Container. So, the ‘Social Follow’ block is rendered left-aligned on mobile email clients whereas it will be rendered right-aligned on Desktop email clients.

5.7 Separator for a ‘2 Column Flexi’ Block
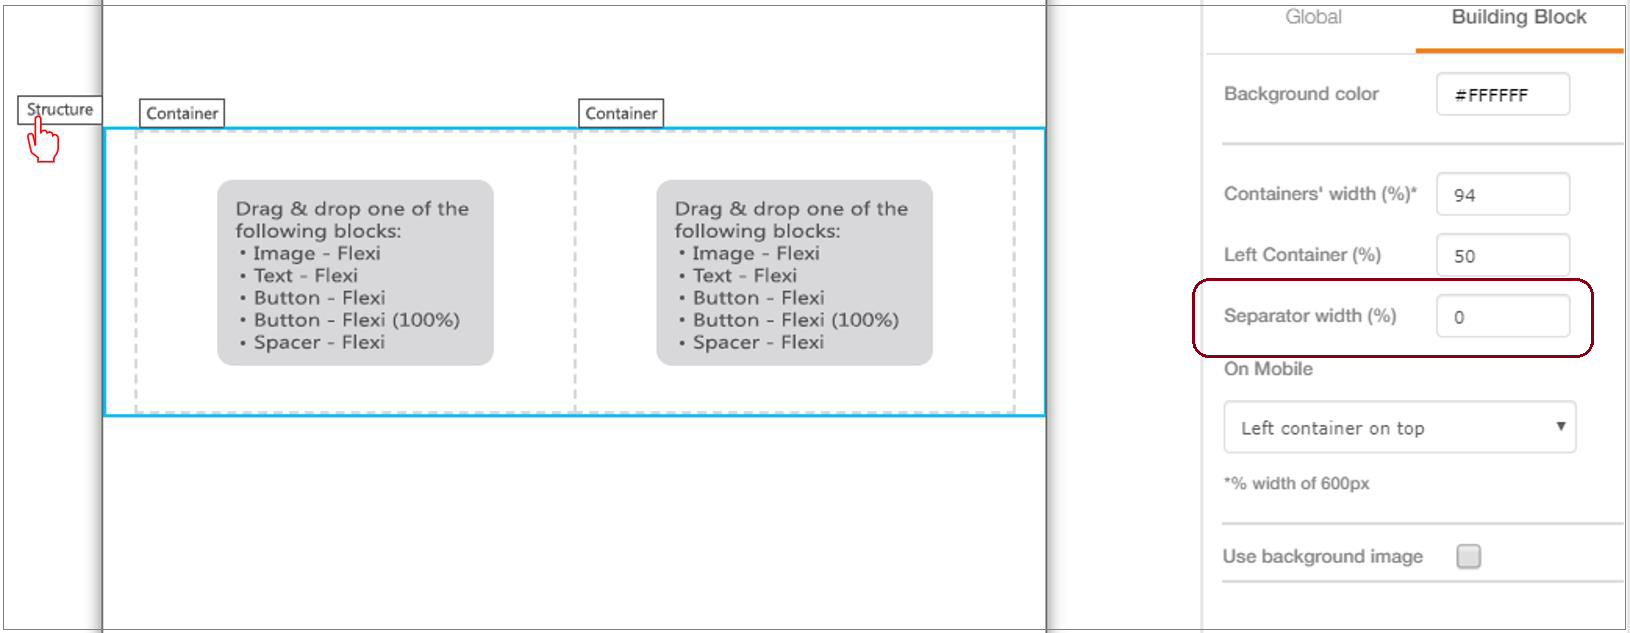
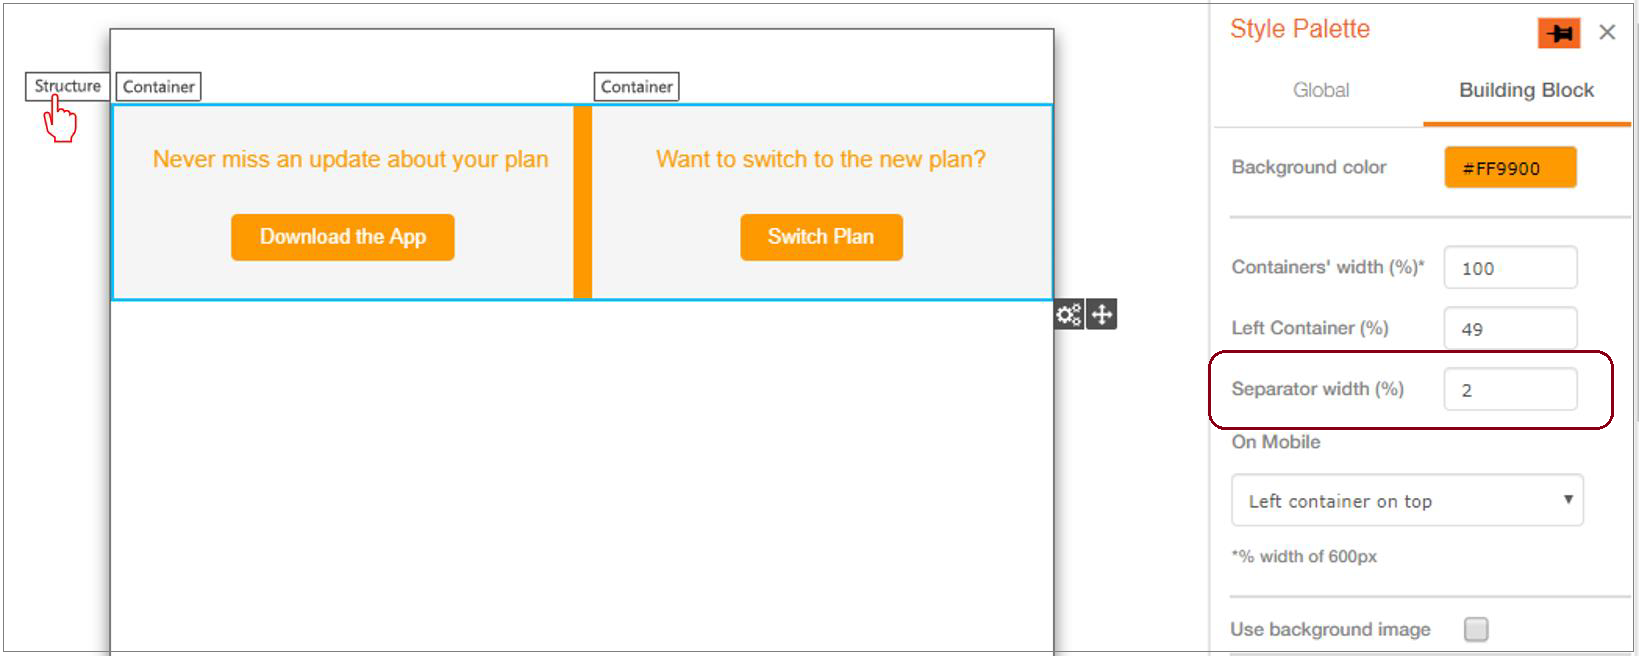
You can now add a ‘Separator’ between the 2 Containers within a ‘2 Column Flexi’ block by using the ‘Separator width (%)’ option available in the Style palette. This option will be visible in the Style palette on clicking on the ‘Structure’ label for the ‘2 Column Flexi’ block.
Usage Notes:
- The max and min values allowed for the Separator width are 5% and 0% respectively.
- This option is available for existing templates as well. The value will be set as 0 (default option).
- It is not possible to apply a background colour specifically to the Separator. The background colour assigned to the Structure will also be applicable to the Separator.
- If you increase / decrease the Separator width, then this will automatically decrease / increase the width of both the left and right containers correspondingly; e.g. if the Separator width is increased from 0% to 2%, then the width of Left Container and the Right Container will be reduced by 1% each.
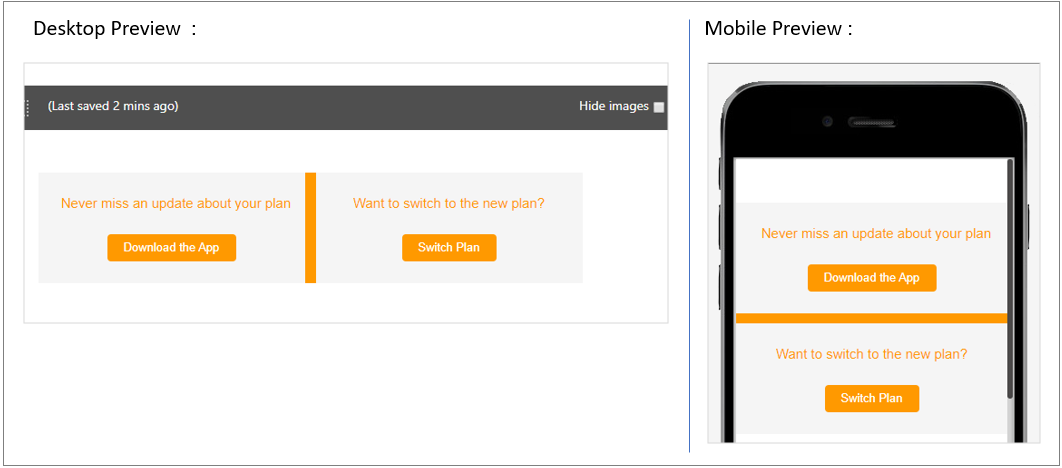
- if ‘Left container on top’ or ‘right container on top’ is selected for ‘On Mobile’ option in the Style palette, then the width of the separator is used to decide the height of the Separator on mobile devices.
In the below example email message template, we have set the ‘Separator width’ to be 2% :
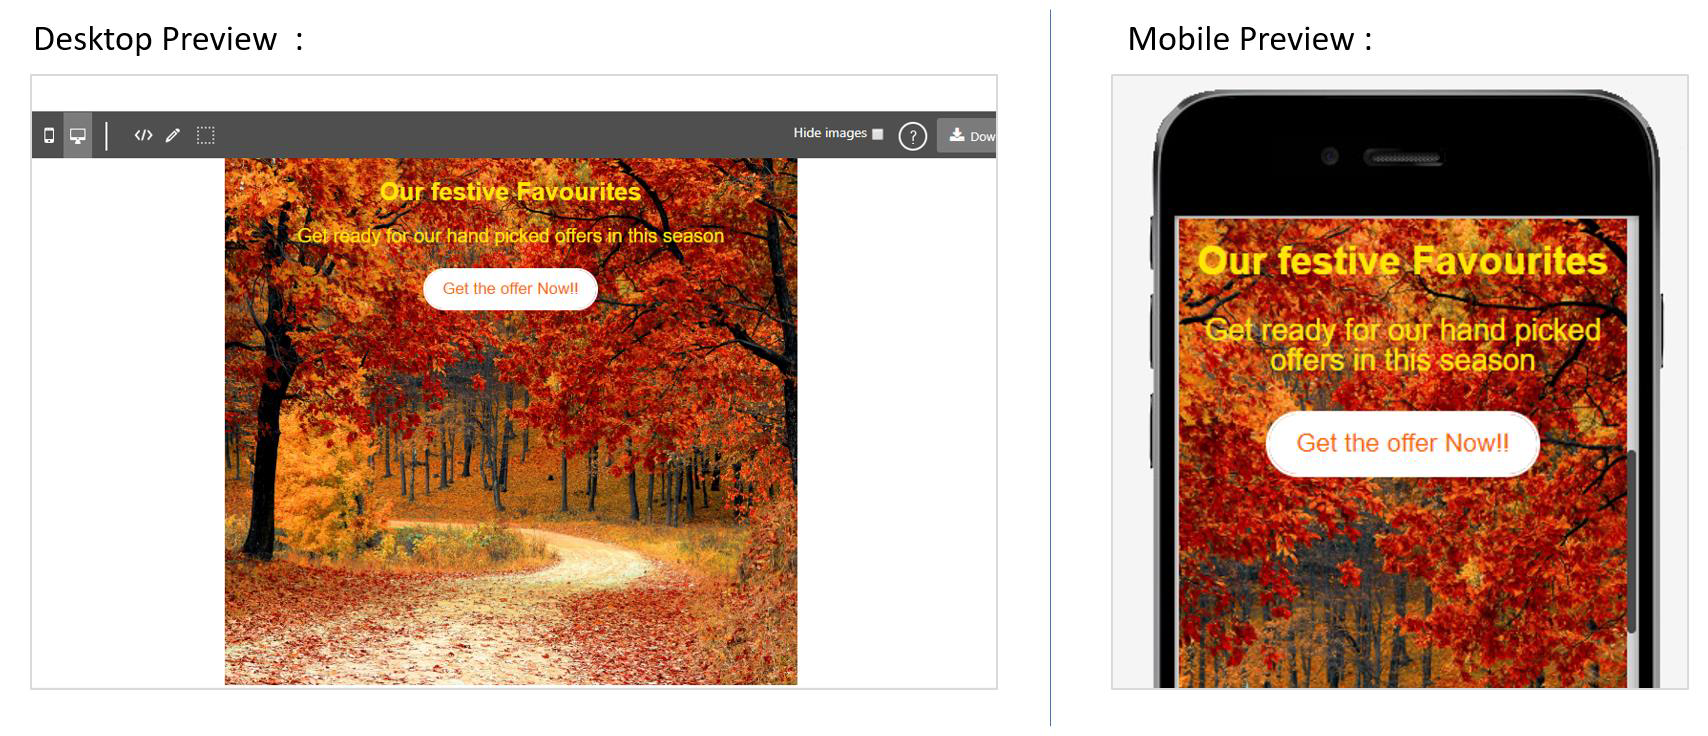
5.8 Background Image for Flexi Blocks
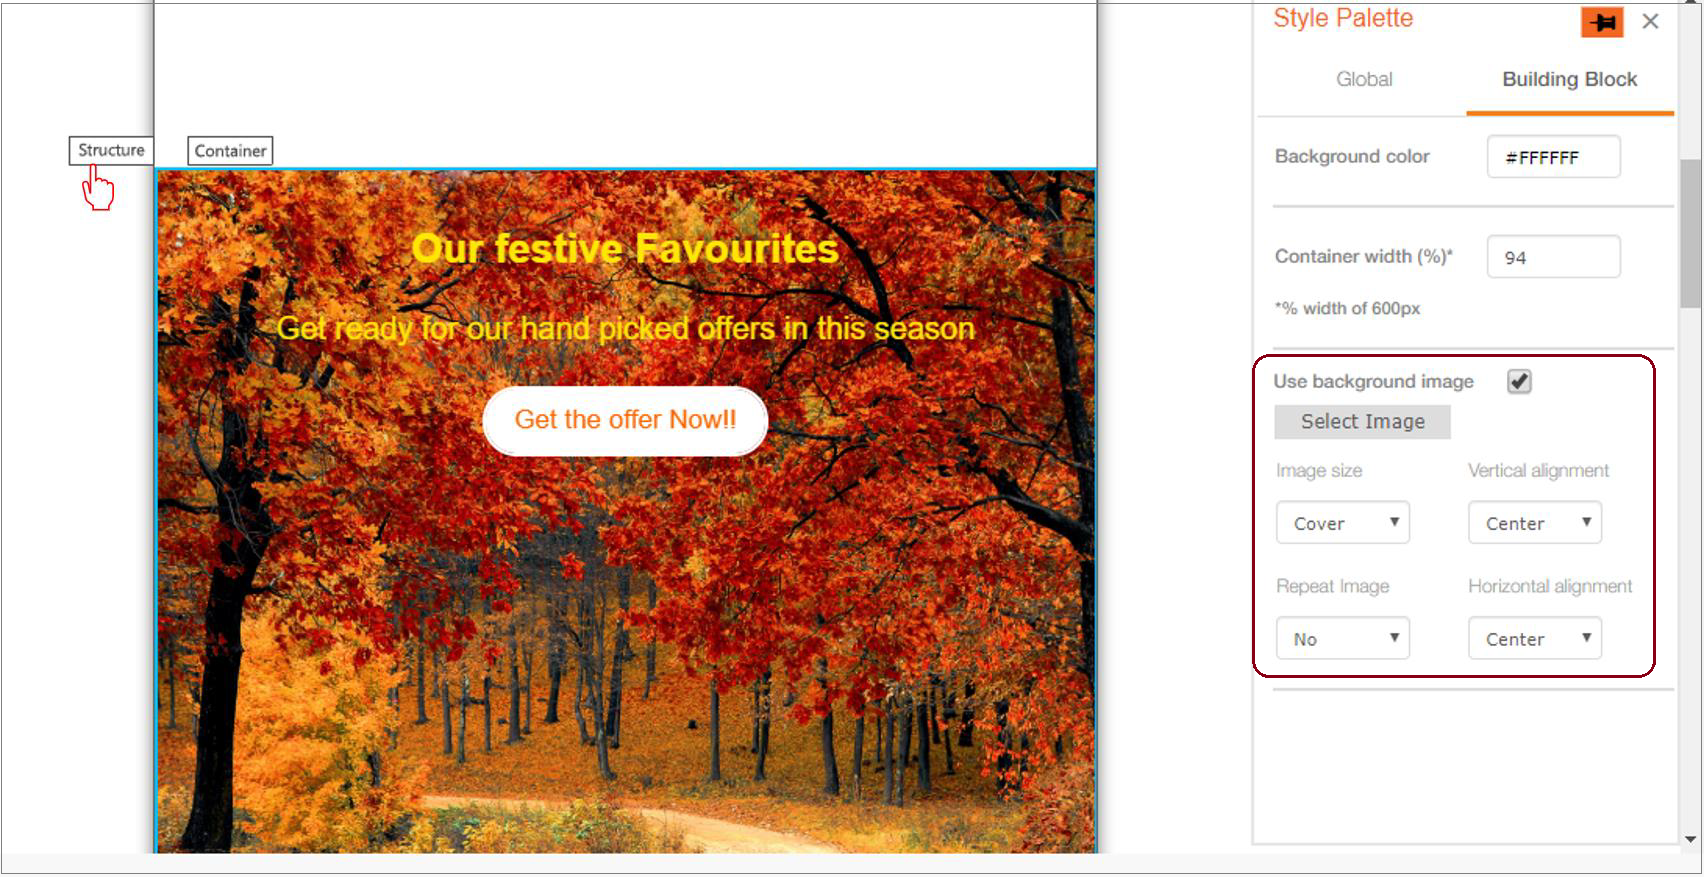
You can now add a background image for ‘1 Column Flexi’, ‘2 Column Flexi’ and ‘3 Column Flexi’ blocks. This setting will be visible in Style palette once you click on the ‘Structure’ label for these blocks.

Usage Notes:
- The settings available for a Background Image in a Flexi block are the same as those for the already existing background image functionality (for non-Flexi blocks).
- This setting is also available for the Drag-&-Drop Partial Composer.
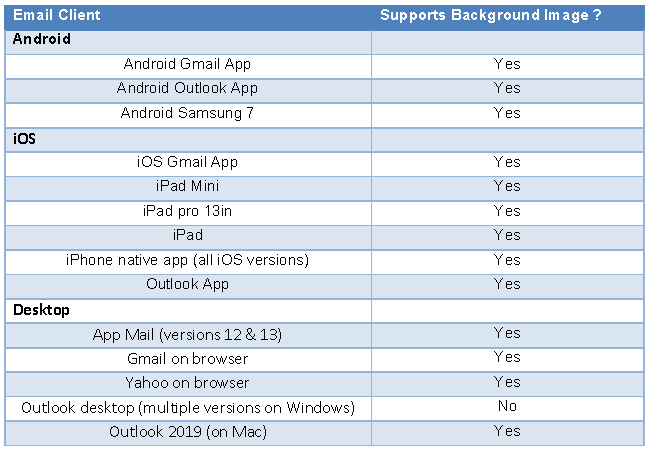
- Please refer to the following table which shows the behaviour of a Background image as applied to a Structure on various rendering devices (as of Sept 2019).
In the below example, a background image is used for a ‘1 Column Flexi’ block. There are 3 other ‘Flexi’ blocks used within the ‘1 Column Flexi’ : ‘Text-Flexi’, ‘Spacer-Flexi’ and ‘Button-Flexi’.
5.9 Add a Border for a Container (Beta)
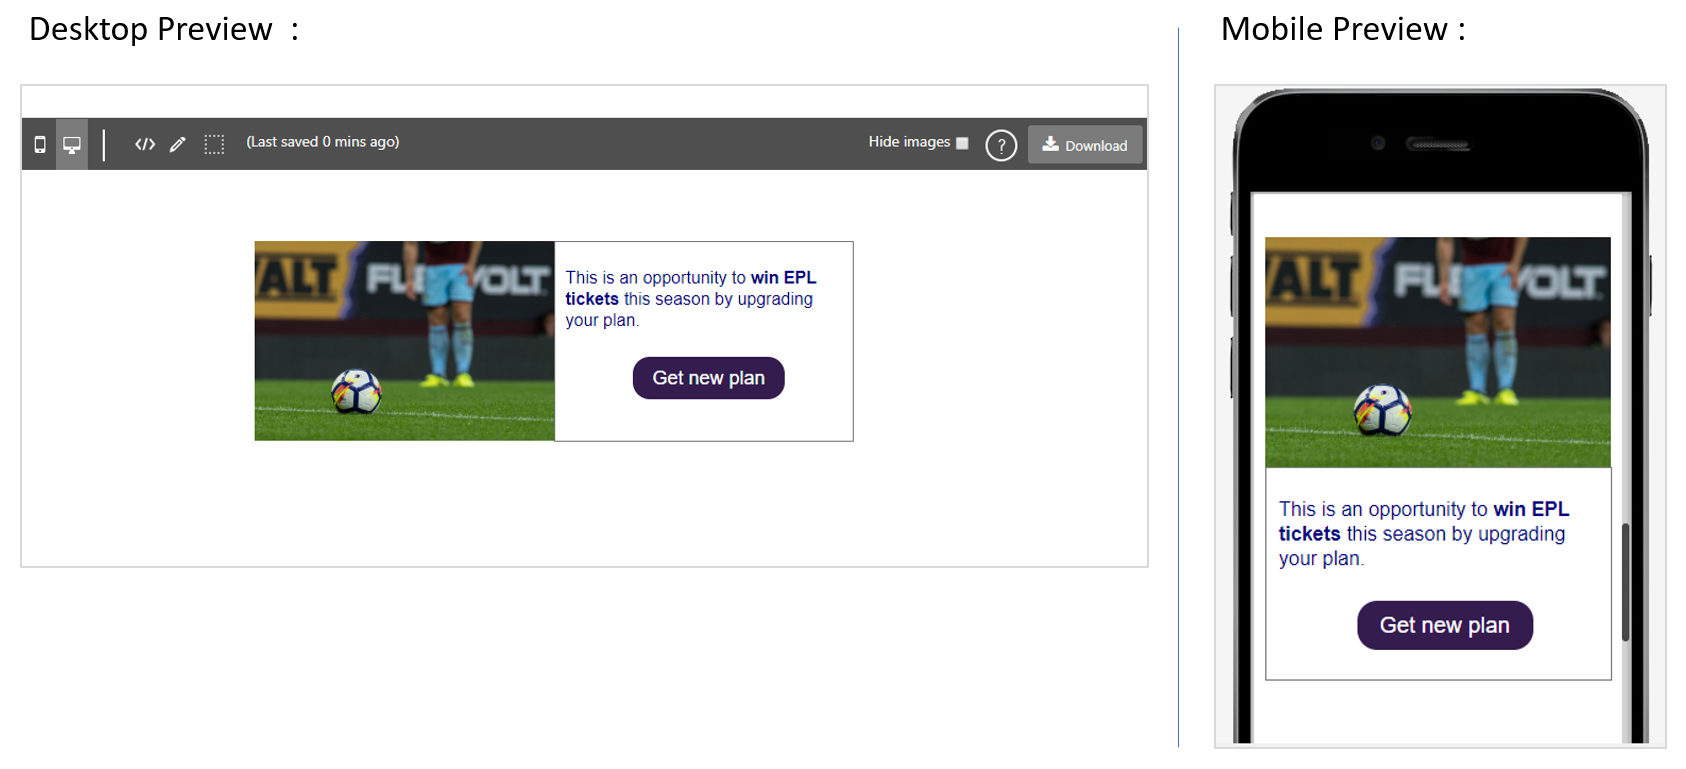
You can now add a border for a Container within ‘1 Column Flexi’, ‘2 Column Flexi’ and ‘3 Column Flexi’ blocks. This setting will be visible in the Style Palette after you click on the ‘Container’ label.

Usage Notes:
- This feature is currently in ‘beta’ as we expect to introduce some enhancements in upcoming releases.
- Emails may not render properly on the Outlook Desktop email client if this setting is used; however, they will render correctly (as designed) on the Outlook App on mobile devices (both Android and iOS).
- The default width is set to 0px, so by default, no border will be applied.
- This setting will be available for existing templates as well.
- This setting will also be available for the Drag-&-Drop Partial Composer.
In the below example, we have used a ‘2 Column Flexi’ block and applied the border to the Right Container.

5.10 New UX for Flexi Blocks
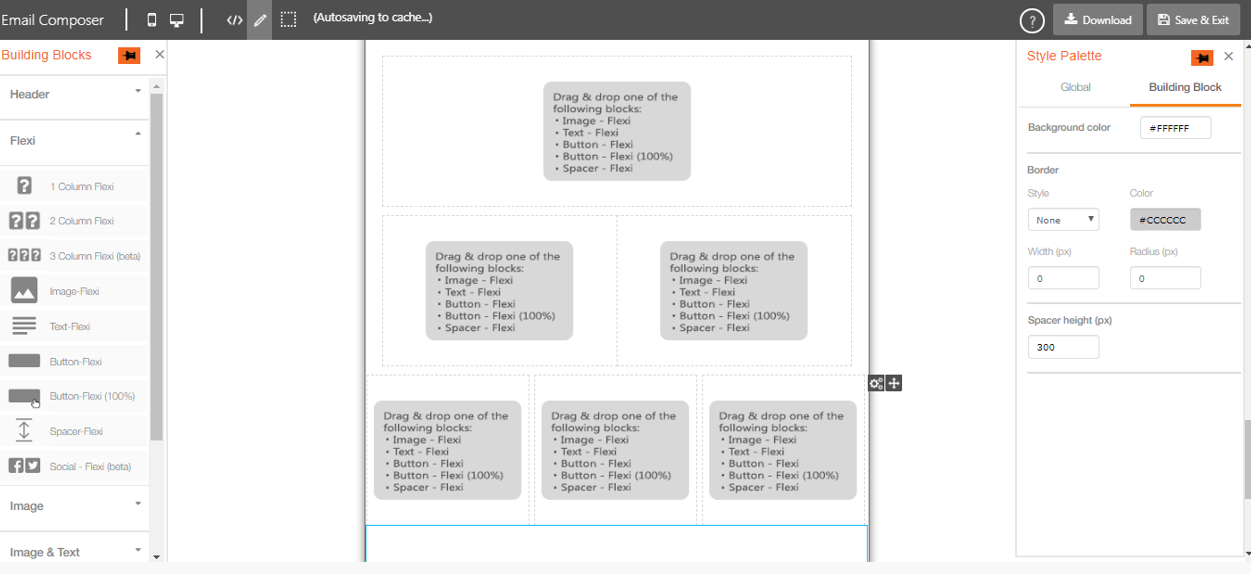
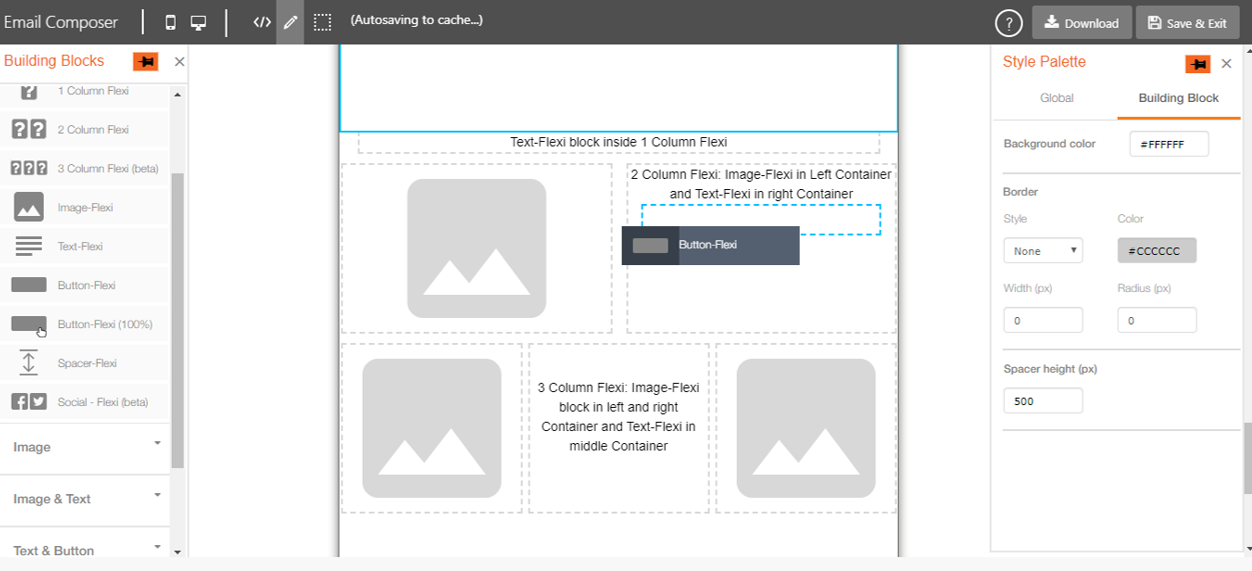
Now, the Containers within a Structure will be highlighted with dashed borders when a ‘1 Column Flexi’, ‘2 Column Flexi’ or ‘3 Column Flexi’ block is dropped in the design area.
After you drop any Flexi block inside the Containers, then these dashed borders will disappear.
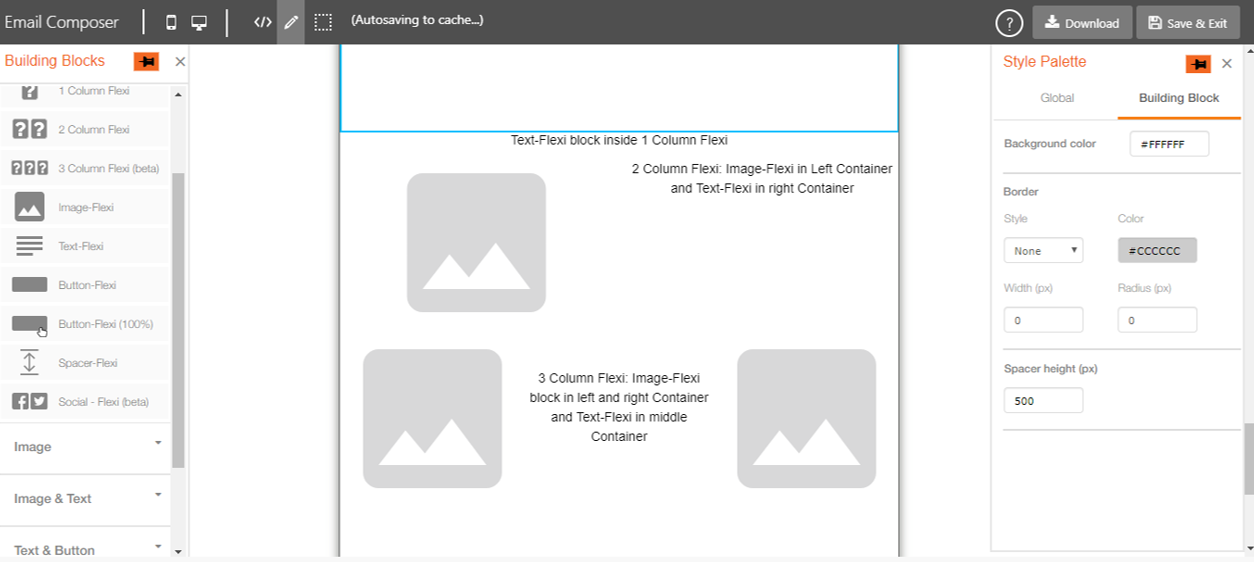
When you try to add a Flexi block inside the Container, then the Containers will be again highlighted with dashed borders to help you drop the block in the appropriate Container:
6.0 Maintenance items in this release
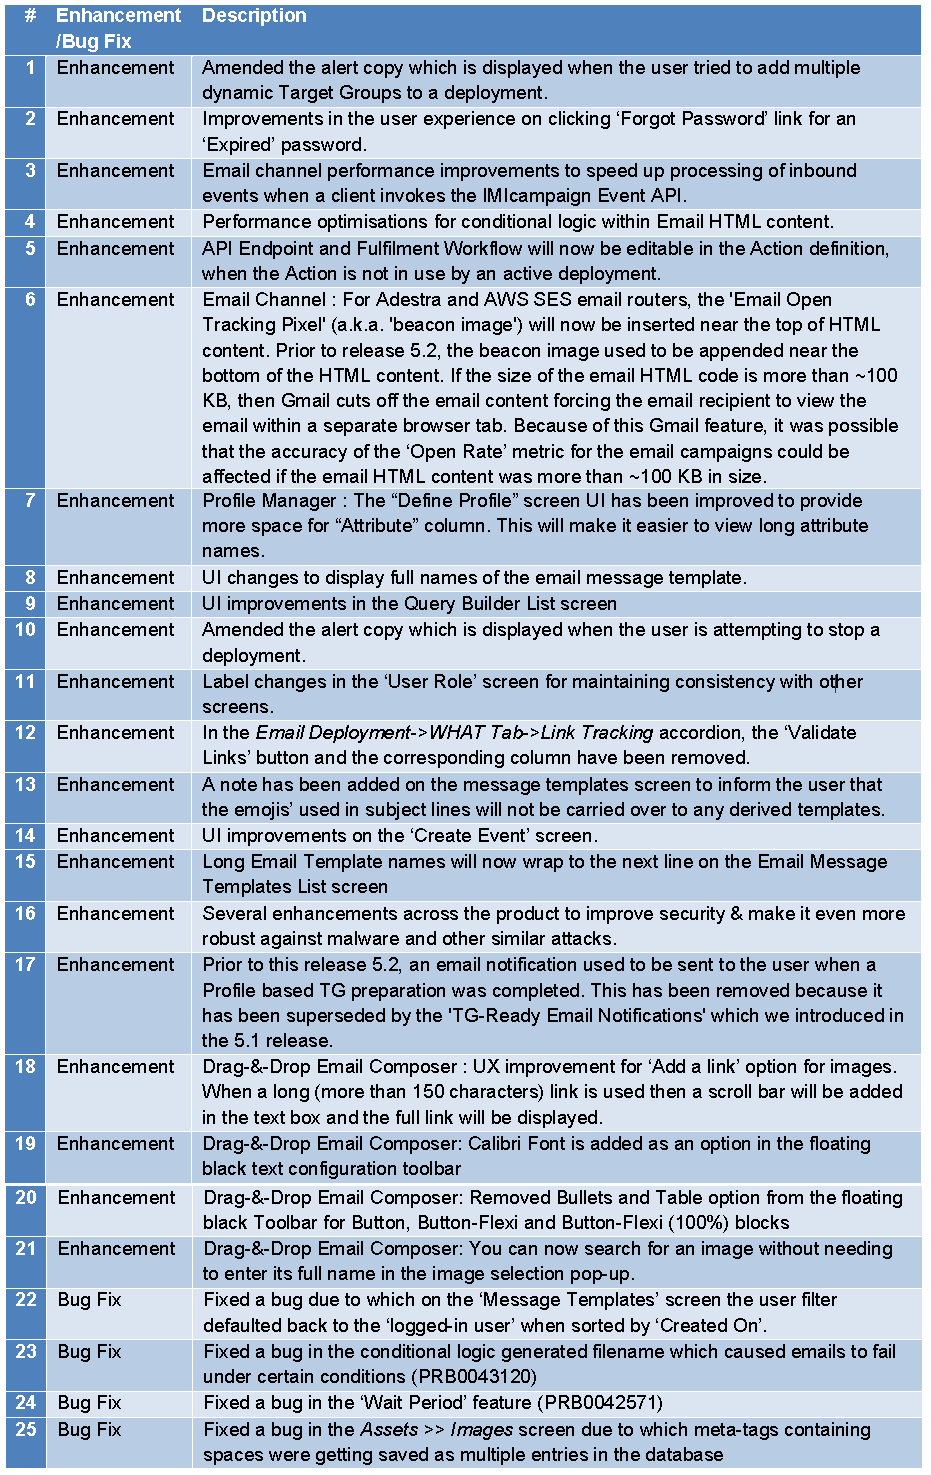
7.0 Need more information or help before or during the update?
Please contact your IMImobile account manager if you have questions or would like access to a new feature.