Release 5.1 - 2019 August
Click on the above link to view the complete list of new features, enhancements, and defect fixes.
1.0 Introducing IMIcampaign’s New Dashboard (Beta)
We are excited to introduce our new-look dashboard (currently in ‘Beta’). We would love for you to try it out and give us your feedback on existing features as well as suggestions for new features.
The new dashboard will open within a new tab on your browser.

The new dashboard will run alongside the existing dashboard. It will be available as ‘Beta’, except for clients running voice-channel campaigns and clients from the Middle East & Asia region.
After a couple of months, the new dashboard will ‘graduate out of Beta’. At that point, the old dashboard will remain available only to clients who are running voice-channel campaigns and to clients from the Middle East & Asia region.
By 2020 Q1, we are aiming to make the new dashboard available to all clients, including clients running voice-channel campaigns and clients from the Middle East & Asia region.
The next few sub-sections provide a glimpse of the new dashboard’s look-&-feel and features.
1.1 Dashboard Home Page (Top Card)
At the top of the home-page, you can get a quick high-level view of the Message Counts by Channel and Deployment Counts by Status for your campaigns. The date filter will be applied to all the ‘cards’ on the page by default.
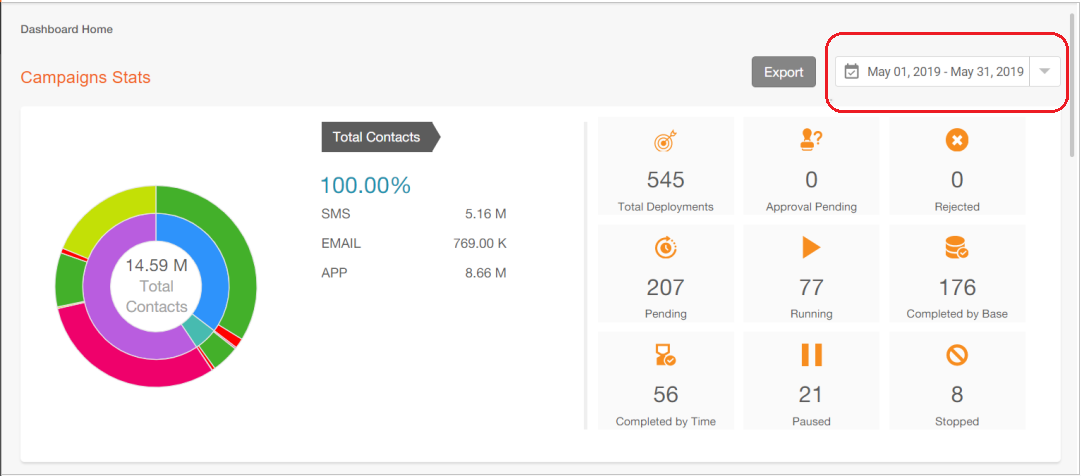
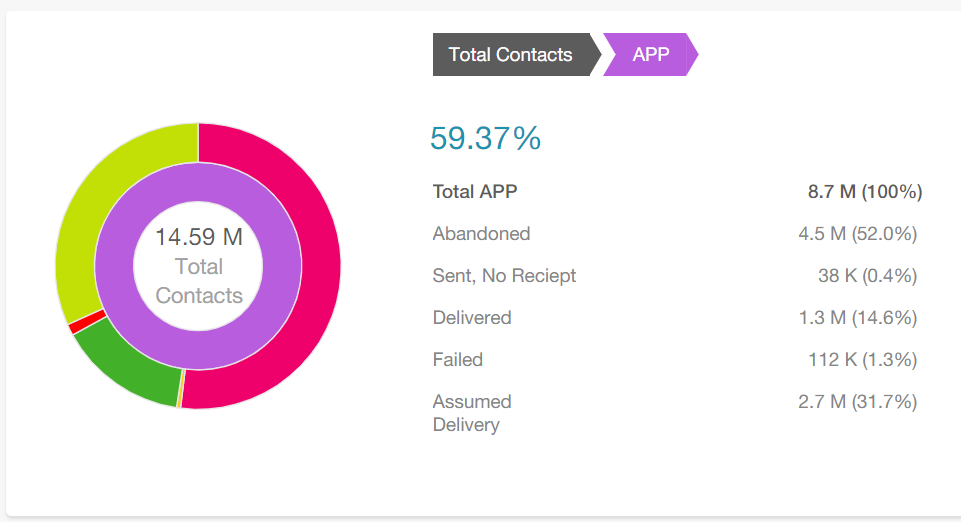
You can interact with the ‘doughnut-chart’ to drill into specific channels or metrics.
1.2 Dashboard Home Page (Middle Card)
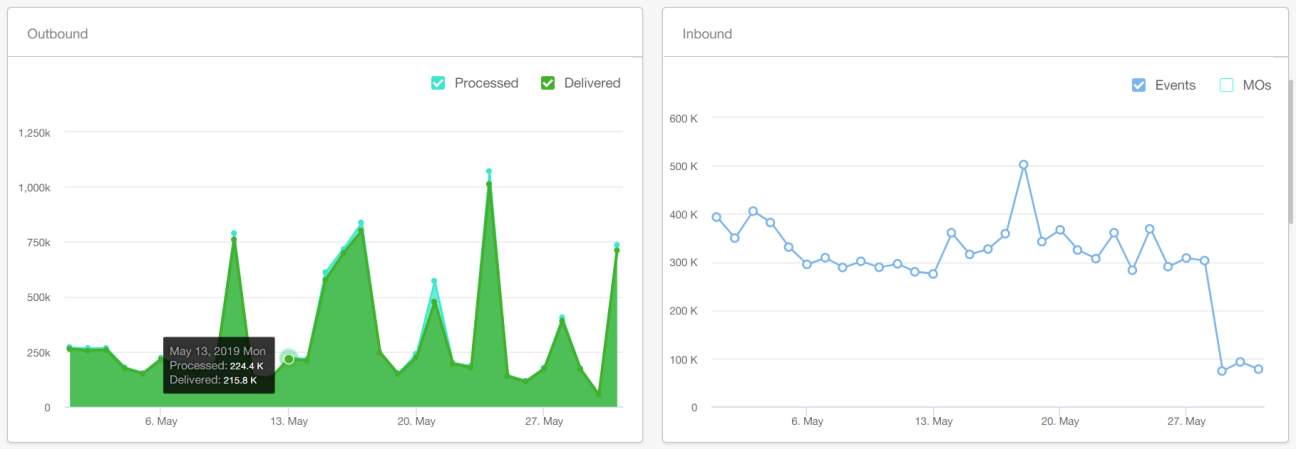
You can get a high-level view of some key ‘Outbound’ and ‘Inbound’ metrics across all your campaigns for the duration selected in the date filter at the top of the page.
1.3 Dashboard Home Page (Bottom Card)
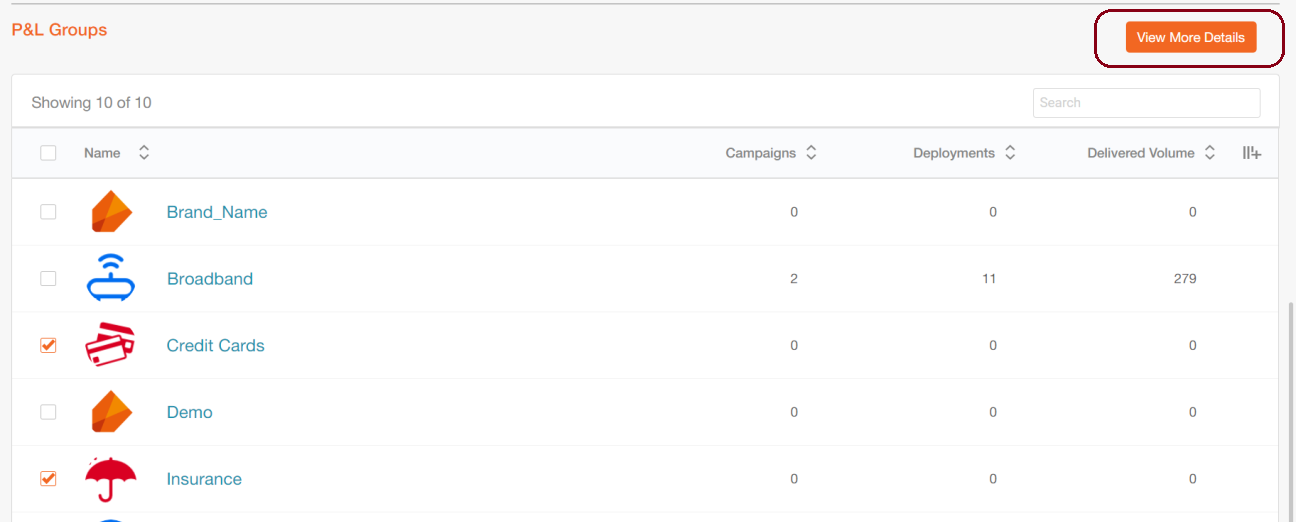
This card shows the count of Campaigns, Deployments and Delivered Volume for each of your P&Ls. You can also drill into one or more specific P&Ls by clicking the ‘View More Details’ button. This will take you to the ‘Campaign Listing’ page with those specific P&Ls applied as the filter.
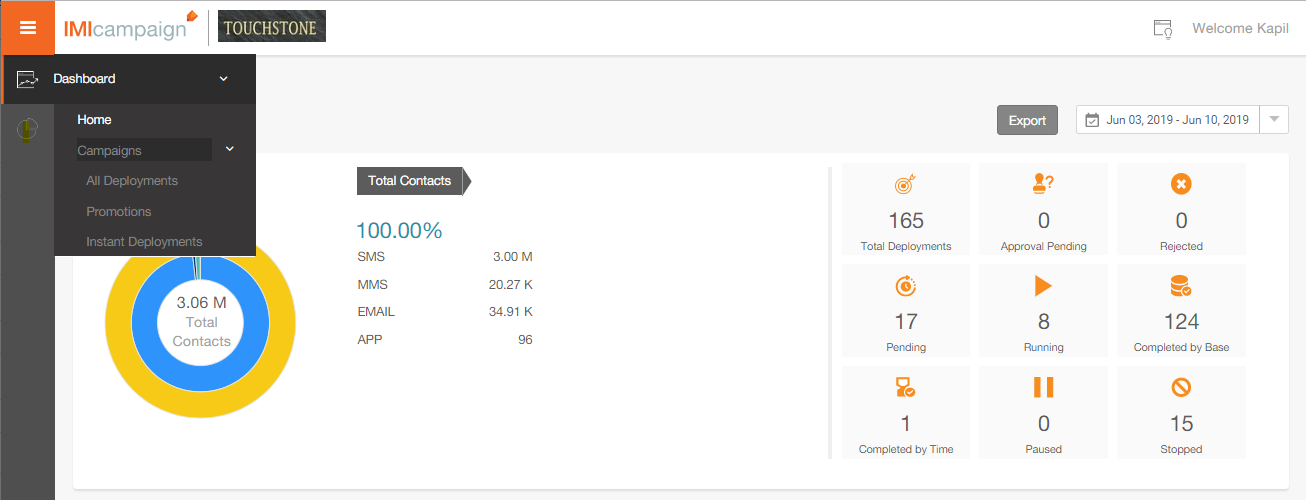
1.4 Dashboard Top Level Menu
You can directly go to the ‘Campaign Listing’ page by using the expanding menu on the left panel.
1.5 Reports Top Level Menu
You can go directly to the Reports section using the expanding menu on the left panel.
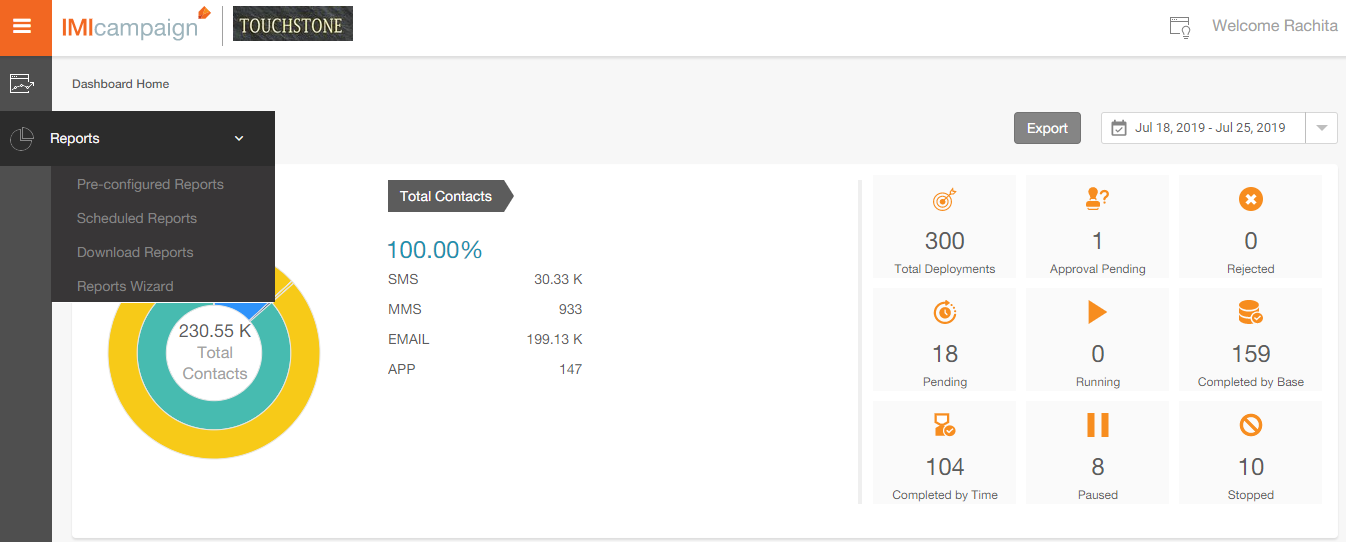
In this release 5.1, the pre-configured reports will not be available on the new UI. So, you will only see the below listed two menu items in this release :
- Scheduled Reports
- Reports Wizard (more about this feature later)
The other two items will be enabled in release 5.2.
1.6 Campaigns Listing Page
On the Campaigns Listing page, you can see the Deployments within the selected Campaigns. You have a top-level filter with the following 3 values:
- All Deployments
- Promotions
- Instant Deployments
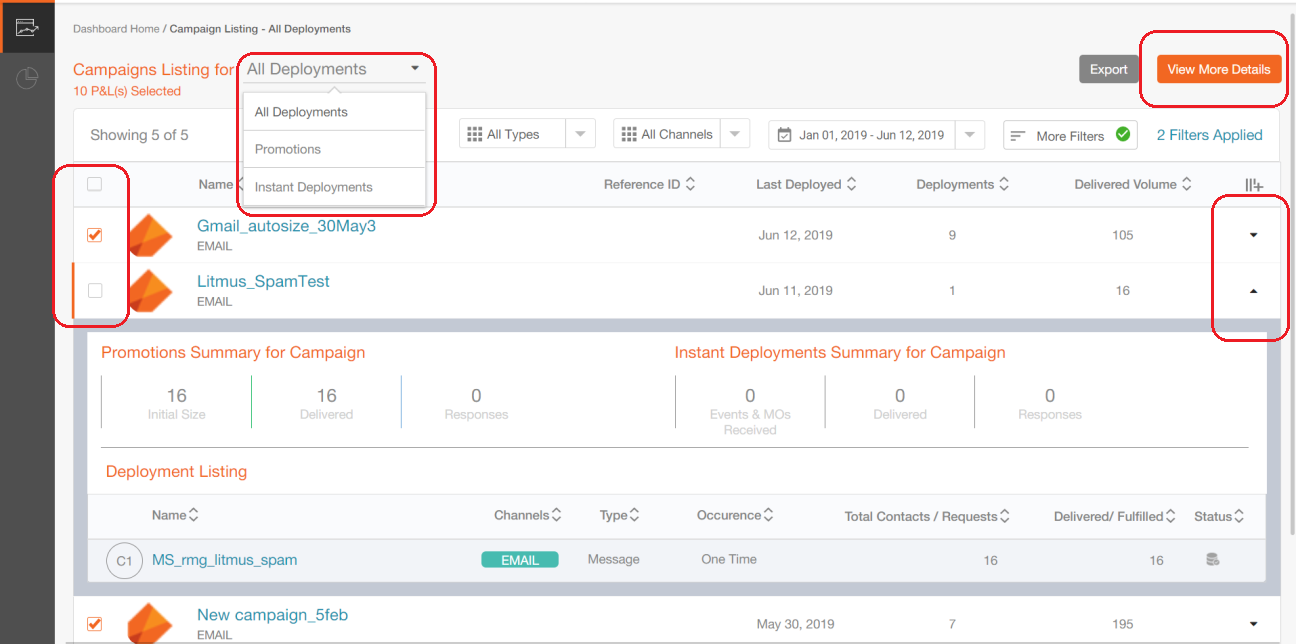
We have introduced a new nomenclature called ‘Promotions’ and ‘Instant Deployments’. All deployments are categorised into these two types as follows:
-
Promotions are deployments which have a pre-defined TG and a schedule associated with them :
o One-time Comms
o Recurring Comms
o One-time Follow-Ups
o Recurring Follow-Ups -
Instant Deployments are triggered by Event-API calls, inbound SMS MOs or customer actions such as Email Opens etc.
o Instant Follow-Ups on External Comms
o Instant Follow-Ups on Existing Comm / Follow-Up
On the Campaigns Listing page, you can select one or more campaigns using the check-boxes on the left side and then click on ‘View More Details’ to further drill into those specific campaigns.
You can also click on the little triangular controls on the right side to drill into a specific campaign. This will open up a card showing all the deployments within that campaign and their respective counts, channels, status etc.
1.7 Multiple Custom Filters
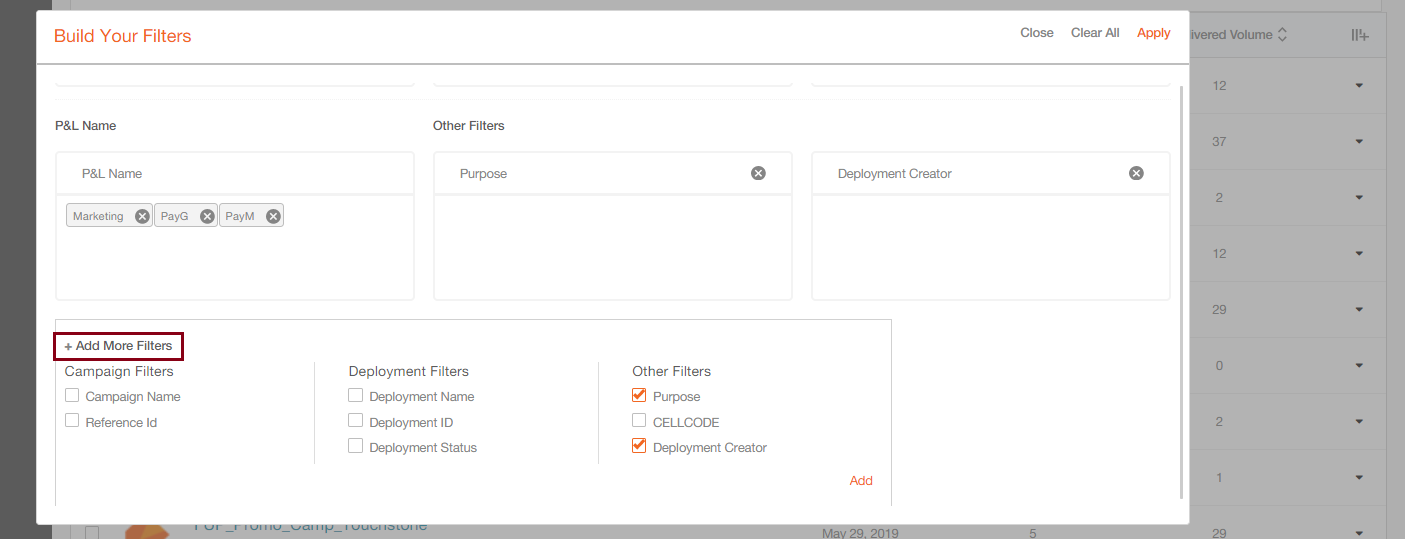
You will now be able to save multiple personalised custom filters.

You can also rename/edit these saved filters.

There are a few additional criteria available for filters as well e.g. ‘Deployment Creator’.
1.8 Campaign Details Pages
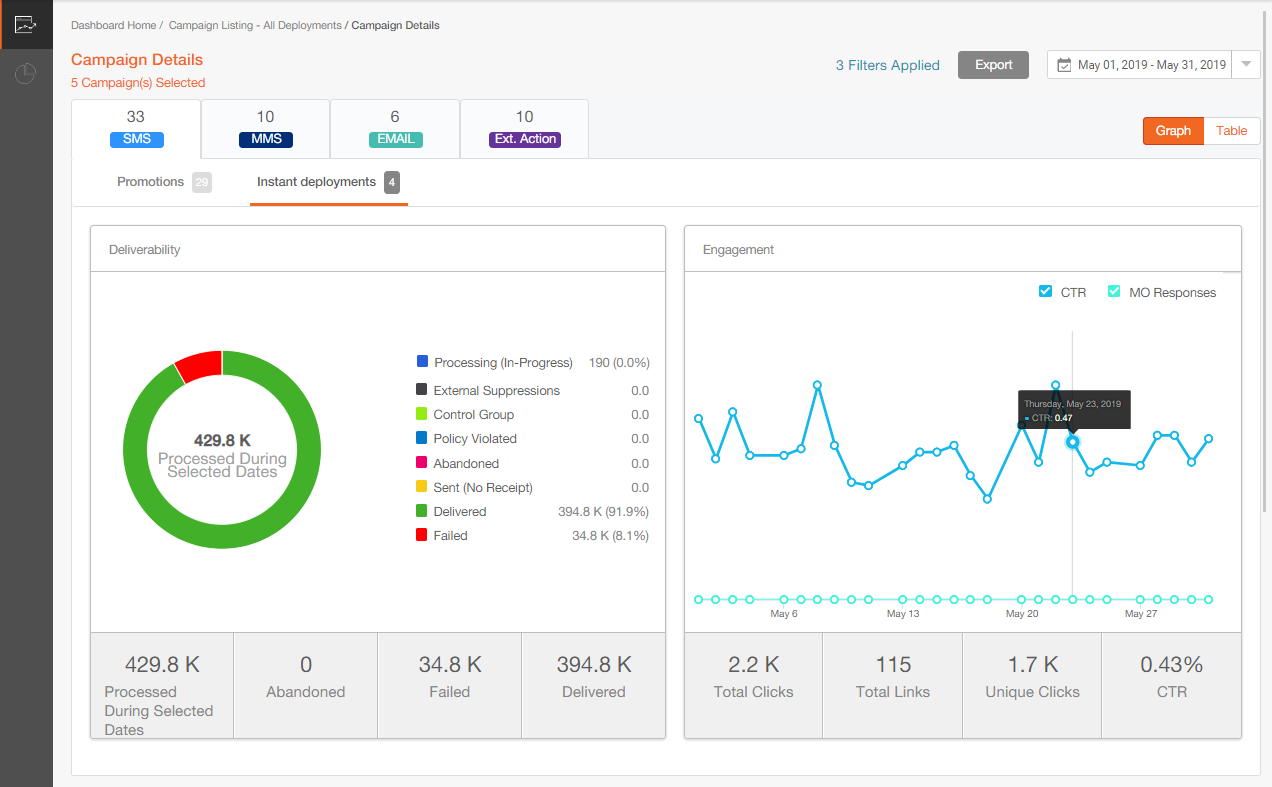
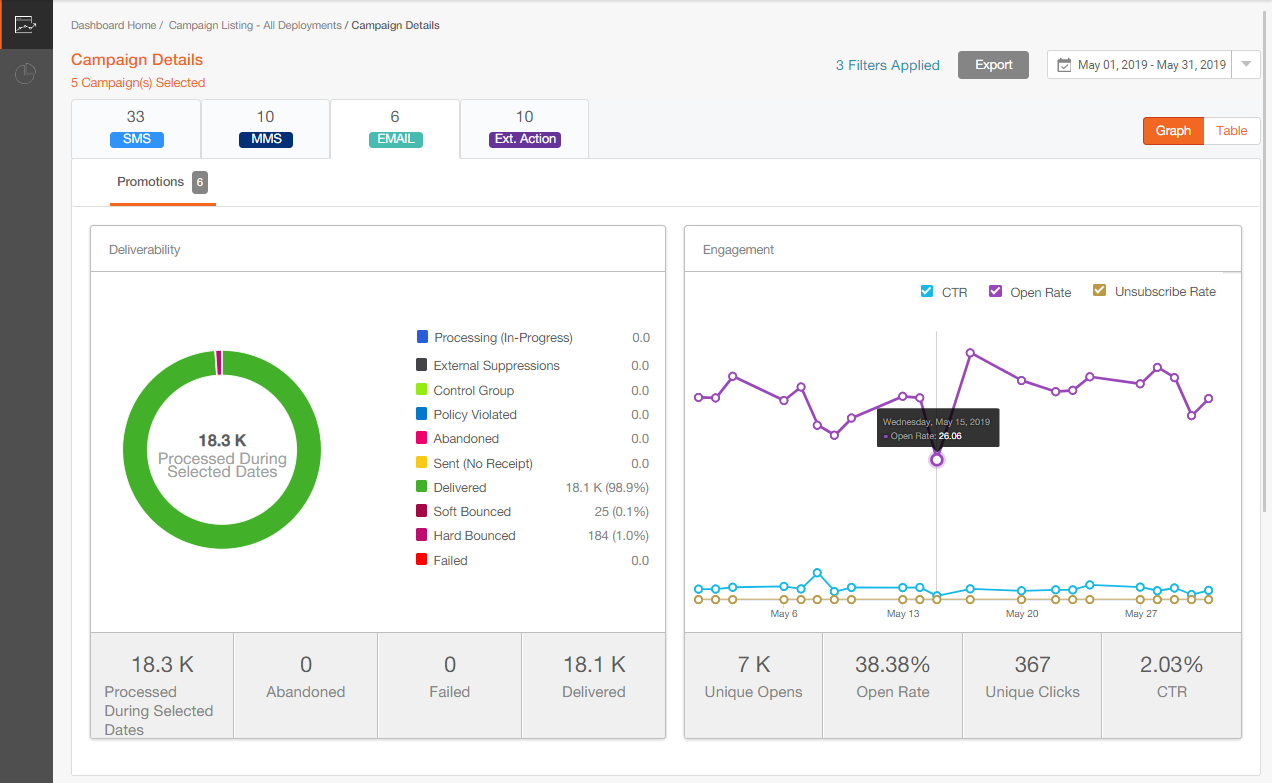
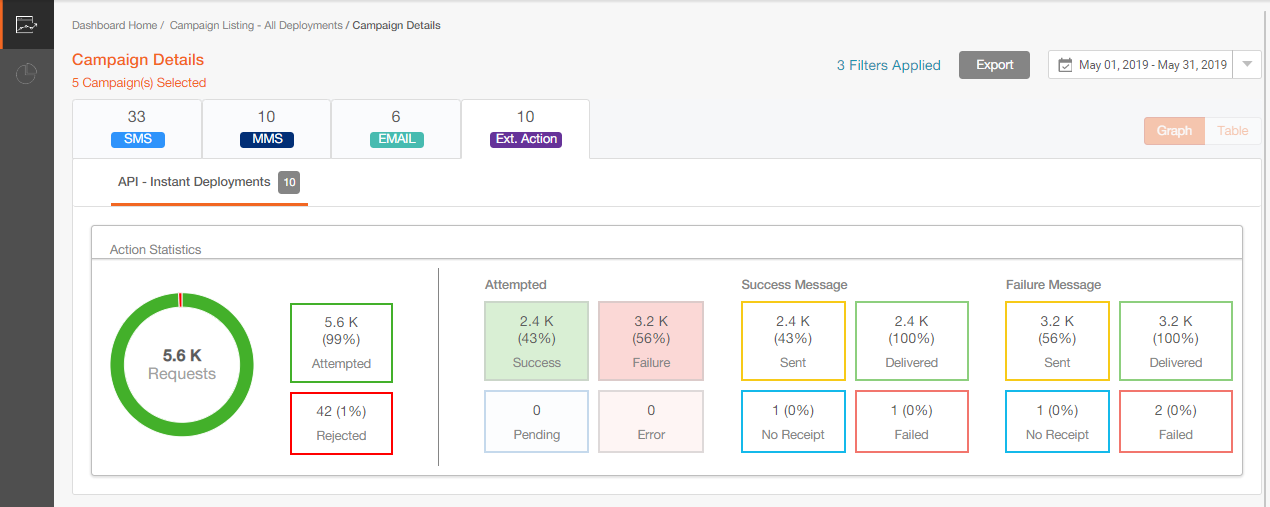
You will now be able to view the Customer Engagement metrics side-by-side next to the Outbound Delivery metrics. This makes it much easier to assess the performance of campaigns. There are separate tabs for each channel. For each channel, there are further tabs for Promotions and Instant Deployments.
The date filter values selected at the top of the page will be applicable for all the cards within this page.
Campaign Details (SMS): In the example below, the counts shown are aggregated for 4 SMS Instant Deployments across the 5 selected Campaigns.
Campaign Details (Email): In the example below, the counts shown are aggregated for 6 Email Promotion Deployments across the 5 selected Campaigns.
Campaign Details (Ext. Action): In the example below, the counts shown are aggregated for 10 Ext. Action (API) Instant Deployments across the 5 selected Campaigns.
1.9 Deployment Details Pages
There are separate Deployment Details pages for each channel. Here, you will be able to view the Customer Engagement metrics next to the Outbound Delivery metrics for a specific deployment.
The date filter values selected at the top of the page will be applicable for all the cards within this page.
These pages look similar to the corresponding Campaign Details pages for those respective channels, but have the following additional cards specific to the Deployment Details pages.
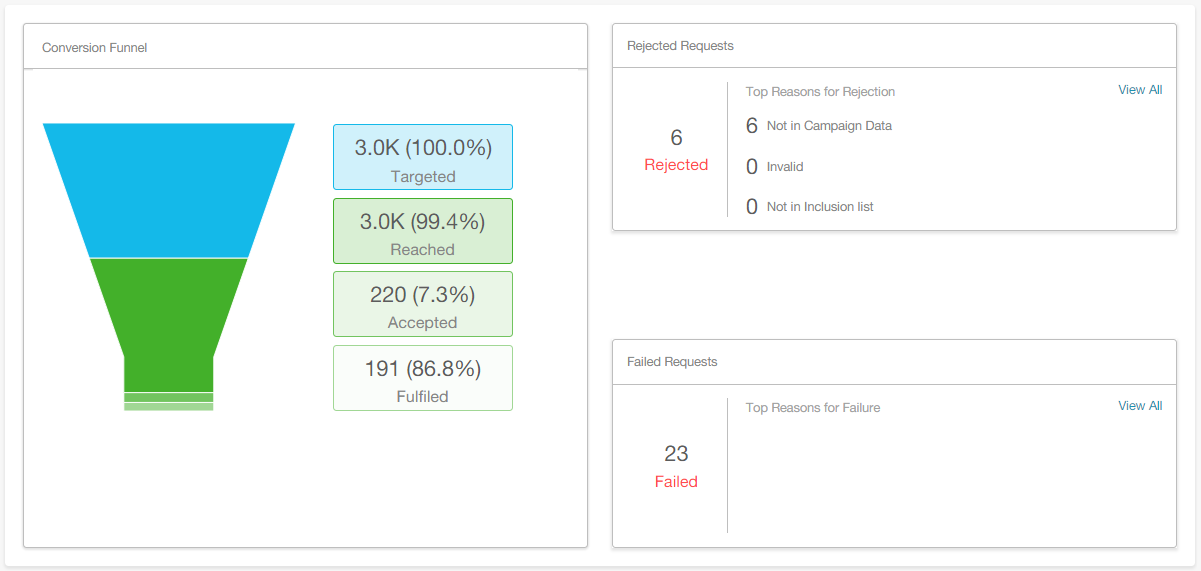
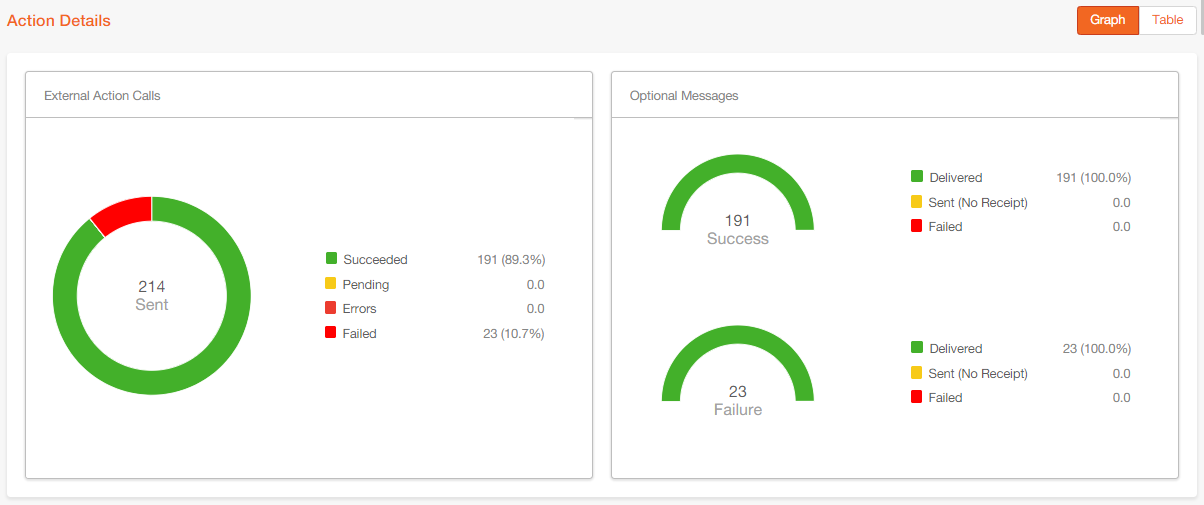
Funnel-Chart for Ext. Action channel Instant Deployments:
- If the Instant Deployment has a whitelist inherited from a parent promotion deployment, then the ‘Targeted’ and ‘Reached’ metrics within this funnel-chart will be populated from that parent promotion deployment.
- If there is no parent promotion deployment present, then these two metrics will be shown as zero.
Success / Failure Metrics for Instant Deployments with Ext. Action channel:
Deployment Timeline:
This card shows the variation of deployment metrics over the last 12 months. It is available for all types of deployments; however, it’s most useful for recurring deployments and instant deployments running over a number of months.
In the future, we will enhance this feature with the ability to view the deployment timeline over hours within a day and dates within a month.

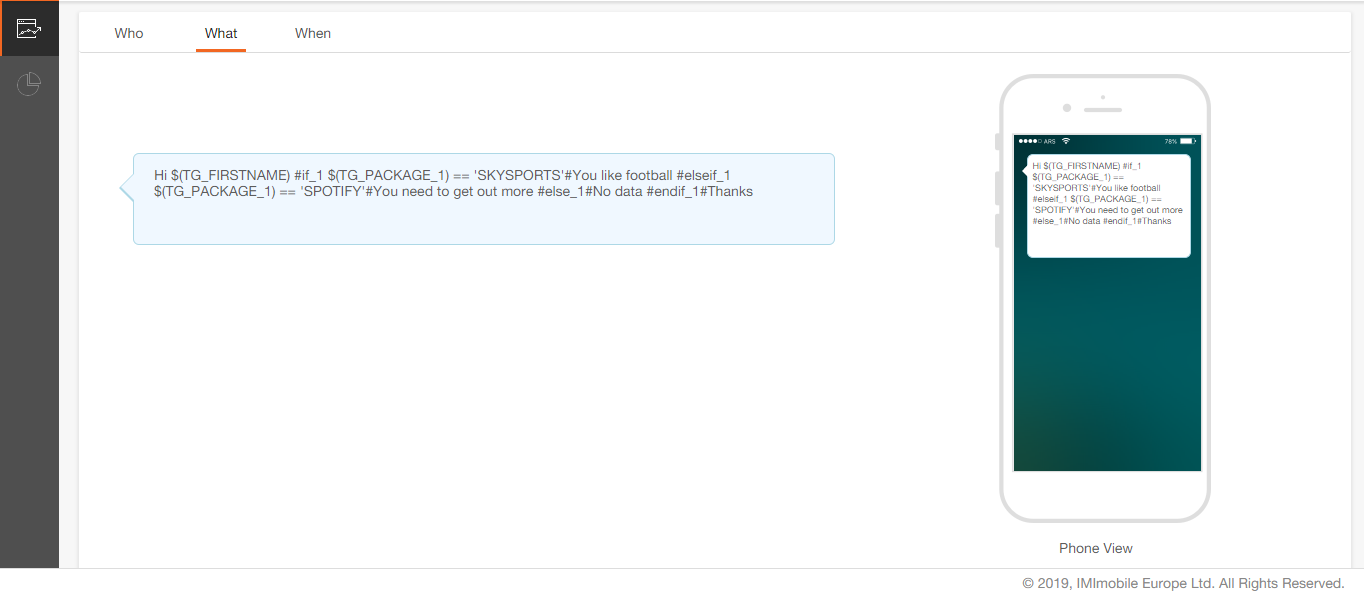
Who / What / When:
You can now easily review all 3 aspects of the deployment set up from within the Deployment Details page. In case of email deployments, you can also view the ‘email heatmap’ right here under the ‘What’ sub-tab.
1.10 Reports Wizard
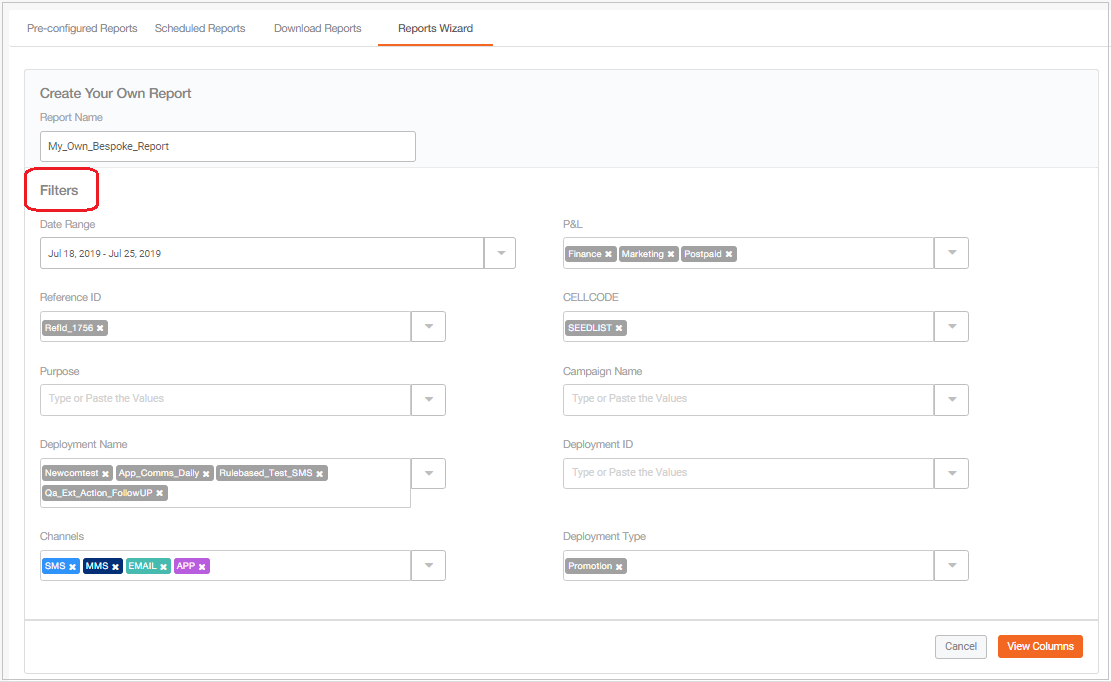
You can now create your own custom reports by choosing the metrics you want.
Reports Wizard-Step 1: Choose filter criteria
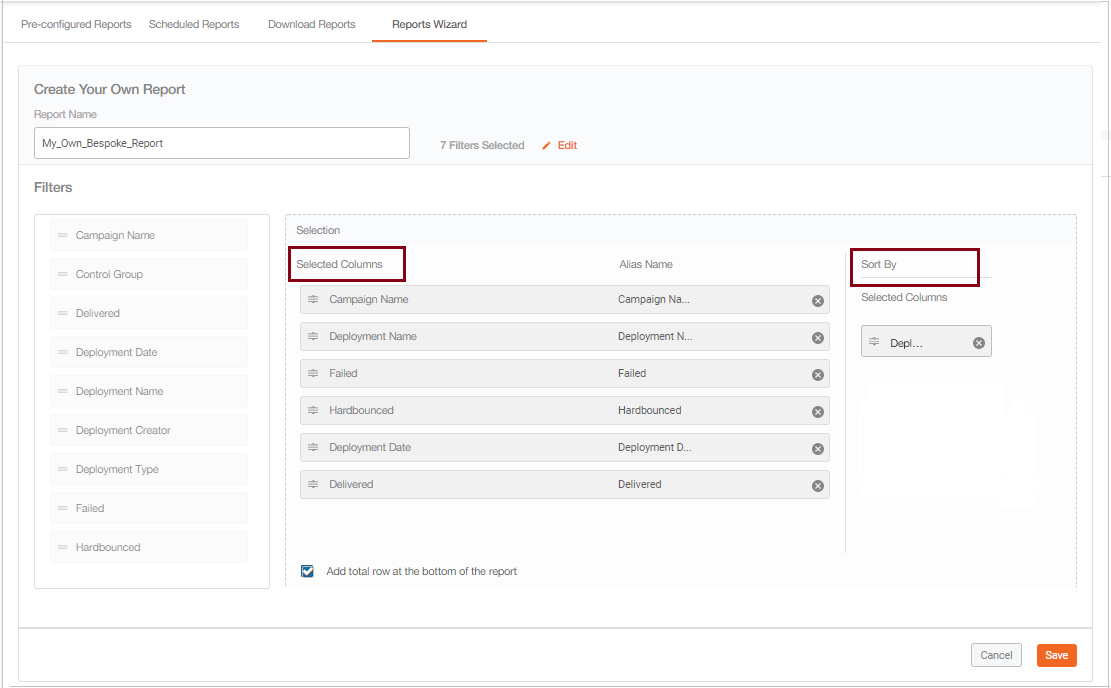
Reports Wizard-Step 2: Choose columns & sort-order
Choose columns you need in your bespoke report by dragging them from the left panel onto the middle ‘Selection’ panel. There are columns with absolute values and % values. In turn, you can specify the sort order by dragging the selected columns from the middle panel to the ‘Sort By’ panel on the right. Over the upcoming releases, we will be adding more columns in the list for you to choose from.
Reports Wizard-Step 3: Schedule your bespoke report
Schedule the report or edit it to change filters and columns etc.

1.11 Data on the New Dashboard – Additional Notes
- The New Dashboard will have campaign metrics data going back to Jan 2018; however, this data migration from the old to the new dashboard may take up to 2 weeks after release 5.1 going live.
- The New Dashboard uses a purpose-built back-end data infrastructure – which is separate from the data infrastructure used for the Campaign Management section of IMIcampaign. This mechanism will improve the performance & responsiveness of the Campaign Management features after the Release 5.2 when the existing dashboard will be decommissioned for most clients.
2.0 Campaign Manager module enhancements
2.1 Follow-up Deployments: Simplified 4-quadrant screen
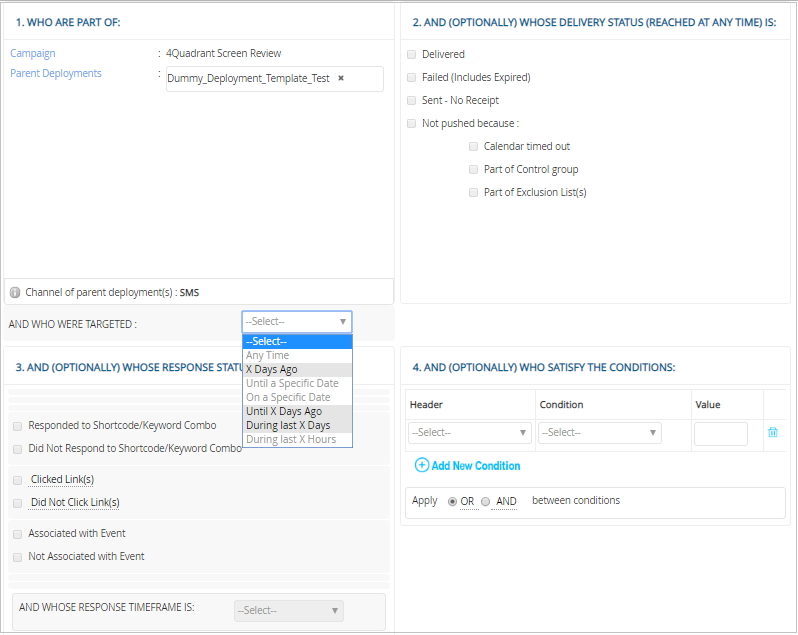
The Follow-Up Target Group creation screen, also known as the 4-quadrant screen, has been simplified to make it easier to use.
- You are no longer required to enter the Target Group name on this screen.
- Wording has been clarified in all the 4 quadrants on this screen.
- It is more clearly conveyed that 2nd, 3rd, and 4th quadrants are optional.
- In the 1st (top-left) quadrant, when the user selects any period option (hour/day based), we now display the indicative days/hours relative to the schedule of the parent deployment(s) - assuming that the deployment is scheduled to be activated on the same day. This should help to clarify what are the actual implications of choice made by the user in the time frame drop-down. Note: This is just an indicative time frame and not the actual deployment schedule (which will depend on what schedule you set up later the WHEN tab).
- In the 2nd (top-right) quadrant, the time frame drop-down has been removed and a default value of “‘Delivery Status Reached at Any Time’ has been applied. This will reduce the number of choices the user has to make on this screen.
2.2 Follow-up Deployments: Schedule follow-ups for ‘later that same day’
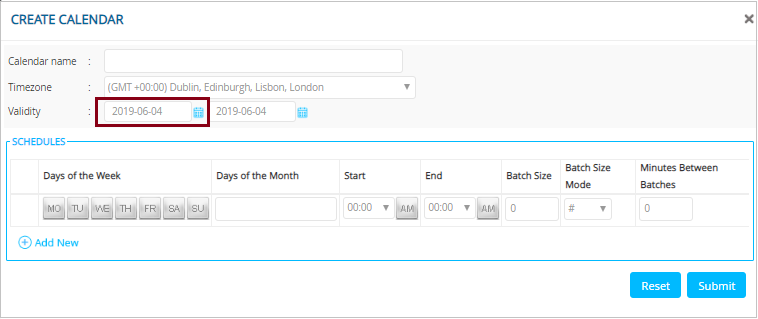
You can now schedule Follow-up deployments to be activated to ‘later that same day’.
Prior to this release, the earliest you could schedule a follow-up deployment to go out was on the next day. This was because Follow-Up Target Groups (TGs) were always prepared at 4 AM every morning.
From this release onwards, we have made a lot of performance improvements to the backend technical processes that are used to generate the Follow-Up TGs. So from now on, the Follow-Up TGs will also be prepared 1 hour before the deployment start time (similar to how they are prepared for promotions/comms).
As shown in the screenshot below, you will now be able to select today’s date as the Start date for the Follow-Up deployment in the ‘Validity’ field.
2.3 WHAT tab: Improved ‘Purpose’ meta-tags for Campaign Deployments
Your tenant administrator will now be able to categorise ‘Purpose’ values within ‘Purpose Groups’. (Administration > Config Management > Tenant Management > Purpose List ).
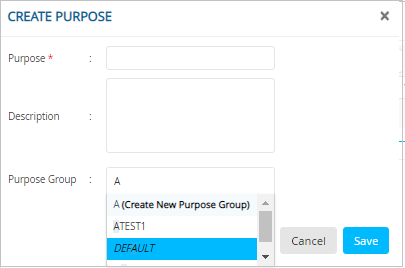
Whilst creating a new Campaign Deployment, it is mandatory to select one and only one ‘Purpose’ value from each of the ‘Purpose Groups’ on the WHAT tab.
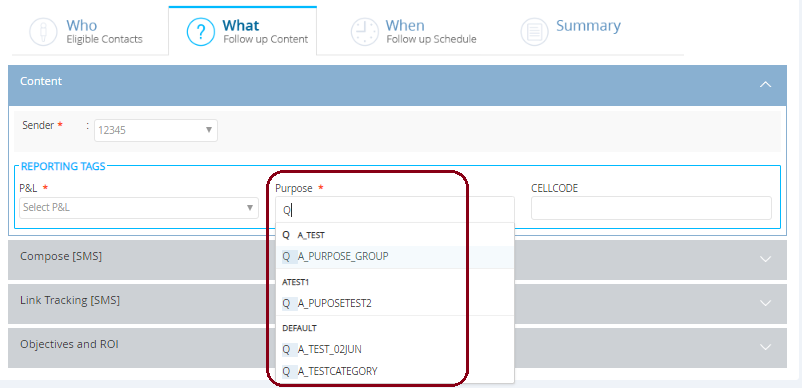
All your existing values for the Purpose meta-tag will be categorised in a "Default" Purpose Group and existing Deployments will continue to function without needing any action from you. Also, you will be able to select one or more Purpose values from the ‘Default’ Purpose Group as per the existing product functionality.
This enhancement will allow your tenant administrator to establish and enforce a level of consistency in the way the ‘Purpose’ meta-tags are applied to Deployments by your team.
2.4 Campaign Flow: Filter Deployments by ‘P&L’ and ‘Purpose’ meta-tags
You will be able to filter Deployments within a Campaign Flow by ‘P&L’ and ‘Purpose’ meta-tags.
( Campaign Management > Campaign List > Campaign Flow ). Here, you can select any number of ‘Purpose’ values from one or more ‘Purpose Group(s)’. You can also select one or more P&Ls to filter on.

2.5 Campaign List: Filter Campaigns by Deployment tags ( ‘P&L’ and ‘Purpose’)
‘P&L’ and ‘Purpose’ fields have also been added as filters on the Campaign List screen. You can now filter Campaigns which contain any Deployments having the selected ‘P&L’ or ‘Purpose’ values. Here, you can select any number of ‘Purpose’ values from one or more ‘Purpose Group’.

2.6 Campaign List: More intuitive navigation
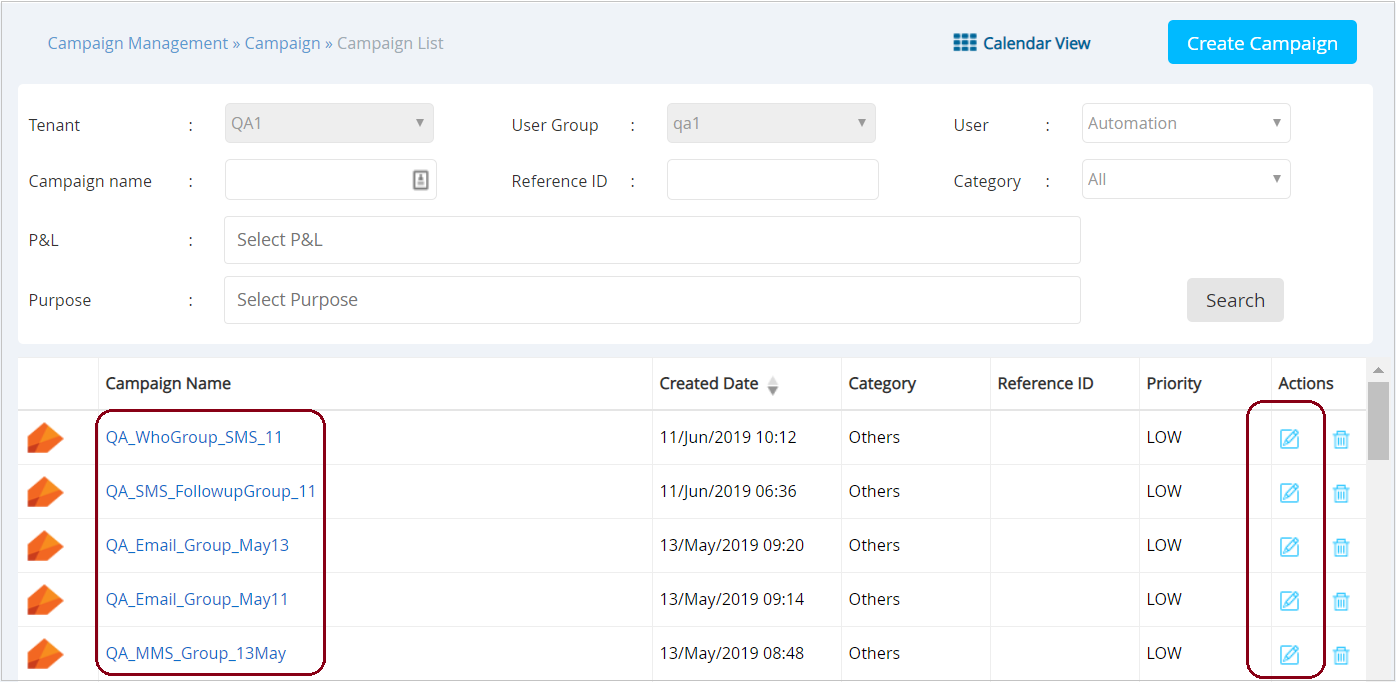
On clicking the Campaign Name, you will now be taken to the Campaign Flow (Deployment List) screen. The button under the ‘Actions’ column which was used to navigate to the Campaign Flow screen, has been replaced with the ‘Edit’ button. On clicking this ‘Edit’ button, you will be taken to the ‘Campaign Details’ screen.
2.7 Campaign Details screen: Campaign-ID field
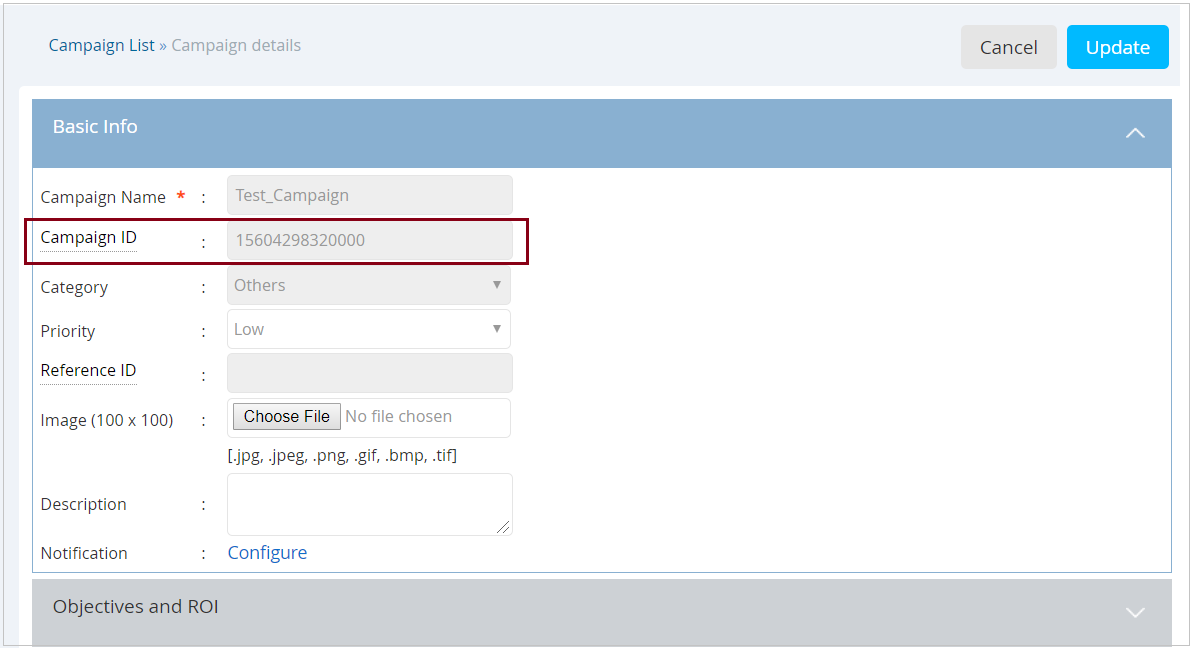
IMIcampaign maintains a unique ID for each Campaign created in the product. This Campaign ID will now be visible on the Campaign Details screen as a read-only field.
2.8 Campaign Flow Visualiser (Beta)
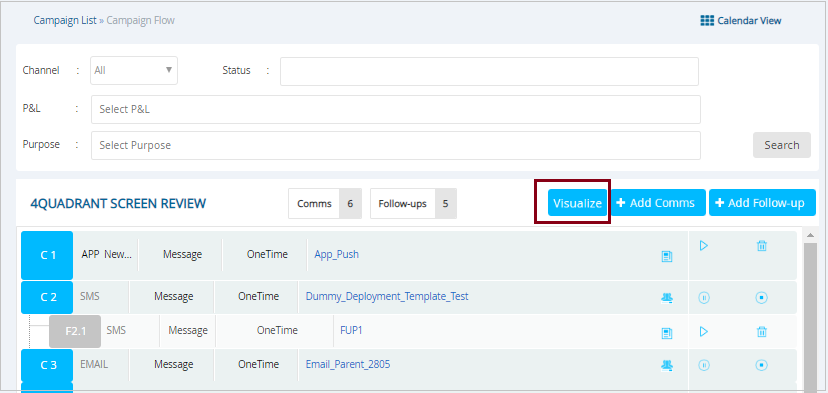
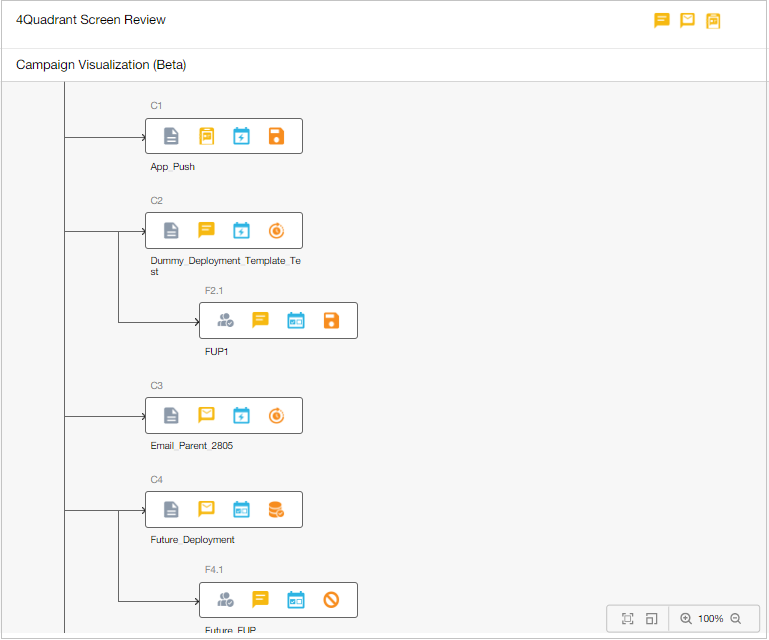
You can click on the "Visualize" button shown on the Campaign Flow (Deployment List) screen ( Campaign List > Campaign Flow ) to view a high-level visual summary of the campaign. The visualization will show all deployments under the campaign and will display the target group type, channel, schedule, and status for each deployment using simple icons. This feature is currently in ‘Beta’.
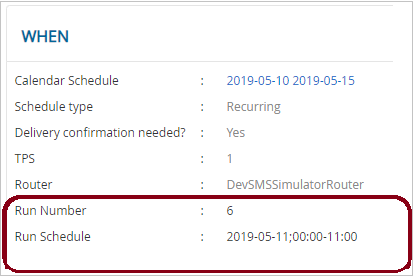
2.9 Recurring Deployments: Introducing ‘Run numbers’
On the SUMMARY tab in the bottom-left quadrant (WHEN quadrant), you will now be able to see the current ‘Run Number’ and its associated schedule for Recurring Deployments.
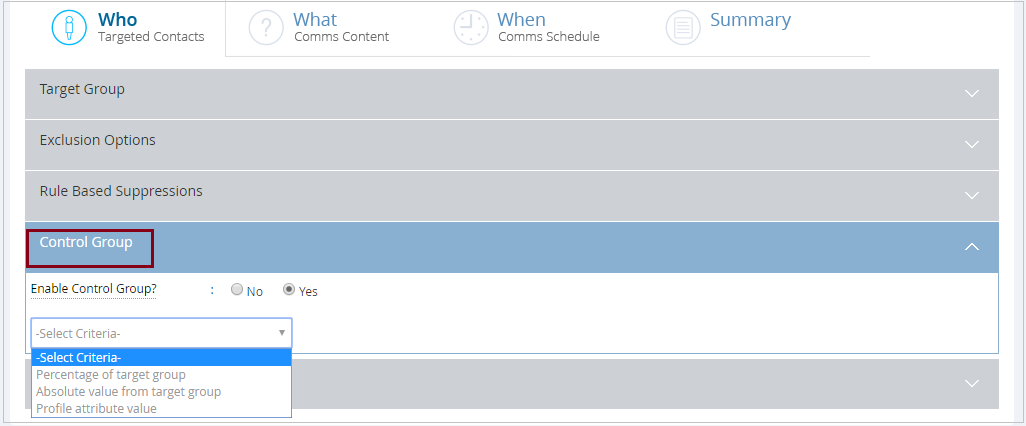
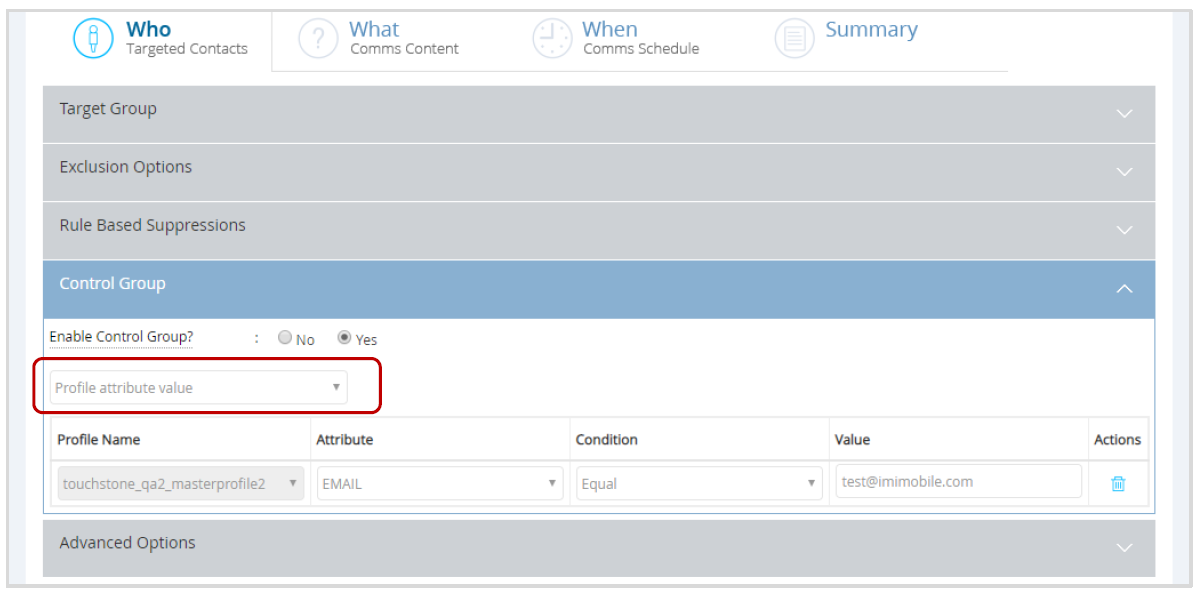
2.10 Control Group Definition based on Profile Attribute Condition Criteria
You will now be able to define a Control Group for a Deployment based on the value of a specific Profile Attribute within the Master Profile. Also, a new accordion for ‘Control Group’ has been introduced.
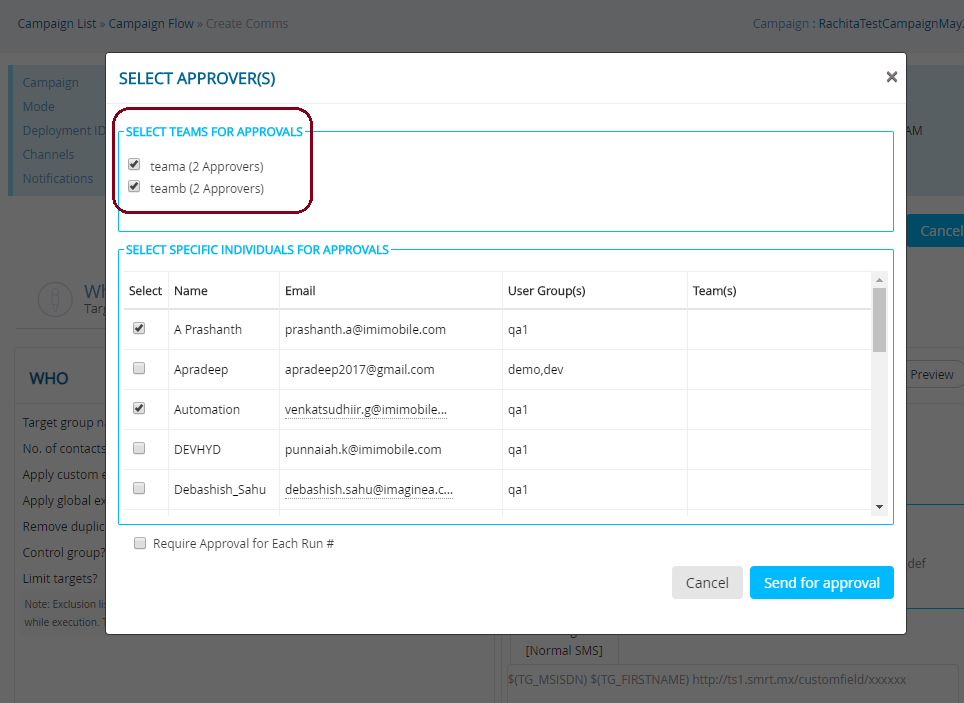
2.11 Deployment Approval by a Team
Prior to this release, you were able to select specific individuals as approvers for a deployment. With this release, you will also be able to select one or more ‘Approval Teams’ for each deployment.
- For a deployment sent for approval to an ‘Approval Team’, when it is approved by any team member, that action is deemed to be taken on behalf of the ‘Approval Team’. i.e. other members of the Approval Team cannot change that decision afterwards.
- You can send your deployment to be approved by one or more ‘Approval Teams’ as well as by ‘Specific Individual Approvers’.
- If an individual X is a designated approver and is also part of an approval team T1, then X will not need to approve the deployment twice; when X approves the deployment, it will be considered as ‘approved’ in their individual capacity and also on behalf of T1.
- If another member of T1, say Y, has approved the deployment on behalf of team T1, then X will still need to approve the deployment in their individual capacity.
Approval Management Screen:
You can also view a list of deployments which are in ‘approved’ / ‘rejected’ / ‘approval pending’ status on the ‘Approval Management’ screen (Campaign Management > Campaign > Approval Management).
How to assign a user to an ‘Approval Team’:
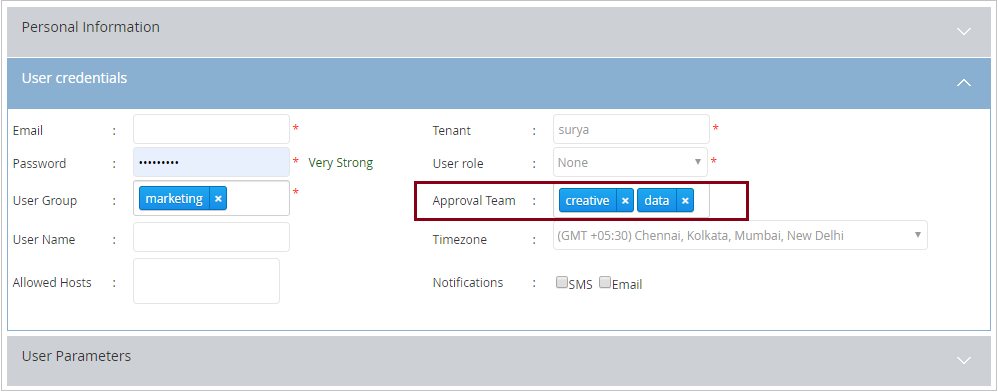
A user can be assigned to an ‘Approval Team’ on the ‘Create / Update User’ screens. A single user can be assigned to a maximum of four ‘Approval Teams’.
2.12 Specifically Approve Each Occurrence of a Recurring Deployment
You can now seek approval for each specific occurrence of a ‘Recurring Deployment’. This will be an optional configuration available while selecting approvers.
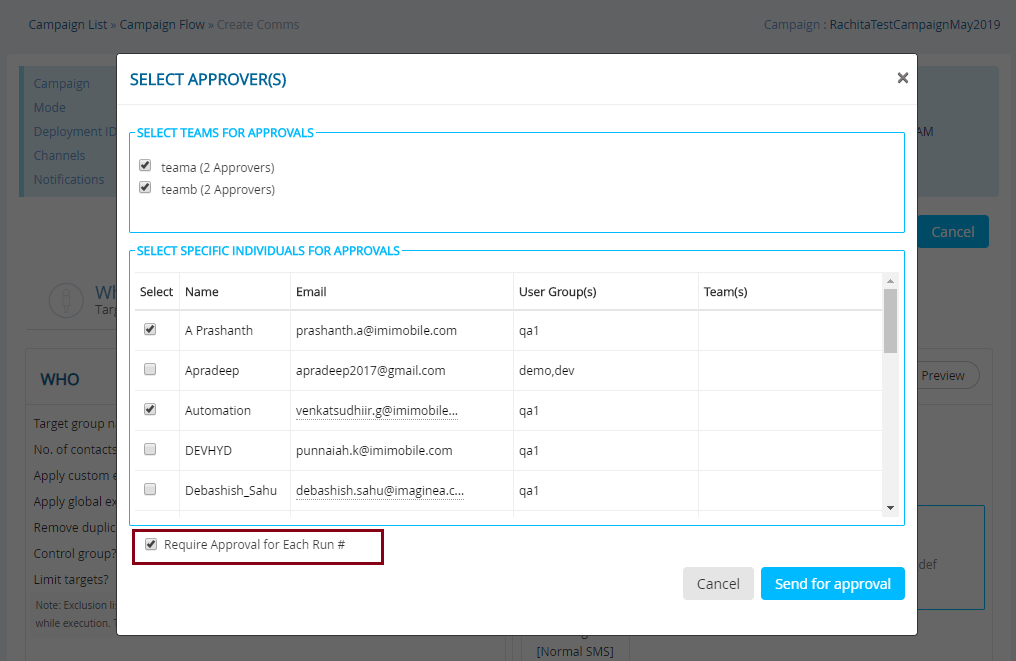
- As soon as an occurrence (Run #) of a deployment is ‘Completed-by-Time’ or ‘Completed-by-Base’, then the approval cycle will begin for the subsequent Run #.
- After a few initial occurrences of a deployment have been approved without any concerns from the approver(s), and if further occurrences do not need to be explicitly approved, then you can pause the deployment; uncheck this checkbox and resume the deployment again. In this case, the next occurrence of the deployment will be sent for approval one last time (in case the deployment-creator has made any other changes to the content while it was paused) and after that occurrence has been approved, then subsequent occurrences will not be sent for approval anymore.
- If an occurrence is rejected, then the Target Group preparation will start again once the deployment is amended and approved. In case the TG source is FTP, the data file will need to be resupplied.
- The ‘Approval Log’ shown on the Summary screen will reset for each Run #.
2.13 Deployment Summary tab: Approval Log Enhancements
The Approval Log feature on the Deployment Summary Screen has been enhanced as follows :
-
Approval Log is now visible to all users within the User Group (previously, it was visible only to the deployment-creator and designated approvers).
-
Approval Log supports team-based-approvals.
-
Approval Log support approvals for each specific occurrence of recurring deployments.
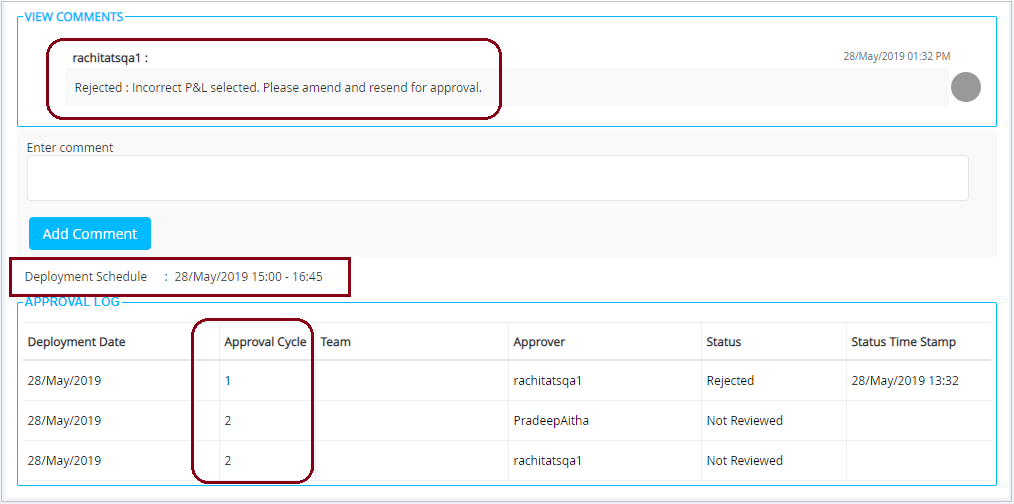
Approval Log for One-time Deployments: -
In the below example screenshot, the deployment schedule for the one-time deployment is shown above the approval log.
-
Initially (for ‘Approval Cycle’ #1) there’s only one designated approver (‘rachitasqa1’).
-
This approver rejected the deployment and sent back to the deployment-creator with a comment.
-
For the Approval Cycle #2, there are two designated approvers and at the time this screenshot was taken, both of those approvers have not yet reviewed the deployment. Both of them must approve before this deployment can become activated.
Approval Log for Recurring Deployments involving Team-based Approvals:
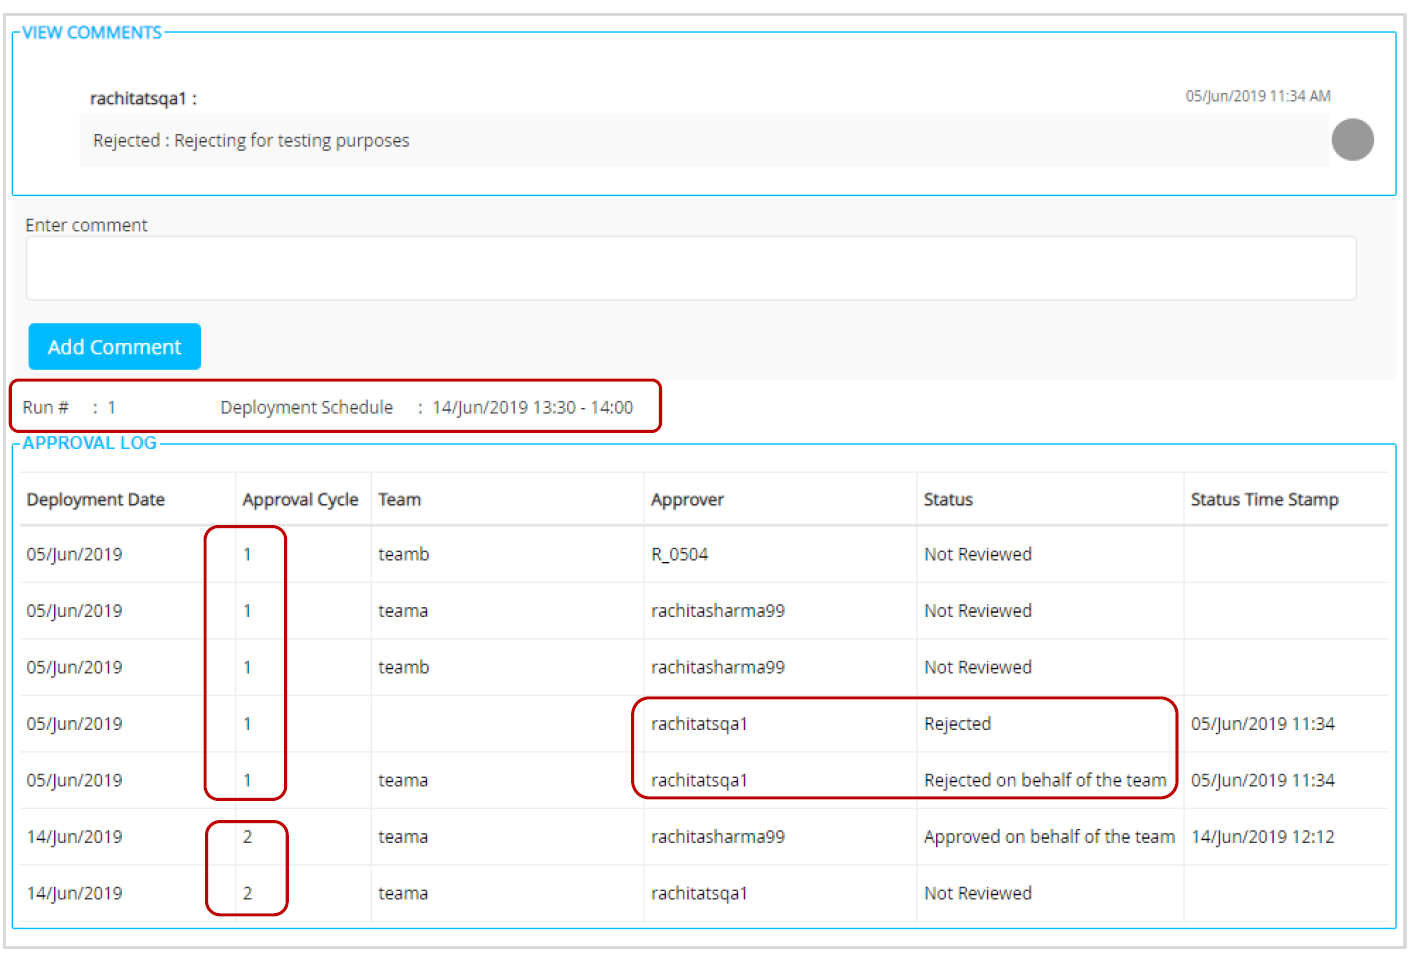
- The Approval Log will reset for each occurrence (Run #). i.e. the Approval Log will only show approval cycles for a single occurrence of a recurring deployment.
- In the below example screenshot, the Approval Log corresponding to the very first occurrence (Run #1) of a Recurring Deployment is shown. The corresponding Deployment-Schedule for Run#1 is also shown above the Approval Log.
- Initially (for ‘Approval Cycle’ #1), the following approvers have been designated :
o Approver Team ‘teama’ (which has two team members named
‘rachitasharma99’ and ‘rachitasqa1’).
o Approver Team ‘teamb’ (which has two team members named ‘R_0504’ and
‘rachitasharma99’). Note that it is possible for the same approver to be part
of two Approval Teams.
o Individual approver ‘rachitasqa1’. - The approver ‘rachitasqa1’ has rejected the deployment.
- In the Approval Log, there are two entries for this rejection : one for the rejection by ‘rachitasqa1’ in their individual capacity and another entry indicating that this means the deployment has also received rejection on behalf of the Approval Team ‘teama’.
- Now the deployment has been sent back to the deployment-creator to make amends as per the comments.
- For the Approval Cycle #2, the deployment-creator has then designated only one approver : ‘teama’. No individual approvers have been designated.
- This time round, the team member ‘rachitasharma99’ has approved the deployment on behalf of the Approval Team ‘teama’.
- Now that the deployment has secured the necessary approvals, it will be activated.
2.14 Rule Based Suppressions using Rulesets and Enforcing them by Channel
This feature could make it easier for you to enforce adherence to your customers’ opt-out preferences. It is especially useful for clients who have a large number of IMIcampaign users setting up a large number of Campaign Deployments. A challenge for these clients is how to reduce the possibility that their team of deployment-creators might forget to include some important contact-suppression criteria as part of Target Group definitions.
This feature is currently only available for Promotion Deployments. (‘Promotion’ is a new nomenclature we are introducing in this release. It means a One-time / Recurring Comm Deployment or a One-time / Recurring Follow-Up Deployment).
The Rule Based Suppressions feature is not currently available for Instant Deployments.
High Level Summary of how to use Rule Based Suppressions:
- Your tenant administrator will be able to request IMImobile Operations team to enable a setting to ‘Enforce at least one Rule Based Suppression for Email / SMS / MMS channels’. This is a tenant-level setting that can be switched on or off for each of these 3 channels. (Note: The below screenshot is from a screen that is available only to IMImobile Technical Support team; it is shown here only for your info).

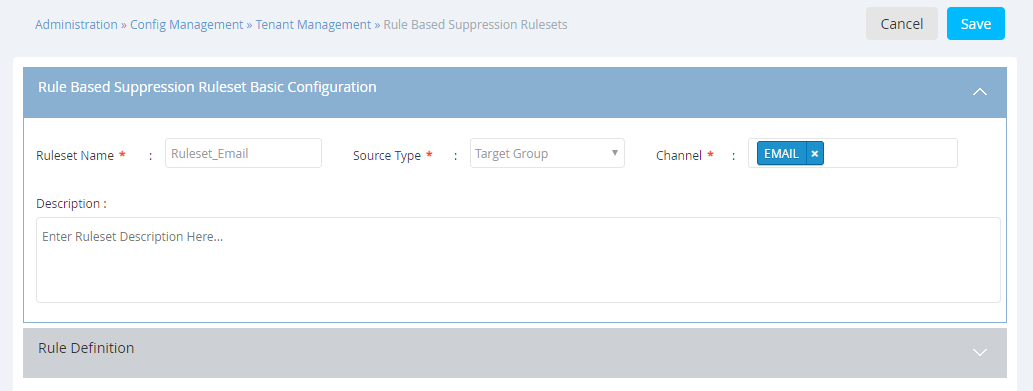
- Your tenant administrator will be able to create ‘Rulesets’ in the IMIcampaign Administration section. (Administration > Config Management > Tenant Management > Rule Based Suppression Rulesets )
a. A Ruleset can be configured to be applicable for one or more of the three
supported channels. (Email / SMS / MMS).
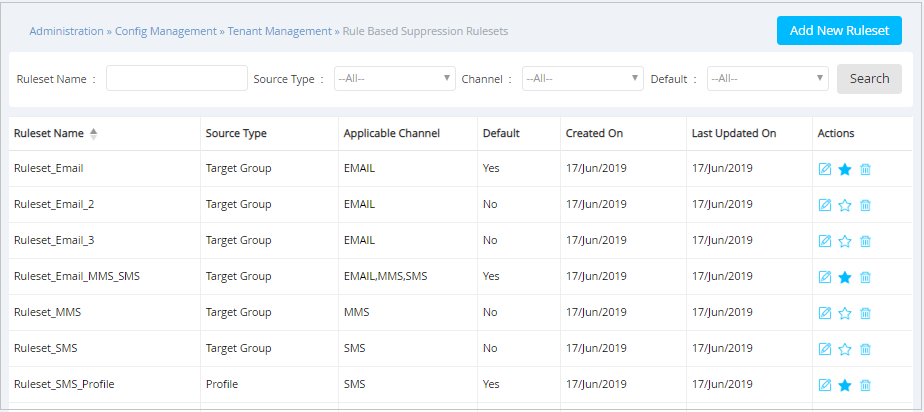
    b. A Ruleset is applicable to one of the two Source Types: ‘Target Group’ or
        ‘Profile’.
    c. A Ruleset can be designated as a ‘Default Ruleset’ by clicking on the ‘star’ icon.
    d. A Ruleset can contain up to five Rules.
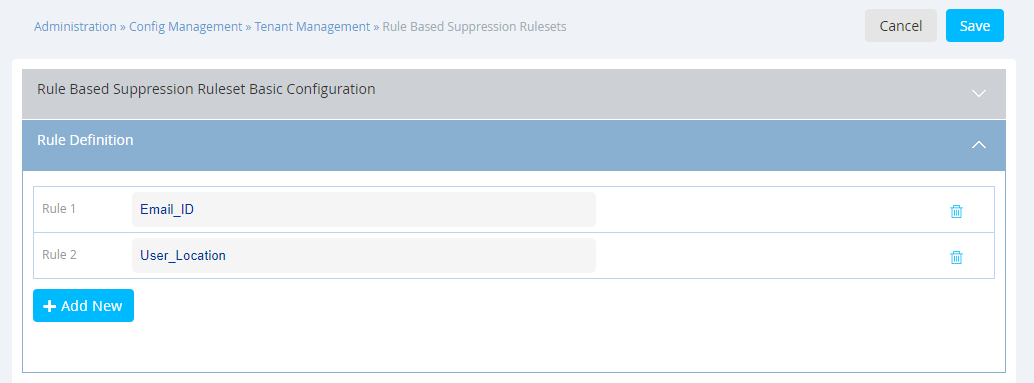
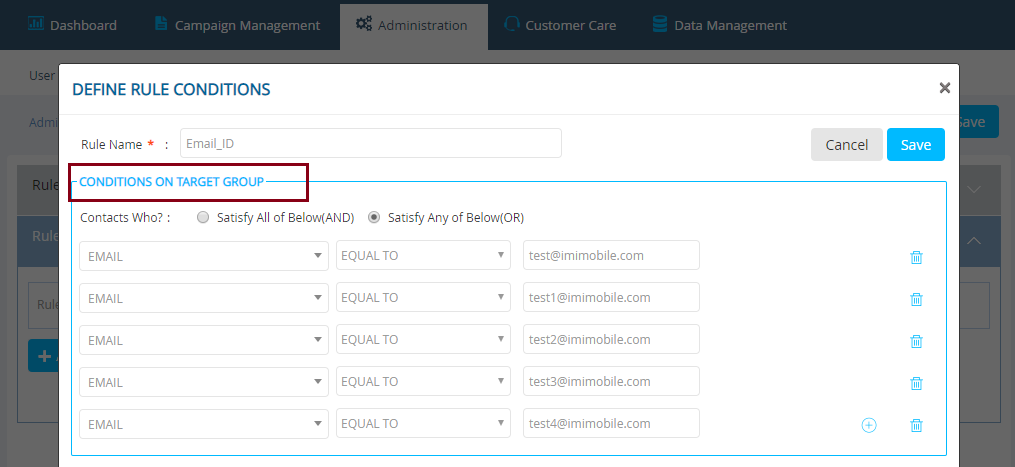
   e. If the Source Type of a Ruleset is ‘Target Group’, then each Rule within that
       Ruleset can contain up to 5 Conditions based on the Header-values for that
       tenant.
    f. If the Source Type of a Ruleset is ‘Profile Data’, then each Rule within that
       Ruleset can contain up to 5 Conditions based on the Master Profile Attributes.

- When a deployment-creator is creating a Promotion Deployment on a channel, say, Email and if your tenant administrator has designated several Rulesets as ‘Default’ for the Email channel, then these Rulesets will be automatically applied on the WHO tab for that Deployment.
A new accordion for Rule Based Suppressions has been introduced under the WHO tab.
This is how you can improve your adherence to customers’ opt-out preferences and reduce the possibility of deployment-creators forgetting to apply customers’ contact preferences.
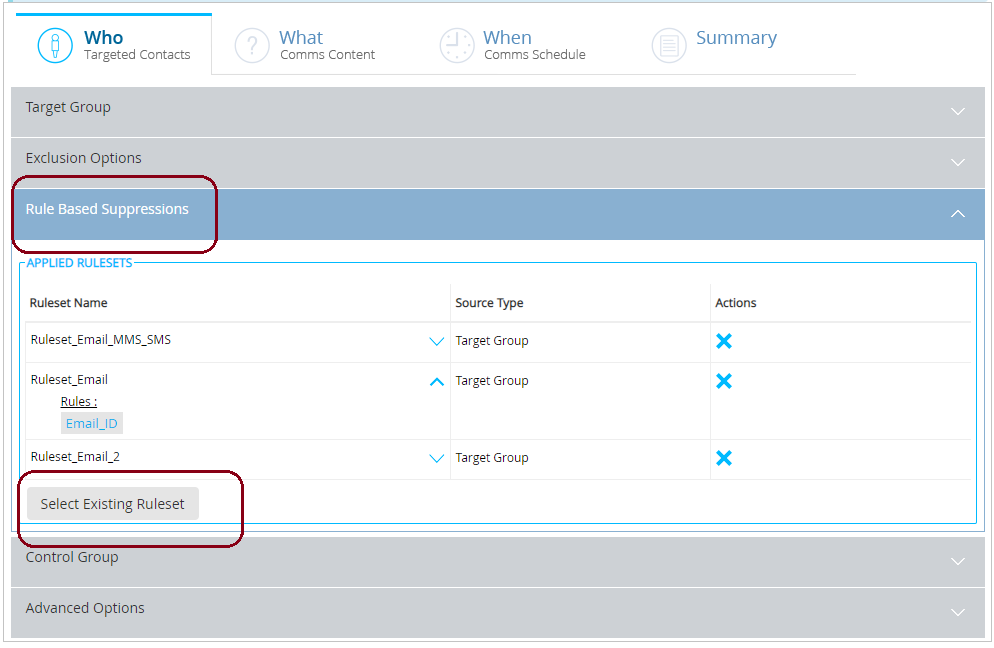
- The deployment-creator will have the discretion to select more Rulesets in addition to the Default Rulesets by clicking the ‘Select Existing Ruleset’ button.

-
The deployment-creator will have the discretion to remove all the automatically applied ‘Default’ Rulesets by clicking on the ‘X’ button under the ‘Actions’ column; however, if your tenant administrator has requested to ‘Enforce at least one Rule Based Suppression for Email’ (as mentioned in item # 1 above), then it will be mandatory for the deployment-creator to apply at least one Rule Based Suppression Ruleset to every Email channel Deployment.
-
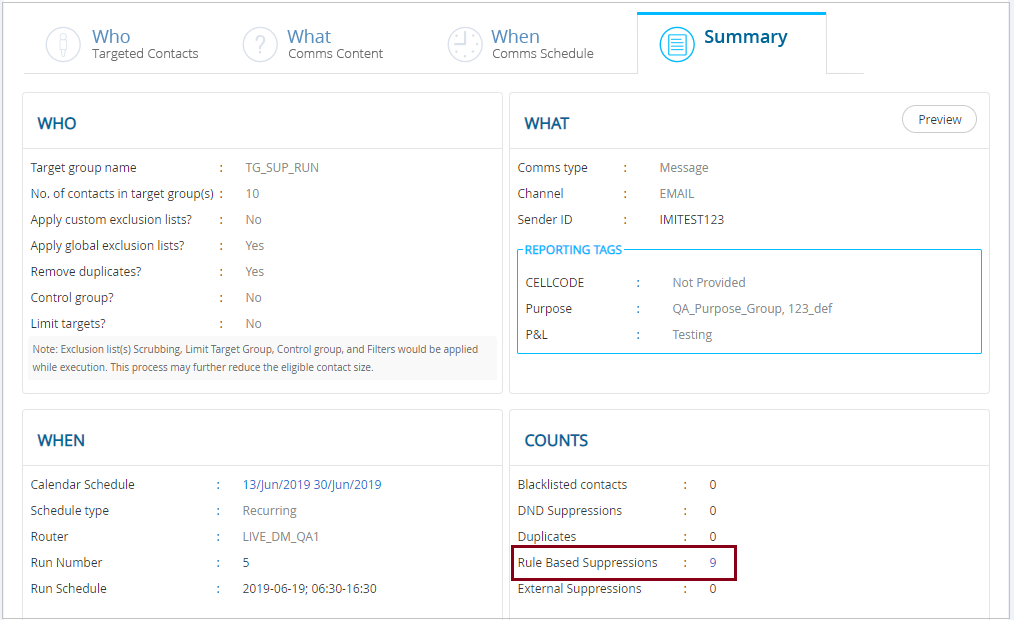
For Activated Deployments, the count of contacts suppressed due to Rule Based Suppressions will be shown on the ‘Summary’ tab in the ‘Counts’ section. You can also click on the count to download this list.
2.15 Switch User Group
You will be able to switch your User Group by clicking on the link from the menu next to your organisation’s logo.

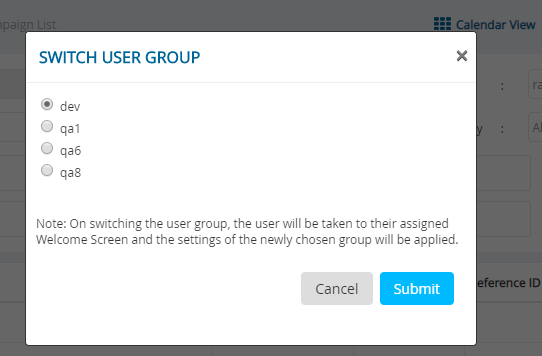
On switching the User Group, you will be taken to your usual ‘welcome screen’ and now you will see Campaigns, Deployments, Assets, Target Groups etc. corresponding to the newly selected User Group.
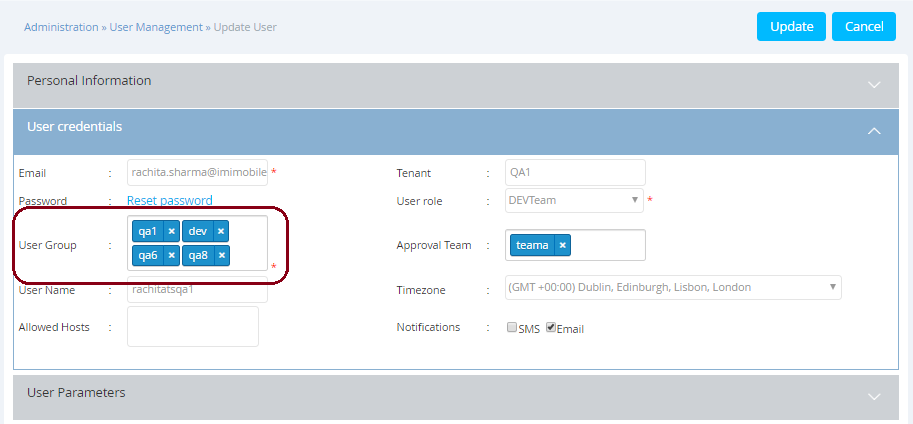
How to assign multiple User Groups to a user:
Your tenant administrator will be able to assign up to 4 User Groups for a user (Administration > User Management).
2.16 New 'File' Channel for Promotion Deployments
We have introduced a new channel called ‘File’ channel.
As of release 5.1, this channel will be available only for the following types of deployments:
-
Deployments with TG-Source = ‘Profile Data’ (i.e. the ‘File’ channel will be currently available only to clients who have licensed IMIcampaign’s Profile Manager module).
-
Promotion Deployments i.e.
o One-time and Recurring Comms
o One-time and Recurring Follow-Ups
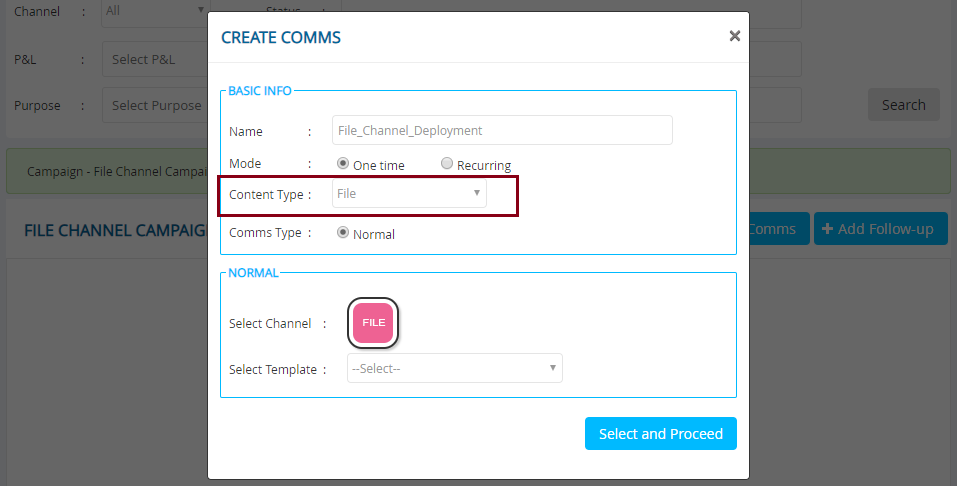
The main purpose for deployments with ‘File’ channel is to generate a file from the Target Group data and transfer this file to a specified location according to a specified deployment-schedule. -
Content Type value should be selected as ‘File’.
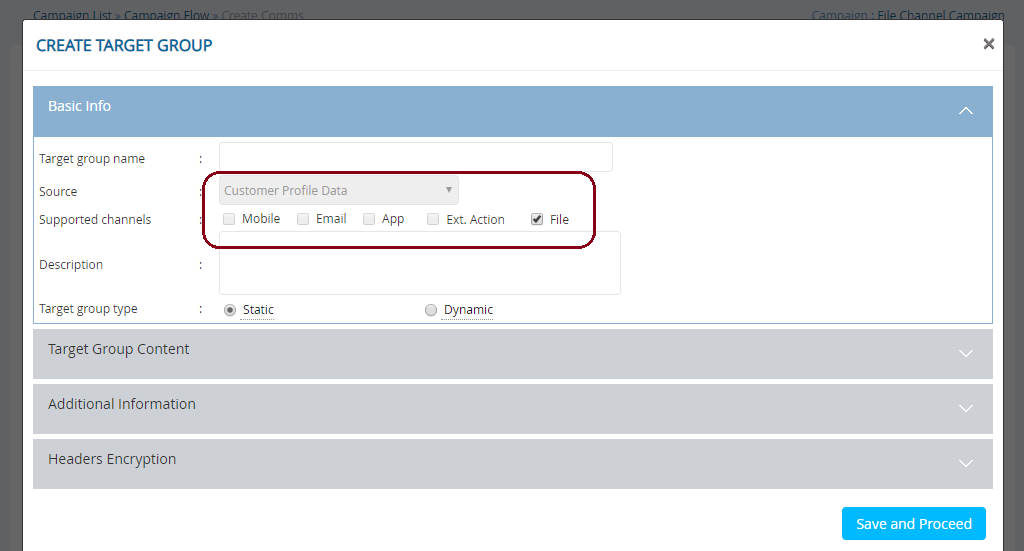
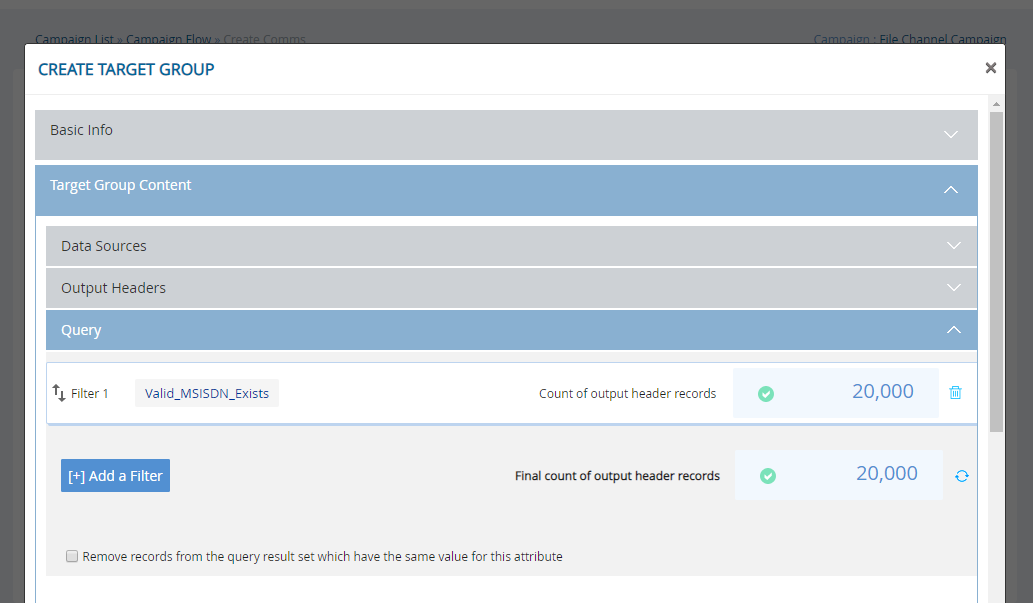
- As mentioned above, for deployments with ‘File’ channel, the TG must have been created using the Query Builder feature of the Profile Manager. In future releases, we aim to make the ‘File’ channel also available for deployments whose TG-source is FTP data.
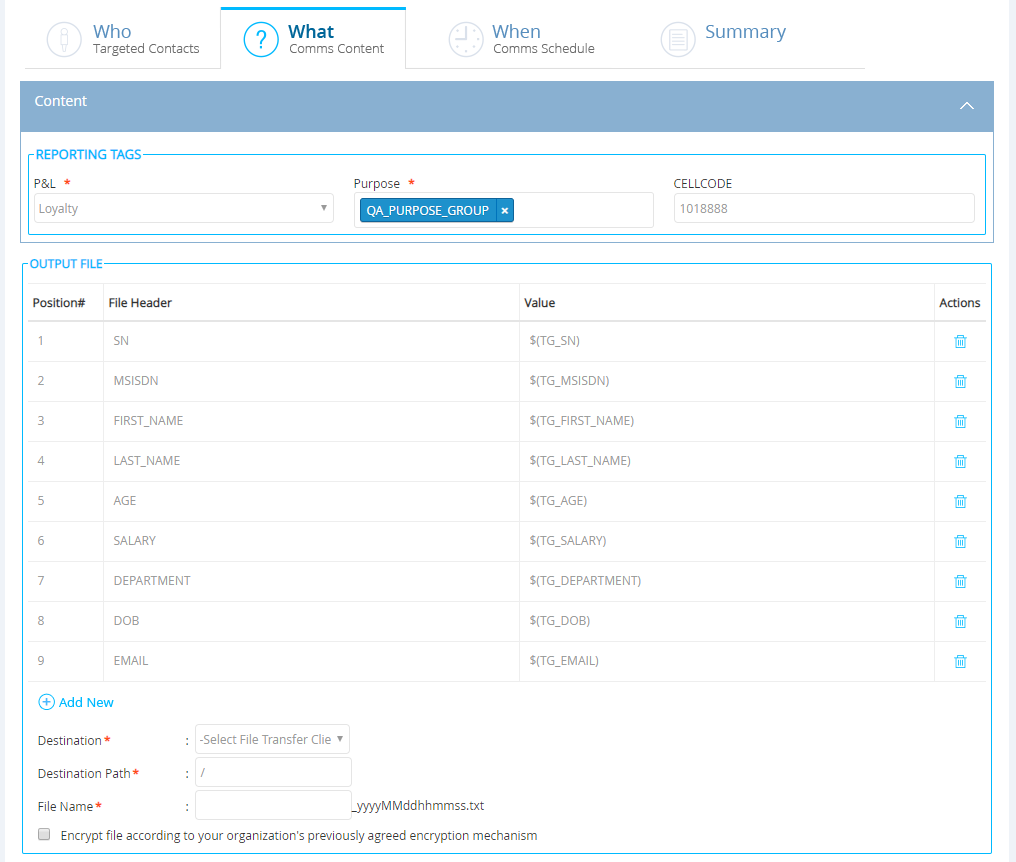
The headers in the output file will be sourced from the attributes from the Master Customer Profile.
- You can add, rename, or delete the headers as desired.
- You can select a pre-configured destination to transfer the file to. This can be an SFTP location or an Amazon AWS S3 bucket.
- You can choose a name for your output file. By default, the filename will be appended by the date/time-stamp.
- You can choose the field separator in the file to be a comma (,) or pipe (|).
- You will have an option to encrypt the file according to your organisation’s previously agreed encryption mechanism.
- The metrics for the ‘File’ channel will be available to view only on the New-UI Dashboard when all the Deployments under a specific Campaign are shown by expanding the accordion.
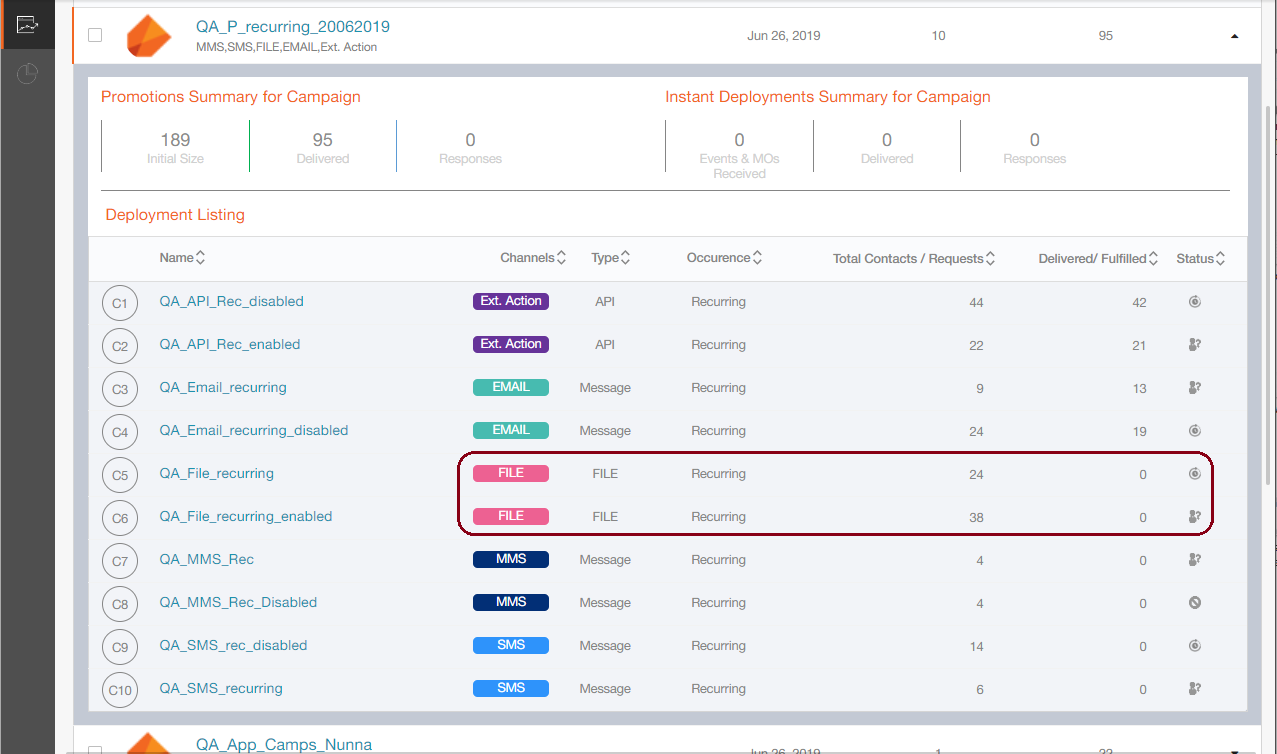
- On the New-UI Dashboard Campaign Details page, the tab for the File channel will not be clickable as there’s no additional information available currently to be displayed under that tab. The ‘File’ channel tab is there to only display the number of Deployments within the selected Campaigns, e.g. in the below example, there are 11 File Channel Deployments under the 4 selected Campaigns.

2.17 New ‘Ext. Action’ channel for Promotion Deployments
Prior to this release, you were able to create Instant Deployments using Ext Action channel. These Instant Ext Actions (3rd party APIs) could only be triggered at the back on an Event or an inbound SMS MO; i.e. you could not directly control when an Ext Action API would be invoked. In addition, Ext Action Instant Deployments could only be configured with MSISDN (mobile number) as the Event_Key.
After release 5.1, you will be able to create Ext Action Promotion Deployments and schedule them just like any other Promotions. In addition, for Ext Action Promotions, MSISDN (mobile number) is not a mandatory parameter.
-
Promotion Deployments cover the following 4 types of deployments
o One-time and Recurring Comms
o One-time and Recurring Follow-Ups -
No messages will be delivered to customers directly as a result of these Ext Action Promotions; instead, the specified Ext Action API will be invoked once for each TG record as per the specified deployment schedule.
-
Content Type value should be selected as ‘API’.
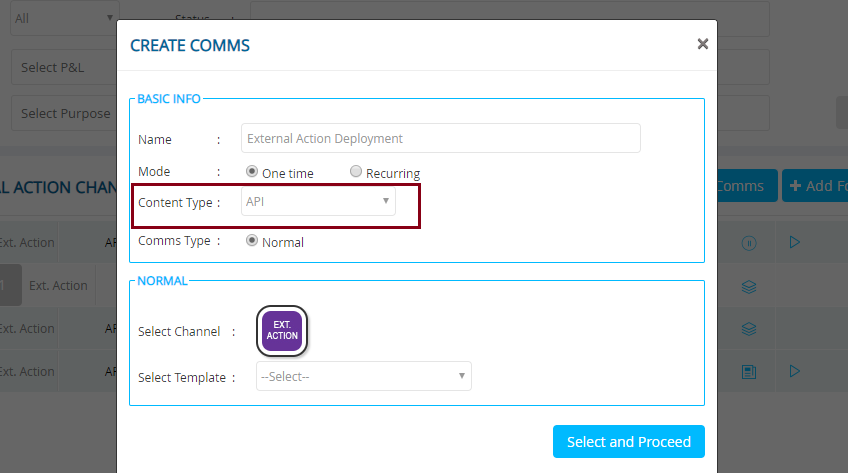
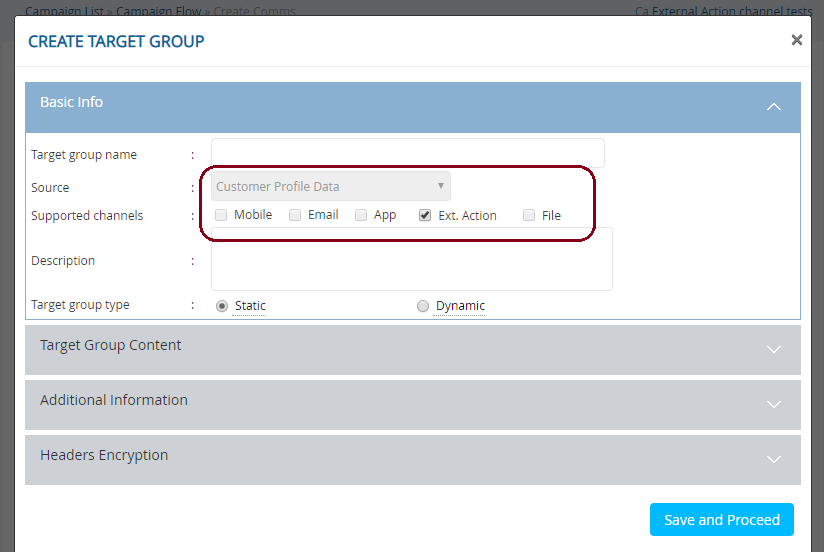
- As of release 5.1, for Ext Acton Promotions, the TG must have been created using the Query Builder feature of the Profile Manager.(i.e. available only to clients who have licensed IMIcampaign’s Profile Manager module). In future releases, we aim to support deployments with TG-source as FTP data.
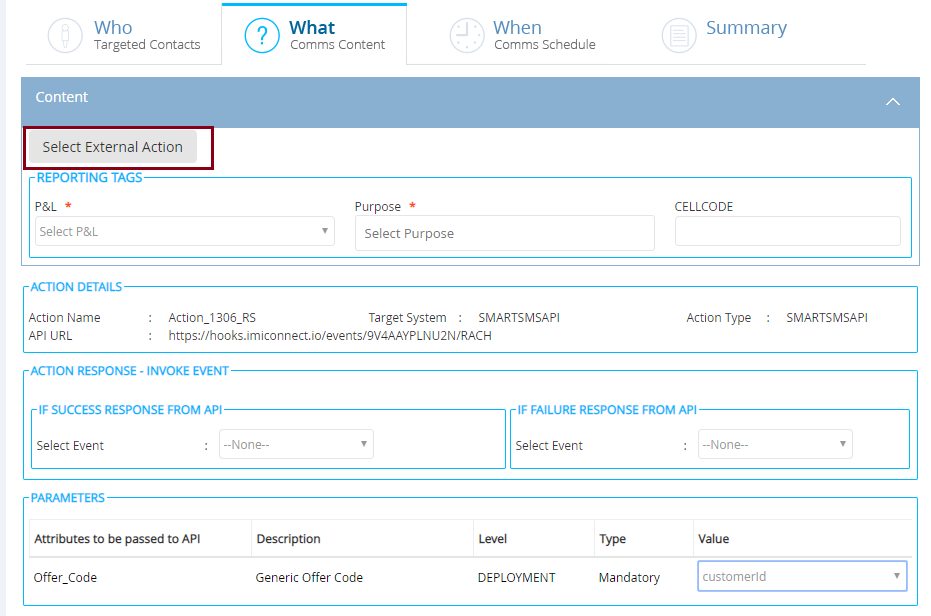
- You will need to select the ‘Ext Action’ on the WHAT tab from the list of Ext Actions pre-configured by your Tenant Administrator.
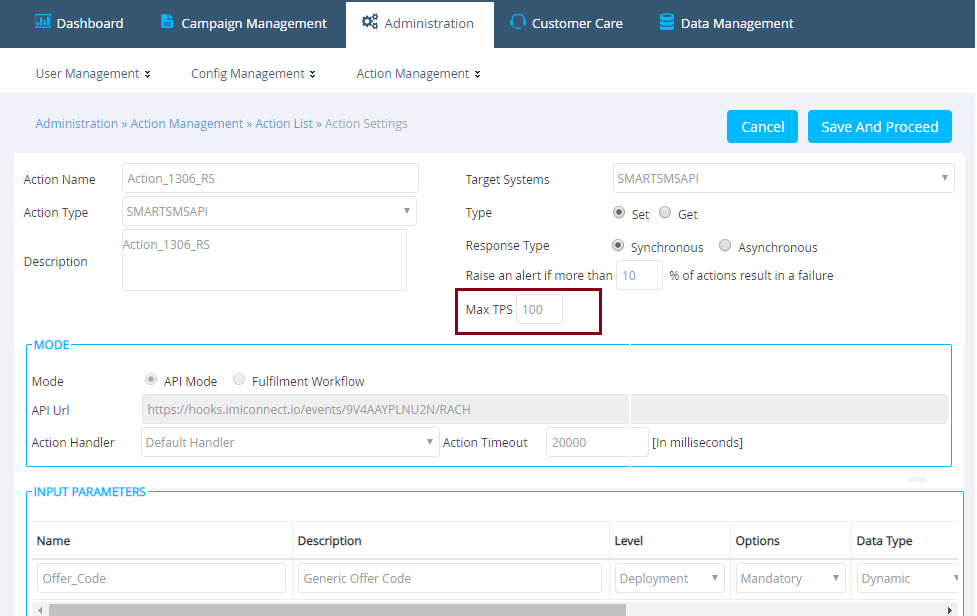
- The existing ‘Action Settings’ screen has been amended to include a new ‘Max TPS’ field.
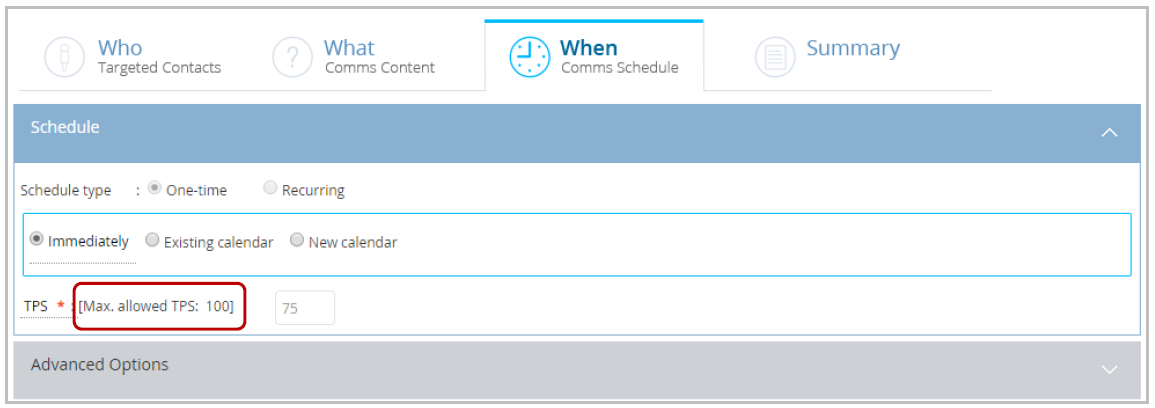
- That same ‘Max TPS’ value for an Ext Action API will be pre-populated on the WHEN tab.
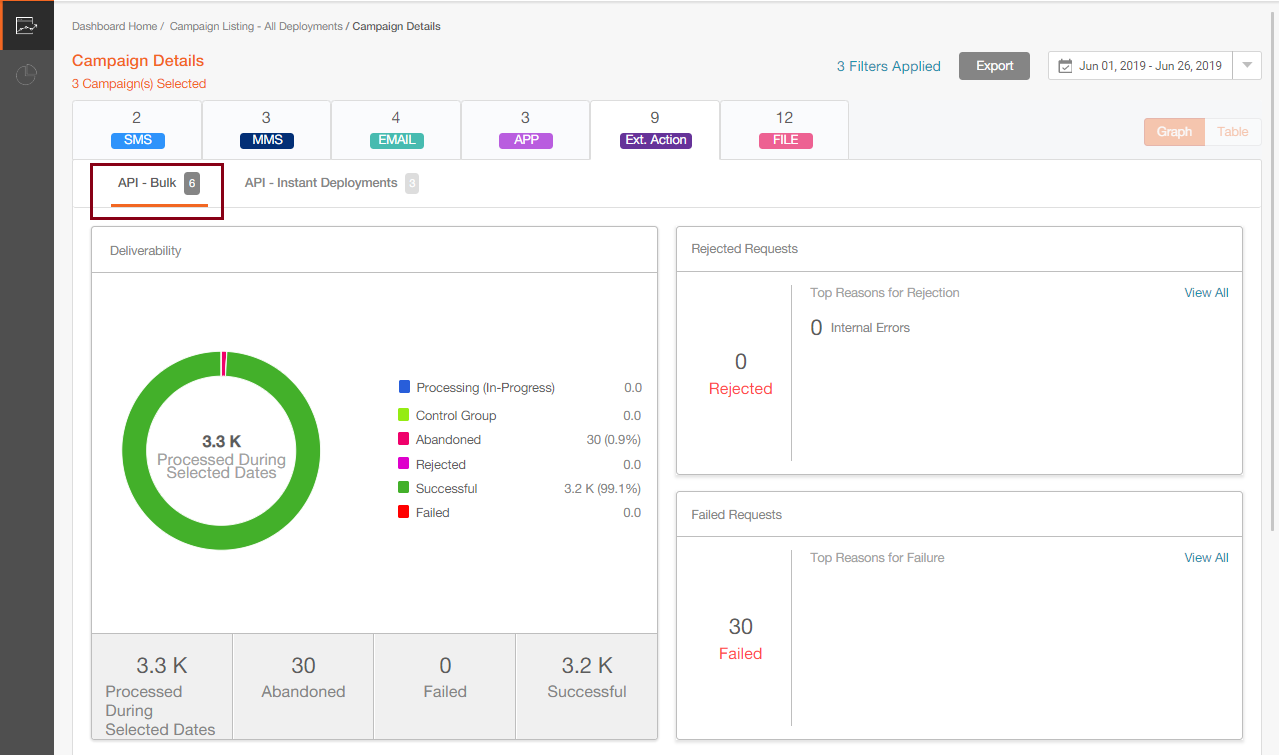
- The metrics for the ‘Ext Action’ channel will be available to view only on the New-UI Dashboard, e.g. in the below example, there are 9 Deployments with Ext Action channel within the 3 selected Campaigns. Out of those 9, there are 6 Promotion Deployments (‘API – Bulk’) and 3 Instant Deployments.
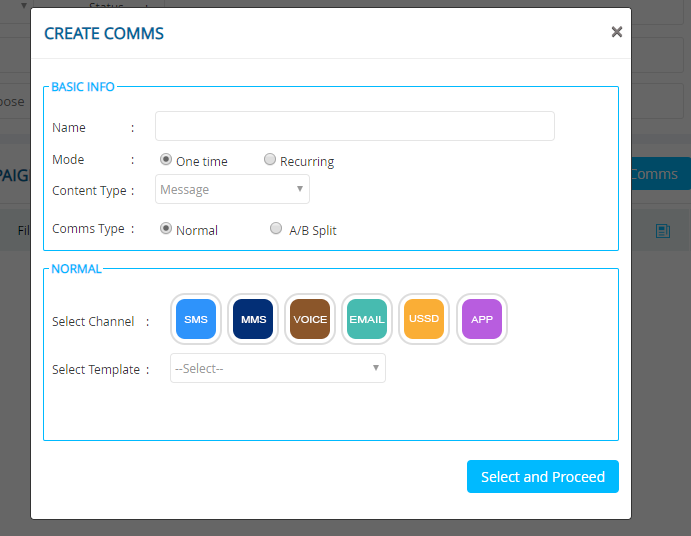
2.18 Deployment Creation new images for channel indicators
While creating a new deployment, you will notice the channel indicator images are now aligned to the corresponding channel colours used on the new dashboard.
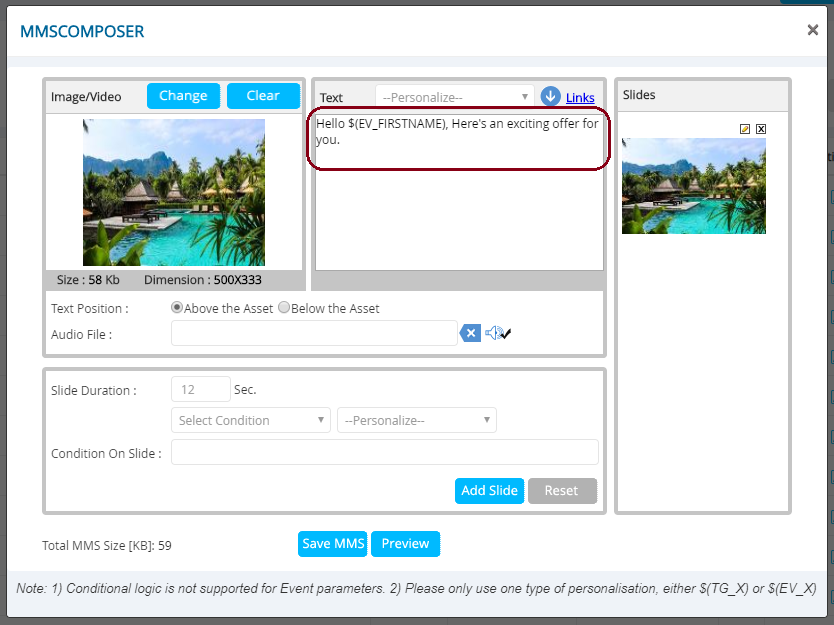
2.19 MMS Text Personalisation for Event-driven Deployments
Prior to this release, you were already able to use personalisation parameters for the text portion of an MMS message using the $(TG_X) headers from the associated Target Group for Promotion Deployments (One-time / Recurring Scheduled Deployments).
With this release, you will now be able to similarly use personalisation parameters for the text portion in case of Event-driven MMS Deployments using the $(EV_X) notation.
- There is no drop-down from which to select the Event parameters; you can just directly embed the parameters into your text message e.g. “Hello $(EV_FIRSTNAME)”.
- Conditional logic is not supported.
- Only one type of personalisation should be used in a given MMS template i.e. either $(TG_X) or $(EV_X).
- You should ensure that all the $(EV_X) parameters used in the MMS template are passed to the Event ; whether the invocation method is API or File-Drop.
2.20 Bulk emails via AWS SES
IMIcampaign will now offer pushing Bulk Emails to Amazon SES in addition to the current mechanism of pushing Emails on a one-to-one basis. This functionality can be used by selecting a router that supports Email Bulk Push (Deployment> When ). Please contact your IMImobile Account Manager if you are interested in getting this feature enabled for your tenant. This enhancement will enable the resolution of the issues raised in PRB0042736 / INC9671334.
3.0 Profile Manager module enhancements
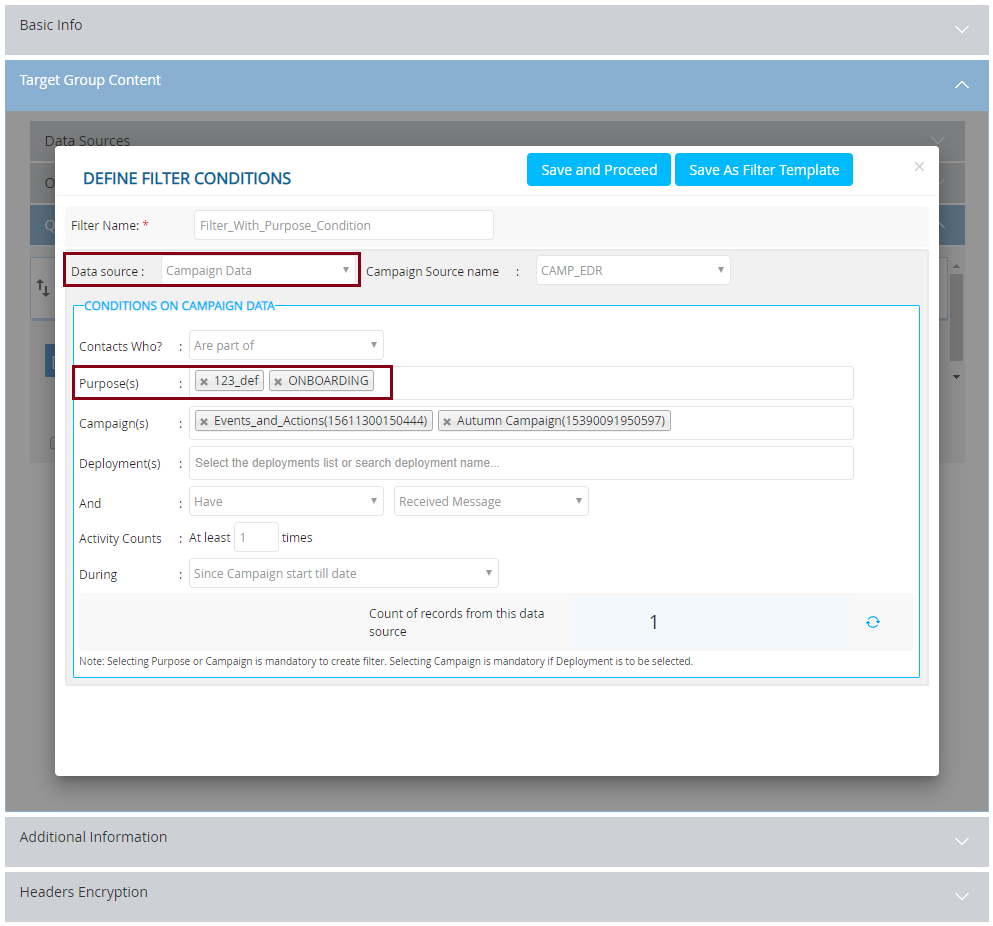
3.1 QB Filter using ‘Purpose(s)’
A new filter for ‘Purpose(s)’ has been added to the Query Builder Filter Condition screen to provide increased flexibility in defining conditions. This filter will only be available if the Filter Condition Data Source is ‘Campaign Data’. i.e. it will not be available if Filter Condition Data Source is ‘Profile’ or ‘Data Mart’. This filter will also not be available in case of Follow-Up Deployments.
3.2 Follow-Up definition using QB filters
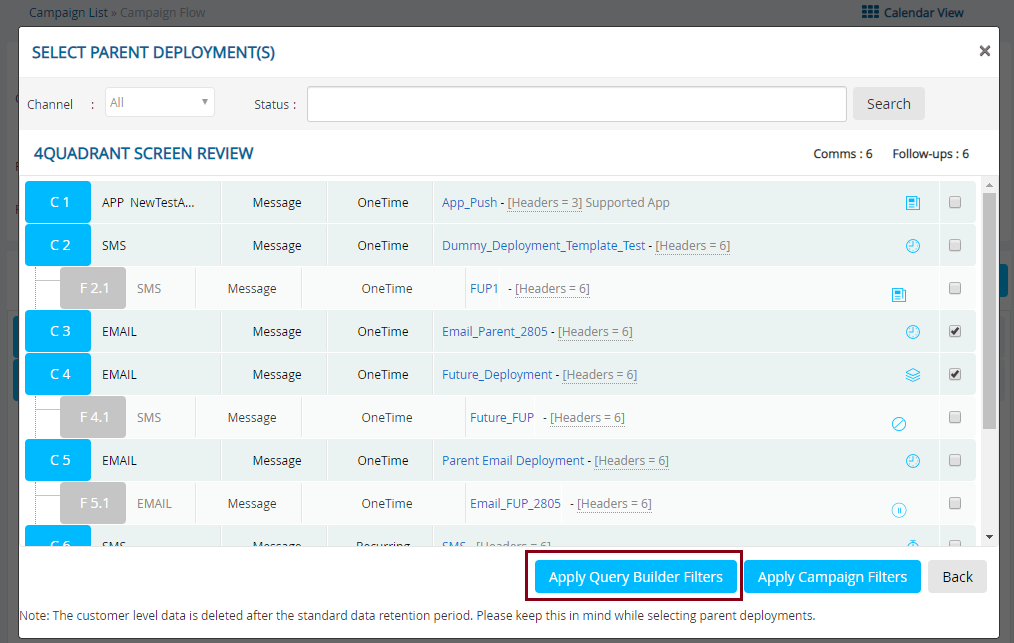
If you have access to IMIcampaign’s Profile Manager module, you will now be able to define Follow-Up Target Group using Query Builder (QB) Filters.
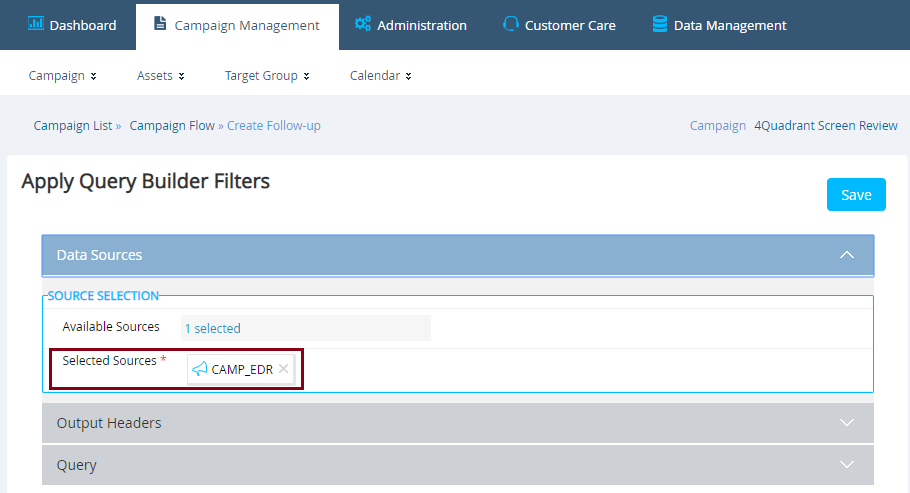
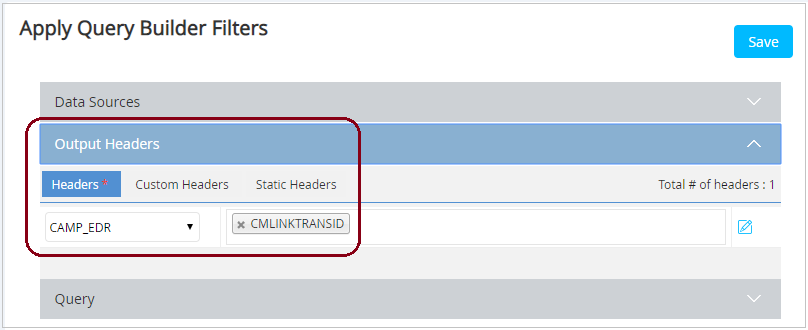
- On the QB Filters screen, the ‘Campaign Data Source’ will be already selected by default. You can add another ‘joining’ Data Source such as ‘Profile Data’; however, you will not be able to remove the default ‘Campaign Data Source’. You can use the additional Data Source within the ‘Query’ accordion, but not within the ‘Output Headers’ accordion.
- The ‘Output Headers’ accordion will operate in read-only mode. This is because in case of Follow-Ups, the Output Headers are inherited from the Parent Deployment(s).
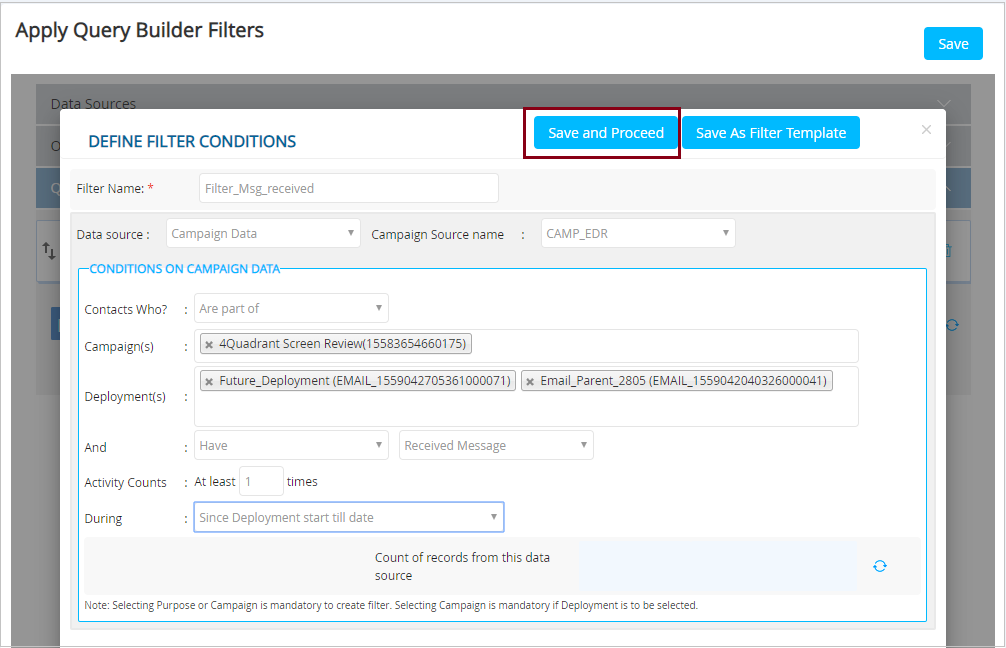
- You will be able to define and save filter conditions within the ‘Query’ accordion.
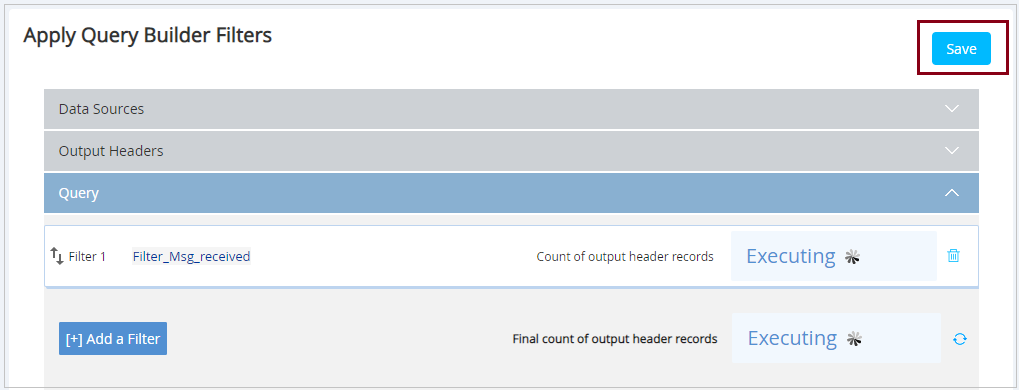
- Click on the ‘Save’ button to save the Follow-Up TG conditions.
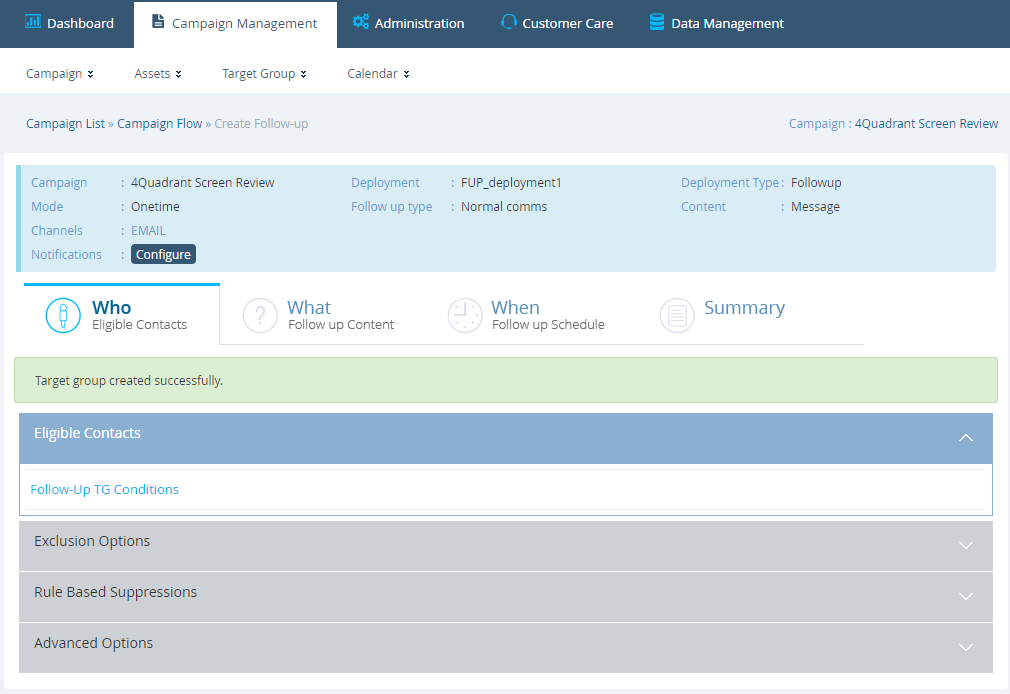
On saving the query, you will be taken back to the WHO tab.
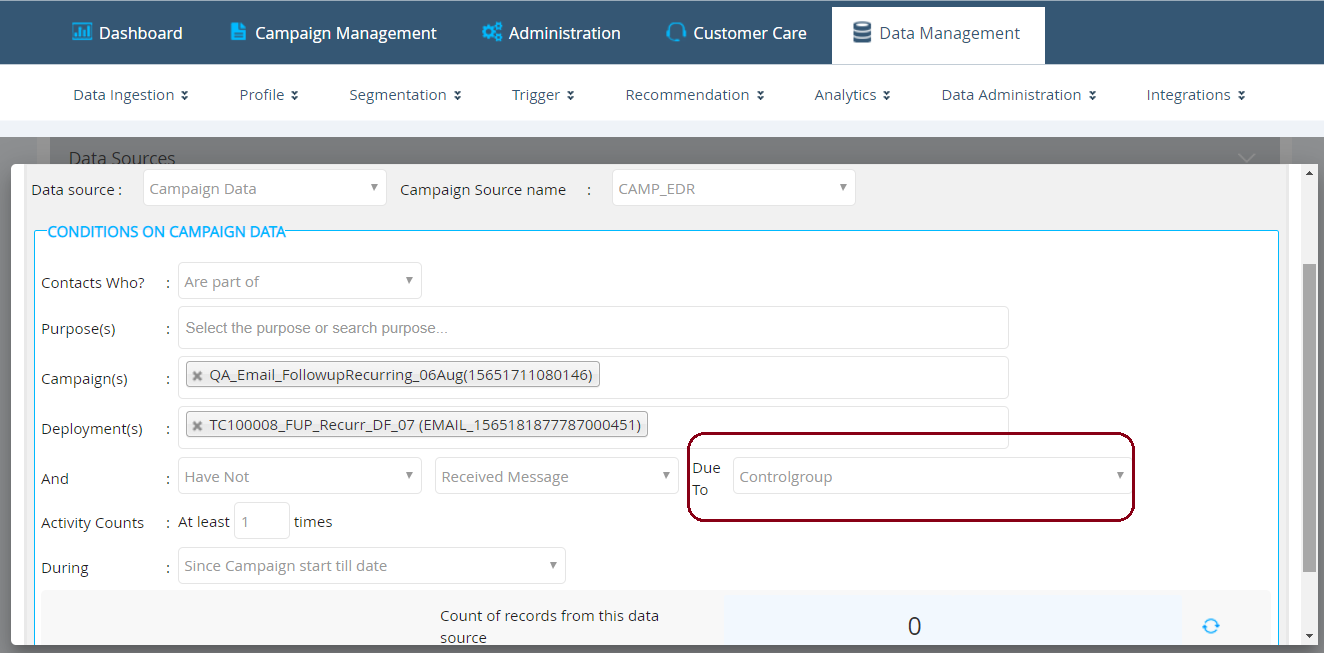
3.3 QB Conditions on Campaign Data – Secondary Conditions
We have made it easier to select the ‘secondary conditions’ on the pop-up screen for ‘Conditions On Campaign Data’. e.g. to select customers who have not received a specific communication – because they were part of the Control Group.
3.4 ‘TG Ready’ Email Notifications for Profile Manager Data Source
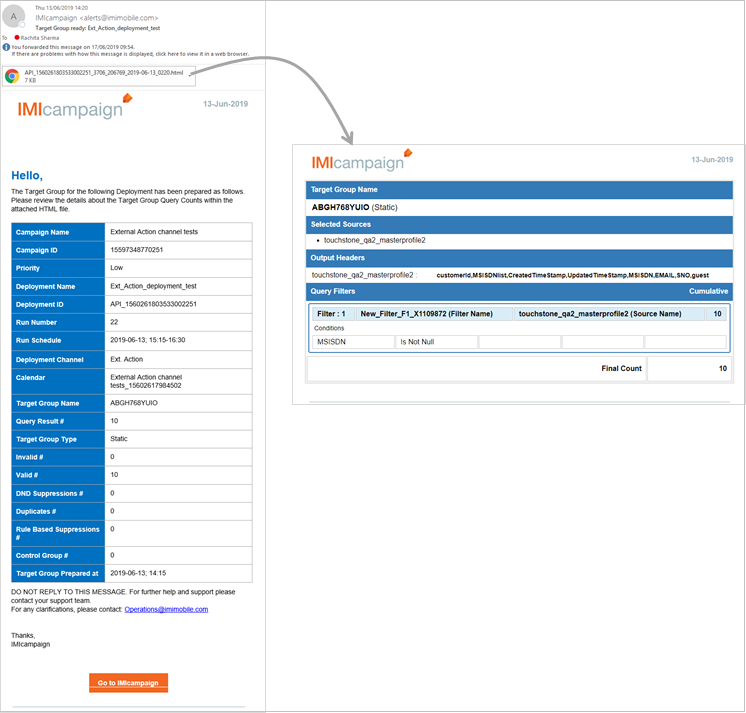
For all deployments where TG source is ‘Customer Profile Data’, we have introduced a new email notification called ‘Target Group Ready’ notification.
The deployment-creator and any designated approvers will receive this notification after the Target Group preparation is completed. This email notification will contain an HTML file attachment which will show a snapshot of the filters applied and the final count of target audience selected for the deployment.
4.0 API & Integration capability enhancements
4.1 IMIconnect handler for quicker integrations
Clients who have licensed our IMIconnect platform will now be able to benefit from easier integrations between IMIcampaign and IMIconnect. A typical use case is for IMIcampaign Ext Action Deployments where the Ext Action is an IMIconnect Workflow exposed as an API.
4.2 User List API : Updated to include additional fields
IMIcampaign’s User List API will now include the following additional fields: User ID (which will be a unique identifier for the user), User First Name, User Last Name, and User Creation Date. These additional fields can help clients’ IT departments better identify and audit their users who access and work with IMIcampaign.
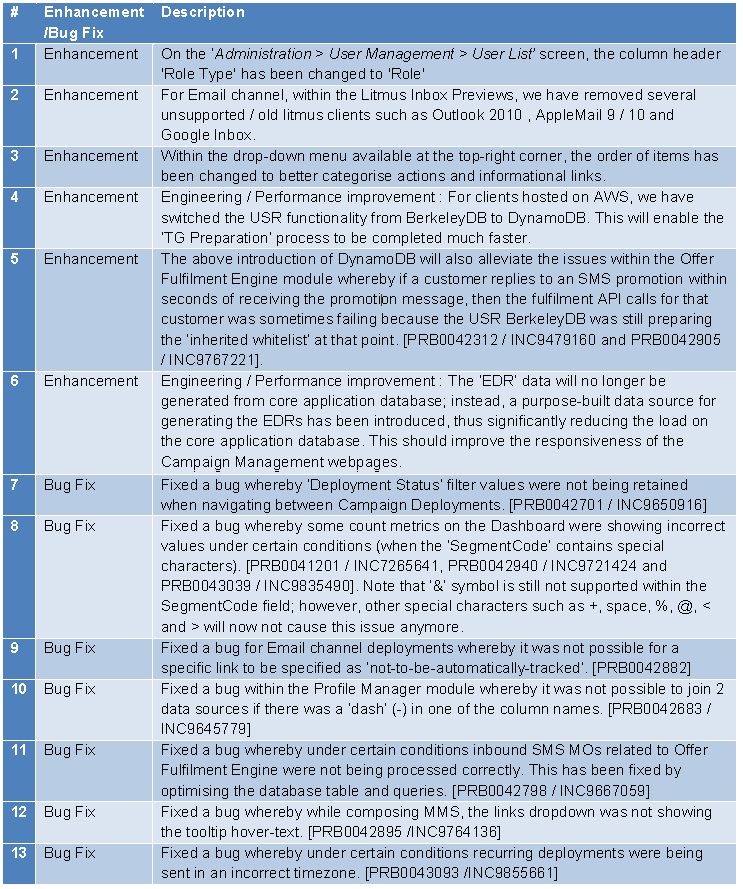
5.0 Maintenance items in this release
6.0 Need more information or help before or during the update?
Please contact your IMImobile account manager if you have questions or would like access to a new feature.